| Home | Shack | APRS | My Radios | Antennas | Frequencies that I Monitor | Echolink | Packet | D-Star | DMR / YSF | Links |
| ACARS | CW | FRN | HELP | Data Modes | Motorola, Solved - Allstar | Rallies | RTTY | SSTV | Weather Fax | DVSwitch |
ALLSTARLINK 2.0, (instructions by Adrian, M7MRX.)
INSTALLATION MANUAL IN PDF FORMAT (see link below).
With huge thanks to Adrian, M7MRX.
Information from Dave, G0KBM, to which I am eternally grateful.
Support from
Dave, WB3JSW, Ian
MM3TWA, and Dave,
M6KCI. Thank you.
(If I have missed anyone, please let me know)
NEW - ALLSCAN -
ADD A MONITOR TO SUPERMON - DETAILS
HERE
![]()
Please check back often for
![]() updates
updates
Please REFRESH this page.
(SHIFT+F5 in CHROME)
All Links
open in a new window.
![]()
Digital Radio using a Raspberry PI.
You will need.........
|
Raspberry PI 3B+ and a 32gb micro SD card
(recommended size) and the
following software (all links open in a new window) Firstly the
ALLSTARLINK Image File SD Card formatter - HERE win32disk imager - HERE or balena Etcher - HERE putty - HERE WINSCP - HERE Remember to open up (port forward) ports 4569 and 12345 on you router (TCP & UDP) |
![]()
INSTRUCTIONS.
| 1. | INSTALLATION MANUAL | 24.575kb Abobe Acrobat PDF File | HERE |
| 2 | Adobe Acrobat Reader | To view the PDF File | HERE |
| 3. | Installation | Video on You Tube | HERE |
| 3a. | You will never get those 47 minutes and 43 seconds back...LOL | ||
| 4. | Adding Talkgroups | Video on You Tube | HERE |
| 4a. | Great tutorial of 5 minutes 41 seconds | ||
| 5. | Using Supermon, hUC (HTML User Client) and the dashboard | Video on You Tube | HERE |
| 5a. |
Tutorial of 4 minutes 34 seconds |
Video on You Tube |
Please make sure everything is
installed and configured as per the PDF guide, before continuing.
updating the software.
| log on to your pi type asl-menu and press enter choose option 7, then options A and B Alternatively log into your pi, and from the root... type sudo -s and press enter then type apt-get update --allow-releaseinfo-change and press enter |
IMPORTANT.
It is advisable once you have a working version,
MAKE A BACK UP IMAGE on your computer
you can then restore it, should you make any changes that render your copy
un-useable.
THIS CAN BE ACHIEVED USING WIN32DISK IMAGER
ISSUES WITH ASL and HUC
|
Within HUC after a period of time not going into
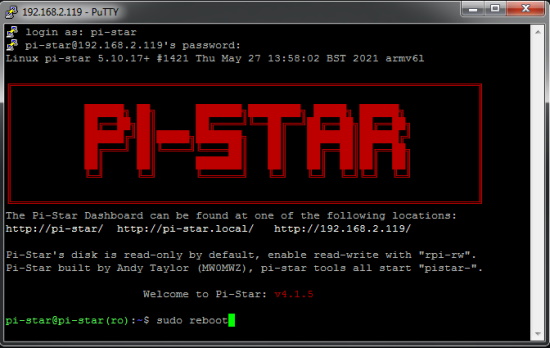
allstar the fucntion would not work, Alternatively exit asl-menu and type sudo reboot followed by the enter key 73 de G0KBM, Dave |
![]()
|
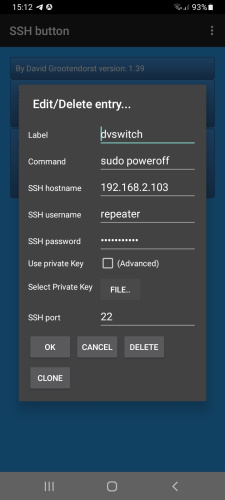
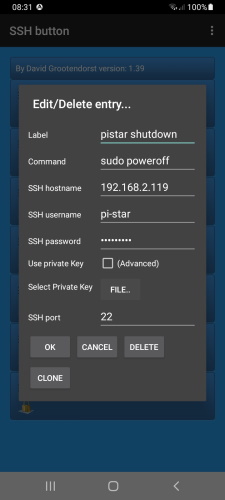
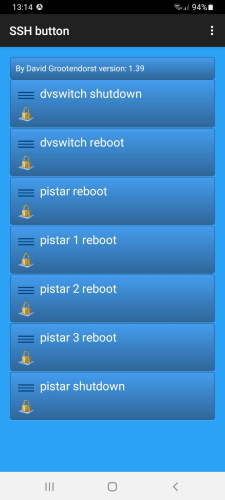
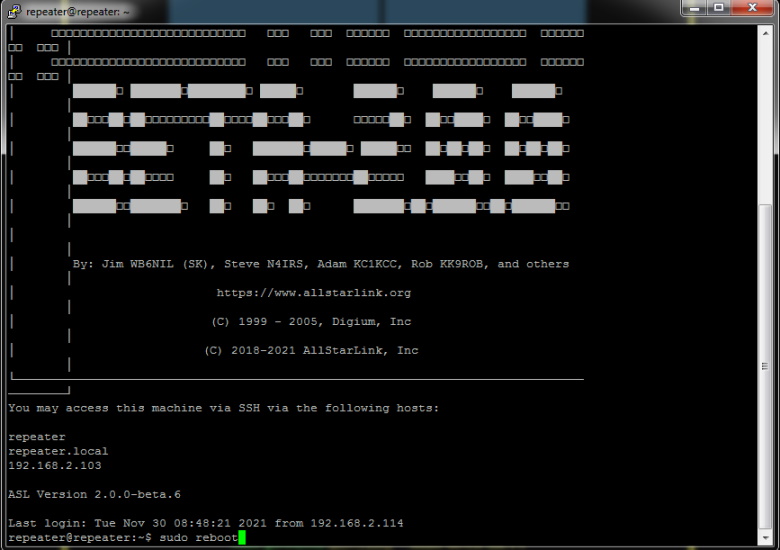
SSH BUTTON. A mobile application on PLAY STORE by PA7LIM This will enable easy remote SHUTDOWN of your RASPBERRY PI (should you need to) sample screenshots ALLSTARLINK - JUMBOSPOT - MAIN SCREEN
This is shown below in "PUTTY" however, the details
are the same for SSH BUTTON. ALLSTARLINK - JUMBOSPOT
Depending on the system, you could wait up to 2 minutes before you can un-plug after SHUT DOWN |
| PI
putty commands sudo poweroff (ENTER) < shuts down the PI sudo reboot (ENTER) < reboots the PI sudo - run the command as superuser |
![]()
Audio issues.
if people have problems hearing you.
use putty to access your PI
log in and enter sudo -s then asl-menu
navigate to option 6 ASL Configuration Edit MENU
Choose option B Edit rpt.conf file
scroll down to duplex = 1 and it change to duplex = 0
once done, hold down CTRL and press X then release CTRL and press Y then press the ENTER KEY to SAVE
at the MENU select BACK, choose 9 Sytem Diagnostics Menu,choose option G Restart ASL Asterisk (astres.sh)
exit and try again.
![]()
ASL STANZAS.
ASL Menu 2, 2
1 edit the MMDVM_Bridge.ini file
Here you can enter RX and TX freq (if required), power level,
latitude and longitude (in WGS84 format),
height, town location, description, URL (Uniform Resource Locator).
After entering all the Information, menu will say PLEASE WAIT whilst it saves and updates.
![]()
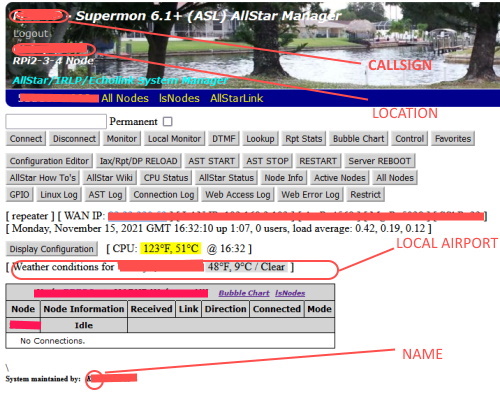
SUPERMON.
problems logging in ?
|
log in to your PI with putty At prompt type cd /var/www/html/supermonpress enter type sudo htpasswd -cB .htpasswd admin press enter you will now be requested to enter your password press enter and enter your password again once that is done...... type cd .. press enterthen cd allmon2 press enter then type in the command ./astdb.php now you should be able to log in to supermon in your browser |
|
Problems with
ALLSTAR "unable to tune". follow pages 55, 56 and 57 of the installation guide. this will solve this issue. |
|
PROBLEMS LOGGING
INTO TGIF. When setting up DMR servers, DO NOT 'cut and paste' any passwords. YOU MUST ENTER THEM MANUALLY or it won't work. example you have to manually edit dmr node list json in >> opt/Analog_Reflector/arRoot/modes/DMR_node_list.json and manually enter tgif password as the huc wouldn't connect The .json files in the modes folder allow you to add your favorites.
|
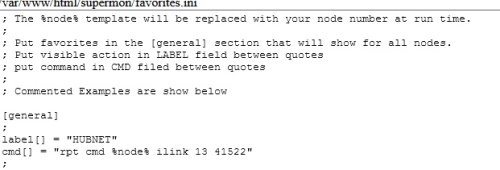
| adding allstar favourites to supermon. log in to the pi via putty type sudo -s press enter type cd /var/www/html/supermon press enter type nano favorites.ini press enter now you can follow the format to add favorites Add whatever you need EXAMPLE BELOW [general] hold down CTRL and press
X then release CTRL and press Y then
press the ENTER KEY to
SAVE |
| SUPERMON
DISPLAY SCREEN Just 4 items to edit here (Highlighted in GREEN) LOG IN TO YOUR PI then type sudo -s now enter nano /var/www/html/supermon/global.inc below is what you will see in the editor. <?php once you are done, SUPERMON will now be personalised for
you
|
Within supermon.
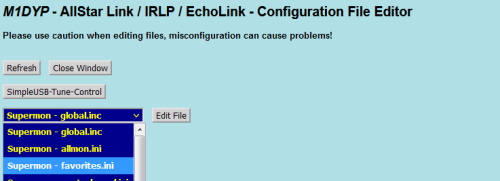
Be very careful whilst editing files, my example just adds HUBNET
|
supermon configuration
editor does not work This is not an error. Those files are read only for a reason. It is totally unsafe to edit those files in a web browser in the current Supermon. The message at the top of the screen specifically tells you to edit in Linux with nano or vi if it is a read only file. In any event this is the best way to do it. Changing permissions on files should never be done and if you do so you are doing it at your own risk. We possibly may be looking at a way to allow safer editing of these files but some files like iax.conf that have passwords will probably never be editable via the web. I should point out that web access is NOT secure. This uses http not https and data is in the clear out on the net. If you have access to a web page to your server then you most certainly should also have access via ssh using putty or another ssh client. All you need to do is log in and edit the file. Most of these files do not get edited that often anyway. |
![]()
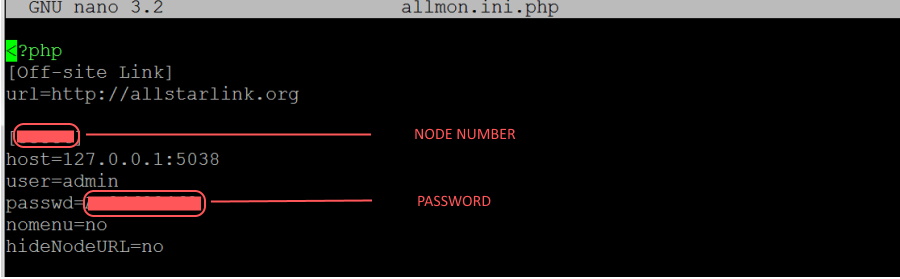
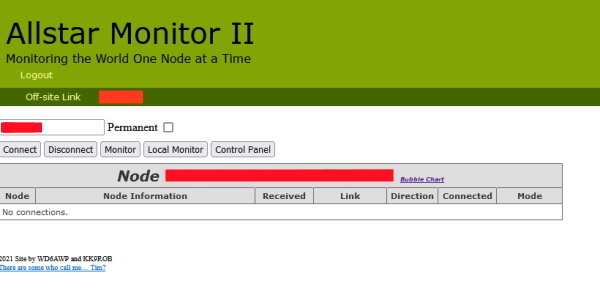
ALLSTAR
MONITOR II.
| Using PUTTY at the prompt enter cd /var/www/html/allmon2 (press enter) type sudo -s (press enter) type chmod 777 astdb.php (press enter) type ./astdb.php (press enter) you should see : Success: astdb.txt 764888 bytes type htpasswd -cB .htpasswd admin (press enter) you will be asked to type New password: a message should appear Now edit the allmon.ini.php type in sudo nano allmon.ini.php (press enter) now paste this into your empty .ini file
once done, hold down CTRL and press X then release CTRL and press Y then press the ENTER KEY to SAVE
now in PUTTY. type cp controlpanel.ini.txt controlpanel.ini.php (press enter) this will enable the control panel button now, in a browser, go to http://192.168.x.x/allmon2 that should be it.......(hopefully)
|
![]()
links in your browser when set up.
|
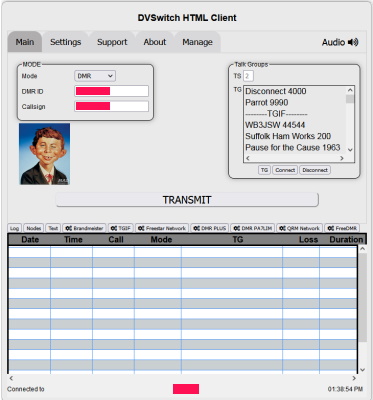
DVSwitch HTML CLIENT
https://192.168.*.***/html/hUC-min.html (the address of
your PI) |
example = 192.168.0.123/
![]()
USRP-for-Windows
As far as I can see, this
only works on WINDOWS 10 (so I cannot test this,
sorry)
firstly download the .zip file
Click HERE click CODE then DOWNLOAD ZIP
extract the .zip to a folder on your hard drive
edit the pyUC.ini file as below
(example from the DS5QDR Lee, Heonmin github page)
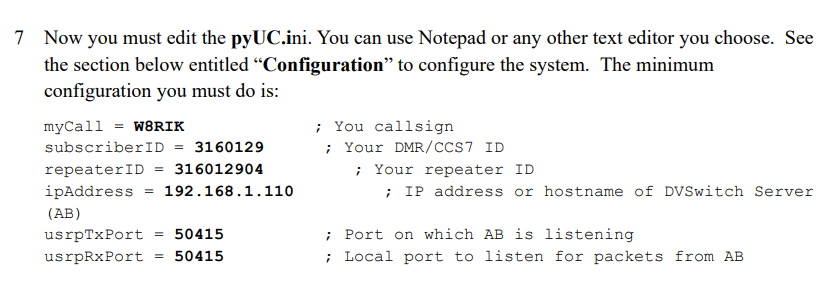
save the edited .ini file and
run usrp.exe
good luck.
![]()
I have found a way to edit the files on the PI, within the ALLSTARIMAGE with windows.
Click here >>> WINSCP <<< to get winscp.
It is all done by importing your saved putty connections
image below, show where to edit the .json files.
on the right hand side is PI, double click to edit the .json files
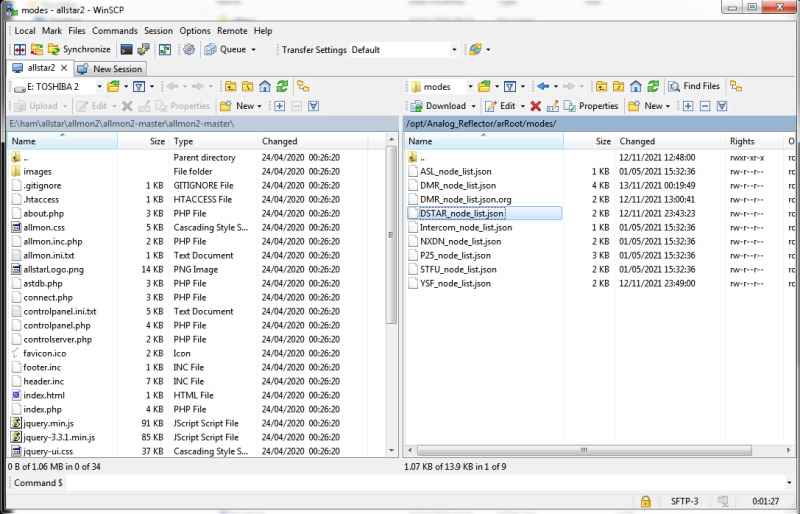
For the site's settings in WinSCP, SELECT
EDIT, then ADVANCED
and navigate to Environment > Shell
Change the text in the field from default to sudo su -
and your "pi" account will log in using sudo privileges,
letting you SCP files anywhere as root. Allowing you to edit them.

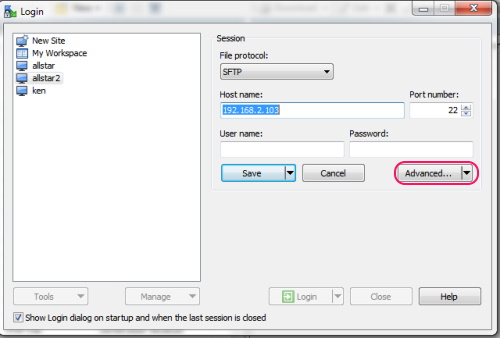
Once this is done, log in to your PI with WINscp and edit your files.
When SAVING a file, choose DELETE to save
After Changes are saved, PUTTY into your Raspberry Pi and log in.
type sudo reboot
OR
open the ASL-MENU, by typing asl-menu at the prompt.
GOTO system diagnostics menu (9).
SELECT (G) restart ASL ASTERISK (astres.sh).
![]()
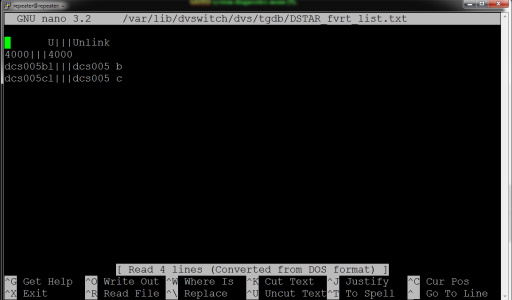
If you prefer to edit .json files within putty.....
root@repeater:/home/repeater#
cd /opt/Analog_Reflector/arRoot/modes
or line by line
cd /opt
cd Analog_Reflector
cd arRoot
cd modes
sudo nano DSTAR_node_list.json
sudo nano ASL_node_list.json
sudo nano DMR_node_list.json
sudo nano YSF_node_list.json
![]()
|
UPDATING THE NODES LIST
IN PUTTY LOG IN TO YOUR PI |
USE A JSON VALIDATOR TO CHECK YOUR FILE IF YOU HAVE PROBLEMS, i.e error parsing etc
JUST COPY AND PASTE IT ON-LINE AND CLICK VALIDATE
![]()
| PI putty commands sudo poweroff (ENTER) < shuts down the PI sudo reboot (ENTER) < reboots the PI sudo - run the command as superuser |
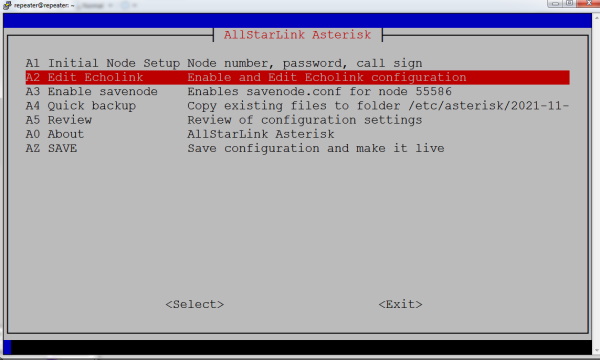
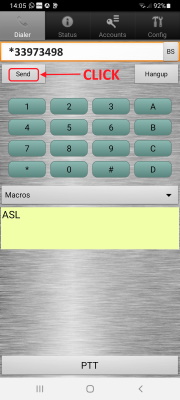
ECHOLINK.
| In PUTTY run
asl-menu select option 2 run node setup menu
sample echolink.conf
file below
Therefore to connect to an echolink node via ASL key in *3002345 for example Hubnet UK would be *33973498 so just
enter
and click send IMPORTANT.
|
![]()
Setting up DVSWITCH MOBILE ........
Android users can access the PI with DVSwitch Mobile from the Google Play Store.
| Select the ACCOUNTS TAB Select the first entry and it will present you with the account setup page. Top left change from iax2 to usrp Host name will be the ip address of your pi Port =12345 Tx port = 12345 your node password Callsign DMR num Uncheck autoload node Transmit level set to the last T in transmit Rec level set to the last L in level Then save. Back out to initial operational screen and press register. The client should then connect. NOTE: it seems that you can run both dvsm and hUC at the same time. once you have set the account up and you back
out of the account setup page make sure the In the PI, login and type dvs followed by the enter key select MENU options 2, 23, 9, should be ADVANCED IN YOUR ROUTER, PORT FORWARD PORTs 4569 and 12345 (TCP and UPD) |
ADDING FAVOURITES TO DVSWITCH MOBILE
and hUC.
(only DMR, D-STAR and FUSION)
(ALLSTAR is different in supermon, see below)
If anyone knows an easier way, please let me know, thank you.
AT THE PROMPT IN PUTTY, TYPE dvs
navigate to menu 2, menu 22, and select the favourites you want to edit.
In these examples, I have added two entries to the d-star, one to ysf and one to dmr favourites.
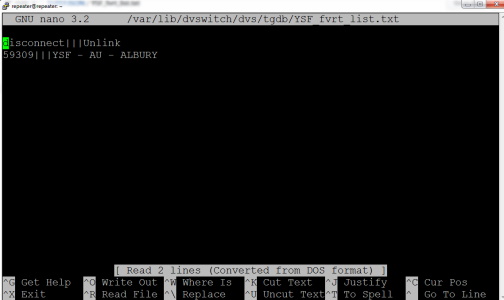

Adding FCS to the
YSF_node_list.json file
example.
| { "disp": "America Link Wires-X", "tg": "fcs00390" }, { "disp": "Pittsburgh Digital Group", "tg": "fcs00315" }, { "disp": "Southern California Link", "tg": "fcs00371" }, { "disp": "Pennsylvania", "tg": "fcs00238" }, { "disp": "Great Britain", "tg": "fcs00105" }, |
once added, hold down CTRL and press X then release CTRL and press Y then press the ENTER KEY to SAVE
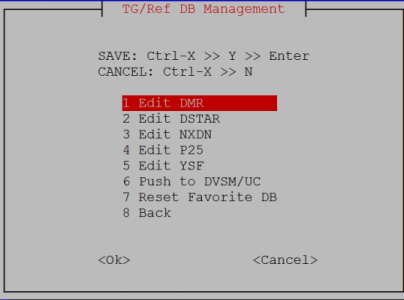
then, with dvswitch mobile connected select option 6, push to DVSM/UC
on your mobile screen you should see messages:-
updating global db, adding favourite db, file transfer rx file success.
Holding B on dvswitch mobile will bring up your updated list.
DVSWITCH MOBILE.
Adding shortcuts to Macros for ALLSTAR
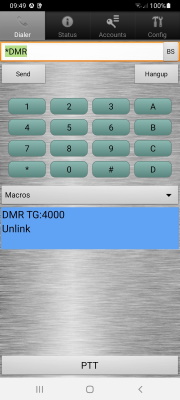

Holding down B brings up your
favourites list,
however, the 1st ten in the list are also accessed as shortcuts
by holding
0 through 9
and the
MACROS drop
down menu will access the ALLSTAR
shortcuts
that you entered in the Config
section (six slots available).
![]()
ADDING ALLSTAR FAVOURITES TO SUPERMON.
LOG INTO YOUR PI
sudo -s nano favorites.ini Add whatever you need EXAMPLE BELOW [general] hold down CTRL and press X then release CTRL and press Y then enter to SAVE |
refreshing your page should see the changes, if not enter sudo reboot to reboot the system
from supermon, click favourites and use the drop down menu to select the required entry.
![]()
![]()
A Similar Project
DVSWITCH.
This is a software solution for Digital Radio
A Two part solution consisting of a
Raspberry PI computer
and a Windows / Android dashboard to control it.
I currently use a Raspberry Pi 3B+ and a Windows 7 64 bit laptop.
Step 1. Download the Image File for the raspberry pi >>> HERE <<<
Step 2. Go to the PI-Star website and download a configuration file for WIFI, wpa_supplicant.conf, >>> HERE <<<
Step 3. Download USRP for Windows (64bit) or (32bit) (The Installer is in Spanish but the Programme is in English)
YOU MAY NEED MICROSOFT VISUAL C++ >>> HERE <<<
Step 4. Download PuTTY >>> HERE <<<
Step 5. Download Instructions >>> HERE <<<
Step 6. Download a sample pyUC.ini file >>> HERE <<<
Step 7. Write the image file to a micro sd card, when completed, copy across the WIFI file wpa_supplicant.conf to the root of your card
Step 8. Read the DVSWITCH install instructions, using PuTTY to SSH into your PI from your Computer.
Step 9. Install the USRP client (note the installer is in Spanish, but once installed it is in English.
Step 10. Replace the pyUC.ini file in the Windows program directory with the sample one you downloaded in step 6.
![]()
You will need to run NOTEPAD as "ADMINISTRATOR" to edit the pyUC.ini file in the windows program directory.
The pyUC.ini file will need to be altered to suit your callsign, ip address, ports, etc and here you can add any short cuts to talkgroups.
Android users can access the PI with DVSwitch Mobile from the Google Play Store.
GOOD LUCK.
EMAIL [email protected]