|

Photo Electric Street
Light

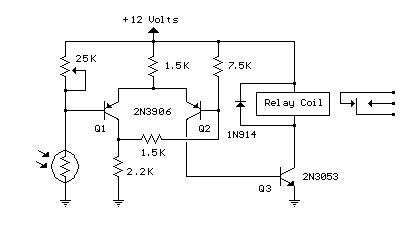
This is basically a Schmitt Trigger circuit which
receives input from a cadmium sulfide photo cell and controls a relay that
can be used to switch off and on a street lamp at dawn and dusk. I have
built the circuit with a 120 ohm/12 volt relay and monitored performance
using a lamp dimmer, but did not connect the relay to an outside light.
The photo cell should be shielded from the lamp to
prevent feedback and is usually mounted above the light on top of a
reflector and pointed upward at the sky so the lamp light does not strike
the photo cell and switch off the lamp.
The photo cell is wired in series with a potentiometer
so the voltage at the junction (and base of transistor) can be adjusted to
about half the supply, at the desired ambient light level. The two PNP
transistors are connected with a common emitter resistor for positive
feedback so as one transistor turns on, the other will turn off, and visa
versa. Under dark conditions, the photo cell resistance will be higher
than the potentiometer producing a voltage at Q1 that is higher than the
base voltage at Q2 which causes Q2 to conduct and activate the relay.
The switching points are about 8 volts and 4 volts
using the resistor values shown but could be brought closer together by
using a lower value for the 7.5K resistor. 3.3K would move the levels to
about 3.5 and 5.5 for a range of 2 volts instead of 4 so the relay turns
on and off closer to the same ambient light level. The potentiometer would
need to be readjusted so that the voltage is around 4.5 at the desired
ambient condition.
Original scheme edited by Bill
Bowden, http://www.bowdenshobbycircuits.info
Single Transistor Relay
Toggle Circuit
The circuit below
requires a double pole, double throw relay in conjunction with a single
transistor to allow toggling the relay with a momentary push button. One set of relay contacts
is used to control the load, while the other is used to provide feedback
to keep the relay activated or deactivated. Several push buttons can be
wired in parallel to allow toggling the relay from different locations.
toggling the relay with a momentary push button. One set of relay contacts
is used to control the load, while the other is used to provide feedback
to keep the relay activated or deactivated. Several push buttons can be
wired in parallel to allow toggling the relay from different locations.
In the deactivated state,
the relay contacts are arranged so the 1000 uF capacitor will charge to
about 2.7 volts. When the switch is closed, the capacitor voltage is
applied to the transistor base through a 560 resistor causing the
transistor to turn on and activate the relay. In the activated state, the
relay contacts are arranged so the 3.3K resistor and 560 ohm resistor
provide a continous current to the transistor base maintaining the
activated state. While in the activated state, the capacitor is allowed to
discharge to zero through the 1K resistor. When the switch is again
closed, the capacitor will cause the transistor base to move toward ground
deactivating the relay.
The circuit has three
distinct advantages, it requires only a few parts, always comes up with
the relay deactivated, and doesn't need any switch debouncing. However
since the capacitor will begin charging as soon as the button is
depressed, the button cannot remain depressed too long to avoid
re-engaging the relay. This problem can be minimized with an additional
resistor connected from the transistor base to ground so that the base
voltage is close to 0.7 volts with the button depressed and the transistor
is biased in the linear region. With the button held down, the relay coil
voltage should be somewhere between the pull in and drop out voltages so
that the relay will maintain the last toggled state. This worked out to
about 820 ohms for the circuit I built using a 12 volt, 120 ohm relay coil
and 2N3053 transistor. Temperature changes will effect the situation but
the operation is still greatly improved. I heated the transistor with a
hair dryer and found that the relay will re-engage with the button held
down for approximately 1 second, but this is not much of a problem under
normal operation.
Original scheme edited by Bill
Bowden, http://www.bowdenshobbycircuits.info
CMOS Toggle Flip Flop
Using Push Button
The circuit below uses a
CMOS dual D flip flop (CD4013) to toggle a relay or other load with a
momentary push button. Several push buttons can be wired in parallel to
control the relay from multiple locations.
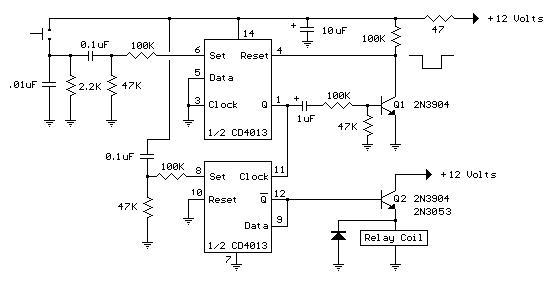 A
high level from the push button is coupled to the set line through a small
(0.1uF) capacitor. The high level from the Q output is inverted by the
upper transistor and supplies a low reset level to the reset line for
about 400 mS, after which time the reset line returns to a high state and
resets the flip flop. The lower flip flop section is configured for toggle
operation and changes state on the rising edge of the clock line or at the
same time as the upper flip flop moves to the set condition. The switch is
debounced due to the short duration of the set signal relative to the long
duration before the circuit is reset. The Q or Qbar outputs will only
supply about 2 mA of current, so a buffer transistor or power MOSFET is
needed to drive a relay coil, or lamp, or other load. A 2N3904 or most any
small signal NPN transistor can be used for relay coil resistances of 250
ohms or more. A 2N3053 or medium power (500 mA) transistor should be used
for coil resistances below 250 ohms. The 47 ohm resistor and 10uF
capacitor serve to decouple the circuit from the power supply and filter
out any short duration noise signals that may be present. The RC network
(.1/47K) at the SET line (pin 8) serves as a power-on reset to ensure the
relay is denergized when circuit power is first applied. The reset idea
was suggested by Terry Pinnell who used the circuit to control a shed
light from multiple locations. A
high level from the push button is coupled to the set line through a small
(0.1uF) capacitor. The high level from the Q output is inverted by the
upper transistor and supplies a low reset level to the reset line for
about 400 mS, after which time the reset line returns to a high state and
resets the flip flop. The lower flip flop section is configured for toggle
operation and changes state on the rising edge of the clock line or at the
same time as the upper flip flop moves to the set condition. The switch is
debounced due to the short duration of the set signal relative to the long
duration before the circuit is reset. The Q or Qbar outputs will only
supply about 2 mA of current, so a buffer transistor or power MOSFET is
needed to drive a relay coil, or lamp, or other load. A 2N3904 or most any
small signal NPN transistor can be used for relay coil resistances of 250
ohms or more. A 2N3053 or medium power (500 mA) transistor should be used
for coil resistances below 250 ohms. The 47 ohm resistor and 10uF
capacitor serve to decouple the circuit from the power supply and filter
out any short duration noise signals that may be present. The RC network
(.1/47K) at the SET line (pin 8) serves as a power-on reset to ensure the
relay is denergized when circuit power is first applied. The reset idea
was suggested by Terry Pinnell who used the circuit to control a shed
light from multiple locations.
Original scheme edited by Bill
Bowden, http://www.bowdenshobbycircuits.info
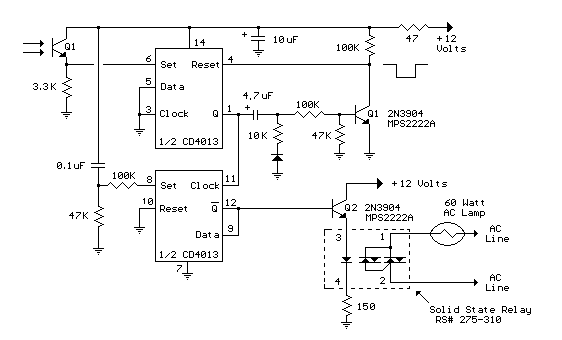
CMOS Toggle Flip Flop
Using Laser Pointer
The circuit below is
similar to the one above but can be used with a laser pointer to toggle
the relay rather than a push button. The IR photo transistor Q1 (Radio
Shack 276-145A) or similar is connected to the set input (pin 6). The
photo transistor should be shielded from direct light so that the voltage
at the set input (pin 6) is less than 1 volt under ambient conditions and
moves to more than 10 volts when illuminated by the laser pointer or other
light source. The reset time is about a half second using a 4.7uF cap
which prevents the circuit from toggling more than once during a half
second interval. The 10K resistor and diode provide a faster discharge
path for the 4.7uF cap so the circuit can be retoggled in less than 1
second. The 3K resistor in series with the photo transistor may need be
adjusted for best performance. The relay shown is a solid state variety to
be used with lights or other resistive loads at less than 3 amps. A
mechanical relay can also be used as shown in circuit above.
Original scheme edited by Bill
Bowden, http://www.bowdenshobbycircuits.info
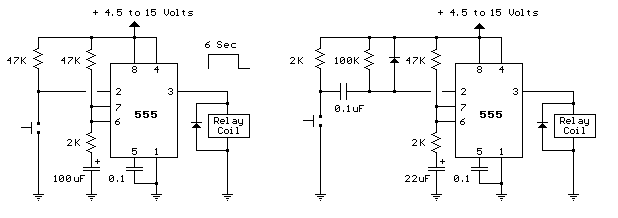
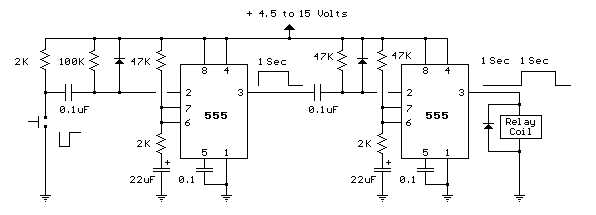
555 timer Mono stable (one
shot) circuit
The two circuits below
illustrate using the 555 timer to close a relay for a predetermined amount
of time by pressing a momentary N/O push button. The circuit on the left
can be used for long time periods where the push button can be pressed and
released before the end of the timing period. For shorter periods, a
capacitor can be used to isolate the switch so that only the initial
switch closure is seen by the timer input and the switch can remain closed
for an unlimited period without effecting the output.
In the idle state, the
output at pin 3 will be at ground and the relay deactivated. The trigger
input (pin 2) is held high by the 100K resistor and both capacitors are
discharged. When the button is closed, the 0.1uF cap will charge through
the button and the 100K resistor which causes the voltage at pin 2 to move
low for a few milliseconds. The falling voltage at pin 2 triggers the 555
and starts the timing cycle. The output at pin 3 immediately moves up to
near the supply voltage (about 10.4 volts for a 12 volt supply) and
remains at that level until the 22 uF timing capacitor charges to about
2/3 of the supply voltage (about 1 second as shown). Most 12 volt relays
will operate at 10.4 volts, if not, the supply voltage could be raised to
13.5 or so to compensate. The 555 output will supply up to 200mA of
current, so the relay could be replaced with a small lamp, doorbell, or
other load that requires less than 200mA. When the button is released, the
0.1uF capacitor discharges through the 100K and 2K resistors. The diode
across the 100K resistor prevents the voltage at pin 2 from rising above
the supply voltage when the cap discharges. The 2K resistor in series with
the 22uF cap limits the discharge current from pin 7 of the timer. This
resistor may not be necessary, but it's a good idea to limit current when
discharging capacitors across switch contacts or transistors.
Original scheme edited by Bill
Bowden, http://www.bowdenshobbycircuits.info
Generating a Delayed
Pulse Using The 555 Timer
The circuit below
illustrates generating a single positive pulse which is delayed relative
to the trigger input time. The circuit is similar to the one above but
employs two stages so that both the pulse width and delay can be
controlled. When the button is depressed, the output of the fist stage
will move up and remain near the supply voltage until the delay time has
elapsed, which in this case is about 1 second. The second 555 stage will
not respond to the rising voltage since it requires a negative, falling
voltage at pin 2, and so the second stage output remains low and the relay
remains de-energized. At the end of the delay time, the output of the
first stage returns to a low level, and the falling voltage causes the
second stage to begin it's output cycle which is also about 1 second as
shown. This same circuit can be built using the dual 555 timer which is a
556, however the pin numbers will be different.
Original scheme edited by Bill
Bowden, http://www.bowdenshobbycircuits.info
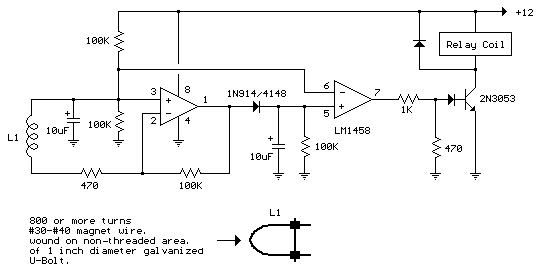
AC Line Current Detector
This circuit will detect
AC line currents of about 250 mA or more without making any electrical
connections to the line. Current is detected by passing one of the AC
lines through an inductive pickup (L1) made with a 1 inch diameter U-bolt
wound with 800 turns of #30 - #35 magnet wire. The pickup could be made
from other iron type rings or transformer cores that allows enough space
to pass one of the AC lines through the center. Only one of the current
carrying lines, either the line or the neutral should be put through the
center of the pickup to avoid the fields cancelling. I tested the circuit
using a 2 wire extension cord which I had separated the twin wires a small
distance with an exacto knife to allow the U-bolt to encircle only one
wire.
The magnetic pickup
(U-bolt) produces about 4 millivolts peak for a AC line current of 250 mA,
or AC load of around 30 watts. The signal from the pickup is raised about
200 times at the output of the op-amp pin 7 which is then peak detected by
the capacitor and diode connected to pin 7. The second op-amp is used as a
comparator which detects a voltage rise greater than the diode drop. The
minimum signal needed to cause the comparator stage output to switch
positive is around 800 mV peak which corresponds to about a 30 watt load
on the AC line. The output 1458 op-amp will only swing within a couple
volts of ground so a voltage divider (1K/470) is used to reduce the
no-signal voltage to about 0.7 volts. An additional diode is added in
series with the transistor base to ensure it turns off when the op-amp
voltage is 2 volts. You may get a little bit of relay chatter if the AC
load is close to the switching point so a larger load of 50 watts or more
is recommended. The sensitivity could be increased by adding more turns to
the pickup.
Original scheme edited by Bill
Bowden, http://www.bowdenshobbycircuits.info
Ham radio Data Center - free schematics | 73s.eu - Free Ham Radio Social Network | Free HAM Directory | About me | Acronyms | CW | Data Sheets | Docs | Download | E-mail | HOME | Ham projects | Hobby circuits | Photo galery | PIC | QTH photos |
Sign in my guestbook | View my guestbook ]
© 2001 - YO5OFH, Csaba Gajdos
|