Simulating reception of a FreeDV plus Video signal
Introduction · The Signal · Hardware · PureSignal · Software · Operating · Technical · Contacts
A WMA test file is available for playback to your FreeDV plus Video setup. The test file can be used to:
1. Simulate a remote station transmitting FreeDV plus Video, as an aid to properly setting up and adjusting the receiving hardware and software.
2. Demonstrate FreeDV plus Video operation to visitors or at a club meeting, when an on-air demo is not possible.
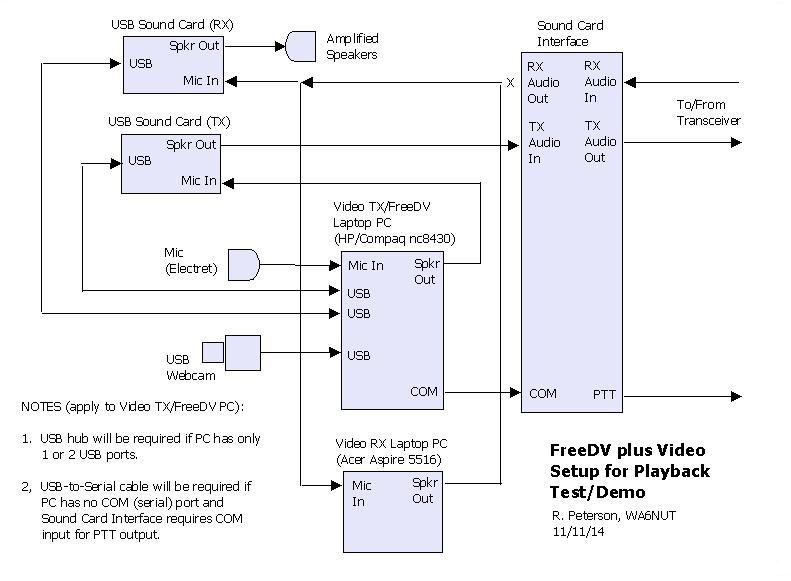
The setup is the same as shown on the "Hardware" page, except for these additional instructions:Software
1. Disconnect the RX USB sound card "Mic In" and Video RX PC "Mic In" connections from the Sound Card Interface "RX Audio Out" and reconnect to the Video RX PC "Spkr Out."
2. The following are not used (but may remain connected):USB Webcam
Mic (Electret)
Sound Card Interface (with "RX Audio Out" disconnected as noted above)
The software is the same as shown on the "Software" page, except for these additional instructions:Setup
1. Download the Demo15.wma file (use the link below) to your Video RX PC (unzip the file in the same folder as the RXfftDIFF7L application).
2. In the Video RX PC Windows Control Panel, set the motherboard sound card as the default Playback device.
3. Open the Demo15.wma file to play in Windows Media Player on the Video RX PC. Set the Media Player for continuous loop playback.
WMA File Download Link
1. On the Video TX/FreeDV PC, set the FreeDV GUI mode to "1600" and display to "Spectrum."
2. Adjust the signal level:a. On the Video RX PC, Adjust the Media Player gain slider and the Playback mixer sound card speaker Level slider; and3. Use the procedures on the "Operating" page to establish settings for optimum audio and video quality.
b. On the Video TX/FreeDV PC, adjust the RX USB sound card ("2- Turtle Beach USB Audio" for the author's setup) Record (Microphone) Level slider such that:
the displayed spectrum does not display off-scale, and that the bottom portions of the sub-carriers are at the display baseline.
4. Lock the WinWarbler AFC to the B58 sub-carrier. Verify that the AFC readout indicates 2.175 kHz ± 2 Hz. If your baseband signal was derived on-air from your HF transceiver (instead of this simulation), you would be able to adjust the transceiver receive frequency (in 1 Hz steps) for optimum color hues in the video image.
After the test/demo is completed, don't forget to disconnect the RX USB sound card "Mic In" and Video RX PC "Mic In" from the Video RX PC "Spkr Out" and reconnect to the Sound Card Interface "RX Audio Out."