Levels and settings for the best audio and video signal
Frequencies for FreeDV plus Video: Primarily on 14236 kHz (shared with FreeDV digital voice)
Click the link below to open the legacy operating instruction page (recommended for older PC's with limited processor capability -- requires an additional USB sound card).
Legacy operating instruction page
When a higher-performance PC is available, the Video TX, FreeDV, and Video RX software are installed on the same PC. Otherwise, two PC's are used: one for Video TX/FreeDV, and the other for Video RX.
Detailed procedure: A detailed procedure for setup and adjustments is given in the "FreeDV Plus Doc" PDF document included in the FreeDV plus Video suite software distribution (click on the FreeDV plus Video link on the "Software" page to download the software).
A fine tutorial, "The Ins and Outs of a Sound Card", by Del Schier, K1UHF, was published in the October 2003 QST, pp. 33-36. Although the article focuses on Windows XP, the information applies to later versions of Windows as well.
K1UHF Article Link
Detailed tutorials and videos for settings for FreeDV are found on the FreeDV webpage (see the FreeDV link on the "Software" page).
Video TX/FreeDV Software: General Settings
Set Up VoiceMeeter as Audio Mixer
VoiceMeeter is an application for Windows that provides:Set Windows Mixers for Correct Default Devices
Monitoring the audio level from the receiver to the FreeDV decoder (Hardware Input 1)First, read the VoiceMeeter User Manual, especially the Quick Startup instructions on pages 10-14 (Steps 0 to 3). Open VoiceMeeter, click on "Menu," select "System Settings/Options," then change the "Preferred Main Sample Rate" from 44100 (default value) to 48000. Exit the menu and set up the main screen as shown in the chart below. The names for the author's USB sound card ("C-Media USB Headset") and motherboard sound card ("High Definition Audio Device") are shown. Substitute the names corresponding to your setup.
Monitoring the mic audio level to the FreeDV encoder (Hardware Input 2)
Monitoring and control of the video subcarrier levels with respect to the fixed FreeDV subcarrier levels (Virtual Input and Hardware Out)
Inputs/Output Select from dropdown Comment Hardware Input 1 C-Media USB Headset WDM Monitor RX audio level Hardware Input 2 High Definition Audio Device WDM Monitor TX mic audio level Virtual Input N/A Monitor and control video TX signal level Hardware Out High Definition Audio Device MME Monitor and control video TX signal level From the Windows Control Panel (Sound) Playback mixer, select Speakers "VoiceMeeter Input" as the "Default Device" (the TXfftCO5L application's output is applied to the default Playback device).
From the Windows Control Panel (Sound) Recording mixer, select Microphone "C-Media USB Headset" as the "Default Device."
From the Windows Control Panel (Sound) Recording mixer, select Microphone "VoiceMeeter Output," and click on the "Properties" button. Select the "Listen" tab, and click on the "Listen to this Device" radio button. Then select "Speakers (High Definition Audio Device)" from the dropdown menu.
Video TX/FreeDV Software: Settings for Digital Voice and Video TX
Set FreeDV for Correct Inputs and OutputsOn the FreeDV GUI, click "Tools", then "Audio Config", and select the devices and sample rates as follows. The name for the author's RX USB sound card ("C-Media USB Headset") is shown below. Substitute the name for your RX USB sound card under "To Speaker/Headphones". Select the sample rates (48000). If the Sample Rate list is blank, type in "48000."
Receive From Radio: Device Sample Rate USB Sound Card C-Media USB Headset WDM 48000 To Speaker/Headphones Sample Rate USB Sound Card: C-Media USB Headset WDM 48000
Click "Apply", then click on the Transmit tab at the bottom. The name for the author's motherboard sound card ("High Definition Audio Device") is shown below. Substitute the name for your motherboard sound card under "From Microphone." Select the sample rates (48000). If the Sample Rate list is blank, type in "48000."
Transmit From Microphone Sample Rate Motherboard Sound Card: High Definition Audio Device WDM 48000 To Radio Sample Rate Motherboard Sound Card: High Definition Audio Device WDM 48000
Click "Apply", then "OK" at the bottom.
Note: These settings should be checked each time the FreeDV app is opened. The settings can change randomly.
Video TX/FreeDV Software: Settings for Receiving Digital Voice with the FreeDV App (screenshot below)If you're using the older FreeDV v.0.97.1 be sure you've selected the mode ("1400" or "1600") compatible with your FreeDV plus Video software (the "1600" and "700D" modes are in current use).
Level to FreeDV Decoder:From the Windows Control Panel (Sound) Recording mixer, highlight the USB sound card (Microphone "C-Media USB Headset" for the author's setup), and click the "Properties" button. Click on the "Levels" tab and use the slider control to adjust the level to the FreeDV decoder. While receiving a FreeDV plus Video (or FreeDV) signal, with the FreeDV display in Spectrum mode, adjust the slider control low enough so that the spectrum amplitude does not exceed full scale. For both screenshots below, received signal strength was S6, as measured on the transceiver's "S" meter.
Speaker Volume: From the Windows Control Panel (Sound) Playback mixer, highlight the USB sound card (Speakers "C-Media USB Headset" for the author's setup), and click the "Properties" button. Click on the "Levels" tab and use the slider control to set the level to the amplified speakers. While receiving a FreeDV plus Video (or FreeDV) signal, adjust the slider control for the desired volume setting.
Tuning (FreeDV plus Video): If you've already tuned the transceiver (receiver) to receive a good quality video image (see the instructions below), no further tuning is required (the AFC in the FreeDV software will lock onto the center FreeDV sub-carrier for proper operation).
Tuning (FreeDV alone without video): The transceiver (receiver) is tuned so that the center sub-carrier of the received FreeDV signal is at the 1500 Hz mark on the spectrum (or waterfall) display. This setting needs not be exact, as the FreeDV software incorporates an AFC feature to lock on to the center sub-carrier.
Squelch: The Squelch slider should be set low enough to avoid missing syllables and high enough to avoid digital ("R2D2") noise in decoding. The author sets the Squelch slider at -1.5.
SNR: Signal-to-noise peaks of 10-14 should be expected with FreeDV plus Video operation with strong (S6 or greater) signals. Without video, (FreeDV alone), SNR readings of 15-17 should be obtained.
Video TX/FreeDV Software: Settings for Transmitting Digital Voice with the FreeDV App (screenshot below)Mic level: From the Windows Control Panel (Sound) Recording mixer, highlight the motherboard sound card (Microphone "High Definition Audio Device" for the author's setup), and click on the "Properties" button. Click on the "Levels" tab and use the slider control to set the mic level to the FreeDV encoder. While speaking into the mic, after clicking the PTT button, adjust the slider control so that the voice peaks on the FreeDV screen are about 60% of full scale. No further adjustment of this setting should be necessary.
Power sharing adjustment: Use the VoiceMeeter Virtual Input "Fader Gain" slider control and the Hardware Out control to set the amplitude of the video sub-carriers with respect to the fixed FreeDV sub-carrier amplitude. This adjustment ensures minimum IM products and reduced noise in the received video. Both the FreeDV and TXfftCO5L applications are opened while making these adjustments. The transceiver is keyed to the TX mode using the PTT button on the FreeDV application.
TX LEVEL 1 and TX LEVEL 2 (on Software page setup diagram): Set the Virtual Input "Fader Gain" slider control and the Hardware Out control so that the amplitude of the FreeDV sub-carriers (as viewed on the FreeDV RX spectrum display with an in-shack monitor receiver or as monitored by another station) is the same as the surrounding video sub-carriers. The FreeDV Spectrum display should be similar to the Video TX/FreeDV PC screenshot below.Adjust transceiver output power level: Both the FreeDV and TXfftCO5L applications are opened while making this adjustment. The transceiver is keyed to the TX mode using the PTT button on the FreeDV application.
TX LEVEL 3 (on setup diagram): The motherboard soundcard Playback slider control is used to set the level of the baseband FreeDV plus Video signal to the transceiver audio input. From the Windows Control Panel (Sound) Playback mixer, highlight the motherboard sound card (Speakers "High Definition Audio Device" in the author's setup) and click on the "Properties" button. Click on the "Levels" tab and use the slider control to set the level of the baseband FreeDV plus Video signal to the transceiver audio input. This setting is made while monitoring the average output power from the transceiver. This level is set to about 1/6 the transceiver rated output power (15-20 watts average power out for a 100-watt transceiver).
Video TX/FreeDV Software: Settings for Transmitting Video with the TXfftCO5L App (screenshot below)Live webcam video: From the menu, USB webcam "live" video can be selected to be transmitted along with voice. A flashing yellow rectangle is displayed to show the portion of the webcam image actually transmitted. The image is sampled at only 1 frame/sec, so any motion in the received live video will be "jerky" (not smooth). The operator and shack should be well-lighted for good video quality (the author uses a Woods 860-151 8.5 inch diameter, 40 W., clamp light clamped to a shelf on the computer cabinet -- the computer cabinet houses the computers and radio).
AVI Video clips: From the menu, AVI video clips can be selected to be transmitted along with voice. The .AVI file should be located in the same folder as the TXfftCO5L application. Although the image is sampled at only 1 frame/sec, the received video can be recorded for later playback at 10 frames/sec (with smooth, natural motion). But remember that 18 seconds of smooth 10 frames/sec playback will require receiving a transmission for 3 full minutes! Note that only video can be recorded (not voice). The screenshot shows the receiving station ready to send the Microsoft WNDSURF1.AVI test file (the title frame is displayed in the screenshot). Mouse over the screenshot to enlarge.
Click on the link below to download the WNDSURF1.AVI test file. Keep this test file in the same folder as the TXfftCO5L application. More AVI files can be downloaded from the "10,000 Sounds Songs" link below.
10,000 Sounds Songs Link
If the TXfftCO5L application displays a "Video not available. Cannot find 'vids:mjpg' decompressor" error message, you'll need to add an older video codec to your PC. This codec is included in the K-Lite Codec Pack (Mega version). Download the K-Lite Codec Pack from the link below.
K-Lite Codec Pack Link
Although your camera may be spec'ed to record video in an AVI format, the actual format may be MJPEG, a format not supported by the TXfftCO5L app. A suitable video converter is the Stoik Video Converter (link below). If your camera's frame rate is too high (30 FPS), the motion in the video may be too slow when the receiving station records it with the RXfftDIFF7L app and plays it back with the RxReplay7A app. First reduce the frame rate of the AVI file from 30 FPS to 10 FPS using the Free Video FPS Converter (link below), then convert the 10 FPS file to "AVI for PC" format using the Stoik Video Converter. Now your camera's AVI file is ready to transmit with the TXfftCO5L app.
Stoik Video Converter Link - - Free Video FPS Converter Link
Text "crawl": From the menu, a text "crawl" may be selected to be displayed at the bottom of the transmitted image. The "crawl" text is taken from the TESTPATT.ini file included with the software. An ASCII text editor (i.e., Notepad) can be used to edit the TESTPATT.ini file, substituting your text, up to 255 characters. This feature works best with Windows XP.
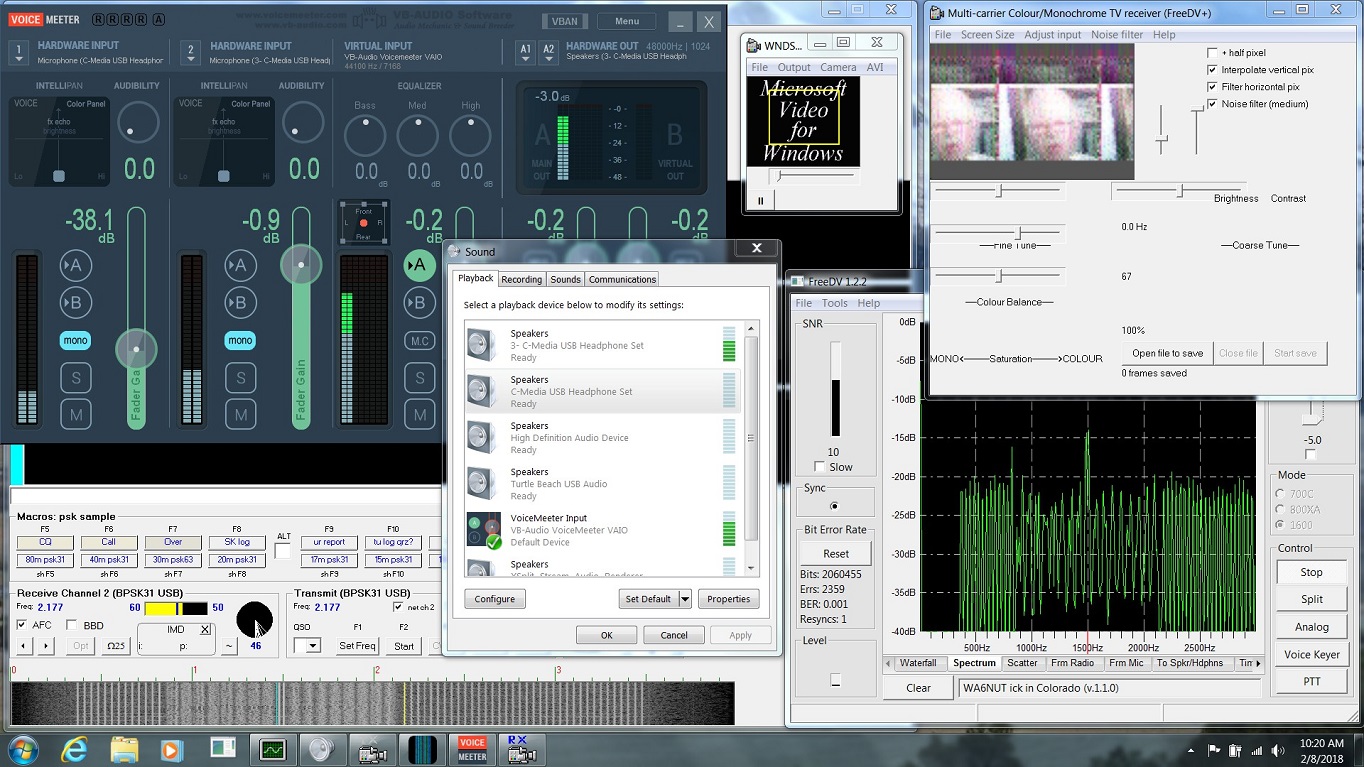 Screenshot of PC running Video TX, FreeDV and Video RX software (Windows 7).
(mouse over the image to enlarge)
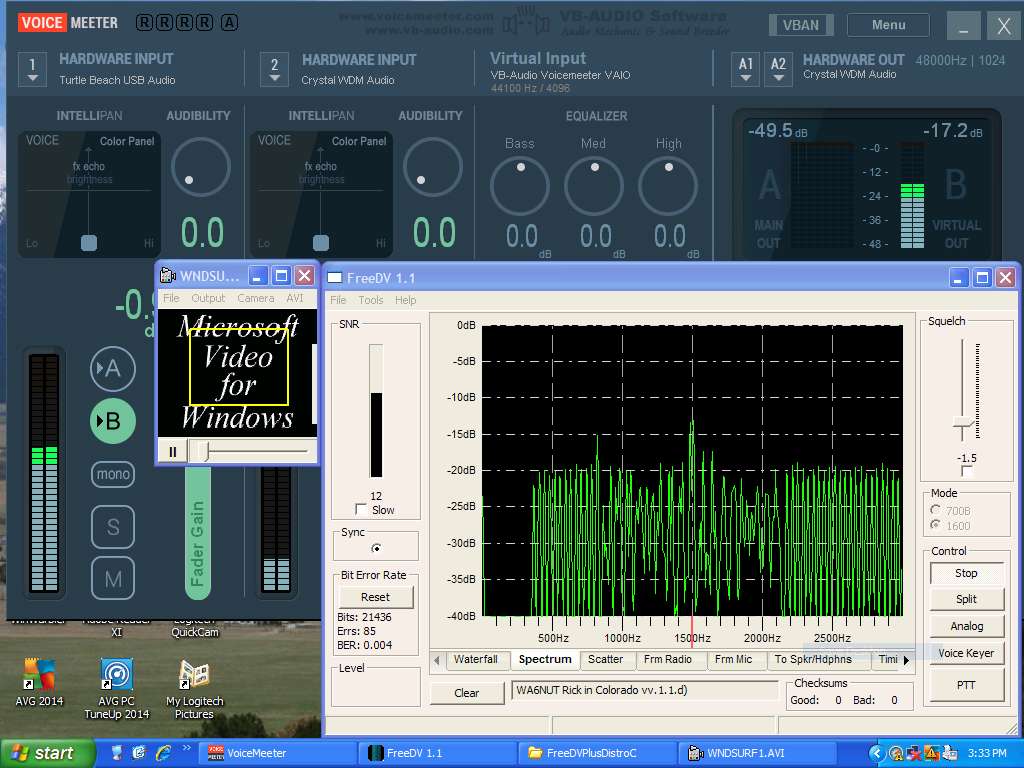
with VoiceMeeter in the background (note that "Crystal WDM Audio" is the name
of the motherboard sound card driver used in the PC running Windows XP).
Separate PC's are used for Video TX/FreeDV and Video RX.
(mouse over the image to enlarge)
Video TX/FreeDV Software: Adding a Waterfall ID for FreeDV+ (screenshot below)
Perhaps you've noticed the waterfall ID used by digital SSTV stations on 14233 kHz. Thanks to the voice keyer feature on the FreeDV app, you can easily transmit a waterfall ID following your FreeDV+ QSO or test transmission. Use EasyPal to record the ID as a .wav file, then load the .wav file to the FreeDV voice keyer. Obtain full details from the "Waterfall ID" link below (links are also given for downloading EasyPal and EasyPal documentation).
Waterfall ID Link - - EasyPal Download Link - - EasyPal Documentation Link
Below: Waterfall ID received by the VE6JY KiwiSDR, a distance of over 1,000 miles.
(mouse over the image to enlarge)

Video RX Software: General SettingsFrom the Windows Control Panel (Sound) Recording mixer, select the motherboard sound card microphone input ("Realtek HD Audio" in some Windows Vista PC's) as the "Default Device" (the RXfftDIFF7L application receives its input from the default device).
Video RX Software: Settings for Receiving Video with the RXfftDIFF7L and WinWarbler Apps (screenshot below)LevelsA screenshot for the Video RX PC is shown below (mouse over the screenshot to enlarge).
In WinWarbler, click the "Config" button, and select the "Soundcard" tab. For both the "PSK soundcard" and "Phone soundcard", select the radio buttons for the motherboard sound card microphone input ("Realtek HD Audio" for some Windows Vista PC's). Close the "WinWarbler Configuration" screen to return to the main WinWarbler screen. On the main WinWarbler screen, select the "AFC" checkbox. These settings will be stored in the WinWarbler application.
From the Windows Control Panel (Sound) Recording mixer, highlight the motherboard sound card microphone input ("Realtek HD Audio" in some Windows Vista PC's) and click the "Properties" button. Click on the "Levels" tab. The Levels "Microphone" slider is used to set the level from the receiver to the RXfftDIFF7L and WinWarbler apps. Set the Levels "Microphone" slider control low enough so the WinWarbler "Receive soundcard overload!" message is not displayed.
Tuning the Video Signal1. First, the WinWarbler AFC is locked to the B58 sub-carrier (B58 is the video sub-carrier just above the highest FreeDV sub-carrier, shown as a yellow trace in the screenshot). Click anywhere in the top WinWarbler textbox, then click on the B58 sub-carrier on the waterfall. The B58 sub-carrier will begin scrolling down as a yellow trace (depending on signal strength, you may need to repeat until the AFC locks to the B58 sub-carrier). Note that the WinWarbler AFC "Freq" readout indicates 2.174 kHz in the screenshot.
2. If the WinWarbler AFC "Freq" readout is BELOW 2.175 kHz, tune the receiver DOWN in 1 Hz steps until 2.175 kHz is indicated. If the AFC "Freq" readout is ABOVE 2.175 kHz, tune the receiver UP in 1 Hz steps until 2.175 kHz is indicated. Further adjustment may be required to obtain the truest hues in the video image. If the AFC "Freq" readout is low (below 2.175 kHz), the video image will show greenish hues. If the AFC "Freq" readout is high (above 2.175 kHz), the video image will show reddish hues.
3. Unlike the FreeDV software, the RXfftDIFF7L application does not incorporate an AFC feature. So it will be necessary to adjust the receiver tuning slightly to compensate for frequency drift in the other station's transmitter and/or in the local receiver. Both transceivers should be operated in the Split mode so that the receiver is tuned independently of the transmitter (both transmit frequencies should remain unchanged). The AFC in the FreeDV software should easily track the small changes in receiver tuning required to maintain good quality in the video image.
Expect a 4 Hz shift (from 2.175 kHz to 2.171 kHz) in the AFC "Freq" readout when changing from a full-color motion image to an all-black video image (such as when receiving the title frame of WNDSURF1.AVI).
Note that there is a 4-frame latency (delay) of the received video image with respect to the received audio.
Recording Received Video for Playback with the RxReplay7A App (not shown in screenshot)The RXfftDIFF7L application can be used to record the video portion of the received signal for later playback using the RxReplay7A application. The RXfftDIFF7L application records the received video as a file in ".49" format. For playback, the ".49" file should be located in the same folder as the RxReplay7A application. The recording feature is especially useful when an .AVI video clip has been transmitted at 1 frame/sec, because RxReplay7A will permit playback at 10 frames/sec. Thus a received AVI clip can be played back with smooth motion.
Processing Recorded VideoThe RxReplay7A application can only play back ".49" video files. Each frame of the ".49" file is sent to the Windows Clipboard as it is displayed.
If live video is recorded to a ".49" file, the jerky 1 frame/sec video can be processed into smooth 10 frames/sec video using special software. The author uses AVI Constructor to convert the ".49" file, sent frame-by-frame to the Clipboard from RxReplay7A, to an .AVI file. Then MotionPerfect is used to provide frame interpolation, converting the 1 frame/sec .AVI file to another .AVI file at 10 frames/sec. Click on the links below for more information and downloads of demo software for AVI Constructor and MotionPerfect.
AVI Constructor Link - - MotionPerfect Link - - MotionPerfect Demo VideoScreenshot of Video RX PC running RXfftDIFF7L and WinWarbler software (Windows Vista)
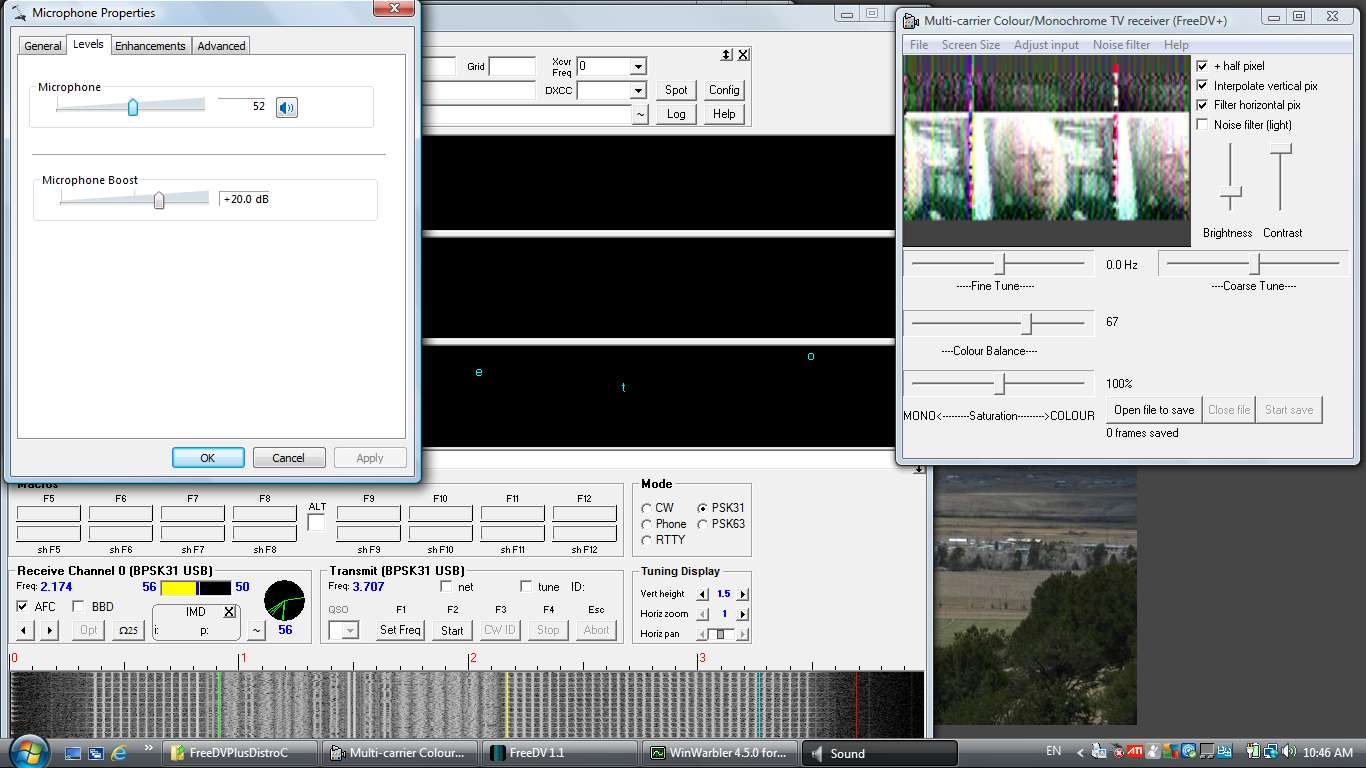
Separate PC's are used for Video TX/FreeDV and Video RX.
(mouse over the image to enlarge)
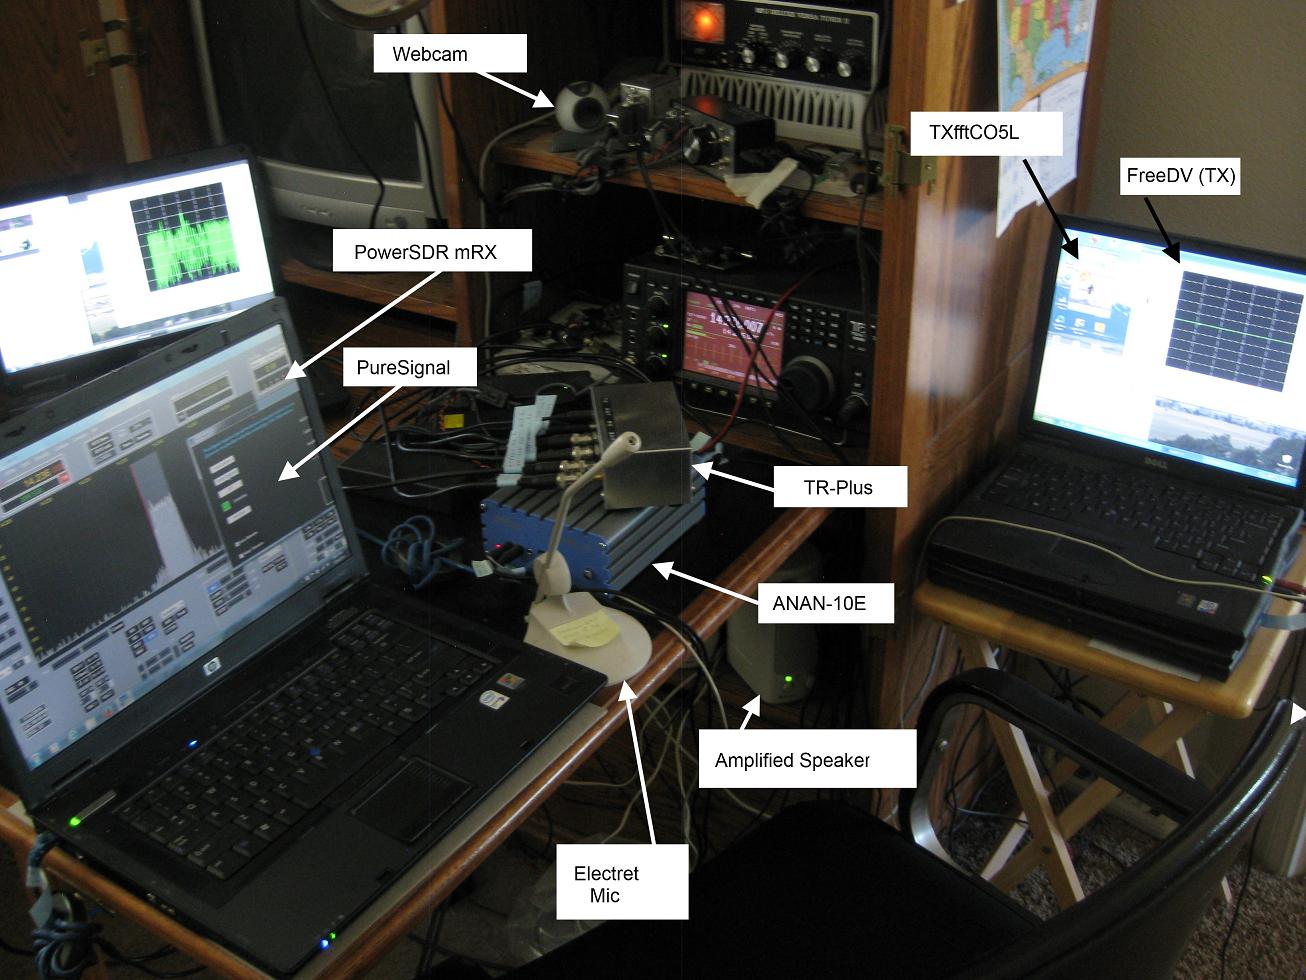
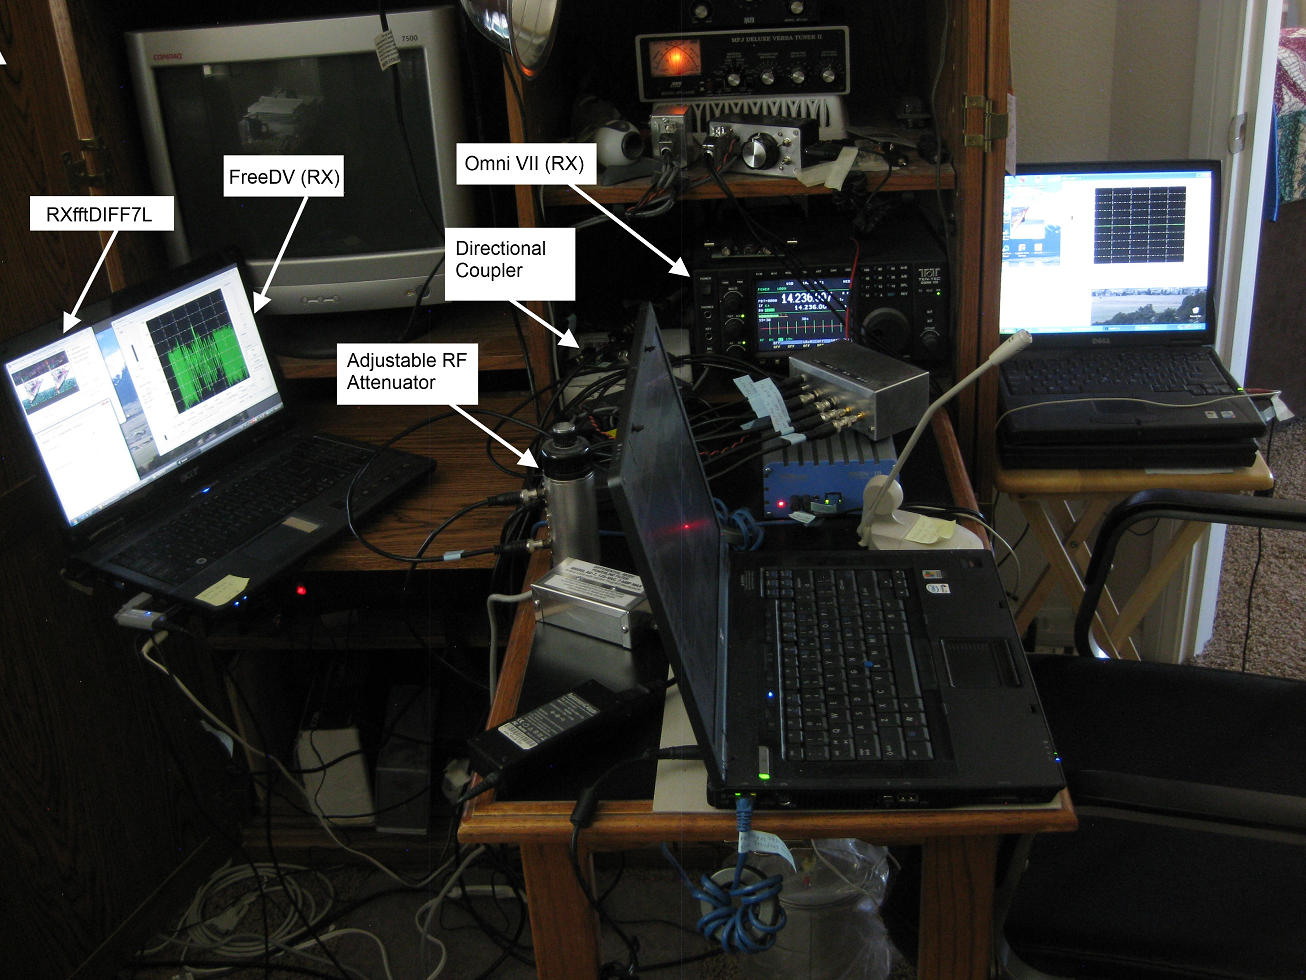
Typical Setup for FreeDV plus Video (photos below: mouse over photo to enlarge)Top: The laptop PC's and the ANAN-10E SDR transceiver at WA6NUT.
Middle: The directional coupler and adjustable RF attenuator are used with PureSignal. The Omni VII is used to monitor the transmitted audio and video.
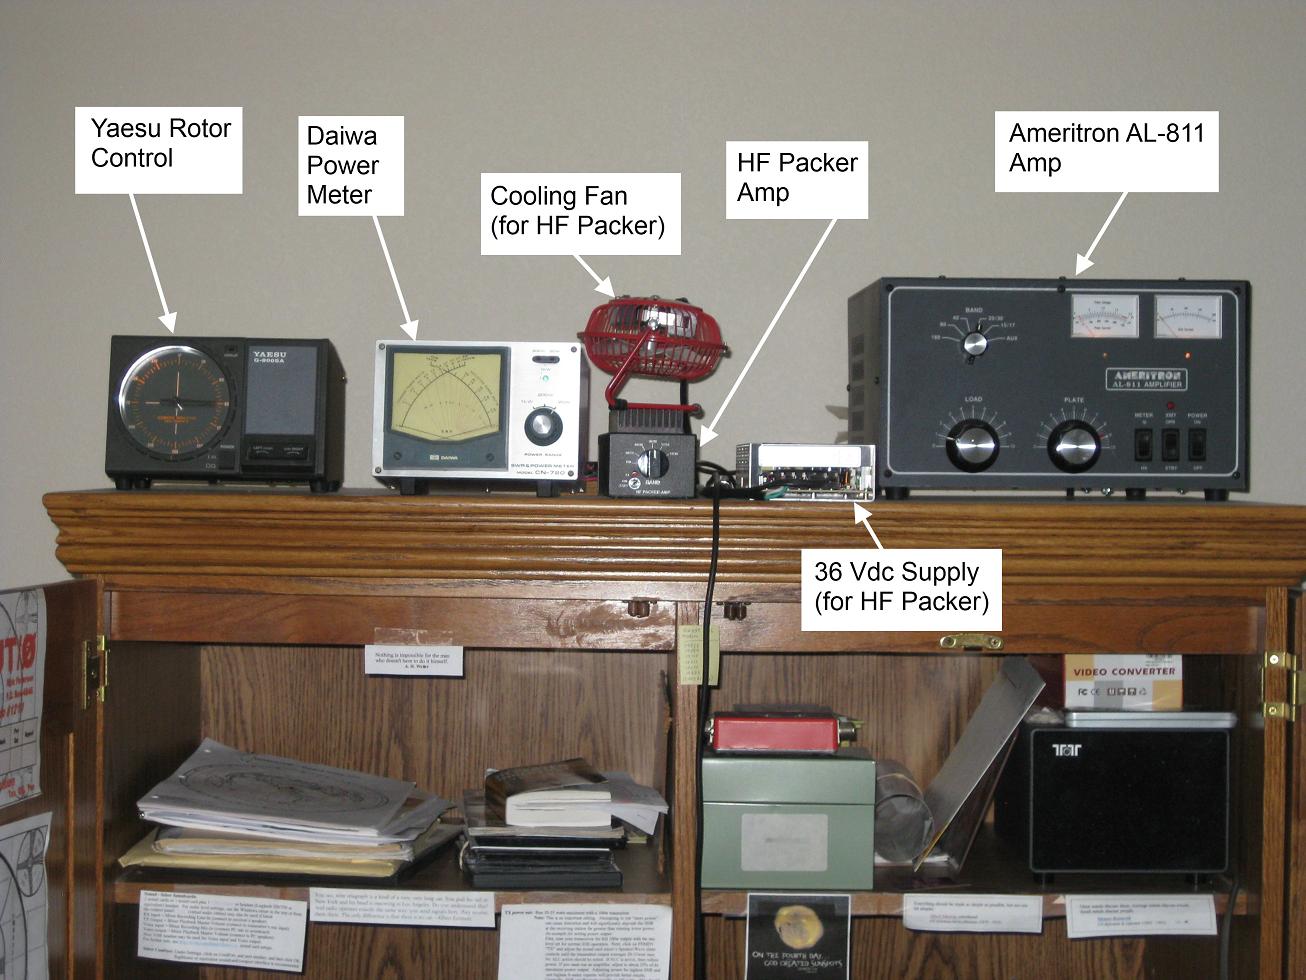
Bottom: The RF amplifier deck (the Ameritron AL-811 is driven from the HF Packer). The AL-811 feeds a Cushcraft MA5B beam at 30 feet.
- 5 July 2013 -Back to WA6NUT home page
(Search the entire site from the home page)