
This information is
supplied for educational purposes only!
Please Note: This
information is for educational purposes
only and is not an endorsement of the
information supplied. I assume no
liability or responsibility with respect
to the use of such information. So if you
try some of the articles on your own
equipment,
it's on your own risk.
Be aware of the type acceptance
laws and the FCC Rules and Regulations.
Performing modifications of some
equipment may be a violation of local
laws. If you have any doubts, do not
perform the modification.
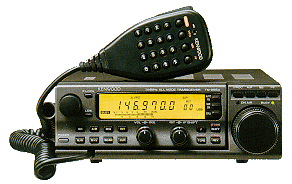
TM255
and TM455 discussion group
MODS FOR THE
KENWOOD TM-255E
My Kenwood
MODs:
Adjust
LOW power setting
The way to adjust low
power is to regulate VR401. This
trimmer can be found under the
speaker (regulates power between 2
and 30 watts).
Adjust HI power
setting
To regulate the power of
the HI position is to adjust VR601.
You can find this trimmer on the back
left side (remove top and locate the
alu cover).
Please be carefully when you dismount
and locate the trimmer.
Adjust
TX-Power/SWR ratio
At the same place you
can find VR603 and that is the SWR
protection control. Be carefull when
adjusting this trimmer, because it
protects your transceiver against bad
SWR, but can be usefull when power
drops to much on relative good SWR.
Adjust AGC
To adjust the AGC time
constant of the transceiver locate
VR402 that can be found on the left
side at the center when removing the
top.
Bulb voltage
Each lightbulb (Display lighting) has
a voltage of 6 volts which are
connected in pairs (in serie making
it 2 x 6v = 12v).
Improved audio
quality with the MC-44/45 that comes
with the TM255/455
Replace C1 (33nF) with a 100nF. This
capacitor can be found down left
corner.
View picture of this microphone mods
Note:
Please be carefully with
these adjustments! All modifications
you make is totaly at your own risk.
If you
have any other mods for this good
transceiver then please contact me.
ON6MU
You'll find
lots and lots more in our TM-255/455
discussion group
TM-255E
service menu
BEFORE
ANYTHING: write down the original
values, just in case!
To enter service menu :
Hold down NB and MHz keys + Power ON.
Turn the Frequency Tuning knob to
change menu number.
UP/DOWN keys to change value
>
>A0 Checksum diplay
>A1 RIT center
>A2 IF-Shift center
>A3 LSB carrier point
>A4 USB carrier point
>A5 S-meter adjust S1 (not FM)
>A6 S-meter adjust S9 (not FM)
>A7 S-meter adjust full (not FM)
>A8 S-meter FM start
>A9 S-meter FM full scale
>AA RF-meter adjust low
>AB RF-meter adjust middle
>AC RF-meter adjust high
>AD DTSS single tone frequency
>AE ALC start (microphone gain
control by ALC)
>AF ALC zone max (microphone gain
control by ALC)
>B0 ALC zone +6dB (microphone gain
control by ALC)
>B1 Microphone gain level FM
>B2 Microphone gain Level SSB
>B3 Write to Eprom by pressing UP
or DOWN key.
More mods and info, tips and tricks
at https://on6mu.groups.io/g/tm255-455
73"
Guy
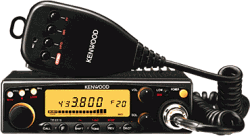
TM-441e
Kenwood
TM-441e 9600 baud modification
(improved version de ON6MU)
How to use the
Kenwood TH-D7e, TM-D700 or TS-2000 with
GP 1.63 (Graphic Packet)
You
can download a special DOS utility
that I programmed to select and
configure the TH-D7, TM-D700 or
TS-2000 for 9600 baud or 1200 baud in
use with GP. Easy to use and makes
all the needed configurations for
you.
Download GPKTNC11.ZIP .
Simply
install all the files in your
GP-directory and run GPKTNC.EXE and
follow the instructions on your
screen.
FreeWare!
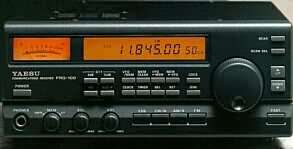
YAESU
FRG-100
RX expantion
The new RX Yaesu FRG100
is a very good receiver. The
specifications are: frequency 130 KHz
to 30 MHz, but 30 KHz to 30 MHz is
also possible if you:
Press
and hold the folowing keys while
turning on POWER.
<<
AM and SSB keys >>
FRG-100 AGC
much faster
To improve the original
AGC and make it even faster as it is:
Remove
the top cover
The C1225 1uF/50v capacitor is
located on the main board in the left
region about 5-6 cm from the S-meter
(near a two pole connector)
C 1225
(original 1 uF ) replace with 100 nF
It
works really very well!
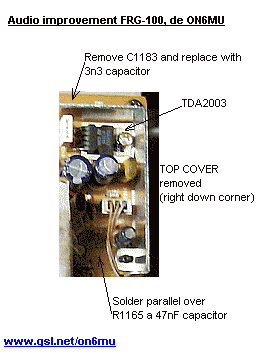
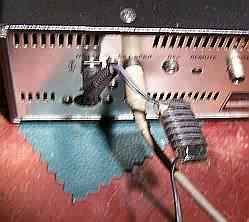
Improved
audio with following mods:
Replace
C1183 (near de TDA2003 10 watt
amplifier) with a 3n3 capacitor.
Solder parallel over R1165 a 47nF
capacitor
View picture -> FRG-100 audio
mod
This modification will improve the
higher end of the audio spectrum,
making the sound clearer (less
"muddy").
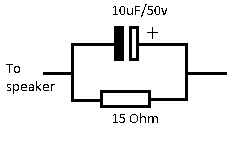
Added
06/2018: The resonance of the case
enhances the low-mids of the spectrum
with the stock speaker. The stock
speaker isn't suited for this type of
enclosure at all.
Improved sound clarity can be done by
using a proper external speaker (HI,
kinda obvious). But you can improve
the sound of the internal speaker by
adding a filter to enhance the mids
and highs. This is done by a 10uF/50v
capacitor parallel to a 15 Ohm
resistor. This is placed series
with the speaker inside the Frog.
This super simple modification clears
the audio of the inside speaker much.
The plus of the elco is soldered on
the red wire (picture), the other
side is of course connected to the
speaker (where the red wire was
initially connected).
You do loose a bit of the volume, but
the result is a much clearer sound
for use in a communications receiver.
This mod does not affect the output
speaker connection.
Bass responce
of FM audio of FM-unit-100 mod:
To
improve the bass responce of the
audio in FM mode you need to
place/solder a 100nF capacitor
parallel over C4007 (0.0047uF) and a
10nF capacitor parallel over C4008
(0.022uF) in FM-Unit-100.
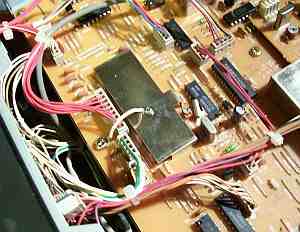
Fix / reduce
CPU noise and power supply
interference:
I've
got my radio for more then 10 years
now, and just recently I noticed a
kind of hiss (hum, electrical
interference kind of noise) with no
antenna connected. After connecting
the Frog to a battery to be sure it
wasn't the power supply, I was sure
it had to be inside the FRG and
probable a ground type of fault. And
surely it was! Grounding the CPU
shield (bottom board) to the chassis
reduced it by 60%. After loosening
all screws on the top print board and
the screws holding the bottom print
board, put some contact cleaner on
each hole and tighten all screws
again. Humming sound gone. I've got
the CPU interference better then
original by soldering a little wire
from the CPU shield to the chassis - picture and by using a
shoke on the power connecter - picture (using a
ferrite rod and about 7 turns of the
power cable around it)
Note:
Please be carefully with
these adjustments! All modifications
you make is totaly at your own
risk.
DRM Reception
with the FRG-100:
DRM
mods: 455 Khz MF to AF
converter used for DRM reception in a
Yaesu FRG-100 receiver
Review
http://www.eham.net/reviews/detail/476
DRM Mod: http://www.kb2ljj.com/data/yaesu/frg-100.htm or here
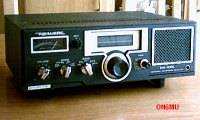
Realistic
DX-100L
An analog
AM/CW/SSB receiver
Produced in 1981
Coverage: 150...30000 KHz
Improve
audio, SSB tuning and much more mods:
modifications
and extra info can be found here...
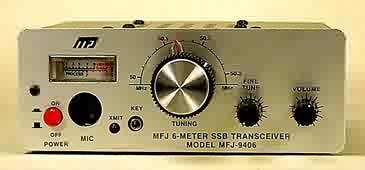
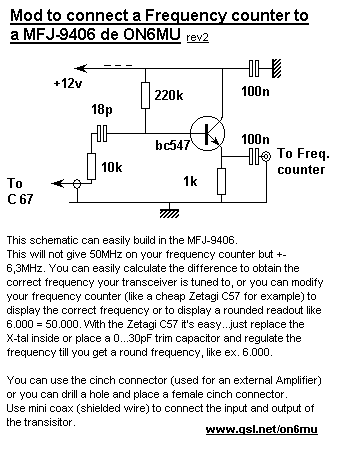
MFJ-9406x
An analog SSB/CW
transceiver
Coverage: 50.000...50.305 MHz
Power: 10 watt
Peak amps: 2A
MODS
Digital Frequency read-out: My mod to
connect a frequencycounter to an
MFJ-9406
CONDOR 16
Old VHF mobile
transceiver
1/10 watt
FM
My Condor16
info and mods page
Kenwood
TH-215/TH-415
To get the unfiltered LF
output from the TH-215/415 Kenwood
portable you need to get to pin 9 of
IC1 (TA7761P).
You could use the unused mic
connector pin that feeds the top pin
of a 3.5mm jack. You need to remove
the SMD 220 Ohm resistor too (mine
was 47 Ohms) which can be found
beneeth the mic connector.
MODS
TH-215/TH415 mods
for wide LF 9k6 output from
discriminator TA7761
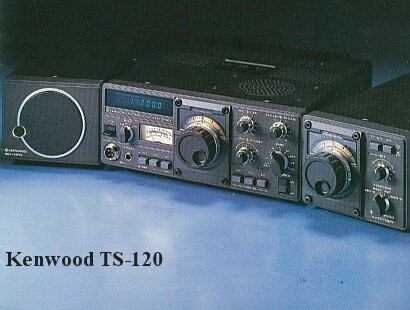
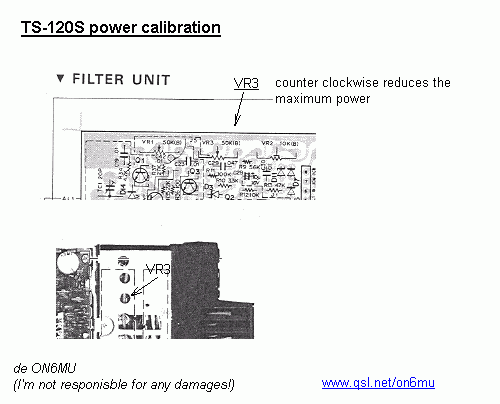
TS-120S
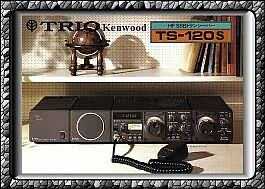
Power: 100 Watt
Bands: 80m, 40m, 20m, 15m, 10m
Modes: CW/USB/LSB
Features: Vox, RF ATT, NB, RIT,
RF-gain, optional CW filter, external
VFO etc...
|

