Some sophisticated applications required the control of Spectrum Lab by other
programs, and vice versa (Spectrum Lab controlling other programs). This
chapter describes the two possibilities: The tiny HTTP server integrated
in Spectrum Lab, and a system using windows messages.
The latter may be a bit simpler if both programs run on the same machine,
but HTTP and HTML / Javascript (especially with HTML5 and WebSockets)
have come a long way since the early days, thus in most of this document,
we will focus on communication via HTTP, and leave the old windows-specific
WM_COPYDATA method for the end of this file.
For remotely controlled operation of Spectrum Lab, you can use the integrated
HTTP server. This has the following advantages:
the remote control client is just an ordinary web browser
you can use Javascript (in a web browser) to control SL and/or analyse data;
which is more flexible than SL's built-in 'Conditional Actions'
a custom user interface can be created in the form of HTML documents
(the OpenWebRX-alike pages and javascripts presented later are just one example)
the integrated HTTP server can be used as an audio stream server (for a limited number of clients)
other applications can retrieve data from SL via network (HTTP, JSON); for example DL2ALF's famous AirScout
Downside: Sending HTTP requests, and receiving the response (from the client's
point of view) is not as fast as exchanging WM_COPYDATA messages locally
(as explained in the next chapter). Details about the HTTP server inside
SL can be found in the server_pages
directory after the installation. There are some examples (HTML with javascript)
in the server_pages directory too. If you read this document while SpecLab
runs on the same machine, with the server enabled, try this link to check
the remote control examples:
To configure the built-in HTTP server, select "Options"..."Configure and
supervise HTTP Server" in SL's main menu.
Config tab
Network name of this machine : ( shows the PC's name, as
seen in the LAN (local area network) )
Local IP Address (of this PC) : ( also just a display for
convenience, can be used as browser address )
HTTP Server Port (default=80) : (enter the IP port number under
which the server shall be accessed in the LAN)
Root directory for HTTP Server :
( this is the name of the folder on your harddisk, where the web server's
HTML pages, Javascript, and other files are stored.
The HTTP server also uses this directory to store temporary files,
like JPEGs with the current spectrogram, etc). You can alternatively
enter the full path of your modified OpenWebRX 'htdocs' pages
here. Finally, you can also drop an IP address blacklist / blocklist file
(ipblocklist.txt) into this folder
to keep out malicious visitors.
[ ] allow _iproc.html and
_ifunc.html (check this if you allow others to remotely control contrast,
brightness,
and
remotely call functions in Spectrum Lab's
interpreter via Javascript in your browser )
[ ] allow remote clients to control my radio
(unchecked by default)
Without this option, remote clients can only listen and see the spectrum,
but are not able to 'QSY' (via their web browser), switch modes, etc.
Max number of simultaneous connections, Update images only when older than
X seconds, Bandwidth limit...:
These parameters should speak for themselves. They can be used
to limit the bandwidth
when this HTTP server is used as a 'real' web server (which
can be accessed from the world wide web).
Buttons:
Buttons on the right side of the HTTP server control panel
To let others remotely look at the current spectrogram through their web
browsers, it's enough to enable the HTTP server (the first option
set, the other two not set). By default, after installing Spectrum Lab, this
option (and all other HTTP-server related options) are in their safest state,
which means they are 'off' (=not enabled).
To let others remotely adjust the spectrogram's display and brightness, the
option 'allow _iproc.html' + '_ifunc.html' must be set, too. Technically,
this option allows to call interpreter functions, and interpreter procedures
through two special html pages named '_iproc.html' = remote procedure call,
and '_ifunc.htm' = remote function calls. An example for remote control
via Javascript is in the sample server pages ('server_pages/controls.htm').
A few 'potentially dangerous' interpreter commands can not be called from
the HTTP server even if this option is set - see next paragraph.
The option allow remote control ("exec") should only be used in a
LAN, because "exec" can be used to launch OS commands ! Do not set this option
if the server is accessable through the internet. This (potentially
dangerous) option is always off by default, furthermore it is only usable
along with the two other options (because from Javascript, "exec" can only
be invoked through the '_iproc.html' page mentioned above. Interpreter commands
which, from he HTTP server, can only be called with this option
are: exec,
send,
fopen/fread/fwrite .
Again, details about SL's integrated HTTP server, and the 'things you can
do with a bit of Javascript' can be found in the
server_pages (the 'readme'
is intended for developers, please read it. The README about
the server pages is in the folder with SL's example server pages,
thus this link doesn't work in the "online copy" of SL's html-based
help system) .
Note: If -besides the HTTP server- you also use the
Audio-via-raw-TCP/IP-Server,
take care not to use the same IP port number for these functions. Both servers
use the IP address of the machine on which they run, so you must use a different
port number for the HTTP server and the audio server. BTW, the default port
number for an HTTP server is 80.
On some occasions, the TCP port number (e.g. 80 for the HTTP server) was already
occupied by some other applications or services.
For example, under Windows 10, port 80 was always occupied by 'the system'
("windows itself"), causing the 'bind' command in SL's server to fail (with an entry
in the HTTP server's own error log). If all goes well and SL can accept connections
on the port configured for the HTTP server, you will see something like this
in the HTTP server's "Event Log" (one of the tabsheets in the tiny control window):
20:42:34.909 HTTP Server Started: YHF6 [192.168.56.1] on port 80
Otherwise, if the port cannot be bound to Spectrum Lab, you would see error messages
like the following:
bind() error : Address already in use
or (often seen under Windows 10 which hijacked port 80 as shown further below) :
bind() error : Permission denied
To find out if and which process occupies a certain
port, use the 'netstat' command as shown in the example below. For bizarre reasons,
you need to open a command window (run 'cmd.exe' as administrator to execute
'netstat -abnop TCP' on Windows 10). Ask your favourite search engine about
how to do that on your windows version (7,8,10). If all works as planned,
the netstat command should show something like the this:
netstat -abnop TCP

Aktive Verbindungen

  Proto  Lokale Adresse         Remoteadresse          Status           PID
  TCP    0.0.0.0:80             0.0.0.0:0          ABHÖREN (listening) 4416
 [SpecLab.exe]           (<- ah, that's us, ok.)
...
The same command launched under Windows 10 (using 'power shell' with admin privileges),
after the 'Permission denied' error shown in SL's HTTP event log:
netstat -abnop TCP

Aktive Verbindungen

  Proto  Lokale Adresse         Remoteadresse          Status           PID
  TCP    0.0.0.0:80             0.0.0.0:0          ABHÖREN (listening) 4
 Es konnten keine Besitzerinformationen abgerufen werden.
 ( "Can not obtain ownership information" - maybe because it's a system service )
...
With the above output from netstat, the culprit that held port 80 occupied
was a strange 'World Wide Web Publishing Service' / 'WWW Publishingdienst',
which could be disabled via windows 'Services' / 'Dienste' (run services.msc to stop
and deactivate that service, unless you really want the operating system
to run its own HTTP server in the background to 'publish' your files).
Even though SL's tiny web server wasn't designed for dozens of clients
simultaneously accessing it through the internet, here are the
basic steps for achieving that using 'normal equipment' like a domestic
ADSL connection, using a Fritzbox DSL router.
Step 1 : Setup up a TCP port forwarding in your DSL router.
In a Fritzbox with german user interface, this used to be
under Internet ... Freigaben ... Portfreigaben.
Create a new entry with the TCP port number seen 'on the internet' (e.g. port 81),
the TCP port number used in your local network (e.g. port 80, must be the same
as configured in SL's 'HTTP Server Port', 80 is just the default). Also let your
'Fritzbox' (or whatever) know the name of the computer that runs Spectrum Lab.
In the Fritzbox, they use the computer's hostname, not the numeric IP, for this
purpose. You can see the computer's name (for the network) in SL's HTTP Server
configuration dialog, labelled 'Network name of this machine'.
Step 2 : Enable the local TCP server port in your computer's Firewall.
In the windows (8) system control, select Windows Firewall
... Advanced Settings / Erweiterte Einstellungen.
This opened another window with a rather confusing 'overview',
titled 'Windows-Firewall mit erweiterter Sicherheit - Lokaler Computer'
in my case. There's a line under this title saying :
"Eingehende Verbindungen, für die es keine Regel gibt, werden blockiert" /
"Inbound connections that do not match a rule are blocked". You don't want to change this !
Instead, add a rule especially for SL's HTTP server ('listening port').
In this example, the local port (not necessarily the same as
"the port seen in the internet") is 80, but your mileage may vary.
- Right-click Inbound Rules (Eingehende Regeln),
- in the popup menu, New Rule (Neue Regel),
- in the "rule creation wizard", check Port (not 'Program'),
- click Continue,
- Does this rule apply to TCP or UDP ? Set checkmark for TCP
- Specific local ports : 80 (or whatever you use for SL)
- click Continue,
- check Allow the connection (even those without IPsec)
- click Continue,
- When does this rule apply ? Check: Domain, Private, Public /
- Enter a name for this rule, e.g. "HTTP"; Finish
If you're pedantic, you can limit the application of this rule
to only the intended program (under windows 8.1, firefall rules could
be edited by double-clicking into the tabular display under 'Inbound Rules').
Note: Step 2 may even be necessary if you want to access the HTTP server
from another PC in your local network (LAN, WiFi).
Step 3 : Check if you can access the web server with a 2nd PC in your local network.
You can either enter the numeric IP (if you know the right one,
since a PC may have multiple local IP address, or (better)
the hostname of the PC that runs the web server. Some stubborn
browsers assume you want to 'google' (search) for something if you
enter a short string in the wanna-be-clever address bar.
In such cases, convince the browser that you don't want to search,
for something, but to establish a connection using HTTP.
Sometimes it helps to append a forward slash after the hostname,
to prevent the browser from searching the WWW for the name.
For example, the 'SpecLab HTTP Server' control panel may show:
Network name of this machine : YHF6 and
Local IP addresses: 192.168.56.1 192.168.178.26
(the latter turned out the WiFi adapter - ask 'ipconfig /all'
if you really need to know).
In this example, enter either
YHF6/ or
http://yhf6/ (the casing doesn't matter in the URL) or even
http://yhf6:80/ (you only need to specify the port if not equal to 80).
If the hostname doesn't work try of the numeric IPs shown on
SL's server control panel, or try the "IPv4 address" listed
by command 'ipconfig /all' for the adapter (Ethernet or Wireless)
you intend to use.
If all works well, you will see the main page of SL's old server pages,
or (alternatively, as described in the next chapter)
the OpenWebRX page.
Step 4 : Let a friend try to access your server
from his internet service provider.
If your DSL modem/router doesn't have a static public IPv4 address (in the
internet), ask a site like WhatIsMyIP,
or use a 'dynamic DNS' providing service (a few of them are really free,
not just for 30 days) so your server can be reached through a fixed URL.
Hinweis für deutsche Fritzbox-Anwender /
Hint for german users of a 'Fritzbox' :
Die Option 'Internetzugriff auf die Fritzbox über HTTPS aktivieren'
unter 'Internet / Freigaben/ FRITZ!Box-Dienste'
ist für den Betrieb eines DynDNS-Dienstes (wie z.B. 'dynv6')
nicht erforderlich.
Then ask a friend to enter that address, followed by the port number
from step 1 (if you decided not to use port 80 in the WWW).
On the 'Event Log' tab, Spectrum Lab's HTTP server panel should
now show something like this (where HHH.HHH.HHH.HHH is your friend's
public IP address):
23:20:07.110 Connection #2 accepted on socket 420 from: HHH.HHH.HHH.HHH
23:20:07.438 C:\OpenWebRX\htdocs\index.wrx
23:20:07.438 Closing socket 420, ti=0.3 s, rcvd=355, sent=13933 byte.
23:20:07.579 Connection #2 accepted on socket 984 from: HHH.HHH.HHH.HHH
23:20:07.579 C:\OpenWebRX\htdocs\sdr.js
23:20:07.594 Connection #3 accepted on socket 756 from: HHH.HHH.HHH.HHH
23:20:07.594 C:\OpenWebRX\htdocs\mathbox-bundle.min.js
          .. etc, etc, until all requested resouces have been loaded,
             and OpenWebRX starts sending spectra and audio through a WebSocket (WS):
23:20:11.485 Opened WS /ws/61F0F85EF03AE14A072B85FB3934CCC1 . Sending response header: 147 bytes on socket 960.
23:20:11.485 Initial WS frame to socket 960 : CLIENT DE SERVER openwebrx.py
23:20:11.657 WS frame to socket 960 : MSG center_freq=7020042 bandwidth=40084 fft_size=475 ... setup
          .. etc, etc, until the remote client decides to leave:
23:21:48.237 Closed by remote client despite KEEP_ALIVE : no error
23:21:48.237 Closing socket 960, ti=76.9 s, rcvd=693, sent=558548 byte.
A similar procedure as described above may also be necessary for non-HTTP
audio streams 'served' to the web by Spectrum Lab,
as described here (in an extra file).
The following is an extract from
server_pages/README_server_pages.html
(this link only works when reading the help system on your
local harddisk, after installing SL with the original 'HTTP server
pages'. It's not available online).
Spectrum Lab's tiny HTTP server was drilled up to play with HA7ILM's OpenWebRX.
The original OpenWbRX server only works under Linux and uses a bunch of "modern" C++
features (with many Linux/Posix dependencies) and relied lot on Python 2.7.
The HTTP server in Spectrum Lab doesn't - it's "stoneage technologie" using only the standard
Berkeley socket API, if that means anything to you - but that's why SL's server doesn't support HTTPS.
Small screenshot of OpenWebRX, 'hosted' by Spectrum Lab's HTTP server,
showing an IC-7300's "Spectrum Scope" remotely in a web browser.
It also delivers the receiver's audio output to multiple remote clients.
Spectrum Lab's entire HTTP server (including the new OpenWebRX server module) is
exclusively written in C / C++ (no Python at all).
All that was 'recycled' (and later heavily modified) for the OpenWebRX-alike
server are the contents of the original OpenWebRX 'htdocs' folder (more on that
further below), which you can use instead of the stoneage pre-HTML5
"server pages" in Spectrum Lab.
Also don't miss Andras' BSc thesis about OpenWebRX,
which (in 2019) could be downloaded from sdr.hu/openwebrx .
Since 2020-06, a modified variant of the OpenWebRX 'htdocs' folder
is available on the DL4YHF website,
www.qsl.net/dl4yhf/spectra1.html.
The archive contains all you need for the OpenWebRX-alike server,
including html pages, web receiver template for the main page (index.wrx),
stylesheets (*.css), Javascript modules (*.js), and the 'gfx' subdirectory
with a few images (*.png) and -maybe- an open source font that was
also used in the original OpenWebRX.
Unzip all files and subdirectories from that archive into a directory
of your choice (where you, and Spectrum Lab, can access them).
In Spectrum Lab's HTTP server settings, enter the file path
to your new 'htdocs' under 'Root directory for HTTP Server'
(overwriting the original path to SL's stoneage original 'Server Pages').
If OpenWebRX doesn't work, you can easily switch back
by re-entering the original directory path.
If you dare to bite the bullet and use Spectrum Lab as an
OpenWebRX-like server (with HTTP, not HTTPS), read the next
chapters (OpenWebRX operating principle
and customizing).
If you cannot get the modified OpenWebRX client files running, get help on
the Spectrum Lab Users Group.
Again, to keep the default installer for Spectrum Lab as small as possible,
the modified OpenWebRX 'htdocs' folder (with HTML documents and Javascript)
is not included in the installer, but can be downloaded as a zip file
from the author's website
(don't trust any other download site, neither "softpedia", nor "freedownloadmanager",
nor anyone else because you never know what those sites did to the files).
If a remote client asks Spectrum Lab's integrated web server
for the root document, and there's only a file named 'index.wrx'
but no 'index.html' as in Spectrum Lab's own (ancient) 'server pages'
directory (configurable - it may be anywhere on your local harddisk),
it will read the template file (file with extension wrx)
and replace some of the special tags as specified in Andras' BSc thesis
(anything beginning with "%[" and ending with "]" after the token), e.g.
%[RX_TITLE]
%[WS_URL]
%[CLIENT_ID]
Note (1)
Spectrum Lab recognizes only a small subset of what OpenWebRX may use
in the special tags of 'index.wrx'. At the time of this writing (01/2019),
implementing support for %[RX_PHOTO_HEIGHT], %[RX_PHOTO_TITLE], %[RX_PHOTO_DESC]
was considered not worth the effort, since Borland's C++Builder V6
(the environment used to develop Spectrum Lab) didn't even support
JPEG files, etc etc. If you want to customize these, edit the file
index.wrx after unpacking it from openwebrx-master.zip .
Other tokens like %[RX_ANT], %[RX_QRA], etc are replaced by dummy strings.
Note (2)
A similar problem as mentioned on the KiwiSDR website (in 2020) also applies to the OpenWebRX pages when hosted by Spectrum Lab: There's no audio, caused by some "modern" browsers that prevent audio from being played without some kind of user intervention:
> you may not hear audio due to recent browser changes
> preventing the autoplay of audio and video.
> This is especially true with Firefox.
In new browser versions, you only need to confirm you want the audio
by clicking the VCR-like "play" button (triangle pointing right).
At least Firefox seems to remember this setting, and will not bug you
by not playing audio in future on a certain URL.
As explained in the previous chapter, the entire 'Web SDR' hosted by
Spectrum Lab are just a couple of files that you can tailor
for your own application. Thus, the entire user interface running in
any modern browser is highly customizeable. You can modify the HTML
template file (index.wrx), you can modify the appearance by editing
the CSS files, and you can add a lot of 'functionality' in Javascript.
Some of the 'appearance' of the user interface is controlled the same way
that OpenWebRX ("the original by HA7ILM") embedded customizeable parts
of the main page in the HTML template file, index.wrc.
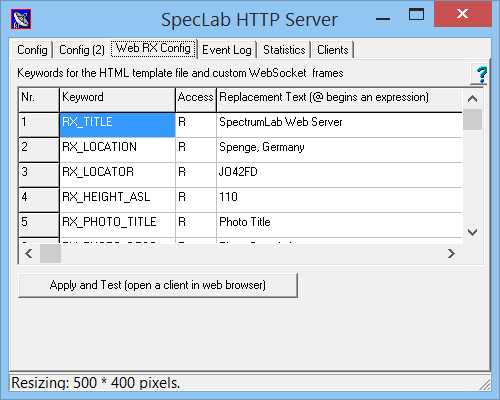
Strings beginning with %[, followed by a keyword preferred in upper case,
and ending with a ] will be replaced by a string (text),
or even an evaluated expression from SL's built-in interpreter.
Some of those keywords are hard-coded in the program. You can
add your own keywords along with the the text (strings) that
shall replace the %[<keyword>] on the Web RX Config
tab, e.g.:
Spectrum Lab's HTTP server control panel with the 'Web RX Config' tab.
After adding new items, or modifying items in the string grid shown
in the screenshot (under 'Keywords for the HTML template file'),
click on 'Apply and Test (open a client in a web browser)'.
This first only 'applies' the new strings (keywords and replacement texts)
from the visual table, and stores them in the web server configuration
file (sl_webrx_config.txt, located in the configurable
'Root directory for the server'),
and finally tries to launch the default web browser on your PC,
with the URL of the 'local host' passed via command line
(e.g. http://127.0.0.1:80).
This works with most, but unfortunately not all browsers.
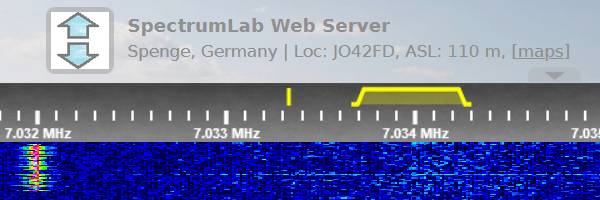
The result (after customizing some of those fields) may look like this:
OpenWebRX-alike display in a web browser, after customizing via 'Web RX Config' tab.
When extending the html- and javascript modules from OpenWebRX for use
in Spectrum Lab, and testing it as 'web SDR' with multiple listeners
connected to a 'single-channel radio' (in my case an IC-7300),
the HTTP server's "Event Log" had to be drilled up to see what happened
from the server's point of view.
Basically, the log can show the following events,
ordered by the time of occurrence:
System messages like 'HTTP Server Started: <hostname> on port 80'
TCP-related messages like 'Connection #0 accepted on socket 932 from: 88.71.239.133'
Names of files the remote client asked for,
combined into a full path like 'C:\OpenWebRX\htdocs\favicon.ico
Statistics with the number of bytes sent and received (when closing a connection)
Network protocol info like 'Socket 976 closed by remote client despite KEEP_ALIVE : no error'
OpenWebRX-specific info like 'OWRX: All clients are gone, pausing web audio.'
The check boxes above the editor (near 'Show:') can be used to suppress the display
of certain messages:
Time
Show a timestamp (time of day with one-millisecond resolution) for each message
Conn's (connections)
Show when a new TCP connectection was accepted by the server, or rejected,
or closed from any side
Requests
Show which 'file' (or similar resource) the client has asked for
Msgs (Messages)
This mostly applies to the OpenWebRX server's WebSocket, excluding
audio- and waterfall frames (which would quickly flood the log)
Verbose
Shows additional details, for example the entire initial HTTP request (header).
For example, turn the 'Verbose' display to see what a malicious visitor
had tried to do, before being blacklisted.
Note: SL's built-in HTTP server will not write its 'Event Log'
into an endlessly growing disk file. For logging and in-depth analysis
of the network traffic, use tools like Wireshark (highly recommended)
or the 'Network analysis' built inside your favourite browser (where
you can also debug the Javascript running in the OpenWebRX client).
If your server is connected to the internet (not just your
local network), you may occasionally see traffic from port scanners
or potential attackers knocking on your door.
Don't panic, those attackers rely on
features that are simply not implemented in Spectrum Lab,
like PHP or other, sometimes vulnerable, server-side programming
languages, shell commands executed from the initial GET-request
(who on earth would allow this ?).
With the 'verbose'-checkmark on the 'Event Log' panel, you can see
the entire HTTP request (often a GET-request, but some bastards even try
to POST CGI scripts, which of course doesn't work here as well
since we neither support CGI nor PHP nor any other server-side scripting),
as in this example of an attempted attack from a botnet ("XTC"):
SL's integrated web server will automatically blacklist
IP addresses if their requests smell 'fishy', in addition
to the blocklist file mentioned further below:
Try to POST something when there is no reason for it;
Specifically request a PHP file (instead of letting the server
decide what to send as 'root document');
Use other suspicious HTTP request headers (for example,
a request or query string with Linux/Unix commands like "chmod"
is just ridiculous, and will automatically cause being blacklisted);
... (there may be more here in future)
In addition, you can 'manually' blacklist individual IP addresses
or entire domains (by the most significant parts of their IP addresses).
Possibly the easiest way for you is to copy an up-to-date
"blacklist" (aka "IP Blocklist") into Spectrum Lab's
configurable 'server_pages' folder. More on that in the description
of the 'server pages'
themselves (this link only works when viewed off-line, on your local harddisk,
after installing Spectrum Lab).
For example, with the attacker's IP 108.53.13.37 entered in a
search engine in June 2020, that address was found in several
'blacklists' / 'blocklists', for example (and by pure coincidence) at https://raw.githubusercontent.com/ktsaou/blocklist-ipsets/master/iblocklist_ciarmy_malicious.netset,
which seemed to contain the same as this (with a few comment lines added): http://cinsscore.com/list/ci-badguys.txt .
Similar block-lists are available from many sources (if you think
you need them), in a similar simple format as specified below.
Each line in the list that Spectrum Lab is supposed to load
must only contain the to-be-blocked numeric IP address - nothing else,
with a few exceptions (like the '#' or ';' character to mark
the begin of a comment line).
Save the file as ipblocklist.txt or ci-badguys.txt (not as *.ipset !)
in Spectrum Lab's configurable Root directory
for HTTP Server Pages. Even though located in the
'Server Pages' folder, that file (ipblocklist.txt) is not
accessable via GET / POST from the outside world.
Blocked IP addresses will not even get a "404 File Not Found"-response
from SL's HTTP server. In fact, they will receive precisely ZERO BYTES,
and no 'response header' at all, to keep the bandwidth consumed
for those bastards as low as possible. All you will see from their
activty in the Event Log will be something like
20:17:05.796 Loaded 14635 entries from C:\OpenWebRX\htdocs\ipblocklist.txt
20:17:05.827 HTTP Server Started: YHF6 on port 80
20:17:59.409 Connection denied from IP 108.53.13.37 (in IP-blocklist)
Furthermore, on the server's 'Statistics' tab, they may appear
blacklisted as follows:
Blacklist:IP     Status       Reason for blacklisting
83.250.212.227  blacklisted   tried PHP
136.144.201.64  blacklisted   tried to POST
108.53.13.37    blacklisted   in the IP-blocklist
("tried to POST" here means "tried to POST out of the blue, when there was
no good reason to do so". In certain situations, e.g. after filling
out a 'form' in an HTML document previously loaded via GET
from the same IP a POST request is perfectly ok, and no indication of 'hacking').
The 'Statistics' tab gives a quick overview about the server usage,
the number of connections (TCP sockets) currently in use, etc,
and a list of malicious (and now blacklisted) visitors.
Screenshot of Spectrum Lab's HTTP Server control panel, 'Statistics' tab
The above screenshot was made when the support for OpenWebRX was still
in the development phase. As on most other tabs, the info area
uses a simple text editor, from which you can copy & paste the info
as plain text. For example, if you want to know details about one
of the 'automatic blacklisted' visitors, you can copy his IP address
from here into the windows clipboard. Also copy the entire Event Log
(in 'Verbose' display mode) into your favourite text editor (or RichText editor
if you want to keep the colour highlighting). Then search the
entire log for the bad guy's IP address. If you are familiar with HTTP,
the request header shows what the attacker was trying to achieve.
If the info text under Reason for blacklisting shows in the IP-blocklist,
the "visitor" is one of the already known bad guys, contained in the
imported blacklist (aka blocklist).
If the info text shows tried PHP, tried to POST, or similar,
then SL has blacklisted him automatically. You could copy his IP into
the blocklist (manually) for any 'future visit' but this isn't worth
the effort, because those IP addresses are frequently changed.
Even though SL's web server was never intended to serve the 'world wide web',
there's some rudimentary bookkeeping in it that may help you to supervise it.
For each new visitor, the server adds an entry with the visitor's IP address,
and (maybe, in future) the user name.
To check the entries in the server's client list, select "Options"..."Configure and
supervise HTTP Server" in SL's main menu, then (in the 'SpecLab HTTP Server' window)
switch to the 'Clients' tab.
The display is simple: Only one line per client, with the following data
presented in text columns (possibly truncated if the strings get too long):
Remote client's public IP address
Client's user name (perferrable ham radio callsign)
Date and time of first visit ..
Date and time of last visit
The 'Msg' field can be used to send a single line of text into a client's
'log' (in the orginal OpenWebRX client GUI, that log could be opened and
closed by the operator, and only showed messages generated from the
Javascript in htdocs/openwebrx.js . In the variant modified by DL4YHF,
the server can also 'push' messages into this log via Web Socket).
After entering your message text, click 'Send msg to all clients'
(sends to everyone that is currently connected to your server)
or 'Send to selected client' (sends only to the client currently
selected, i.e. with the blinking text cursor in the message list).
Some -not all- of SL's interpreter functions
can also be invoked from Javascript running in a web browser
(even remotely, i.e. in a web browser which runs on a different machine, tablet PC, smartphone, etc).
Details are in the "readme"-file in Spectrum Lab's HTTP server pages directory,
which you will find on your harddisk after installing it.
As shown in chapter 2.1, this kind of 'remote procedure call'
or 'remote function call' can be disabled by unchecking
[ ] allow _iproc.html and _ifunc.html on the
'HTTP Server Configuration' tab.
If you read this document on a PC that runs the HTTP server with the original 'server pages',
the following link opens
For this task, a simple communication protocol which uses WM_COPYDATA messages
was implemented (long ago). The WM_COPYDATA method still works,
but it has been superseded by the HTTP server which is highly
recommended for any new project. WM_COPYDATA is windows-specific,
and it only works between applications running on the same machine.
HTTP can work between any two machines (even worldwide), and is not
restricted to a certain operation system.
Detailed information about the WM_COPYDATA protocol (for fellow programmers)
can still be found on the author's website, search for the file yhf_comm_info.htm,
titled
(If the link fails due to server problems, copy the title into
your favourite search engine - you may find the file on my "backup" site
too)
I didn't include it in the Spectrum Lab documentation because it is used
in other projects too (and there shall not be outdated copies of that document
all over the place.. ;-) . So follow the above link for the latest up-to-date
description of DL4YHF's "YHF_COMM" protocol if you are considering to...
write your own application which shall receive "something" from Spectrum
Lab
write your own application which shall "control" Spectrum Lab (because there
is something you cannot achieve with SL alone).
No idea what such an application could be ? You can send any interpreter
command which is mentioned in the SL manual in a WM_COPYDATA message, so
you could..
send a command to SL to produce a screenshot instantly, because only your
program knows that "something interesting" has just happened,
send a command to SL to start logging, stop logging, start/stop the spectrum
analyzer, etc etc,
ask SL for the current amplitude in a given frequency range, tell you the
current noise level, and calculate a lot of other values.
The other way around, you can also
send commands from SL to other programs (if they are designed for it), using
the interpreter's "send"-command.
exchange audio streams via WM_COPYDATA messages (not recommended, though...
better use internet protocols)
All this is possible ... but, due to the unavoidable time lag in the windows
message processing system, this message system is not suitable for "tough"
real-time operation. Expect a delay of some milliseconds until the command
you sent to SL has been executed, and your program receives the result message.
All you have to know -in addition to the general message protocol- are the
MODULE-ID's and COMMAND-ID's which are used to invoke the interpreter commands
and -functions through WM_COPYDATA messages. The next chapter gives an overview
of these values.
To send a windows message to Spectrum Lab, you must know its windows handle.
This can be found with a WinAPI function called "FindWindow". For convenience,
don't search for the window's title (which may change depending on the version),
use the window's class name (lpClassName, which is the first parameter for
"FindWindow"). The class name of Spectrum Lab's main window is
TSpectrumLab. But this is not the only possibility:
To support communication between two instances of SpecLab running on the
same PC, the program now uses the following additional names (for programmers:
SL creates an extra invisible window for this purpose, which has a unique
class name) :
The first instance running on a PC receives WM_COPYDATA messages directed
to "SpecLab1"
The second instance running on a PC receives WM_COPYDATA messages directed
to "SpecLab2"
The third instance running on a PC receives WM_COPYDATA messages directed
to "SpecLab3"
The old class name "TSpectrumLab" (for the main window) remains for backward
compatibility.
Hint:
For testing purposes, open the "Command Window" in Spectrum Lab, and let
it show all received and sent traffic in the message list (in the command
window: "Options".."show Inter-Application Comm's").
The third and fourth character in the message's dwData parameter contain
the "command". They are specific to the "module ID". Here are the most important
"command IDs" for the Command Line Interpreter built inside DL4YHF's Spectrum
Lab:
Calculate Function (with result returned in response message)
EC
Execute Command (no result, will not send a response message)
Example: To stop the spectrum analyser, send the following message..
 COPYDATASTRUCT cds;
 // Set module ID "CL"  + command ID "EC" :
 cds.dwData = ('C')+((DWORD)'L'>>8)+((DWORD)'E'>>16)+((DWORD)'C'>>24);
 cds.lpData = "spectrum.pause=1";        // command sent to SpecLab's interpreter
 cds.cbData = strlen((char*)cds.lpData); // count of bytes in data block
 SendMessage(hDestWindow,WM_COPYDATA,(WPARAM)MyWindowHandle,(LPARAM)&cds);
How to send audio streams per WM_COPYDATA is explained in the next chapter.
Notes (on the use of WM_COPYDATA):
WM_COPYDATA is very deprecated now. Things have changed a lot since 2004.
Consider using one of the network-based communication methods, e.g.
the HTTP server.
WM_COPYDATA doesn't work if sender and recipient run with different privileges.
For example, if the recipient (SL) was started 'as admin' but the sender
(e.g. DL4YHF's ancient "Message Tester") was started normally, messages
don't get through. See notes on the 'send()' command.
Note: If possible, do not use this feature, because it is not available under
non-windows operating systems; and both sender and receiver must be running
on the same PC. Better use one of the UDP or TCP/IP-based methods
(like web streams or even HTTP) :
They allow sending audio over a local network, and even work between PCs running different operating
systems (like Windows and Linux).
The first use for this principle was the
"winamp-to-SpecLab" plugin; the
WM_COPYDATA method was chosen for simplicity.
As explained in the previous chapter, the four bytes (here: four characters)
in the dwData parameter of the WM_COPYDATA message must contain the "module
identifier" (here: "AU" for audio data), followed by the "command identifier"
(here: "SD" = stream data).
Below is the sourcecode of a C function which sends a block of audio samples
through a WM_COPYDATA message (actually taken from audiomsg.c). The
T_AudioMsgBuffer structure contains the audio block, and some information
about the audio stream (like the number of channels, the sampling rate, etc).
It is defined in the file audiomsg.h which is available in the archive
"SoundUtlSources.zip".
The same data structures are used when sending audio streams via UDP or TCP/IP.
An introduction to the sound utilities is here.
Details, header files, and "C" sourcecodes of a simple test application which
uses WM_COPYDATA to send a test signal to Spectrum Lab are included in the zipped archive.
Benötigen Sie eine deutsche Übersetzung ? Vielleicht hilft dieser Übersetzer - auch wenn das Resultat z.T. recht "drollig" ausfällt !
Avez-vous besoin d'une traduction en français ? Peut-être que ce traducteur vous aidera !