Contents
- Periodic Actions
- Scheduled Actions
- Conditional Actions
- Screen Capture Options
- Info Text Definitions for the Screen Capture
- Interpreter commands to control periodic actions, screen capture, etc
- Screen capture via interpreter command
- Starting / Stopping 'periodic actions' via interpreter command
- Screen capture extension macros
- Command-driven FTP upload (via batchfile)
See also: Spectrum Lab's main index, 'A to Z',
command interpreter, controlling SL via HTTP server .
back to top
Periodic Actions
For long-term (or late-night) observations, the program can save the contents
of the waterfall screen periodically
(idea from Petr, OK1FIG). Use the item "Periodic Actions" in the main menu
under "file". This will open the following dialog:
The "Periodic actions" tab defines the start time, end time, the interval
when an action shall take place, for example saving the waterfall as a bitmap
file. Don't forget to activate the 'Periodic Actions' here.
To be compatible with old program versions, enter the command "capture" as
the action macro. Other interpreter
commands may be also be entered in this line, separated with the ":"
character.
In the shown example, every 30 minutes between 21:00 and 05:00 a picture
will be saved in the specified directory (Note: Spectrum Lab will
never support the AM/PM format, only the 24 hour format). After that,
the export function is started (it writes some 'interesting' data into a
text file).
The "Test" button here executes the action macros for testing purposes, the
result (error code, etc) is printed in the grey field next to the button.
back to top
Scheduled Actions
Similar to the periodic actions (which take place at constant intervals),
it's possible to define some "scheduled actions" which take place at arbitrary
times (in a 24-hour period).
Use the item "Scheduled Actions" in the main menu under "file". This will
open the following dialog:
The "Scheduled Actions" tab defines a 24-hour-schedule (times in UTC). Every
line in this table can define a number or programmable interpreter commands,
separated with a ":"-character.
For example, enter the command "capture" (with or without arguments) in the
'Action' column. This will do a screen capture at the specified time.
An overview of spectrum lab's interpreter commands is here.
Allmost all of those commands can be used in the 'Action' colum of the table shown above.
To rearrange the lines in the schedule table, you can move a single line
up or down with the mouse. Keep the left button pressed while the arrow is
in the first column (index column, grey, labelled "Nr").
Up to 12 entries can be entered into the schedule, so a maximum
of 12 different actions PER DAY is possible. Don't forget to activate
the schedule with the checkmark on the left side ("active"). You can
use a combination of 'periodic' and 'scheduled' actions, but this doesn't
make sense for most purposes.
back to top
Conditional Actions
Besides the periodic and scheduled actions,
you can also use the conditional actions (CA) which will be explained in this chapter.
The basic principle is:
-
You define certain "events" (conditions) in a table, and tell the program what to do if
such an event occurs (actions).
(this is quite similar to the "IF"..."THEN"-statement which you may know
from some programming language).
-
The table with these IF's and THEN's is periodically evaluated, for example every 200 milliseconds (adjustable),
and / or whenever a new spectrum (FFT) has been calculated
by SL's main spectrum analyser. So the Conditional Action 'script' can analyse each new spectrum if necessary.
-
The IF-column (event,condition) in the table of conditional actions can be any numeric expression,
or the call of an interpreter function which returns a numeric or boolean
value. Any non-zero value is treated like the boolean value TRUE.
Expressions may contain numbers,
variables, operators, parentheses, function calls, and similar.
They are evaluated by Spectrum Lab's built-in interpreter.
Example: peak_a(1745,1755) > (noise(300,2700) + 10)
(the result of this expression is TRUE when the peak amplitude between 1745 and 1755 Hz is at least 10 dB above the noise measured between 300 and 2700 Hz)
-
The THEN-column (action) in the table can be one or more interpreter commands, separated
by colons.
Example: timer0.start(5) : capture : REM capture the screen as a file when the 1750 Hz tone is detected
The definition table for Conditional Actions may look like this:
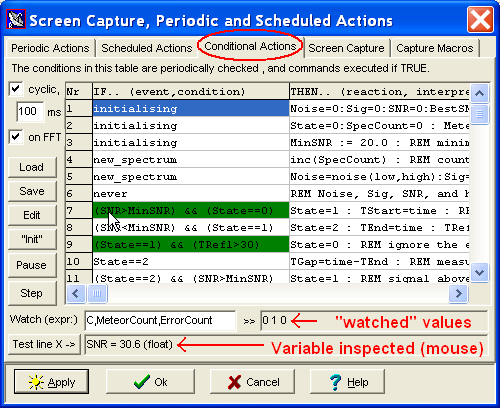
All conditions which are momentarily TRUE will be marked
with a green background in the corresponding cells (in the "IF"-column).
If an error occurrs when evaluating a condition or action, the cell will have a red background,
and the status line (below the table) will show details about the error.
A yellow background in the first column (with the line numbers) means
'a breakpoint in this line has fired, and paused the execution'
or 'this line is the next, waiting for execution in single-step mode'.
More about the debugging tools for the Conditional Actions will follow in a later chapter

The entire CA table is evaluated / executed in a single over (unless debugging in 'single step' mode).
This happens periodically and/or whenever a new spectrum (FFT) for the main waterfall display has been calculated
(depending on the checkmarks 'periodic' and 'on FFT' in the upper left corner of the CA tab).
None of the interpreter commands used as 'action' here may be blocking,
because the entire CA table is evaluated in a single call,
and Spectrum Lab cannot continue until the entire CA evaluation is through (it uses a loop which runs
'through all lines' of the table).
Thus the CA table is used to implement state machines.
It is not a replacement for a full-grown scripting language !
For applications with more complexity, consider using Javascript
running in a web browser (which even works on a separate machine),
and SL's built-in HTTP server from where you can invoke the same interpreter commands
as from the CA table.
The following special interpreter
functions have been implemented especially for the IF-column ("events") in the CA table:
-
initialising
this flag is TRUE (one) once when initialising the program, or after loading
a new configuration (*.usr). Typically used to set variables to their initial values.
Americans may also use 'initializing' instead of 'initialising'.
-
terminating
Complementary to 'initialising', the "terminating"-flag is set once shortly
before SL terminates. It was used on an automated website, where closing
SpecLab started a batch file which signalled "live spectrogram offline" or
similar.
-
new_spectrum
This flag will be set (for the conditional actions) immediately after calculating
a new FFT, i.e. when appending a new line of pixels to the waterfall display
and/or updating the spectrum display (curve with the most recent spectrum).
The purpose of this event is to evaluate the most recent spectrum, for example
looking for peaks to detect meteor reflections, etc (see peak detection functions).
The results calculated this way (once after a new FFT) should be stored
in variables which will be used in the next lines of the CA table.
For example, calculate the noise level once instead of calling
the "noise"-function repeatedly (if the same noise value is used more than once
in the table of Conditional Actions).
This saves CPU power, because reading a variable is faster than calling a math-intense function.
-
new_strip
Similar like 'new_spectrum', but this flag (event) for the conditional
actions signals the begin of a new "strip" in the multi-strip spectrogram.
As usual, follow the link for details and examples. See also:
water.line_number (returns the number of waterfall lines yet to be painted into the current strip of the waterfall).
-
always
is simply ALWAYS true.
-
never
is the counterpart to the 'always'-event - it is just 'never' true (boolean
'false', or numeric value zero). You may as well enter a zero in the IF'-column
of the conditional actions, but 'never' is a bit more descriptive.
As strange as it seems, the 'never'-event is not completely useless:
It can be used to add comments in the table, to describe
(in a single line) what the following part of the program is supposed to do.
The action for such a line typically begins with the interpreter command
REM (remark).
-
else
Returns TRUE if the condition in the previous line was FALSE; and FALSE if
the condition in the previous line was TRUE. Use this to do "something" in
a certain line #N, and do "something else" in line #N+1 if the condition
in line N is not true. See the sample section at the end of this chapter.
continuation
Returns TRUE if the condition in the previous line was TRUE; and FALSE if
the condition in the previous line was FALSE. Use this condition if the
'action' for a certain event gets too long for a single line in the CA table.
-
queued_event (function)
Checks if the timestamp of a queued-up event has reached the current time.
If so, this function removes the event from the queue and returns TRUE.
Otherwise, the function returns FALSE.
See also: queue_event(timestamp,delta_t) which
enters a timestamp into the queue.
-
timerX.expired
(where X is the timer number, 0...19)
returns TRUE if a user-programmable timer has expired, otherwise FALSE. No
side effect, the "timer-expired-flag" will not be cleared. Note: If a timer
has never been started, it will never expire. By default,
a timer is stopped.
-
timerX.expired(1)
same as above, but the "timer-expired-flag" will be cleared automatically
after polling it
-
timerX.value
Returns the remaining time (in seconds) until this timer will be expired.
Zero means the timer is expired or has never been started.
-
replay_started
Returns TRUE (one) once after an audio file has successfully been opend
(or rewound) in file-analysis mode.
-
rec.started, rec.stopped
These 'one-shot' events are generated by the triggered audio recorder when an audio file
recording is started or stopped.
The flags are only set (TRUE) once when evaluating the CA script, thus there is no need to clear them via command.
Follow the links for details and examples.
Interpreter commands typically used in the CA table's THEN-column:
-
queue_event(timestamp, delta_t)
Enters an event into the timestamped event queue, i.e. 'queues it up'.
The first argument (timestamp) is the Unix timestamp (same format as used by function 'now')
when the event shall be pulled out of the queue, polled via queued_event.
The second argument (delta_t in seconds) defines the minimum distance between two events in the queue:
If another event, with a timestamp closer than delta_t (in any direction, negative or positive)
is already queued up, the new event is ignored. Purpose / example:
When detecting meteor events (by monitoring amplitudes in certain frequency ranges),
a screenshot of the spectrogram shall be made a few seconds later to have
the whole event (including the slow decay) in the screenshot. Furthermore, if the
amplitude crosses the threshold repeatedly in a short time (delta_t = 2 seconds in the example
shown below), no new screenshot shall be made.
The following command 'plans' a screenshot in the near future by entering
a timestamped event five seconds from 'now', but only if the previous event's timestamp (if still in the queue)
differs from the new timestamp by more than two seconds:
queue_event( now + 5, 2 );
Remember: 'now' returns the current time in Unix format, which is
the number of seconds elapsed since 1970-01-01 00:00:00 UTC.
Adding 5 [seconds] gives a timestamp for the 'near future'.
To actually perform a screenshot whenever a timestamped event 'leaves' the queue,
use a conditional action like this:
| IF-column (condition) |
THEN-column (action) |
queued_event |
capture("meteor_"+str("YYYYMMDD_hhmmss",now)+".jpg") |
-
timerX.start(<interval_in_seconds>)
starts one of the user-programmable timers in single-shot mode,
non-retriggerable, for the specified interval in seconds .
"Non-retriggerable" means, if timer X (X=0..19) is already running, nothing
happens (the time until the timer expires is not affected,
once it was started).
-
timerX.restart(<interval_in_seconds>)
starts one of the user-programmable timers in single-shot mode, retriggerable,
for the specified interval in seconds .
No matter if the timer is already running or not, with this command it is
RE-STARTED for the full interval time.
-
timerX.periodic(<interval_in_seconds>)
starts one of the user-programmable timers in continuously running mode (like
an astable multivibrator). Example:
timer5.periodic(1.5) lets timer 5 fire "events"
(timer5.expired) every 1.5 seconds.
A complete list of interpreter commands, many of them suitable for use in the CA table,
is here.
Some examples:
| IF-column (condition) |
THEN-column (action) |
always |
N = noise_n( 300, 2700) : REM calculate normalized noise level
in passband |
peak_a(1745,1755) > (N+10) |
bb[2].agc.max_gain=+90 : REM 1750 Hz tone exceeds noise -> let AGC amplify |
continuation |
inc(BusyTime) : REM same condition as in the above line |
else |
bb[2].agc.max_gain= -6 : REM let AGC attenuate if pilot tone
NOT detected |
continuation |
inc(IdleTime) : REM same condition as in the above line |
always |
T2=now : P=15*60 : REM GB3SSS beacon TX cycle is 15 minutes, ... |
int((T1+5)/P)<>int((T2+5)/P) |
T1=T2 : BeaconIsOn=1 : REM see GB3SSS_beacon_monitor.usr for details |
Shown below is an advanced example from the 'Multi-frequency Bat Monitor' application,
which monitors four bats equipped with VHF transmitters on different frequencies.
It uses the multi-strip spectrogram. The activity of each bat is visualized on
one strip of the waterfall. At the end of a strip (event 'new_strip'),
the script switches to a new frequency (remote receiver controlled via digimode terminal).
At the begin of each strip, the current date and time is displayed.
At the end of each strip, the name of one of the four bats ("Betti","Kalli","Lotti","Netti") is printed.
At the end of a complete 'four-bat cycle', a screen capture is saved.
| IF-column (event,condition) |
THEN-column (reaction, interpreter command[s]) |
initialising |
Channel:=1 : MayCapture:=FALSE; // don't capture before complete cycle |
initialising |
Name := ""; |
|
|
new_strip |
Channel:= (Channel+1) % 4; // begin new 'four bat' cycle |
new_strip && (Channel==0) |
Name := "Betti" : digimode.tx("150.090"); // switch VHF receiver to next frequency... |
new_strip && (Channel==1) |
Name := "Kalli" : digimode.tx("150.125"); // ...or similar command to change frequency |
new_strip && (Channel==2) |
Name := "Lotti" : digimode.tx("150.165"); |
new_strip && (Channel==3) |
Name := "Netti" : digimode.tx("150.200"); |
new_strip |
wave.record("H:\\bats\\"+Name+"_"+str("YYYYMMDD_hhmm",sp.time)+".ogg") |
|
|
water.line_nr == (water.lines-26) |
sp.print(str("YYYY-MM-DD hh:mm",sp.time)) |
water.line_nr == 10 |
sp.print(Name); // show bat's name near end of strip |
(water.line_nr==1) && (Channel==3) |
capture("H:\\bats\\Capture_"+str("YYYYMMDD_hhmm",sp.time)+".jpg"); |
Notes
The "else"-condition is just an arithmetic function which returns
either 0 (zero=FALSE) or 1 (one=TRUE), as the 'inverse' of the condition in the preceding line.
It can even be used in a numeric expression (unlike the "else" in a real script language).
If a command sequence ('action') gets too long for a single line,
move the second half of the sequence into a new line,
and use continuation as the condition for that line. The flag "continuation"
contains the result of the evaluation of the condition in the preceding line.
Debugging the Conditional Actions
Different colours in different cells of the CA table indicate "what's going on" at the moment.
A cell marked with a blue background is currently
selected for editing, but this is not a special feature of the CA table (all 'String Grids'
with editable cells in Spectrum Lab behave like this. The blue selection bar can be moved with the cursor keys.)
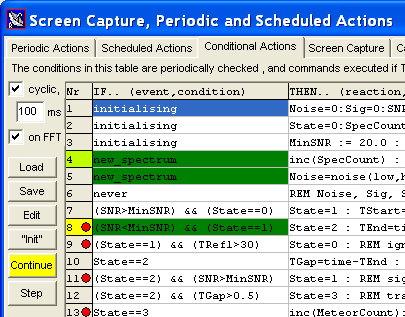
Screenshot of 'Conditional Actions' with various breakpoints and coloured indicators (while single-stepping)
Colours in the first column of th CA table (= column with the line numbers and breakpoints)
- normal gray background
- There's no breakpoint set in this line, not stopped in this line,
and this line is not the next one to be executed in single-step mode.
- gray background with red disk near the line number ( ● )
- A breakpoint has been set in this line, but it didn't fire yet
because the program didn't get here, or in other words the condition
wasn't TRUE since the breakpoint was set.
(To toggle a breakpoint, click into a line with the right mouse button
and select 'toggle breakpoint' in the context menu.)
- green background (only appears in single-step mode)
- This line has been executed in the previous single-step.
- yellow background (only appears in single-step mode)
- This line will be the next to be executed in single-step mode.
When the running CA script 'hits a breakpoint' in a certain line,
the execution is paused, and you can contine in single-step mode,
or resume normal operation (by clicking the "Contine" button).
When both apply to one line ('executed in the previous step' and 'will be executed in the next step'),
because there is only one TRUE condition in the entire CA table,
the background of that cell will be checkered (half green, half yellow).
- yellow background with red disk near the line number ( ● )
- A breakpoint has been set in this line, which 'fired' and thus stopped execution here
because the condition in this line was true (usually it still is).
The reaction in this line has not been executed yet (it will be, when clicking "Continue" or "Step").
Thus you have the chance to inspect variables (values) before and after executing the programmed reaction.
Colours in the second column of th CA table (= column with the conditions)
- normal gray background
- The condition in this line is FALSE at the moment,
the action in this line is currently NOT executed,
and there has not been an error in this line (yet).
- green background
- The condition in this line is TRUE at the moment,
the action in this line is being executed (over and over, in each loop, unless 'paused' for debugging),
and there has not been an error in this line (yet).
- red background
- Error (something wrong in this line, bad syntax, divide by zero, etc etc).
In addition to the cell colour highlighting, there are a other debugging tools to find and fix errors in the Conditional Action table.
These were implemented because some CA scripts (which were emailed to the author of Spectrum Lab)
were difficult to understand. The following features were added in November 2014 to simplify debugging:
- Inspect the current value of variables (in the CA definition table) by hovering over them
- Move the mouse pointer over the name of a variable in the script (CA table).
The variable's current value will be displayed in the 'test line' below the table.
- Inspect more variables, numerical expressions, or similar in the 'Watch' field
- Multiple variables and / or numerical expressions can be entered in that field.
Use a comma to separate them. The result will be displayed in the gray field
right next to the edit field.
Alternatively (if you have more variables to inspect than the 'Watch' field below
the CA table permits): Add the name of those variables in Spectrum Lab's
"Watch List with Plotter",
where you can examine the values in tabular form, or plot them (over time),
or log their values as a text file.
- Add code for a 'self test' in the CA definitions
- For example, check if values (calculated by the CA script) are plausible,
and if they are not, let the CA stop itself using the command ca.stop .
Then, when stopped, analyse the intermediate values / variables (by hovering over them,
as explained above) to find out at which step the calculation went wrong.
- Use breakpoints in the CA definitions
- Breakpoints temporarily stop the execution of the CA script, when the condition in the line with the breakpoint gets TRUE.
To toggle a breakpoint in a certain line of the CA table, click into the grid with
the right mouse button, and select 'toggle breakpoint' in the context menu.
Active breakpoints are shown as small red circles in the column with the CA line numbers.
When the condition of a line with a breakpoint gets true, the execution is temporarily paused,
and the line number of the 'fired' breakpoint is highlighted with a yellow background.
While paused, variables can be examined as shown further above (hover over them with tht mouse).
To continue CA execution (after hitting a breakpoint), click on the 'Continue' button on the left side
of the CA grid.
Note: Breakpoints can only be set in non-empty lines of the Conditional Actions table.
Commands to control the Conditional Actions
The interpreter commands listed below can be used to control the Contional Actions (CA).
For example, the CA can be activated at a certain time of day, and be stopped at another time of day
using the Scheduled Actions (SA).
- ca.start
- Starts the conditional actions. When not running yet, this command
also causes the 'initialising'-flag to be set,
for the next CA execution loop.
- ca.stop
- Stops the conditional actions. This command can even be used
inside the CA, so the CA "script" (state machine) can stop itself if necessary.
When stopped, it's easier to analyse the current values of the variables used in the CA
(by hovering over them with the mouse).
- ca.init
- Sets the 'initialising'-flag for the next CA execution loop,
even if the conditional actions have already been initialized.
See also: Overwiev of interpreter
commands , interpreter
functions, controlling SL via HTTP server .
back to top
Screen Capture Options
A frequently used action triggered by 'periodic' or 'scheduled' events
is capturing the current waterfall screen -alias spectrogram- as a file ('screenshot').
To produce such a capture, use the "capture" command,
or select the function from the main menu: File...Screen Capture...Capture the screen NOW.
Some options for saving graphic files can be set on the "Screen Capture"
tab (from the main menu: File...Screen Capture...Options):
-
File Index
-
The program adds a two- or three-digit "serial number" to the filename of
a screen capture and the extension ".bmp" (if the
"capture"-command is called without arguments).
The index of the first saved picture (=serial number) can be defined under
"Current Index". This number will be incremented every time after a new image
has been captured.
-
Filename (path and capture file name, no extension)
-
Do not enter the file's serial number and the extension ".bmp" in the field
"Path and sequence name" ! Both number and extension ".bmp" or ".jpg" will
be added automatically when the capture command is executed without a file
name argument. This name can be overridden if a screen capture is triggered
with the "capture"-command with a filename as
argument. Note that when a capture is launched from the "capture" command
(with a full path specified in the argument list),
backslashes can have a special
meaning (as in the "C" programming language).
-
File Format
-
Select BMP, JPG, or PNG in this combo box. JPEG files save a lot of disk space, but
they are not loss-less. BMP is lossless but occupies a lot of disk space.
PNG is also lossless, and compresses the image, but the resulting image size
may be many times larger than JPG. JPG is best for spectrograms, while PNG is better
for spectrum graph (plotted curves, with lots of monochrome screen space).
-
JPEG Quality
-
Allows you to trade between "high compression" (but low quality) etc. 50
Percent is a good value for most applications, JPEG images compressed this
way only require 10% of a BMP file's size. 5 percent "quality" produces a
very crude image, don't go below this. 95 percent quality gives a very good
image which is still significantly smaller than a BMP file (25% of a BMP
file). Going above 95 percent only seems to inflate the file size but does
not really improve the quality (reason unknown).
The JPEG quality parameter can optionally be specified in the interpreter's
capture command, so you can have
different quality settings for capturing the spectrogram image or other
'diagrams' like the curve plotter. But the quality specified in the command
only affects that single captured image; it does not modify the
configuration.
-
Info Text definitions
-
You can add a few info text lines which will be visible in every captured
image. Since V1.9 of the program, these info texts are very flexible (they
replace the "time & date"-label and the "frequency info"-label of earlier
versions). It is possible do show almost anything in such an info text, like:
-
current date and time in any
format supported by Spectrum Lab
(look for "format string")
-
parameters: filename, displayed frequency range, waterfall contrast and
brightness settings, etc
-
other info, for example a string variable with an info text (see example
in the edit command)
-
measurements: noise level, peak amplitude and peak value in different frequency
ranges
A few examples can be found in the following
chapter.
-
Macros executed after every "capture"
command:
-
In this edit window, you can enter a few lines of SpecLab's tiny programming
language. The interpreter will execute these lines, whenever a screen capture
has been performed (in other words, a very short time after the capture has
been completed !). You can use these macros to produce an additional text
file where some parameters are listed, or even some calculated data like
the "noise floor" etc. But you can also use this feature to start another
program which does something with the captured image (like sending the file
through a network, etc).
back to top
Info Text Definitions for the Screen Capture
A text editor on the "Screen Capture Configuration" dialog is used to define
additional info strings which will be visible in the captured images.
The info definitions are evaluated by Spectrum Lab's interpreter like the
parameters for the "print" commands. The interpreter uses a "pseudo-programming
language" which may be confusing for non-programmers... so here a few guidelines:
-
info definitions may be fixed strings in double quotes, like: "This is a
lousy test."
-
numerical values should be turned into strings using the str-function, like:
str("hh:mm:ss",now)
(here "hh:mm:ss" is the format string, and 'now' is a numerical value which
will be formatted)
-
substrings must be concatenated (or "added"), like:
"Noise="+str("##0.0",noise(300,3000))+"dB"
(here the noise value is formatted into a number with one to four digits,
and always one digit after the comma)
-
To display more than one number in a line without using the "str"-function
(which turns numbers into strings), separate numbers by comma (which produces
a space character in the output) or a semicolon (which does not produce
a space character, like in the BASIC programming language).
There can be many fixed strings and formatted values in one definition line.
For typical applications, you will find a few examples which you can copy
& paste into the info text definitions (mark them with the mouse here,
press CTRL-C (or STRG-C on a german keyboard), then switch to the Capture
Configuration dialog, place the cursor in the text field and press CTRL-V
to insert the text line.
Time & Date
-
"Date="+str("YYYY-MM-DD",now)+" Time="+str("hh:mm",now)
(shows the current date and time as preferred by many scientists)
Frequency range and related parameters
-
"Freq= "+str("###0.#",water.f_min)+"..."+str("###0.#",water.f_max)+" Hz"
(displays the visible frequency range of the waterfall)
-
"Noise="+str("##0.0",noise(300,3000))+"dB,
PeakAmpl="+str("##0.0",peak_a(300,3000))+"dB"
(shows the noise level in an audio range of 300..3000Hz, and a peak amplitude)
File Information
-
"File="+capture.fname
(full file name of the captured image, with path and extension)
-
"File="+capture.tfn = truncated filename
(with path, but without the extension ".bmp" or ".jpg")
-
"JPEG-quality=";cfg.JpegQuality
(Note: cfg.JpegQuality is a number, which cannot be added to a string.
Use the semicolon here)
Short written notes by the operator
-
In addition to the above "automatic" text in the info box, the operator can
be prompted to enter a short note before making a screen capture. This is
a bit tricky. The principle is as follows:
-
-
Before invoking the "capture" command (for example, from one of the programmable
buttons), open a small window asking the operator to enter/edit a short text.
This can be achieved with the edit command.
-
When the operator has finished editing (or entering) the info text, the text
will be stored in a string-variable (let's
call the variable 'Text' for simplicity, and assume the operator entered
the text "Something strange happened !" in it.
-
Now the command sequence (in the programmable button) invokes the "capture"
command to produce a screen capture.
-
In one of the Screen Capture Info Text Definitions, the variable 'Text' is
referenced. The interpreter will read the contents of that variable, and
put the string "Something strange happened !" into the info box.
-
After that, the image -with the superimposed info text line(s)- will be saved
as a BMP- or JPEG image.
-
For details on how to realize this with one of the programmable buttons,
look at the examples presented for the edit
command.
So, for this example (using the variable 'Text' to store the prompted input),
enter this line in one of the info text definition lines:
-
Text
A detailed description of the interpreter functions used in these examples
can be found in another file. Look for:
str-function,
format-string,
noise,
peak,
capture.xxx,
water.xxx, edit
(command) .
If you prefer to write some information about the captured image into a text
file instead of putting them as graphics in the captured image,
use the Screen Capture Extension
Macros.
Interpreter commands to control periodic actions, screen capture, etc
The following interpreter commands and functions and procedures can be called
from Spectrum Lab's command window, or as a periodic or scheduled action:
Screen capture via interpreter command
capture("<filename.ext>")
This procedure saves the current waterfall and/or spectrum plot as a graphic
file (called a "screen capture"). Without arguments, the filename is generated
as defined in the periodic action dialog, and
the sequence counter is incremented.
A filename may be passed in argument parenthesis (see examples below). Note
that, similar to the "C" programming language,
backslash characters can have
a special meaning when followed by certain characters, thus when a full path
(and not just the filename) is specified in the command, duplicate the backslash
characters as explained
here.
If a filename (or string expression) is passed to the capture command, the
sequence counter is NOT incremented.
Other parameters and options for the sreen capture can be defined in the
"screen capture" configuration dialog. The
quality for screens captured as JPEG files can optionally be specified in
the command's argument list
Examples:
-
capture
-
Saves the diagram (here: usually spectrogram) as a graphic file with the
name specified in the screen capture configuration
dialog. The file index (or "serial number") will be incremented after
completion of the command. If required, the index can be cleared, or set
to a new value, by a command like
cfg.Capt1Sequence = 0 // reset the screen-capture file index
-
capture("p"+str("YMMDDhh",now)+".jpg")
-
Saves the diagram as a JPEG image, a date-and-time dependent file name will
be generated automatically.
The string expression in the argument
builds a filename, depending on the current date and time.
-
capture("gram50.jpg",50)
-
Saves the diagram as a JPEG image with a quality of 50 (percent) which is
ok for most applications. If the quality value is not specified in the argument
list, the value from the screen capture options
dialog is used.
-
capture("c:\\ftp_upload\\grabber1.jpg")

    exec("c:\\ftp_upload\\ftp_up.bat
    grabber1.jpg")
-
Saves the spectrum/spectrogram in a certain directory on the local harddisk.
Immediately afterwards (for example, in the second line of the
periodic actions), a batchfile is invoked which uploads
this file (grabber1.jpg) to a website via FTP (FTP client controlled via
command line).
The contents of the FTP_UP batchfile is listed
here (of course you will have to modify it for your providers's FTP host
address, your user name, and most likely an FTP password) .
-
capture.tfn
The function returns the truncated filename (tfn) of the last
saved screen capture. This is not necessarily the filename defined in the
"screen capture" configuration dialog, it may
also be the last filename which was generated when the last
capture command was executed !
Truncated means, "only the file path and file name, but not the extension".
This makes it easier to replace the extension of the saved image (.bmp of
.jpg) with the extension ".txt" if you want to produce a description for
the file with the optional screen capture
extension macros.
Starting / Stopping 'periodic actions' via interpreter command
periodic.start
This interpreter command starts the periodic actions. It can optionally modify
the interval time (in seconds), for example:
-
periodic.start( 15*60 )
-
Starts the periodic actions, with an interval time of 15 minutes.
periodic.stop
This interpreter command stops the periodic actions. Like the command
'periodic.start', this command was intended to be used in any of the
programmable buttons, for
example, to start / stop periodically saving the screen contents, record
audio files, etc.
In most case, you will only start (or stop) the periodic actions
once through spectrum lab's main menu, because the status "started"
or "stopped" is saved between to sessions.
See also: Overwiev of all interpreter
commands
Screen Capture Extension Macros
..can be defined in the capture configuration dialog. These macros are no
"specialized" interpreter commands, just any sequence of interpreter commands
can be used (as shown in the following example). The example creates a textfile
with additional info about a captured image (waterfall etc). You will find
some of these in a file named "capture_macros.txt" in the directory where
Spectrum Lab has been installed, but you can also copy & paste them from
the example into the "screen capture" configuration
dialog (use CTRL-C to copy and CTRL-V to paste).
An example to extend the functionality of the
"capture" command:
print("Producing screenshot info file \""+capture.tfn+".txt\"...")

fopen(capture.tfn+".txt")

fprint("Info for capture \""+capture.tfn+"\"")

fp("-------------------------------------------------------------------")

fp("Date=";str("YYYY-MM-DD",now),"time="+str("hh:mm:ss",now))

fp("Contrast=";cfg.Wat1ClContrast,"Brightness=";cfg.Wat1ClBrightns)

fp("Noise(n)=";noise_n(10,2000);"dB,
Peak_f=";peak_f(10,2000);"Hz,Peak_a=";peak_a(10,2000);"dB")

fclose
The first line is just an info which will be printed into the "output" window
of the command interpreter.
The commands fopen, fprint (abbreviated as "fp") and fclose are described
here. The sample code produces a
text file with same path+filename like the captured image, but the extension
".txt". Then, a few text lines are written into the file, with date, time,
and a few parameters (here: waterfall contrast and -brightness) and calculated
results from the last collected data (here: the normalized noise level, peak
frequecy and peak amplitude).
Finally, the text file is closed again (so other programs can read it).
See also: Overwiev of interpreter
commands, overwiev of interpreter
functions , Spectrum Lab's main index .
back to top
FTP Upload via Batchfile
Note: Under 'modern' windows versions, there should be
easier methods for a command-line drive FTP upload
than the 'batchfile-driven' way described below.
Screen captures (as well as any other files) can be automatically uploaded
to a website, using the command-line driven FTP client which is built inside
any recent windows version. Similar should be possible under Linux/Wine as
well, but the author didn't test this yet. Thus the following only applies
to batchfiles under windows (inherited from DOS).
Copy the batch code below into a text editor, modifiy it as explained in
the comment lines, and save it as plain text in C:\ftp_upload\ftp_up.bat.
You can invoke it from Spectrum Lab through the
exec command, for example from the 'periodic
actions' as explained in one the capture
command examples .
:: Batchfile to upload a screenshot to a website via FTP.
:: Called from some 'Spectrum Lab Grabber' applications.
:: Uses the command line driven FTP client in MS windows.
:: Only works when located in C:\ftp_upload\ftp_up.bat .
:: Doesn't require any 3rd-party software !
:: You will need to modify your provider's ftp host name,
:: your user name, and (unfortunately non-encrypted)
:: the FTP password in the 'ftpcmd' lines further below .
:: The name of the file to be sent is specified as argument %1
:: when this batchfile is invoked (from SL's periodic actions,
etc)
::
:: Make sure we are where we should be (current directory) :
cd \ftp_upload
::
:: Create the input (command file) for the ftp client program .
:: The line after the USER command is the password .
> ftpcmd.txt ECHO USER
MyUserName
>> ftpcmd.txt ECHO
MyFTPPassword
>> ftpcmd.txt ECHO cd grabber
>> ftpcmd.txt ECHO binary
>> ftpcmd.txt ECHO put %1
>> ftpcmd.txt ECHO disconnect
>> ftpcmd.txt ECHO bye
::
:: At this point, we have created a temporary command file
:: for the stoneage FTP client. This command file replaces the input
:: which would be entered via keyboard in an INTERACTIVE ftp session.
:: Now start the ftp client program, output redirected to a file
:: which is EXTREMELY helpful for troubleshooting .
:: Replace the dummy address with your provider's ftp address:
FTP -n -s:ftpcmd.txt
MyProvidersFTPHostName > ftplog.txt
:: The -n option suppresses the auto-login upon initial connection
.
:: The -s option specifies a text file with FTP commands .
:: If the FTP client (above) fails, TEST EACH STEP IN INTERACTIVE MODE
!
:: (each step is now in ftpcmd.txt)
:End
Again, the three strings
MyUserName ,
MyFTPPassword , and
MyProvidersFTPHostName must be modified
in the batchfile. You will hopefully find them somewhere on your internet
service provider's, or webspace provider's, website. If he doesn't allow
accesing your own files via FTP, chose another ;o)
You can then test the FTP connection, login, single-file upload (ftp "put"
command), and disconnect in an interactive FTP session (which means
a session in which the FTP server prompts you for input).
For more info about the command-driven FTP client program in windows, search
the net for 'Unattended FTP downloads', or 'Microsoft command-line FTP client'
.
Alternatively, there may be a couple of FTP client programs available which
support command-line driven (unattended) operation.
See also: Spectrum Lab's main index .
Last modified : 2021-05-20 (chapters counted and numbered via CSS)
Benötigen Sie eine deutsche Übersetzung ? Vielleicht hilft dieser Übersetzer - auch wenn das Resultat z.T. recht "drollig" ausfällt !
Avez-vous besoin d'une traduction en français ? Peut-être que ce traducteur vous aidera !