These were some of the steps I took to setup my Allstar link node/server and some of the modifications that I did to it.
These are the steps to build your first node.  Be sure to read through all the links on the Allstar (https://allstarlink.org/) site BEFORE you login. Because after login the menu changes and much (if not all) of the basic information goes away.

In order to become a member of the AllStar Link Network, you must first Register to become user of the Portal system. To qualify for membership, you must be a holder of a valid Amateur Radio license.


There is alot of good doccumented information here http://docs.allstarlink.org/drupal/


Set Up IAXRPT Access                  TEST PAGE ALLSTAR STATUS


Note I am now  using the Raspberry Pi II B+  computers
See http://www.crompton.com/hamradio/BeagleBoneBlackAllstar/  for more info


Changing the SSH Port
Log in as root
cd /etc/ssh
nano sshd_config
Change to the desired port number
Use Control-O to save the file and then Control-X to exit the nano editor.
I then issued the shutdown -r now command for changes to take effect.
Don't forget to change the port forwarding in your router to reflect the new port that needs to be forwarded to your node computer.

Changing Port for LS Nodes
nano /etc/httpd/conf/httpd.conf
Change Listen Port if needed.
systemctl restart httpd

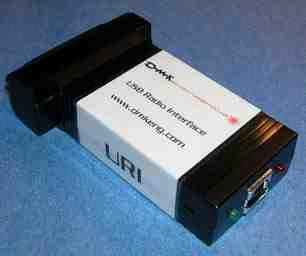
Wiring my Maxtrac to the URI

Radius/Maxtrac series with 16 pin accessory
connector - Simplex - Processed audio

URI 20 - Radius 7    GROUND
URI 21 - Radius 11   RX AUDIO
URI 22 - Radius 2    MIC AUDIO
URI 1 -  Radius 3    PTT
URI 8 -  Radius 8    (COR/CTCSS Det.)

Radius Must be programmed to output COR/CTCSS det. on
pin 8 of accessory connector, and JU551 in position 'B'
(de-emphasized audio out).

I use Simple usb for the audio.
I needed to change...
carrierfrom=usb    ; no,usb,usbinvert
                   ; no - no carrier detection at all
                   ; usb - from the COR line on the URI
                   ; usbinvert - from the inverted COR line on the modified USB sound fob
Some useful commands to know

Restart asterisk by typing: astres.sh at the linux command line.

Enter asterisk commands type "asterisk -r" at the command line.

node status : "rpt stats node#"

There are several helper scripts which are executable from anywhere.
The table below explains the purpose of each script:

Script Name         Purpose

astdn.sh          Shuts down Asterisk

astres.sh         Restarts Asterisk. Use to fore a reload of all configuration files.

astup.sh          Starts up Asterisk

nodesetup.sh      Allows the Allstar node number, node number password, and identification message to be set on a single node system.

nscheck.sh        Diagnostic tool. Reports back which Allstar link node servers are up, and optionally the node data for a specific node or IP address.

restore.sh     Restores the Asterisk config files, and node name sound files in the /tmp directory

radio-tune-menu  List of radio tune functions

simpleusb-tune-menu  Setup Simple usb audio

systemctl restart httpd  Restarts httpd when changing ports for ls nodes

asterisk -rvvvvv     Starts the Asterisk CLI>
W2YMM
long island ny
Adding Autopatch to the system

This is for making outbound telephone calls from a mobile or portable radio.

I started out using the Autopatch service hosted by allstarlink.org for $5.00 per month and quickly realized
that it will not be getting much use.  I looked into how to do it cheaper and this was my results.

I found a BYOD (Bring Your Own Device) service called voipvoip.com
There is no setup fees or monthly charges.  It is pay as you go. 
You can buy a $10.00 credit to apply toward your account and calls are
1.9 cents a minute calls to anywhere in the USA.

Setup was straight forward, and I have included a sample of the lines i edited on my node below.

Additional information I found helpful was on:
http://ohnosec.org/drupal/node/63

Note Upon upgrading to BBB Version 1.2.1, the Autopatch stopped working.
I found that I needed to edit the
/etc/asterisk/modules.conf and had to comment out the line:
;noload=chan_sip.so

------------------------------------------------------------------------------------------------------------------------
In rpt.conf

In the Node Stanza I added the line:
[1998] ; Your assigned node number
context=voipvoip ; Autopatch addon ; This is towards the bottom of the node stanza

Then further down in the code I added:

6=autopatchup,context=voipvoip,noct=1,farenddisconnect=1,dialtime=20000,quiet=1    ; Autopatch up
0=autopatchdn                ; Autopatch down

I commented out the line
;6=autopatchup,context=pbx_server,noct=1,farenddisconnect=1,dialtime=20000,quiet=1    ; Autopatch up

--------------------------------------------------------------------------------------------------------------------------
extensions.conf

[voipvoip]

exten => _1NXXNXXXXXX,1,Dial,SIP/voipvoip/${EXTEN}    ;This specifies a Sip call through voipvoip
exten => _1NXXNXXXXXX,2,Congestion

and I commented out the lines :
;[pstn-out]
;exten=_NXXNXXXXXX,1,playback(ss-noservice)
;exten=_NXXNXXXXXX,2,Congestion

---------------------------------------------------------------------------------------------------------------------------
sip.conf

; SIP Configuration example for Asterisk
;
[general]
context=default           ; Default context for incoming calls
allowoverlap=no          ; Disable overlap dialing support. (Default is yes)
bindport=5060            ; UDP Port to bind to (SIP standard port is 5060)
bindaddr=0.0.0.0        ; IP address to bind to (0.0.0.0 binds to all)
srvlookup=yes   

[voipvoip]

username=XXXXXXXXXX          ; (your VoIP VoIP account assigned while signing up)
type=peer
qualify=yes
secret=XXXXXXX                      ; (your VoIP VoIP password when logging into voipvoip webpage)
nat=auto
insecure=very
host=sip3.voipvoip.com              ; Supplied by service provider
fromuser=XXXXXXXXXX            ; (your VoIP VoIP account assigned while signing up)
fromdomain=sip3.voipvoip.com   ;; Supplied by service provider
callerid = "Autopatch" <00000XXXXX> ; This dosen't seem to work ?
dtmfmode=rfc2833
disallow=all
allow=g729
allow=ilbc
allow=ulaw
allow=alaw

-------------------------------------------------------------------------------------------------------------------------------

I have no affiliation with the above company, It one one of the companies I found through a google
search that offered a byod sip configuration with no monthly fees.


To make a call, I enter *6 + 1 + Area Code + Phone Number  (All at one time, don't leave any pauses)
To end the call enter *0

I have some Macros setup to make calling commonly used numbers easier.
Another company I just found was  Callcentric.  A friend of mine uses them with good results.
I saw this posted about setting up Autopatch for Callcentric

ALSO    Just learned about this company that people are reporting good results  https://voip.ms/
COURTESY TONES FOR ALLSTAR

Additional Information can be found at http://docs.allstarlink.org/drupal/node/110
Tone Group
A tone group is a set of 4 comma separated integers formatted as follows:
(frequency1,frequency2,duration,amplitude)
frequency1 and frequency2 must be a number between 0 and 3000. These specify the tone frequency in Hz.
duration is the tone on time in Milliseconds. amplitude is the relative volume level of the tone or tones. This can be from 0 to 8192.
A tone group consisting of zeroes for amplitude and frequency will be sent as a silent period.
A single frequency tone can be sent by setting frequency2 to zero.
Note: There must be no spaces between the commas, numbers, or the parenthesis.

Change the X in ctX=|t  to a Number to suit your needs
Example:  Beep
Freq 880Hz Duration 100mSec
ct9=|t(1000,0,100,2048)  ; BEEP


=========================================================================

HERE ARE SOME EXAMPLES I HAVE TRIED ON MY NODE

Bumble Bee     This is the same as ACC default courtesy tone #1
Program a 640ms delay from squelch closure to 1st tone
Freq 330Hz Duration 100mSec
Freq 495Hz Duration 100mSec (one book had this at 500hz)
Freq 660Hz Duration 100mSec
ctX=|t(0,0,640,0)(330,0,100,2048)(495,0,100,2048)(660,0,100,2048)  ; BUMBLE BEE
----------------------------------------------------------------------------------------------------------------
ACC default courtesy tone #2 is the same as above except the tone duration is 75ms
Piano Chord     This is the same as ACC default courtesy tone #3
640ms delay from squelch closure to 1st tone
Freq 660Hz and 880 Duration 100mSec
ctX=|t(0,0,640,0)(660,880,100,2048)  ; PIANO CHORD
----------------------------------------------------------------------------------------------------------------
ACC default courtesy tone #8
640ms delay from squelch closure to 1st tone
Freq 660Hz Duration 580mSec
ctX=|t(0,0,640,0)(660,0,580,2048)  ; ACC8
------------------------------------------------------------------------------------------------------------------
ACC default courtesy tone #9
640ms delay from squelch closure to 1st tone
Freq 660Hz Duration 120mSec
ctX=|t(0,0,640,0)(660,0,580,2048)  ; ACC9
-------------------------------------------------------------------------------------------------------------------
ACC default courtesy tone #10
640ms delay from squelch closure to 1st tone
Freq 660Hz and 250Hz Duration 100mSec
ctX=|t(0,0,640,0)(660,250,100,2048)  ; ACC10
------------------------------------------------------------------------------------------------------------------------
Yellow Jacket (a half-as-long Bumble Bee)
Freq 330Hz Duration 50mSec
Freq 495Hz Duration 50mSec (one book had this at 500hz)
Freq 660Hz Duration 50mSec
ctX=|t(0,0,640,0)(330,0,50,2048)(495,0,50,2048)(660,0,50,2048)  ; YELLOW JACKET
------------------------------------------------------------------------------------------------------------------------
Shooting Star
Freq 800Hz Duration 100mSec
Freq 540Hz Duration 100mSec
ctX=|t(800,0,100,2048)(800,0,100,2048)(540,0,100,2048)  ; SHOOTING STAR
----------------------------------------------------------------------------------------------------------------------
Comet
Freq 500Hz Duration 100mSec
Freq 750Hz Duration 100mSec
ctX=|t(500,0,100,2048)(500,0,100,2048)(750,0,100,2048)  ; COMET
------------------------------------------------------------------------------------------------------------------------
Stardust
Freq 750Hz Duration 125mSec
Freq 880Hz Duration 80mSec
880Hz and 1200Hz Duration 80mSec
ctX=|t(750,0,125,2048)(808,0,80,2048)(880,1200,80,2048)  ; STARDUST
------------------------------------------------------------------------------------------------------------------------
Hornet   (just a Yellow Jacket with the tone sequence reversed)
Freq 660Hz Duration 50mSec
Freq 500Hz Duration 50mSec
Freq 385Hz Duration 50mSec
ctX=|t(0,0,640,0)(660,0,50,2048)(500,0,50,2048)(385,0,50,2048)  ; HORNET
-------------------------------------------------------------------------------------------------------------------------
Wasp   (just a Bumble Bee with the tone sequence reversed)
Same as Hornet but double the duration of each tone
ctX=|t(0,0,640,0)(660,0,100,2048)(500,0,100,2048)(385,0,100,2048)  ; WASP
-------------------------------------------------------------------------------------------------------------------------
Tumbleweed
Freq 1000Hz Duration 20mSec
Freq 800Hz Duration 20mSec
Freq 600Hz Duration 20mSec
ctX=|t(1000,0,20,2048)(800,0,20,2048)(600,0,20,2048)  ; TUMBLE WEED
-------------------------------------------------------------------------------------------------------------------------
Fire Fly
Freq 1000Hz and 1200Hz 120mSec
Freq 1200Hz and 1400Hz 80 mSec
Freq 600Hz and 800Hz 100mSec
ctX=|t(1000,1200,120,2048)(1200,1400,80,2048)(600,800,100,2048)  ; FIRE FLY
--------------------------------------------------------------------------------------------------------------------------
Chirp-Chomp
Freq 1500Hz 20mSec
Freq 1250Hz 20mSec
Freq 1000Hz 20mSec
Freq 750Hz 20mSec
Freq 500Hz 20mSec
Freq 2550Hz 20mSec
   ctX=|t(1500,0,20,2048)(1250,0,20,2048)(1000,0,20,2048)(750,0,20,2048)(500,0,20,2048)(2550,0,20,2048); CHIRPCHOMP
----------------------------------------------------------------------------------------------------------------------------
Moonbounce
Freq 1000Hz and 800Hz 50mSec
Freq 800Hz 50mSec
Freq 600Hz 50mSec
Freq 1500Hz 50mSec
ctX=|t(1000,800,50,2048)(800,0,50,2048)(600,0,50,2048)(1500,0,50,2048) ; MOONBOUNCE
----------------------------------------------------------------------------------------
Dunce Cap
Freq 440Hz and 500Hz Duration 200mSec
Freq 440Hz and 350Hz Duration 200mSec
ctX=|t(440,500,200,2048)(440,350,200,2048)  ; DUNCE CAP
----------------------------------------------------------------------------------------------------------
Uonk (pronounced like "honk" less the "h" sound)
Freq 500Hz and 700 Duration 100mSec
ctX=|t(500,700,100,2048)   ; UONK
----------------------------------------------------------------------------------------------------------
Beep
Freq 880Hz Duration 100mSec
ctX=|t(1000,0,100,2048)  ; BEEP
-----------------------------------------------------------------------------------------------------------
Boop
Freq 440Hz Duration 100mSec
ctX=|t(440,0,100,2048)   ; BOOP
-------------------------------------------------------------------------------------------------------------
Bloop
Freq 840Hz and 500Hz Duration 100mSec
ctX=|t(840,500,100,2048)   ; BLOOP
------------------------------------------------------------------------------------------------------------
Doorbell
Freq 800Hz Duration 75mSec
Freq 400Hz Duration 50mSec
ctX=|t(800,0,75,2048)(400,50,50,2048)  ; DOORBELL
-------------------------------------------------------------------------------------------------------------
Descending
Freq 1000Hz 50mSec
Freq 750Hz 50mSec
Freq 500Hz 50mSec
ctX=|t(1000,0,50,2048)(750,0,50,2048)(500,0,50,2048)   ; DESCENDING
-------------------------------------------------------------------------------------------------------------
Ascending
Freq 500Hz 50mSec
Freq 750Hz 50mSec
Freq 1000Hz 50mSec
ctX=|t(500,0,50,2048)(750,0,50,2048)(1000,0,50,2048)   ; ASCENDING
-------------------------------------------------------------------------------------------------------------
Other Beeps:
Nextel beep
Freq 1760Hz Duration 30mSec
30ms gap
Freq 1760Hz Duration 30mSec
30ms gap
Freq 1760Hz Duration 30mSec
ctX=|t(1760,0,30,2048)(0,0,30,0)(1760,0,30,2048)(0,0,30,0)(1760,0,30,2048)  ; NEXTEL
-------------------------------------------------------------------------------------------------------------
Function Complete
Freq 480 and 1200Hz for 40ms
40ms gap
Freq 480 and 1200Hz for 40ms
ctX=|t(480,1200,40,2048)(0,0,40,0)(480,1200,40,2048)   ; FUNCTION COMPLETE 1
-------------------------------------------------------------------------------------------------------------
Another function complete
Freq 900 for 60ms
60ms gap
Freq 900 for 60ms
ctX=|t(900,0,60,2048)(0,0,60,0)(900,0,60,2048)   ; FUNCTION COMPLETE 2
-------------------------------------------------------------------------------------------------------------
NASA "Over" beep
Freq 2450Hz for 200ms
Note that the beep used in the movie "Apollo 13" was 2500 Hz just to be different, and for 100ms just to speed the movie up.
ctX=|t(2450,0,200,2048)      or    ctX=|t(2500,0,100,2048)   ; NASA OVER
Motorola tone remote
2,175 Hz and is 100-300 millisecond 2nd tone is 1,950 Hz.
ctX=|t(2175,0,200,2048)(1950,0,175,2048)   ; TONE REMOTE 1
ct12=|t(2175,0,75,2048)(1950,0,50,2048);TONE REMOTE SHORT
---------------------------------------------------------------------
MORSE CODE
ctX=|ik ; Sends morse code K as Courtesy tone
___________________________________________
Tones in use on my node
[telemetry]

ct1=|t(350,0,100,2048)(500,0,100,2048)(660,0,100,2048)
ct2=|t(660,880,150,2048) 
ct3=|t(440,0,150,4096)
ct4=|t(550,0,150,2048)
ct5=|t(660,0,150,2048)
ct6=|t(880,0,150,2048)
ct7=|t(660,440,150,2048)
ct8=|t(700,1100,150,2048)
ct12=|t(2175,0,75,2048)(1950,0,50,2048);TONE REMOTE SHORT
remotetx=|t(1633,0,50,3000)(0,0,80,0)(1209,0,50,3000)
remotemon=|t(1209,0,50,2048)
cmdmode=|t(900,903,200,2048)
functcomplete=|t(1000,0,100,2048)(0,0,100,0)(1000,0,100,2048)
patchup=rpt/callproceeding
patchdown=rpt/callterminated

unlinkedct=ct1               ; local off-link tone
remotect=ct3                ; remote base connected tone
linkunkeyct=ct8              ; remote on-link tone

Configuring a SIP phone on my network       ..........UNDER CONSTRUCTION..........

While researching how to configure the autopatch on my node I saw various Youtube videos where people had a SIP phone
connected directly to there network to access their nodes by just dialing their node number.
Here is what I found out...
I think this method is what is referred to as Reverse Autopatch ???

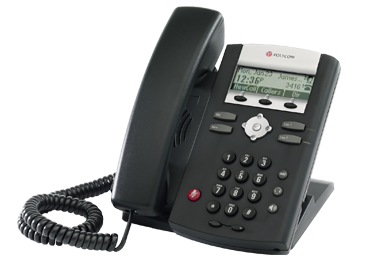
One video I saw, they used a POLYCOM SoundPoint IP 331.
They sell on the used market for about $10.00.

As of 4/10/15 I now have this feature working :-)
Setup was fairly straight forward.
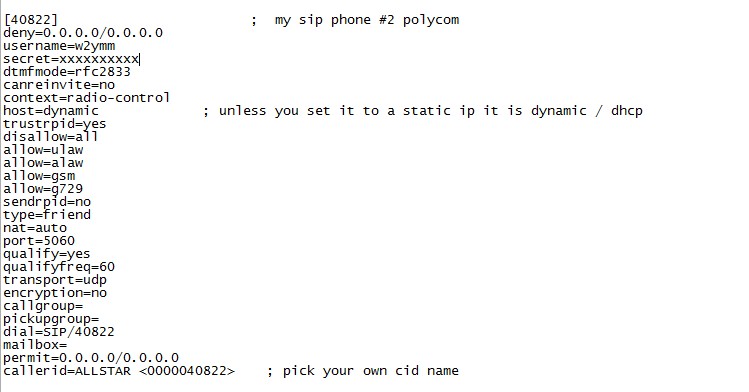
An entry needed to be added to sip.conf and extensions.conf
The phone needed to be configured, and that was accomplished through
the web based portal using the local ip address of the phone.

My only initial problem was with the actual phone.
I did not have the admin password, so I was unable to reset it to
the default values.
After some extensive online research I was able to figure out how to
install new firmware into the device and actually do an update.
This restored it back to factory settings.

Now I can just dial the extension that I configured and gain access
to my node from my desktop sip phone.   Very handy feature.

POLYCOM 331 DATA SHEET

USER MANUAL

POLYCOM SUPPORT PAGE
PROVISIONING SERVER PAGE


Asterisk™: The Definitive Guide


snippet from my sip.conf === >
snippet from my extensions.conf  === >

Configuring Echolink on my Allstar Raspberry Pi node
This is how I configured Echolink on my Raspberry Pi Allstar server.
My node is based on the image from http://www.crompton.com/hamradio/BeagleBoneBlackAllstar/

Additional information was obtained from
echolink.conf - Setting up Echolink Connectivity

You will need to rename echolink.xxx  to echolink.conf in  etc/asterisk

You obviously need a valid echolink node number, call, and matching password that you put in echolink.conf

You need to setup port forwarding in your router for the two echolink ports to the IP address of you node  5198 and 5199 UDP.

You need to be aware that you can only run one echolink node per public IP.
So you can't run echolink on a PC on your same network unless you use a proxy.
You could run it on a smartphone using cell provided internet for local testing.

Then restart Asterisk or reboot.    astres.sh   or   reboot

If echolink is running properly you will have an echolink command in the Asterisk client and be able to see the database there.

asterisk -rvvv

CLI>echolink dbdump

long list.....


Added to rpt.conf   in the node stanza

erxgain=-3  ;Echolink receive gain adjustment in +/- db-volts. Used to balance Echolink recieve audio on an app_rpt node.
etxgain=3   ;Echolink transmit gain adjustment in +/- db-volts. Used to balance Echolink transmit audio on an app_rpt node.

eannmode=2
;     0 = do not announce Echolink nodes at all
;     1 = Say only node number on EchoLink connects
;     2 = say phonetic call sign only on EchoLink connects
;     3 = say phonetic call sign and node number on EchoLink connects


etc/asterisk/echolink.conf    (Sample of my configuration)

[el0]
confmode=no
call=MY CALLSIGN -L       ; Change this! Registered Callsign  -L or -R
pwd=My Password            ; Change this! Registered Password
name=My Name                ; Change this to your real name!
qth=Location                      ; Change this to your actual QTH!
email=My Email address   ; Change this! Valid Email address
maxstns=20                       ; Maximum number of station that can connect to you
rtcptimeout=10
node=00000                      ; Change this! Echolink Node Number
recfile=/tmp/recorded.gsm
astnode=XXXXX               ; Change this to your active Allstar node number!
context=radio-secure
server1=oceania.echolink.org
server2=server2.echolink.org
server3=server3.echolink.org
naeast.echolink.org
nasouth.echolink.org
;servers.echolink.org
;backup.echolink.org
; Change The following setting to your parameters
;THIS IS FOR THE ECHOLINK STATUS PAGE
freq=145.400 ; Freq in MHz
tone=100.0 ; CTCSS Tone (0 for none)
lat=40.7012345
lon=-73.223457
power=9   ;0=0W, 1=1W, 2=4W,  3=9W, 4=16W, 5=25W, 6=36W,  7=49W,  8=64W,  9=81W  (Power in Watts)
height=3   ;0=10' ,1=20',2=40',3=80' ,4=160' ,5=320' ,6=640' ,7=1280',8=2560',9=5120' (AMSL in Feet)
gain=6      ;Gain in db (0-9)
dir=0         ;0=omni,(Direction)
;deny=
;permit=


CRON JOB FOR AUTO CONNECT AND DISCONNECT

I needed to have my node automatically disconnect from any connected nodes before
a weekly net on Monday nights.

Here is my cron example:
Log in as root
type  crontab -e

# Disconnect node 28183 at 19:55 Monday
55 19 * * 1 /usr/sbin/asterisk -rx "rpt fun 28183 *76"

# Connect to *AB2M* ECHOLINK conference Mondays as 19:56
56 19 * * 1 /usr/sbin/asterisk -rx "rpt fun 28183 *33088953"

# Disconnect node 28183 at 2230  Monday
30 22 * * 1 /usr/sbin/asterisk -rx "rpt fun 28183 *76"

Note, I first changed my cron editor to nano
The command is:      export EDITOR=nano
You should only need to do this once to set the default editor

Confirm the new cron is created by typing
crontab -l      (crontab space dash lower case L)


Echolink Link Status Page

Echolink Current Logins

    To deny w6xxx you would add the statement: deny=w6xxx
    To prohibit computer-based connections you would write: permit=*-*
    To allow access to only a select group of callsigns: permit=w6abc,w6def,...
RPT.CONF WITH NOTES

ECHOLINK.CONF WITH NOTES
Custom connect messages

Create a .ulaw sound file 12345.ulaw for example
Store in var/lib/asterisk/sounds/rpt/nodenames

Dynamic Update Client

I was trying to log into a friends Allstar node, but his IP address changed since the last time.  Trying to figure it out took too long so I looked into a dynamic ip solution that I could name.  After doing this I discovered this feature is already built in.
Here are what I tried first, Followed by the current way I'm doing it.

For updating your nodes ip address to a DNS service
                      Sign up at noip.com
https://www.noip.com/download?page=linux

This is the built in one.
You can access your node remotely without having to know the actual ip address
by using the following address Plus your port number
<NODE>.asnode.org:<PORT>
Creating A Hub Server

I wanted to create a Hub server to connect a few of my nodes to
There are only 2 files to modify.
I had extra BBB computers, So why not.....

rpt.conf  add
[12345]    ; Change this to your assigned node number
;rxchannel = SimpleUSB/usb (Comment this line out)
rxchannel=dahdi/pseudo


modules.conf add
noload=chan_simpleusb.so

Then restart asterisk
astres.sh

and you should be good to go
9/2016
I just ordered the Repeater Builder
Low cost Interface device
USB RIM LITE for the Maxtrac
available here
 
Are you using the Hamvoip version and want to disable the hourly time announcements ?
You'll need to log in to your node
Select option 9 to bring up the Bash shell interface
type   crontab -e
and put a # in front of the command (Comment it out)
#00 0-23 * * * (source /usr/local/etc/allstar.env ; /usr/bin/nice -19 /usr/bin/perl /usr/local/sbin/saytime.pl $NODE1 > /dev/null)

You could also change when the announcements are played by changing the hours and minutes

Additional tweaks

00 0-23 * * * (source /usr/local/etc/allstar.env ; /usr/bin/nice -19 /usr/bin/perl /usr/local/sbin/saytime.pl 11795 $NODE1 > /dev/null)
   In this 2nd example I have added my Zip code 11795 and the script will play the current weather condition and temperature.
    You could also use your local airport designator as well   ie    JFK
        Additional info here
 
Note, VOIPVOIP does not seem to be working for me anymore.
I have VOIP.MS working and will update this info soon.


New info using voip.ms in pdf format

Website update soon