|
Benvenuti nel Firmware personalizzato
ADALM-PLUTO
QO-100 DATV
Grazie
per aver testato questo firmware personalizzato. È principalmente
destinato a creare una piattaforma facile per TX / RX sul satellite
QO-100, ma potrebbe essere utilizzato su altre bande.
This zip file should include these files:

|
Filename |
Purpose |
boot.dfu |
DFU file for First Stage Boot Loader, and U-Boot |
boot.frm |
Firmware file for First Stage Boot Loader, U-Boot
and it's default environment |
pluto.dfu |
DFU file for Pluto Firmware, this would include FPGA
Bit File, Linux kernel (all drivers), and ram based
file system |
m2k.dfu |
DFU file for M2k Firmware, this would include FPGA
Bit File, Linux kernel (all drivers), and ram based
file system |
pluto.frm |
Firmware file for Pluto Firmware, this would include
FPGA Bit File, Linux kernel (all drivers), and ram
based file system |
m2k.frm |
Firmware file for M2k Firmware, this would include
FPGA Bit File, Linux kernel (all drivers), and ram
based file system |
uboot-env.dfu |
DFU file which includes the default U-Boot
environment |
Pluto/M2k Firmware Updates [Analog Devices Wiki] |
|
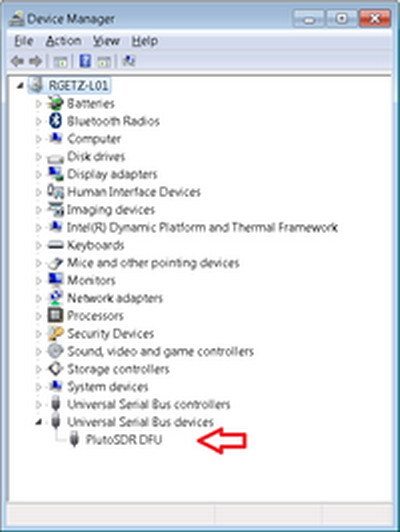
Come posso verificare se il dispositivo è in modalità DFU?
Quando il dispositivo è in
modalità DFU, il LED DONE SPENTO,LED1 è costantemente ACCESO. Il dispositivo commuta il suo USB PID in 0xB674 (PlutoSDR DFU) Finestre
Verificare con Gestione periferiche e verificare se viene visualizzata la modalità DFU.
|
|
Rigenerazione Firmware in modalità DFU
Inizialmente, il Plutone è collegato al PC tramite un cavo USB che
gli porta anche il suo alimentatore da 5V (presa USB a sinistra sul
Plutone, la destra è libera). Se non vedi (o non vedi più) un'unità
Pluto G:\ (la cartella ad esempio) con Esplora risorse, devi ripristinare il
Firmware utilizzando il seguente metodo.
-
Firmware vai a
-
https://github.com/analogdevicesinc/plutosdr-fw/releases
-
CERCARE LA RIGA
Scarica plutosdr-fw-v032.zip
Inizia SE il
Pluto SDR non lampeggiatore il LED
-
Scollegare il cavo USB da Pluto c'è un buco ed mettere dentro un
filo da pigiare affinché e attivo il led piccola illuminazione e
pronto non
c'è problema adesso eseguire come ho scritto
-
Sul
PC, creare una cartella sulla directory
-
C:\TEMP\DFU (utile
se si
deve ripetere l'operazione nel temp)
-
C:\temp\duf\pluto-recovery-v0.32>
-
PRIMO COMANDO DA INVIARE A PLUTO
-
C: \ temp\DUF\UPDATE.BAT
uboot-env.dfu
-
Attendere qualche secondo che inizia la configurazione ha PLUTO
-
QUI INIZA LA
CONFIGURAZIONE
Copyright 2005-2009 Weston Schmidt, Harald
Welte and OpenMoko Inc.
Copyright 2010-2016 Tormod Volden and Stefan Schmidt
This program is Free Software and has ABSOLUTELY NO WARRANTY
Please report bugs to http://sourceforge.net/p/dfu-util/tickets/
Opening DFU capable USB device...
ID 0456:b674
Run-time device DFU version 0110
Claiming USB DFU Interface...
Setting Alternate Setting #3 ...
Determining device status: state = dfuIDLE, status = 0
dfuIDLE, continuing
DFU mode device DFU version 0110
Device returned transfer size 4096
Copying data from PC to DFU device
Download [=========================]
100% 131072 bytes
Download done.
state(7) = dfuMANIFEST, status(0) = No
error condition is present
state(2) = dfuIDLE, status(0) = No error condition is present
Done!
-
SECONDO
COMANDO DA INVIARE A PLUTO
-
C: \ temp\DUF\UPDATE.BAT
pluto.dfu
-
Attendere qualche secondo che inizia la configurazione ha PLUTO
Copyright 2005-2009 Weston Schmidt, Harald
Welte and OpenMoko Inc.
Copyright 2010-2016 Tormod Volden and Stefan Schmidt
This program is Free Software and has ABSOLUTELY NO WARRANTY
Please report bugs to http://sourceforge.net/p/dfu-util/tickets/
Opening DFU capable USB device...
ID 0456:b674
Run-time device DFU version 0110
Claiming USB DFU Interface...
Setting Alternate Setting #1 ...
Determining device status: state = dfuIDLE, status = 0
dfuIDLE, continuing
DFU mode device DFU version 0110
Device returned transfer size 4096
Copying data from PC to DFU device
Download [=========================]
100% 12330291 bytes
Download done.
state(7) = dfuMANIFEST, status(0) = No error condition is
present
state(2) = dfuIDLE, status(0) = No error condition is present
Done!
Rimuovere il cavo USB di PLUTO, attendere che vedrai i due led
che lampeggiano normale
fatto il LED a destra brilla e quello a sinistra lampeggia.
se il lavoro e stato fatto corretto avete attivato PLUTO,
se non e stato fatto corretto il lampeggio rifare tutto da
capo......
PlutoSDR (D:) può essere trovato in
Esplora risorse (o
F: o G: o altro a seconda dell'albero del PC) e puoi vederne il
contenuto.

Puoi trovare IIO (riepilogo di "Pluto SDR IIO USBD")
nel gestore dispositivi (sotto "Dispositivi Serial Universal
Bus").
Lo stesso sotto "schede di rete": Pluto SDR
USB Ethernet / RNDIS gadget.
Grazie
a Nico ON7NDR del
suo supporto di attivare Pluto in originale.
|
73 IK1HGI Tony

Vai in alto
Menu
ATV
____________________________________________________________________
|


