


Getting Ready for the Cement
10/3
The next part was dropping in the rebar cage – which also turned out to be a big deal. My cage was pretty wobbly (I found out later that a neighbor has a spot welder - could have made it a bit stiffer!). After lowering it into the hole, I couldn't get it to sit straight and not touch the dirt on the sides. It sat on the blocks in the corners, but I had a very hard time keeping the sides from leaning into the walls of the hole. I found some steel high-tension wire for fencing and criss-crossed it on the side faces of the cage. That really stiffened it up nicely and made it stand up straight. After tightening the clamps on the Ufer ground wires, I climbed out of the hole.
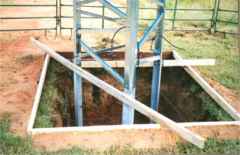
With the hole all set, I started work on the frame. I nailed three very straight 2x4's together and a 2x10 (to make up for a bit of slope) to be about 3-4" bigger than the hole on all sides. This went over the hole and was leveled by digging and shimming. It served as a form for the top of the concrete as well as a support for the tower base over the hole.
The tower base assembly was lowered into the hole with the help of my neighbor and his two football-playing sons. The 2x4's on the tower sat on the square frame level on the ground. I then plumbed the tower by shimming the 2x4’s as needed where they sat on the frame. We verified the plumb setting by measuring the distance between a plumb level and each tower leg - not more than about 1/16th of an inch difference all the way around. I also marked where the tower supports sat on the frame in case it got bumped.
Looks like it's all set!
10/4
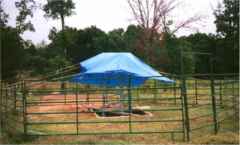
I woke up to a torrential rain! A quick run outside with an umbrella and flashlight found no caving yet, but I made an emergency run to Home Depot for a tarp. After a major struggle with the thing and the ropes, it looked like a funeral tent, but at least no dirt fell in. I hope the weather holds this week!