


Base Preparation
9/27
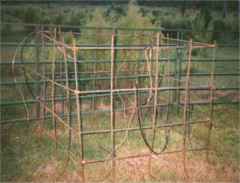
I finally got around to building the rebar cage - not much to look at, but I won't have to look at it for long. The tower goes out in the pasture with the horse, so I had to put up our temporary fencing to keep her away from all the accumulating stuff at the site. This fencing turned out to be a big help is building the cage - I lashed two uprights to the fence to hold the cage steady while I wired the horizontal bars.
The cage is a 5' cube and stands by itself because the horizontal bars are 10' long bent in the middle 90 degrees. Two of them tied together at the free ends make a 5' square. Five of them a foot apart tied together by vertical 5' bars makes the cage. The horizontal bars are 'rotated' around the perimeter of the cage to distribute the tied and bent corners pretty much evenly. I got more rigidity by weaving the vertical bars through the horizontal ones. With the rebar ties, the thing is pretty sturdy.
Before assembling the top horizontal bar, I put two ground rod clamps on one side and one on the opposite side. Once the cage was assembled, I put three #2 'pigtails' in the clamps to be tied to the tower legs above the concrete. This will be a 'Ufer' ground (al la Polyphaser book). After I put the cage in the hole and suspend the tower over it, I'll tape the pigtails to the tower legs for the pour.
9/28
I got the permit! After yet another trip to the zoning office, my plans (with the stamp) were blessed.
On the way home I stopped by a local concrete shop and ordered 9 yards for Saturday delivery. Trylon's specs call for between 7 and 8 yards of concrete, but I'm making the hole a little bigger and forming a nice square top above ground. Besides, I've always wanted to be able to say I used the 'whole 9 yards!'
The concrete guys had recommendations for a couple of local backhoe guys. A couple quick calls later and I've got one set up for early Friday morning. That should give me the better part of a day to get the cage in the hole, rig the Ufer ground, etc. I'm on my way!
9/29
I decided on and ordered a Force12 C-31XR. The introductory price is still good, and the 2-3 week lead-time works out great. I still have to decide on a mast.
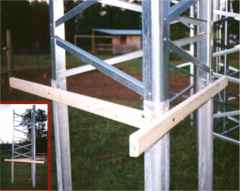
I bolted the leg 'extensions' that go in the concrete onto the bottom section of the tower. After consultations with other TowerTalkians, the cement guys, and a couple engineers, I decided to 'suspend' the tower over the hole, resting on the form to keep it plumb (more on that later).
The tower legs are very sturdy angle-iron, roughly bent at 60 degrees. Each leg bolts to the concrete extensions with four bolts - two on each side of the angle. I decided to leave the bottom bolt of each side out and bolt 2x4's to suspend it over the hole. Here's how it worked.
The tower has three sides. One 12' 2x4 is bolted to the bottom of the tower legs on one side so that it sticks out evenly on both ends. The faces of the bottom section of the tower are 4' wide, so 4' of the 2x4 sticks out on both ends. The holes are drilled in the 2x4 to match up with the tower boltholes so that when they're bolted on, the tower will be plumb when the 2x4 is level. Another 2x4 is drilled the same way and is bolted to another of the faces. Since the first 2x4 extends out past the legs, the 2nd 2x4 will butt up against it and extend about 4' out past the 3rd leg. From the top I guess the 2x4's look like a 'lopsided lambda'. What I ended up with was the bottom tower section standing upright on the ground on its leg extensions. The two 2x4's are bolted to two sides.