|
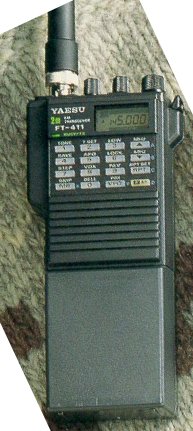
YAESU FT 411 Utility
FT 411 OUT OF BAND MODIFICATIONS.
---------------------------------------------------------
1) Open the front cover
2) Locate the C.P.U. unit (it is located on the front cover ).
3) Locate Jumpers 1,2,3 and 4 , These are the band setting Jumpers
4) Jumpers No 1, 2 and 4 should be disconnected ,and Jumper No 3 should be
connected.
5) Close the radio.
6) Apply power to the radio and turn it on. The display will initialize with
memory No 1 flashing and the frequency display will show 1.000
7) Now , adjust the display to the desired lowest receive frequency. When
done ,press VFO. The memory CH will now show 2 flashing.
8) Adjust the display to the desired highest receive frequency. When done
press VFO. The memory CH will now show 3 flashing.
9) Adjust the display to the desired lowest transmit frequency. When done
,press VFO. The memory CH will now show 4 flashing
10) Now , adjust the display to the desired highest transmit frequency. When
done ,press VFO. The rig is now set for your programed band on transmit and
receive.
COMMENTS
---------------------------------------------------------------------------------
1) After the rig was programmed to the band and you want to change it to
other ranges you will have to open the rig again and disconnect Jumper No 3
then to apply power to the radio, turn it on again open it again ,connect
Jumper No 3 back and repeat from steps 5.
Any comment and other information would be appreciated. disclamer: I have
not tested or verified the above, proceed at your own risk.
WA2ISE
ft411.5
RECENTLY I SAW A MOD COME ACROSS THE SYSTEM ABOUT THE YAESU 411E PTT LOCK.
THE SAME MOD IS AVAILABLE ON THE 411. JUST TURN OFF THE RADIO. HOLD THE PTT
BUTTON AND THE #6 BUTTON WHILE TURNING ON THE RADIO. PRESS FM THEN 6.
PRESS FM THEN 6 AGAIN THE LOCK AND THE PTT ICON WILL NOW BE ON. THATS ALL
THERE IS TO IT! TO TURN IT OFF JUST PRESS FM 6.
ENJOY 73 DE BOB KB8GNF
Msg Nr. : 129748
Da : CT1ENI
Per : MODS @WW
Tipo/status : BF
Data/ora : 1225/2320
Dimensione : 2717
Bid (Mid) : 266_CT1ENI
Titolo : MODS for FT-411/811
Hello, TNX for reading this MSG. I hope it can be usefull.
To allow this TRX for a VHF UHF general cover, do the following mods :
1ø) Remove the front panel.
2ø) Look for the first part where the Lithium battery is connect
there are 8 connectors like :
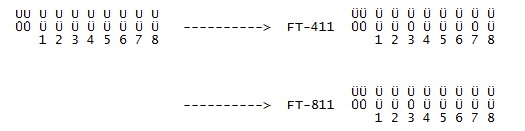
To validate the micro controller, do next :
For the FT-411 : RX 120 - 174 Mhz TX 140 - 174 Mhz
1ø) Reset the TRX by switch on it with [MR] and [VFO] key down.
2ø) Type 1200 [VFO] 1740 [VFO] 1400 [VFO] 1740 [VFO]
3ø) Press the [F] and [7] keys tho change the QSY step.
BE CARREFULL, with this few mods, the TRX looses the automatic AM detection.
For the FT-811 : RX 420 - 470 Mhz TX 420 - 470 Mhz
Do the same but step 2 is different :
1ø) Idem
2ø) Type 4200 [VFO] 4700 [VFO] 4200 [VFO] 4700 [VFO]
3ø) Idem
Good QSO's...
73's de CT1ENI - Portugal - 10 meters Network (28.125 300bauds) -
- Qth: ALmada IM58KQ -
Msg Nr. : 135515
Da : IW3GRX
Per : MOD
Tipo/status : PN
Data/ora : 0108/1655
Dimensione : 7428
Bid (Mid) : 4443_IW3GRX
Titolo : Alcune modifiche per l'FT411
*****************************************************************************
FT-411 OF YAESU,
I have this Hand held, and by playing with it,
I discovered anice trick to increase it frequency coverage.
It is so simple that you don't even have to open your hand held.
All you have to do is:
1. Make sure that the power switch is off.
2. press the UP arrow and DOWN arrow together, at the same time (those keys
are also called A, and B. and they placed at the upper right side of the
keyped)
3. Keep pressing both buttons and turn the power on.
That's all.
Now you can receive 130-174Mhz, and transmit 140-150Mhz
CAUTON: When you do this modification the memories can be erased.
Ayhow I think it is not the end, and there are some more options.
If you do have some more information about this Hand held, Please leave me a
msg with it.
FT 411 mods
Here is some new interesting info about the FT-411:
FT 411 OUT OF BAND MODIFICATIONS.
---------------------------------
1) Open the front cover
2) Locate the C.P.U. unit (it is located on the front cover ).
3) Locate Jumpers 1,2,3 and 4 , These are the band setting Jumpers
4) Jumpers No 1,2 and 4 should be disconnected ,and Jumper No 3 should be
connected.
5) Close the radio .
6) Apply power to the radio and turn it on.
The display will initialize with memory No 1 flashing and the frequency
display will show 1.000
7) Now , adjust the display to the desired lowest receive frequency When
done ,press VFO.
The memory CH will now show 2 flashing .
8) Adjust the display to th e desired highest receive frequency When done
press VFO .
The memory CH will now show 3 flashing .
9) Adjust the display to the desired lowest transmit frequency
When done ,press VFO.
The memory CH will now show 4 flashing
10)
Now , adjust the display to the desired highest transmit frequency
When done ,press VFO.
The rig is now set for your programed band on transmit and receive.
COMMENTS
-------
1)
After the rig was programmed to the band and you want to change it to
other ranges you will have to open the rig again and disconnect Jumper No 3
then to apply power to the radio, turn it on again open it again ,connect
Jumper No 3 back and repeat from steps 5 .
******************************************************************************
*****************************************************************************
FT 411 OUT OF BAND MODIFICATIONS.
---------------------------------
1) Open the front cover
2) Locate the C.P.U. unit (it is located on the front cover ).
3) Locate Jumpers 1,2,3 and 4 , These are the band setting Jumpers
4) Jumpers No 1,2 and 4 should be disconnected ,and Jumper No 3 should be
connected.
5) Close the radio .
6) Apply power to the radio and turn it on.
The display will initialize with memory No 1 flashing and the frequency
display will show 1.000
7) Now, adjust the display to the desired lowest receive frequency
When done ,press VFO.
The memory CH will now show 2 flashing .
8) Adjust the display to the desired highest receive frequency When done
press VFO . The memory CH will now show 3 flashing .
9) Adjust the display to the desired lowest transmit frequency
When done ,press VFO.
The memory CH will now show 4 flashing
10)
Now , adjust the display to the desired highest transmit frequency
When done ,press VFO.
The rig is now set for your programed band on transmit and receive.
COMMENTS
-------
1) After the rig was programmed to the band and you want to change it to
other ranges you will have to open the rig again and disconnect Jumper No 3
then to apply power to the radio ,turn it on again open it again ,connect
Jumper No 3 back and repeat from steps 5 .
Any comment and other information would be appreciated.
Good Luck
Aviad 4X6TL@4Z4SV
disclamer: I have not tested or verified the above, proceed at your own
risk.
WA2ISE
..........................................................................
. Mark Bramwell, VE3PZR .
. .
. The University of Western Ontario Bitnet: [email protected] .
. School of Business Administration Packet: VE3PZR @ VE3GYQ .
. London, Ontario, N6A 3K7 Phone: (519) 661-3714 .
..........................................................................
I was unhappy with the FT-411's "3" mode because the frequency had to be
entered starting with the 100 MHz digit, and the ARS function would not
work. I now use it in the "2" (normal) mode with the following mod.
I used the "clone" mode to dump the FT-411's ram to a
computer. It's 9600 baud, 1 start bit, 1 stop bit, CMOS logic. 544 bytes are
dumped when the up arrow is pressed. Starting with byte $211 are the upper
and lower transmit and receive frequencies, stored in BCD. I changed these
to the limits I wanted. My FT-411's upper PLL limit is 195.4 MHz, so I used
195 MHz. The lower limit MUST remain set to 130 MHz (magic number) or the
keyboard entry of frequencies will start with the 1 MHz digit .VS. the 10
MHz digit. To put the data back into ram, just press the down arrow and send
the new 544 bytes to the FT-411. You could also just clone an
H.T. that has the limits you want. You can not clone a mode "3" H.T. to a
mode "2" H.T., however. The mode is contained in the first byte, which must
match.
Bill Pherigo
WR0Y
****************************************************************************
For the
FT-411 : RX 120 - 174 Mhz TX 140 - 174 Mhz
1) Reset the TRX by switch on it with [MR] and [VFO] key down.
2) Type 1200 [VFO] 1740 [VFO] 1400 [VFO] 1740 [VFO]
3) Press the [F] and [7] keys tho change the QSY step.
BE CARREFULL, with this few mods, the TRX looses the automatic AM detection.
For the FT-811 : RX 420 - 470 Mhz TX 420 - 470 Mhz
Do the same but step 2 is different :
1) Idem
2) Type 4200 [VFO] 4700 [VFO] 4200 [VFO] 4700 [VFO]
3) Idem
FT-411 Modification via computer
I was unhappy with the FT-411's "3" mode because the frequency had to be
entered starting with the 100 MHz digit, and the ARS function would not
work. I now use it in the "2" (normal) mode with the following mod.
I used the "clone" mode to dump the FT-411's ram to a computer. It's 9600
baud, 1 start bit, 1 stop bit, CMOS logic. 544 bytes are dumped when the up
arrow is pressed. Starting with byte $211 are the upper and lower transmit
and receive frequencies, stored in BCD. I changed these to the limits I
wanted. My FT-411's upper PLL limit is 195.4 MHz, so I used 195 MHz. The
lower limit MUST remain set to 130 MHz (magic number) or the keyboard entry
of frequencies will start with the 1 MHz digit .VS. the 10 MHz digit. To put
the data back into ram, just press the down arrow and send the new 544 bytes
to the FT-411. You could also just clone an H.T. that has the limits you
want. You can not clone a mode "3" H.T. to a mode "2" H.T., however. The
mode is contained in the first byte, which must match.
FT-411 to packet
For those that wish to connect a ft 411 to packet via a mfj tnc the
following modifications are needed. In the black lead from the tx audio out
insert a .01-0.1uf cap. In the red lead from the ptt, insert a 2.2k rst.
Then combine these into a common single lead connected to the tip of the
small mike plug. The yellow rx audio goes to the tip of the large speaker
plug. And the shield goes to the ring of the large plug. This information
can be found in the 1989 august issue of 73. Page 58 it workes for me.
Extended frequency coverage mod for the FT-411
Yaesu has sent out the following as an extended frequency coverage mod for
the FT-411. I tried it and it works as advertised. First remove all black
screws from case. Remove 4 silver screws holding the battery connector on
bottom.
Remove the 3 knobs. Carefully separate the front and back. There is a
multiconductor trace between the front and back so hinge the front from the
back to keep from putting too much tension on the traces. Looking at the
board side of the front cover there are 8 little solder pads. They are half
hidden by a cover plate and the multiconductor trace. Pad 2 will have a
solder connection, the rest are open. Remove the solder from the battery
connector on bottom.
Remove the 3 knobs. Carefully separate the front and back. There is a
multiconductor trace between the front and back so hinge the front from the
back to keep from putting too much tension on the traces. Looking at the
board side of the front cover there are 8 little solder pads. They are half
hidden by a cover plate and the multiconductor trace. Pad 2 will have a
solder connection, the rest are open. Remove the solder from pad 2 and place
a solder bridge on pad 3. All other pads will be open. Close up radio.
Now when you turn on radio it will come up with 1.000 in the display. Memory
channel should say 1. Program in the lower receive frequency.
Example 1 - 4 - 1 - 0 then push VFO key. The Memory channel should go to 2.
Now program in the upper receive frequency. i.e. 1 - 6 - 5 - 0 and push VFO
key. Memory will move to 3. Do same for lower and upper transmit
frequencies.
Note. The receiver sensitivity falls off at 162.55 to about 1 uv. The step
and repeater offset will need to be re-programmed also. Follow instruction
manual.
FT-411 out of band modification (Software)
I discovered a nice trick to increase its frequency coverage.
It is so simple that you don't even have to open your hand held. All you
have to do is:
1. Make sure that the power switch is off.
2. press the UP arrow and DOWN arrow together, at the same time (those keys
are also called A, and B. and they placed at the upper right side of the
keyped)
3. Keep pressing both buttons and turn the power on.
Now you can receive 130-174Mhz, and transmit 140-150Mhz.
CAUTON:
When you do this modification the memories can be erased. Anyhow I think it
is not the end, and there are some more options. If you do have some more
information about this Hand held,
PTT mod for FT-411
Hello, a few days ago i was using my friend's Yaseu FT-411 and found out
this neat trick!!! First, a little background... As i'm sure some of you
know, Yaseu came out with the popular 411 a few years ago. Just recently,
they came out with an "enhanced" model, the 411-E. The only found difference
is the frequency lock of the radio. THe 411E has a feature that lets you
lock the ptt as well as the frequency.
To activate ptt lock on the 411:
• Turn radio off
• Push the 6 button, hold it and turn on the rig while your still holding
it.
• Now, press FM 6, you should see "L".
• Press FM 6 again, you should see "PTT"(Both L and PTT will appear in the
bottem left corner of the lcd display). Congradulations you have installed
ptt lock in ur rig. To turn it off, just repeat those steps.
Copyright © The Defpom 1997-2008
http://www.radiomods.co.nz/ |