
This page steps through how to configure an Icom ID-1 Dstar radio to provide access to the Internet over 1.2 Ghz frequencies.
Configuring an Icom ID-1 DSTAR radio for Internet access over 1.2 Ghz Simplex
Achieving digital data connectivity using the Icom ID-1 radios is not hard, but the manual is not all that comprehensive and clear. These are my "notes" and observations on how to configure the ID-1, and will undergo revisions as I better understand the equipment.
Getting Started
Assuming you've hooked up two radios with power supplies and antennas and got it to work for analog voice operations, its not much more to get it working for digital data operations.
Initially, I thought one had to fix the IP addresses at each end to use the ID-1. I found out that it'll pass any IP traffic as long as:
- you program your callsign into your radio as the source ID
- you program the destination callsign into your radio as destination ID
- similarly, the other station programs his callsign into his radio as the source ID
- the other station programs your callsign into his radio as the destination ID
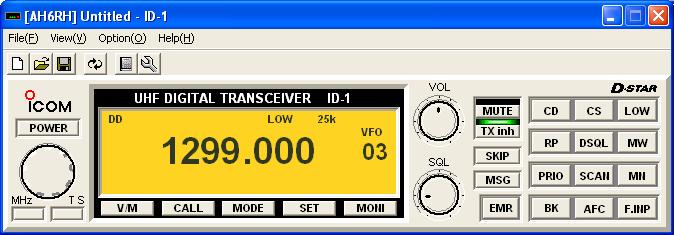
Obviously, we'll be programming the pair of radios for digital data operations over a simplex frequency, so we need to select a frequency. For purposes of this demonstration, the frequency 1299.000 Mhz will be used. You should check with your local frequency coordinator for an appropriate band of 1.2 Ghz simplex frequencies and not interfere with the repeater sub-band. ARRL's bandplan calls for 1248-1258 and 1297-1300 Mhz.
A word on the Icom software configuration
This set of instructions assumes you're using the Icom-supplied software to program the radios. These instructions assume Windows XP SP2. You can install the software once, and use it to control two radios. As you plug each radio's USB interface into your computer, you'll notice that it configures each USB interface into a separate COMn RS-232 type connection. To switch between radios, select the different COM number.
Shall we begin
As we begin, we will organize the information into a checklist.
- Your callsign (when you program the radio, it's called "My Callsign"). We'll label this callsign-a (AH6RH).
- The destination callsign. We'll label this callsign-b (KH7O). On your radio, it's called "Your Callsign"). You can see this can get confusing very quickly.
- Simplex frequency (we'll use 1299.000).
- We will be using the RPS feature RPS=Off to select simplex operations. Don't use RPS=On, as that's "Repeater Simplex" mode. Reference: id-1_addendum_12_04.pdf
We will use the PC software supplied with the ID-1. It is possible to program this using the RC-24 remote control panel, but that is more tedious to use and document and is left as an exercise to the reader.
Main Control Settings - Part 1
- Again, we assume that you've already hooked up the power supply, coaxial cable and antenna.
- Turn on the radio.
- Press the V/M button, until you've selected "VFO" mode. "VFO" should appear right above the memory channel currently selected. In these diagrams, you'll see it as "03".
- Press the MODE button, until "DD" appears in the upper left corner, indicating you've selected Digital Data mode.
- Press the LOW button, until you've selected "LOW" power. "LOW" should appear right above the last three digits of the frequency in use. Low power is suggested, as the radio heats up quickly in the ten watt mode.
- Notice the green light right above the TX inh button. It indicates that the radio is in "Transmit Inhibit" mode while in the digital data mode. This prevents the radio from accidentally transmitting data without your action. After we set the callsigns, we'll press this button to turn off "Transmit Inhibit" and begin operations.
- Note: If you wish to have the radio power-up with the Transmit Inhibit feature off (for operations at remote sites), there is a key sequence which can be used to turn it off permanently. More on that later.
Callsign Select Control Settings

- Press the CS (Callsign Select) button near the upper right hand corner. The CS window appears.
- In the area labeled YOUR, enter the destination callsign (in other words, callsign-b above).
- Press OK to complete the programming of "YOUR" callsign-b.
- Verify that the RPT1 and RPT2 fields are blank.
- In the area labeled MY, press the up and down arrows in the third field until the number 0 (zero) appears. You have up to four other choices for next time, but for this example, we'll use Number zero.
- In the first field, enter your callsign callsign-a.
- If you wish to put on a special designator, such as /MM for maritime mobile, /KH6 for portable KH6 operations, etc. you can put it in after the "/".
- Note: I've tested using one radio as AH6RH and the other radio as AH6RH/KH6 and they will connect to each other. I do not have a third radio to program as AH6RH/M to find out how three radios with the same callsign will behave when connecting on the same simplex frequency.
- Press OK to complete the programming of "MY" callsign-a.
- Press the red "X" box in the upper right corner of the window to close the window.
Main Control Settings - Part 2
- Now that you've program your radio with the frequency, mode and callsigns, do likewise with the other radio, exchanging callsign-a with callsign-b.
- Connect the Ethernet cable to the transceiver if you have not already, and connect the other end to a PC, wireless router or similar IP device. If you're running a PC with Windows/XP, you should see a status comment appear in the system tray in the lower right hand corner of your screen that you now have a 10 Megabit network connection active.
- When all is verified and ready, press the TX inh button to turn off "Transmit inhibit" and begin operations. The station at the other end needs to turn off TX inh also.
- When you attempt to exchange data for the first time, the ID-1 radio will transmit three very short bursts. If your ID-1 radio cannot make a connection with the other radio, it will stop after the three short transmissions.
- If you make a connection, you'll see a window pop-up indicating the radio has connected to a new callsign.
Troubleshooting
Failure to connect is usually due to incomplete, and mismatched settings on each radio. Make sure you write down the desired frequency and callsigns, then slowly step through the steps above. If you're still having problems, have someone else double check and verify the settings while you are setting them.
It can also be due to bad components, such as a defective RJ45 coupler, bad Ethernet cable and the like. Verify and replace the components as necessary.
Turning off Transmit Inhibit
If you wish to have the radio always able to transmit digital data when it's powered up, this is the keystroke sequence. Reference: id-1_addendum_12_04.pdf
- Hold in the "TXinh" key and the "BK" key simultaneously on the RC-24 remote control while powering the radio ON. An asterisk (*) will appear in the upper right hand corner to indicate a successful setting. The radio will now transmit data automatically when it is turned on.
Copyright © 2006-2015 Ron Hashiro
Updated: May 29, 2006, updated Dec 23, 2007 DISCLAIMER: Ron Hashiro Web Site is not responsible for the content at
any of the external sites that we link to and therefore
are not necessarily endorsed by us.