(SOFTWARE)
First Part
![]() DIRECT CABLE CONNECTION
DIRECT CABLE CONNECTION
(SOFTWARE)
First Part
Once we have all the hardware needed to connect two PC between (see HARDWARE pages) we can see what software to use to connect;
In the "Windows
time" you can believe that connecting 2 PC using the old MS-DOS is a silly
thing, but that's not true at all;
infact with only 2 simple boot-floppy you can easy-connect two PC (for example a
pentium 3 with an old 8088) in less that 2 minuts.
So you can easy tansfer files, install sofware, make a back-up and repair files;
All that thanks to 2 small software by Microsoft
INTERLINK e INTERSERVER;
The first is the CLIENT and became running adding the following line in your
CONFIG.SYS
DEVICE=A:\INTERLNK.EXE
the second acts as SERVER simply taping at the DOS prompt:
INTERSVR.EXE;
Once running, you can not access to the SERVER throught the keyboard but only
throught the CLIENT;
You can download the 2 floppy here (that loads also the cd-room driver) or make
its to yourself ;
Download INTERSERVER..EXE
and INTERLNK.EXE
Download the Bootable SERVER Floppy
Download the Bootable CLIENT Floppy
NOTE: you must make the floppy bootable at first with the command "SYS A:" at the dos prompt.
2 PC THE FIRST RUNNIG DOS THE OTHER WINDOWS
It's not very "nice"
but it works!
Use the above "SERVER" floppy in one PC (that so will run DOS) and add
the following line to the CONFIG.SYS in the other one:
DEVICE=C:\WINDOWS\COMMAND\INTERLNK.EXE (or an other valid PATH);
Load Windows (tested with WIN95 and WIN98) and than you can access to the
server as removable drivers (FLOPPY,HARD-DISK,CD-ROOM);
Remember that if you disconnect the SERVER, windows will became very slow (may
be because it try continually to find the SERVER that you've disconetted;
so if you don't need the connection anymore, simply remove the line
DEVICE=C:\WINDOWS\COMMAND\INTERLNK.EXE
in the CONFIG.SYS (using the word "REM") and reboot the PC.
Sometime it's necessary run the Server at first and than the client (be sure the
cable works fine at first).
Download INTERSERVER..EXE
and INTERLNK.EXE
Download the Bootable SERVER Floppy
Download the Bootable CLIENT Floppy
NOTE: you must make the floppy bootable at first with the command "SYS A:" at the dos prompt.
You need more time here:
(NOTE: I use an Italian version of Windows; the procedure for other language is
absolutly the same, but I don' know the "exact" word of the windows;
also the images you'll find here, refers to the italian version..sorry, but if
you send me an english version of Windows...HI HI)
if there's not
installed the Microsoft "DIRECT CABLE CONNECTION (DIRECTCC.EXE) on both
Pc you need to install it (you'll need the WIN9x installation CD-Room);
Go to DESKTOP > COMPUTER RESOURCE > CONTROL PANEL > SOFTWARE
INSTALLATION > WINDOWS INSTALLATION;
Select COMUNICATION and click on DETAIL; Select now DIRECT CABLE CONNECTION
and click OK; Windows will ask for the INSTALLATION CD-ROOM and will
install the software;
It will add also the "REMOTE CONECTION CARD" (the same used by
internet);

Now you must
configure a PROTOCOL (you can use also IPX/SPX or NetBUI; I've tested only
TCP/IP) on both the machine;
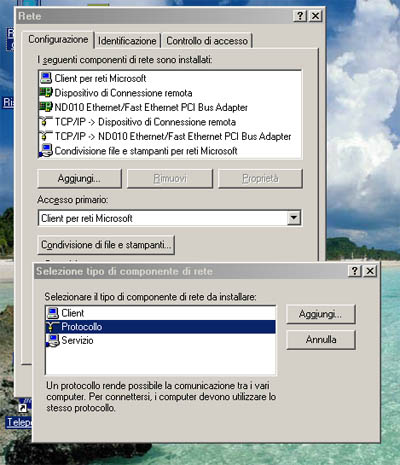
if not already installed go to DESKTOP > COMPUTER RESOURCE > CONTROL
PANEL > NETWORK >
ADD > CLIENT > CLIENT FOR MICROSOFT NETWORK;
ADD > PROTOCOL > MICROSOFT TCP/IP, than
ADD
> SERVICE > FILE AND PRINTERS SHARING FOR MICROSOFT NETWORK and
finally
ADD > CARD > REMOTE ACCESS CARD
Click OK and give a name to both PC in the IDENTIFICATION window (for
example I use pentium150 e AMD400);
use the same name as WORK GROUP;
Reboot ; Windows will ask for a Network password;
Now configure the
TCP/IP:
IP ADDRESS = blak (don't see the address in the image);
SUBNET MASK = blank;
WINS,GATEWAY, NETBIOS, ADVANCED and DNS = all deactivated;
BINDING = select FILES AND PRINTERS SHARING and CLIENT FOR MICROSOFT
NETWORK;

Now select FILE AND
PRINTERS SHARING and select
FILES SHARING
PRINTERS SHARIG;
Reboot, that's all.
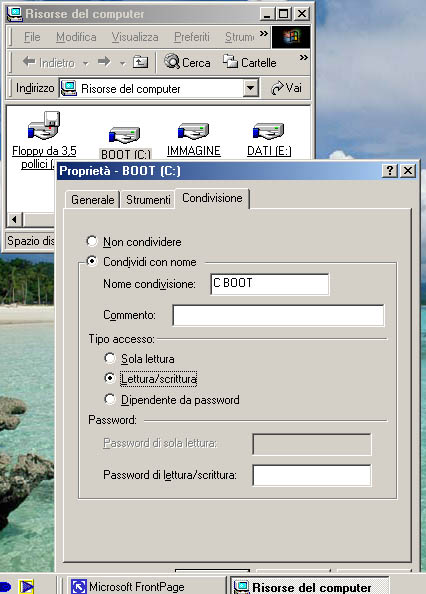
Select now the drive
to share:
right-click on the drive to share (FLOPPY, HARD-DISK, CD-ROOM ecc) and
select (on the SHARING window) the option you prefer (READ-ONLY, WRITE-READ
with or not a PASSWORD); make all that on both rhe machines.
We can run now
DIRECT CABLE CONNECTION.