
|
If you are going to use magnetic coupling with your stabilizer kit, please mention that when ordering the kit. The following relay and transistor are not included with the kits. The current kits include varicaps. Varicaps have greater range and are more effective. In some cases, especially with commercial rigs or other kits, there is not room or it is difficult to tap into the traces to add varicaps, so magnetic coupling may be the only option. The following information is for those cases where you may want to try magnetic coupling for stabilization. See "Frequency Stabilizer Relays" for more information on different types of relays that will work with stabilizers. I tested many types of relays on this stabilizer. The best one found so far is supplied (when requested). Preparation and use is described below. |


Three steps are needed to prepare the relay to mount on the toroid: removing the case, the switching pins, and then the armature.
Pulling the case off the relay PictureA pair of pliers is used to hold onto one of the switching pins and then the case is pulled off the relay. An alternative way is to use a utility knife to pull back the long sides of the case, which pops the case off the relay. Removal of Switching pins and Plastic contact holders PictureA pair of pliers is used to pull the switching pins from the relay, the two pins opposite the armature holder. A gentle tug towards the outside of the relay pulls the pin/contact out of the plastic holder. A slight pull at the top, near the contact holders, help the pins slip out easily. Next, the pin between the coil pins, the common connection for the armature, is bent back and forth until the pin breaks off. Picture With the pliers, remove the plastic pieces that were holding the contacts. Gripe the tall plastic parts that held the contacts and gently bend down. Each piece should break cleanly from the relay. Picture Remove the armature PictureThe armature is lifted straight up until it clears the holder, then bent back, and broken off the armature holder. The copper strip holding the armature is very brittle and breaks with only one twist or up/down motion. Mounting the Relay on the Toroid PictureTests have shown that only that portion of the toroid where the magnetism flows is affected by the relay. So making a little 'high inductance' place for the magnet to work helps in extending range. The relay will stand up, with the end of the metal flange and the metal core sitting across as many turns of wire as possible. The relay is placed so the magnetic field runs around the circumference of the toroid. A slight portion of the edge of the relay will hang over the side of the toroid. To set the relay in place, solder a ground wire at one of the ground connections around the toroid, and while holding the relay in place, bend the ground wire to solder on one of the coil connections, then solder. This will hold the relay in place while you use wax, the best substance to use, to hold the relay in place. Dripping wax from a lighted candle works very well. The Relay lead from the stabilizer is run through one of the holes around the toroid, up to the unused connection to the relay winding. Use solid hookup wire so that it is stable and does not cause frequency changes. |

|
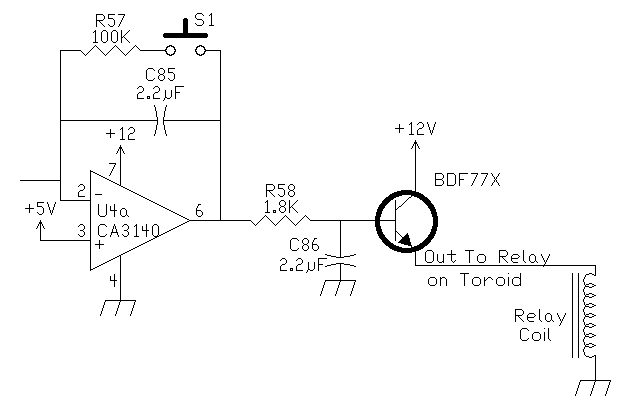
The relay draws more current than the CA3140 can output. The output of the CA3140 is current limited. Therefore, an output transistor is added to the output to carry the extra current. It is important that this transistor is overrated for the application so that it does not heat up. The best transistor found for this application is one that uses a plastic heat sink. The plastic does not absorb ambient temperature changes as quickly as a metal heat sink. If the transistor warms up the collector current will change causing drift in the receiver. Hans Summer in his "Magnetically-coupled Fast Stabiliser", he uses an NPN BD131 power transistor similar to the TIP series of transistors. The specs on this transistor are the following: Vceo: 45, Icontinuous: 3amps, Hfe: 40min, Vce/Ic: 12/0.5, Ft: 60Mhz Pd: 15. A similar transistor in the TIP series are the TIP47, 48, 49, and 50 (similar Hfe specs). The transistor supplied for magnetic coupling is a BDF77X, a plastic transistor with a plastic heat sink. Below is the schematic. |

|
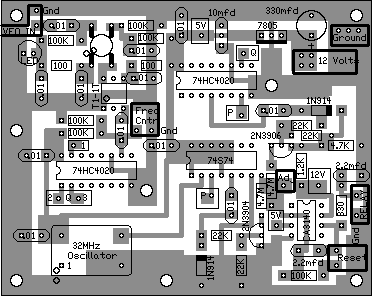
The 330 ohm resistor marked on the board is replaced with a 1.8K resistor. The 2.2mfd cap and the 1.8K resistor is connected to the base of the transistor, the collector to +12 Volts, and the emitter runs to the relay on the toroid. One way to mount the transistor is to solder the base lead of the transistor to one of the "Relay" holes, a wire is soldered to the collector lead and run to the "12 Volt" box, and another wire is soldered to the emitter pin and run to the relay. |

|
____Connect a piece of small coax between the "Frequency Counter" output of the receiver to "VFO IN" on the Stabilizer board. The MOSFET amplifier was used to minimize loading on the VFO. There is no detectable difference in VFO output when this circuit is used. Use a short piece of coax to connect from the "Frequency Out" box on the receiver to the "VFO In" box on the stabilizer board. ____Mount and connect the "Reset" button to the stabilizer. The Reset button is a small push-button switch, closes on push.The 12 volt power supply to the stabilizer should be filtered from the receiver. Make a connection to the receiver only at the BOLD 12 Volt connections, where the RF Chokes are located. Using an additional RF Choke at the 12 Volt connection to the Stabilizer PCB wouldn't hurt. ____Connect the 12 Volts and Ground to the stabilizer board.The output of the MOSFET amplifier on the stabilizer board has a connection for a Frequency Counter at the "Freq Cntr" box, next to the T1-1T transformer. This connection is an optional test output to make sure the MOSFET amp is receiving enough drive to activate the stabilizer. Output at this point should be 5 volts P-P. ____Board 1 and the Stabilizer Board should be mounted in their running positions, so the output of the stabilizer can be secured firmly to the VFO.____Connect coax between the "Relay" box on the Stabilizer board to the relay mounted on the VFO toroid. There is a hole next to the VFO toroid so the wire can be brought up through the PCB to the ungrounded coil connection. In addition, wax can be poured around this hole and the coax to keep it from moving or vibrating. PictureNote this picture and the two below on how to mount and use wax to secure the mounting. |

|
Have the stabilizer turn on at the same time as the receiver. The VFO will do some short term quick drifting, as the 2N5486 warms up from the operating current. The drifting will slow down quickly during the first minute, then the stabilizer will begin to lock. During the next minute or so, the stabilizer will make 30 to 40 Hertz jumps, while the VFO is starting to settle down. After the VFO is stable, hit the reset button to put the stabilizer in the middle of its range of operation. Magnetic coupling does not have the wide range of varicap coupling, so the VFO must be fairly stable for the stabilizer to lock. The normal range of magnetic coupling is about 3 to 5 kHz. There will be a slight drift right after the reset button is hit, as the integrator settles down. The stabilizer should lock down again in 15 - 30 seconds. Depending on how fast the room temperature is changing, normal reset times are about once an hour or less. There will be a slight drift when changing VFO frequencies as you change bands. |

|
If the stabilizer does not lock up after a few minutes of operation, then some troubleshooting is in order. If the drift is in one direction, then one of the signals to the integrator is missing. Frequencies should be checked at the .01 caps going to the transistors. Sudden drifting, with no jumping, is a bad solder connection at a ground or 12 Volt pin at an IC. Check the connections to the transistors also. All the readings below are with the VFO at 14 MHz. ____Use a frequency counter and check for a reading at the output of the MOSFET amplifier. The output is at the "Freq Cntr" box right next to the T1-1T transformer. It should read 14 MHz, the same as at the "VFO OUT" box on the receiver PCB.____Check for a reading at Pin 1 of the 74HC4020, it should be 3434 Hertz. ____Check for a reading at the "P" jumper on the board, it should be 215 Hertz. ____Check for a reading at pin 4 of the 74HC4020 at the top middle of the board, it should be 53 Hertz. ____Check Oscillator output. If your counter can't read the 32 MHz output, check the "P" connection for correct frequency - 215 Hertz. It is very difficult to blow a CMOS chip, unless you put the 5 Volt regulator in backwards. Otherwise, your problem has to be a bad solder connection on the board. An unsoldered pin at one of the ICs is the most likely problem to occur. Check carefully! Resistor/Capacitor MistakesResistors too low in value at the integrator, the 4.7 meg values, will cause modulation in the output of the VFO. This modulation will be heard in the speaker. Remove the wire to the relay coil to test. Check the integrator resistors - two 4.7 meg. If there is no output at the .01 caps coming from the transistors, check the 22K resistors for correct value, and correct polarity of the diodes. |
Send E-Mail || Amateur Radio Receivers || Electroluminescent Receiver || Back to Basic Instructions || Back to Frequency Stabilizer - Circuit Details

