A Simple Touch Sensitive Iambic Paddle For Use With a Keyer

Since my IC-718 has a built in keyer, I decided to build a simple set of paddles to use on CW. I have always used a straight brass key, and wanted to see if I can really get significantly faster. it will take some practice, but it looks like I can get my speed up a bit if I work at it. I never got around to buying a keyer and paddles, although I have been looking at them. Now that I have a rig with a built in keyer it seemed like an easy project to homebrew paddles. I looked at various types of paddles in article on the internet and in magazines, and decided that touch sensitive paddles were interesting.
There are a few places on the internet to buy touch paddles, and a few websites with instructions to build various designs. I looked them over and adapted them to what I had on hand.
I found an old plastic box containing .177 caliber pellets, and thought it would be easy to work into a project box. it was a good size, soft enough to work with easily, but tough enough to hold up.
I got a 1/4" stereo phone plug and a small toggle switch from Radio Shack. A couple of feet of three conductor wire and a few transistors left over from other projects was all that I needed.
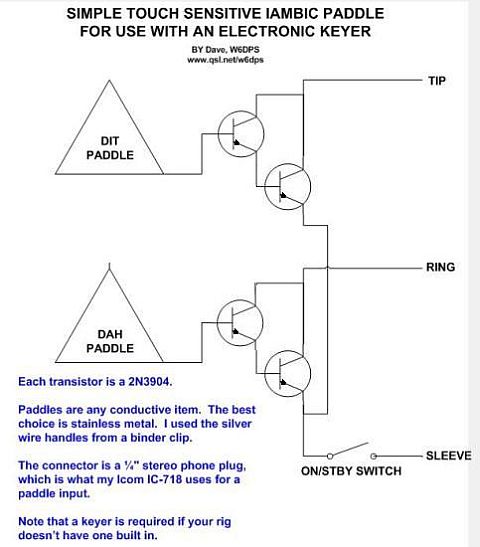
Using two 2N3904 transistors in a Darlington Pair allows very fast switching of the paddle signals to ground. Any noise on the bas of the input transistor is enough to switch it on, and a human body makes a pretty substantial ammount of electrical noise.
I added the "standby" switch mid-way through when I heard about a northern California ham who sent a series of "dits" for days until tracked down by an Official Observer. I hope if I remember to set the switch to standby I won't be sending out any spurious signals.
I used an exacto knife to cut two slots into the end of the plastic box, and inserted the "paddles", which came from a medium sized binder clip. They are nickel plated copper, so they don't tarnish and conduct really well. I simple soldered wires on each, and then started soldering the transistors together. With so few parts, this was a perfect project for the good old fashioned "dead bug" method of point to point construction. I simply mounted the ON/Standby switch on top of the box, ran the cable in the back, and soldered the transistors in. A little testing, and I was ready to stabilize things mechanically with some potting compund.
I even used the remaining few dozen .177 pellets. I put them in the box before potting it to give the paddles enough weight to not move around too much. A bit of velcro helps, too.
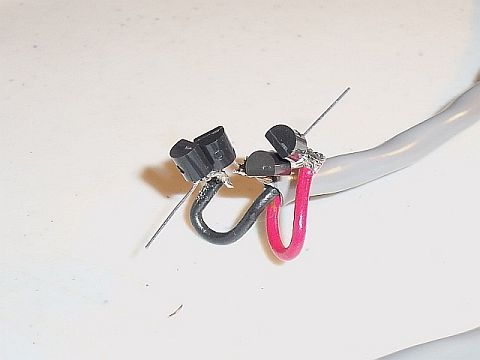
The two darlington pairs on the end of the cable, red for "dah" and black for "dit". The two stubs will be wired to the actual paddles.
The inside of the box before the weight is added and everything is potted in. Note the bottom of the switch that opens the common lead for "standby".

Schematic diagram, which shows how very simple this project is. The biggest challenge is physically constructing a suitable enclosure.
Update, 12/03/11
I got some great feedback from Marc-Andre, VE2EVN, of Montreal, Canada. Their club uses a keyer called the "Morse Machine" which has the "dit" and "dah" reversed compared to the wiring used in most HF rig's built in keyer. Especially the keyer built in to my IC-718, which is what I had in mind for this project. He had a great suggestion--install a DPDT switch to allow the "dit" and "dah" signals to be reversed depending on the keyer used and operator's preference.
His version can be found here.
I always love to hear from anyone who builds something I post, and useful suggestions are even better!
Last updated 02/08/26