Reducing the Cable Clutter
A tracker with one power cable, feature switches, and less tangles...

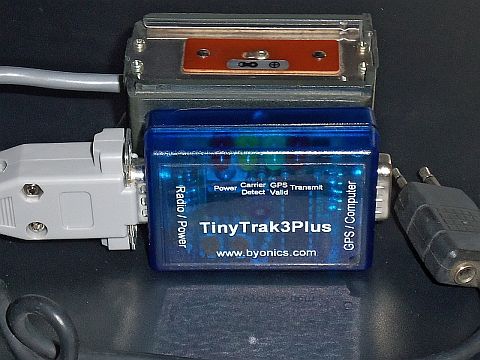
When I first built my TinyTrak 3+ I was amazed at how compact the tracker module itself and the overall set up was.
After using it in my Jeep and various other vehicles for a while, I was less impressed with the amount of room needed and the
number of cables to snag and tangle on everything nearby. Also, the cable I purchased from (Byonics)
only provided power for the TinyTrak. I was tying up a modern HT that still needed batteries, and I still needed
batteries in the GPS receiver. It looked inpressive laid out on the floor, but left some things to be desired in actual use.
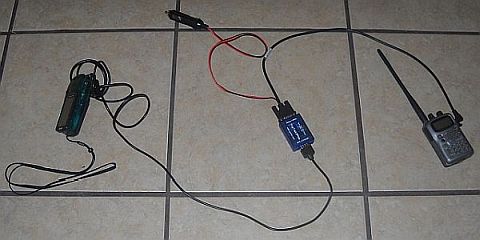
I originally planned to use my TinyTrak 3+ with my venerable HTX-202, or possibly my even older IC-2A. I had used them for a different project that didn't pan out, so now they are again available for APRS use. Many accessories can be used with both, so it helps to set things up for either. In particular, the battery cases and speaker mike configuration are the same.
The VX-5R I was using is an HT I generally use as an HT. It has a great receiver and pretty good memory capacity, so I find I use it fairly often. One disadvantage for APRS use is that if power is removed, the VX-5R does not come back "on" as soon as power is received--it has to be turned on by pushing the power button. With either the HTX-202 or IC-2A if you leave the power switch on it comes on when power is restored. Since the cigarette lighter in my Jeep is only active when the key is on, this means I can simply leave the wholoe APRS tracker setup plugged in and it will turn on when I start the Jeep. Running the whole APRS system off one source is much simpler than having to charge or power the tracker, HT, and GPS separately. Also the cable between the HT and tracker was much longer than I needed.
The Byonics cable also did not have provision to access some of the features of the TT3+. You can store two profiles in the TT3+, but there was no way to switch between them with my original set up. Also, there was no way to initiate a beacon manually. I thought about trying to add a toggle switch and/or pushbutton to the Byonics case, but didn't want to butcher it. The molded connectors on the Byonics cable didn't allow additional connections. Why have features you can't use?
To reduce the clutter, provide a single point for power, and allow accessing the secondary profile and PTT features, I decided
to build an interface module.
I still have the original battery case that came with the IC-2A. The original cells and 2 sets of replacements have given
their lives for ham radio. Since it fits so well to the HTs and has room for "stuff" inside, this seemed like a good project
box and already had a DC power connector on the back, with an LED to show there is power coming in. It is similar in height
and width to the TT3+, but deeper.
First priority was to power the whole tracker system from one DC source. Since I have a cigarette lighter cord that matches the input connector on the battery case, that seemed like a logical choice. I gutted the case of old cells and charging circuitry, and put together a simple regulator to provide the HT with a steady, filtered, 10 volts. I decided to use a cable from the battery case to the "Radio/Power" db9 connector on the TT3+, which also allowed me to hook up the switches if I located them in the battery case.
Digging through my junk box, I was able to find enough parts for a filter and regulator, and the cables and connectors. All I needed to buy for this project were the toggle switch for SW1 and the pushbutton for PTTin.
To mount the TT3+ I elected to use velcro, since Ihave a roll and the TT3+ is very light. I had a Radio Shack speaker mike
that had been dropped enough times I finally couldn't fix it any more, so I used the cable and molded plug for the HT audio
connection. Some four-conductor cable run through the side of the battery case provides for power, SW1 and PTT.

To power the GPS receiver I jumpered the appropriate pads in the TT3+ to pass 5VDC to pin 4 of the "GPS/Computer" db9 connector. this allows the HT, the TT3+, and the GPSr to all be powered by the single DC cable plugged into the battery case.
The cosmetics are not too bad. It reduces clutter by having a nice, short, connection from the TT3+ to the HT, and only the one power cord. The toggle switch to select profiles and puchbutton for PTT allow better control of the rig than my original set up. You need a 2 meter antenna and the GPSr connection, but you needed those before as well.
Not rocket surgery, but it makes this APRS tracker much more convenient.
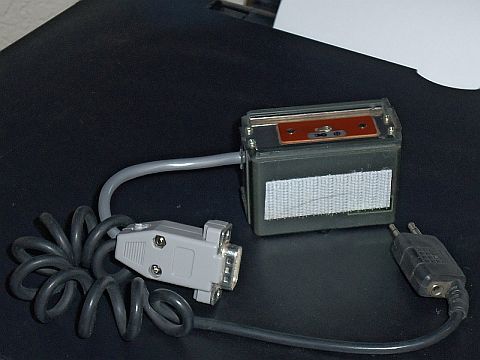
Front view showing velcro for the TT3+, and the two connectors. Note the single db9 with two cables--one for the HT
and one going into the battery case for power and switches:
Rear view to show the DC connector and LED, the toggle switch to select primary or secondary profile, and the PTT
pushbutton. The HT simply slides on top fo the battery case like normal.

With the TT3+ on the velcro: