I built one and it takes up very little room and the expense was only about $8.00, plus a 3 to 9 volt power. My unit fits into an Altoids tin, with the speaker, the battery does not fit, it is external. I use a 9 volt batter. It will also work with as little as 3 volts and upto about 15 volts.
I used Radio Shack parts, because I have a Radio Shack within a mile from home, but I am sure there are other sources for the parts, perhaps better and cheaper. I am in no way connected to Radio shack, they are just convenient for me.
Here is your parts list:
8ohm speaker, I got one for $.79 - Radio Shack Cat No. 40-246, they were on sale, so I bought 3 of them.
A small transformer, I got mine for $1.99
Radio Shack Cat No. 273-1380
One Transistor PNP type. I used an MPS2907, You can also use the kind that come in packages of 10 or just about any PNP transistor.
Radio Shack Cat No. 276-2023, $.59
2 capicitors, one 0.1uf and one 0.05uf or 0.047uf, they are about $.35 each.
One resistor, you can use either a 22k ohm or a 47k ohm. The 22k ohm produces a pretty high pitch, the 47k ohm produces a more moderate pitch. I imagine that you can use a variety of resistors for different affects. I know that both of these work fine. If you are inclined, try a pot so you can vary the pitch at will.
With a little effort, you could find some cute little container for this unit. I have put mine in an Altoids Tin.
The largest part here is the speaker, and that can be replace by an ear phone if you desire. The speaker I got is 2 1/4 inch. The next largest part is the transformer, it is about half a cubic inch, not too bad.
The rest of the parts are miniature things, but the leads are long enough with which to work.
I made my oscillator on a piece of cardboard, you could use plastic, or wood, or corrugated from a box. Of coarse it would be neatest if done on a piece of circuit board, the kind with all the holes in it.
To start with, lay out the parts and figure out which leads connect to which leads and arrange the parts so they are close. There is no reason to make this item very large. Two inches by two inches would be the maximum for the circuit, plus the speaker and the batteries and the key.
Then poke holes in the base material to accomodate the leads. Have your parts above the base, and the connections below the base. This makes your project very neat looking. On the underside, mark what each lead is. As for the transistor, mark the base, collector and emitter. This will make it very easy for you to connect the parts correctly. Once you are completely organized, solder your connections. I would leave the transformer and the speaker till the very last, since there is no connection until you close your key.
As far as the key, you can use almost any kind of
momentary switch. You do not need anything fancy just to practice the
code, unless you are striving for fast code. If you are trying to get
the fast code, the best key you can afford is recommended.
I personally have great difficulty with a straight key,
so I use a Tick-4 keyer with homemade paddles(till I can afford a good set of paddles)
and it is great for evenly spaced dits and dahs.
Just so you know, I learned the code by practicing with a homemade
key and a pieso buzzer. The sound was atrocious, but it did the job to get me through the 5 wpm so I could get licensed and the buzzer only cost $1.59 and also used 3 volts.
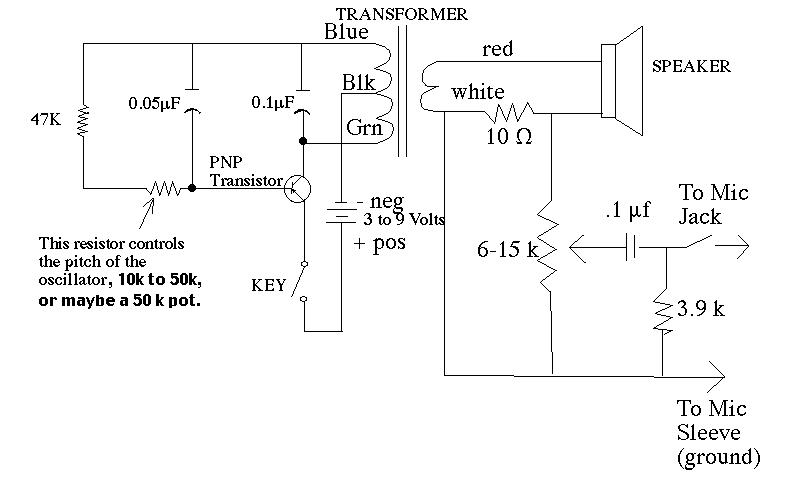
Here is the schematic diagram for the simple tone generator that I have built.
Everything attached below the white wire is an attenuator for plugging this unit into
a mic jack on an HT or other 2 meter FM rig. This allows for modulated CW. With this
unit even Technition Class Amateurs can practice code live on the air with other
amateurs.
Any and all comments sent to me will be read and suggestions will be considered. Here is my email address, but if you click on the link, you will have a pleasant surprise when you go to my very special email page.