|
|
|
The Tank Project |
|
K2 #177 |
|
K2 Bicycle Mobile |
|
MultiPIG |
|
Projects |
|
PIC µControllers |
|
Antennas |
|
Mobile Computing |
|
What's QRP? |
|
Online Log (old) |
|
About Me |
|
MX Riding |
|
My "Ham History" |
|
QRP Wattmeter |
|
SW40+ |
|
There have been |


K2 Bicycle Mobile
|
The K2 bicycle mobile project started when I got my bike and realized that I needed something to do while riding it :-). It seemed logical to put the K2 on the bike because I was soon getting the K2 SSB adapter(I don't think I can handle bicycle mobile CW just yet). It started very simple, on Saturday, March 25, I just hose-clamped the tilt bail to the handlebars. At this time I put tapped out two little mounting brackets on the back under the seat, drilled a hole through a bolt head, and screwed the antenna mount to it. (I really need a picture of this) I went out to Radio Shack and got a full quarter-wavelength 10m whip, since the bike would be most effective as a counterpoise on the higher bands. However, the antenna mounting interfered with the seat and sitting on it. So I decided to make an antenna bracket that mounted farthe back. We had some angle aluminum sitting around (it was from an antenna mount for the first AM-Digital Audio Broadcasting (DAB) research done, which took place at mt Dad's company -- he did much of the mechanical fabrication) Some of it had bent in a strong wind, but the bends were PERFECT to fit the curve of the wheel and be a bit to the side. We tried to weld the bracket at home, but our welder didn't supply enough current, so my dad later took it to work and had their machinist do a beautiful job of it. However, the radio mounting didn't look too good because the radio stuck out so far in the front. So, I thought it would be simple to remote mount the front panel. Why hasn't anyone thought of it? Probably because they are scared of RF getting into stuff, which I think is starting to happen on mine. The guys from Elecraft gave me some suggestions for this. On March 26, I hooked it up with a ribbon cable that had sockets on both ends (I used component leads in one header for pins). Once this worked on the first try, I knew I was onto something. Throughout the following week I got the front panel aluminum enclosure cut and bent. I also made up the front panel remote cable from some ribbon cable and connectors that my dad found. This was really cool, so I started working on the rest of the radio. I first thought of just mounting the radio with the rest of the case (without the front panel), and on March 26 I whipped up a quick mount out of the same aluminum angle used for the antenna mount. This proved to wiggle from side to side too much, and although wasn't uncomfortably wide, didn't look nice. Then another idea struck. Why not use the remote mounting technique to "flatten" the K2 form factor? I hacked apart various connectors, and by the end of the week on Friday, March 31, I got the K2 working with the "remote" (about 3-4" long cable) control board. I also thought to mount it on the Plexiglass sides, and started planning those and the Plexiglass mounts/side seperators. On the following Monday, the SSB option arrived, and I put it together in about four hours. The next day I cut out the mounts and sanded a smooth curve in one side so that they were touching the top tube through much of the curve. The mounts are from a piece of 3/8" or 1/2" thick acrylic that we had laying around. These are what hold the plastic enclosure at the top. I also drilled holes in the ends of these mounts and epoxied (JB Weld) standoffs in to mount them to the sides with. On Saturday, April 4, I got a sheet of Plexiglass from a hardware store, and that evening I made up a cardboard outline of the Plexiglass sides. It took FIVE tries to get the shape right, I sure am glad I made the cardboard mock-up first! When I was done with that, I marked the shape on the Plexiglass and scored it with a utility knife and straight edge. I wouldn't recommend this technique, because I didn't have the best of success. It was hard to get the knife at the exact same spot enough times, so most of the edges weren't smooth when I cracked them. I later had better success with a bandsaw, at first I thought it would crack the Plexiglass. I got one side done, and did the other the next day. On Monday I drilled the holes in the plastic sides, and screwed them together (touching). I did this because they weren't exactly the same, so when held together and sanded with a drum on the Dremel tool, they were the exact same shapes. Then when I was drilling more mounting holes in one of the sides, it cracked! I worked on mounting the K2 to the uncracked side. I got this done, and for a while, the only thing holding me up was the cracked side. On April 13, I cut slots in the bottom of the K2 front panel enclosure, ran a hose clamp through them, and clamped it to the handlebar. On the 24th, I cut out the front piece for the K2 plastic mounting enclosure with the Dremel tool, and sanded huge curves in it to (almost) perfectly fit the curve of the tubes a few inches back from where they meet the front fork bearing tube (not sure of official name). This front piece with the curves in it holds the front of the enclosure fairly tight. On April 27th, I finally got some Plexiglass cement from a well-stocked hardware store. This allowed me to fix the crack in the side as well as secure the front piece of the enclosure to its mounts. This cement is the stuff recommended for the homebrew acrylic enclosures, and it actually forms a chemical bond between the two pieces that is amazingly strong. I fixed the cracked side, and finally could progress further. On May 1, I got the front piece of the enclosure mounted. That Friday, I made the U-shaped bottom mounting bracket. This screws to the bottom tube of the bike frame with two handily provided tapped holes for mounting a water bottle. The sides have holes in them, and screws go thorugh these into nuts epoxied onto the metal mounting bracket. On Thursday, May 11, I realized that I really needed to finish up the bicycle mobile system, because FDIM was a little over a week away! I painted the side of the enclosure with gray spray paint. I ran out, and went to the hardware store, but the can was improperly labeled as gray. I sprayed it on the enclosure, and it was really chrome! It looked awful, and since I was running out of time, I decided to simply paint it with white paint and a brush. I did this on Friday, and then my dad told me it took 24 hours to dry! Also on Friday, I mounted the "Poor Man's Paddles" from QST (more information on these paddles can be found on my Projects page). It was actually pretty simple. I screwed the paddles to one end of a steel strip, bent it to fit the handlebar, and then screwed it to the handlebar with sheet metal screws. The paddles are immediately below the grip-shifter on the right and provide comfortable keying. It is also a rugged, low-profile design (many on Saturday night at FDIM asked if I had a key for CW). I also got to meet N9JXY at FDIM, who designed the paddles. I hurried up and finished painting on Saturday to give me time to work on the rest of the unit. On Saturday I also got a helmet to mount the speaker and mic (a small electret unit) to, and got the NiMh batteries wired in series. These batteries fit 2.1Ah into a package slightly larger than a AA. On Sunday I built a bracket for the battery pack and put the batteries in. On Monday I got the K2 working while mounted on the side cover and being keyed by the paddles. I also hooked it up to my outdoor antenna and it received. The next day, I got the batteries installed and fused, and turned the K2 on. I also mounted the microphone to the helmet. On Wednesday, I soldered the speaker to the microphone boom, and connected the mic to the K2. On Thursday (after getting back from the FDIM seminar) I hooked up the speaker and did some other minor things, including making the discovery that the SSB transmit didn't work! I moved the scope, signal generator, and FT101 downstairs to test the K2 with. On Friday I worked on the SSX TX problem again, and found that it did wierd things when connected to the signal generator! I decided to just take it to FDIM in "work-in-progress" condition. I am actually glad I did this, because it allowed more people to see it. If it would have been in the building contest, they wouldn't have been able to see it as long because the room was closed for judging purposes. On Saturday morning I woke up early (we wanted to leave for the Hamvention by 7:00), and I lengthened the speaker wires, and bundled them with the mic line. Then we taped them to the frame as strain-relief. The K2 Bike was as ready as it would be! We loaded it into the car (we had to take out the car's seat and remove the bike's front tire), and were off. After a great day at the Hamvention, we got to the QRP Hotel (Ramada Inn-Dayton Mall) at about 6:00. We waited around awhile and pulled out the bike and put the front tire back on. I rode it around the back parking lot for awhile to pass time and practice on the paddles while in motion. I finally took it in and set it up. Since I was one of the first to set up, the first people to come in came over and were amazed by what they saw. Many asked, "Where is the rest of the radio?" and some looked around for it. That was cool! Eric Swartz, WA6HHQ of Elecraft was one of the first to come in, and thought it was great. When Eric and Wayne found out I was having problems with it, they offered to help throughout the process of getting the problems worked out. I spent a couple of hours talking to everyone who had questions, and I also heard about other bicycle mobile projects. I had a great time talking to everyone. At this point most people had moved into the other room for the results of the building contest. I didn't really notice until Diz, W8DIZ, and Mary, NA6E, from the FPqrp club came over and said they needed me in the other room. I watched and listened to the other entries being judged. They were great (I really loved the set of aluminum keys and paddles)! It was fun to hear George Dobbs, G3RJV, describe everything. He sure does it like no one else! Then at the end, Jim Stafford, W4QO, (also FPqrp - #21) called me up and announced that for my work, Elecraft and QRP-ARCI had decided to give me the KAT2 K2 auto-tuner!! I was sure excited! Later on they presented it to me. Thanks, QRP-ARCI and Elecraft! This sure made my day the best in a long time! Thanks to all who were a part of it. There are several shortcomings in my design. A major one is the lack of shock mounting. The radio is screwed to the enclosure, which is screwed to the frame. I should probably run my tires a bit lower than normal to at least help a little. Another short-coming is the battery charging. Right now I have an external charging jack hooked up, and the batteries are switched between the K2 and the charging jack. The switch also serves as the on-off switch. The NiMh batteries are charged by an external charger. Another thing pointed out to me is the lack of a generator. This doesn't allow charging of the battery while in motion, and depending on how much I use the K2 bike mobile, I might add a generator later. Here are some pictures: 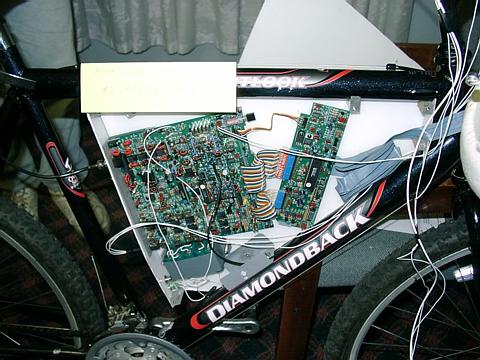  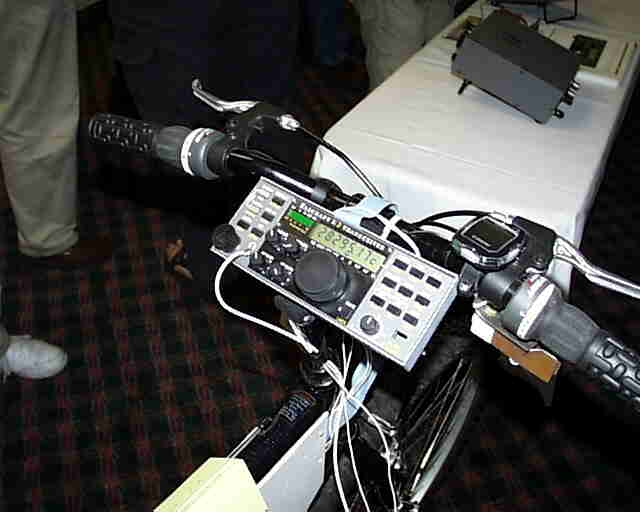 |
[Mobile Computing] [What's QRP?] [Online Log (old)] [About Me] [MX Riding]
[My "Ham History"] [QRP Wattmeter] [SW40+] [Home]
This page last updated 4/13/2002.
© 2002 N8MX.