Switching to Linux
The purpose of this article is to describe my experience switching from the Microsoft (MS) Windows operating system (OS) to Debian 8.6 (Jessie), a popular distribution of Linux. Perhaps my experience will encourage some of you who may be considering switching from Windows to some other OS, to take the plunge. I hope that you consider trying Debian or one of the many other Linux distributions available.
I worked for a relatively large organization that included a 450 bed hospital and medical school. Just about everyone in the organization worked in some way with a personal computer. Our Information Technology (IT) Department found themselves increasingly busy providing for the computer needs of the organization. IT made the decision to stantardize on the Windows platform for the entire organization. This was a reasonable decision at the time. Windows was the dominate OS in the institution and much of the computer infrastructure was Windows based. Meanwhile, I was happily using IBM's OS2 OS. Slowly but surely though, I began to feel the "heat" from both IT and the Administration to switch to Windows. I resisted as long as I could, but finally acquiesced after I realized that I was slowly losing access to important institutional resources, such as the Exchange Email Server. Life with Windows became my daily reality.
After retirement, I continued to use the Windows OS for several years. At the time, Windows 7 was the newest version of the OS and it proved to be one of the more stable versions ever produced. Still, there was a constant series of "zero day vulnerabilities" reported for the OS and security maintenance became an increasingly important and time consuming part of the computing experience. The second Tuesday of each month brought an onslaught of updates from "The Mother Ship". After the updates downloaded and installed, and after the inevitable reboot, I watched the computer screen carefully for any sign of trouble. I must credit the Microsoft engineers with a relatively problem free update experience, at least for me. Others were not as lucky.
Besides security, there were other reasons to look for a new OS. The complexity of Windows increased with every version. According to noted security expert and Windows coder extradinaire Steve Gibson, much of the code from newer versions of Windows was integrated with code from previous versions. One version was essentially "layered" upon another. In some cases, the code base for some of the basic services had not changed since the early days of Windows, in some cases back to Win95. In fact, according to Windows expert Fred Langa, the hierarchical database, known as the Windows Registry file, actually began with Win3.1 and continues in Windows 10 today. If that file gets damaged, the entire Windows OS may be ruined. This sure seems like an extreme case of "putting all your eggs in one basket"!. Much to their credit, the software engineers at Microsoft somehow keep the whole thing running (with a few notable bumps along the way). Of course, complexity is one of the main reasons why it's so difficult to keep Windows secure. Complicated code is more likely to contain vulnerabilities.
Privacy was another issue. Cost for the newer versions of the OS was escalating sharply until recently, when Microsoft made the interesting decision to give the newest version, Windows 10, away "free" to current users of Windows 7 and 8. Microsoft pushed hard to have current users of the OS adopt Windows 10 and at one point, resorted to a shameful, deceptive practice to get users to click on the download and install button. Only after Windows 10 was released did it become clear what was happening. Although it appeared that Windows 10 was "free", of course it was not. Microsoft had a "grand plan" to harvest user data and use that data in various ways to create a "revenue stream". Current users of Windows 10 would do well to carefully review the sections of the OS on Security and Personal Data to determine if they accept the data collection provisions.
It was difficult to contemplate a major change in my computing environment. I worried that I would not have the software tools necessary for my everyday needs. But of course, I didn't need much: I was retired after all. All I needed was a browser, an email client, a file manager, a backup program, a graphics program, a word processor or text editor, and a database program. But I needed additional software and computing capabilities for my hobby of amateur radio. How would that work? Well, I took heart from the experience of others. A friend of mine and fellow amateur radio operator had many of the same computing needs that I had and he was happily running Linux for years. He convinced me that Linux had all of my software needs covered. Amateur radio magazines recorded the experiences of other Linux users who were satisfied that Linux provided what they needed for their radio hobby. Based upon these experiences, I decided to go for it.
Converting to Linux
I made the fortunate decision to start my Linux experience with a distribution called Ubuntu. Ubuntu was as close to "commercial grade" software as you can get in the Linux world. Based on the venerable Debian distribution, Ubuntu is produced and maintained by a company called Canonical. Ubuntu is considered one of the easiest distributions of Linux to install, maintain and use. In 2012, I installed the LTS version of Ubuntu 12.04 on both my desktop and laptop computers (see below). The LTS version of Ubuntu, which stands for (L)ong-(T)erm-(S)upport, is released every two years. LTS versions are supported for five (5) years from the date of release. Support for the LTS version 12.04 ('12' meaning 2012 and '04' meaning April) would last until April of 2017.
I researched install options beforehand and decided to make the Ubuntu installation in four (4) partitions on both my laptop and desktop machines: the partitions were: boot, home, root and swap. This install configuration was overly complicated, but at the time I thought it was necessary. I had Windows 7 already installed on my desktop computer, and wanted my desktop to be a "dual boot" machine. I could have exercised the default option in the Ubuntu installer and installed "Ubuntu along side of Windows", but chose a "manual" installation instead so I could modify the amount of disc space devoted to my four partitions (NB: had I installed Ubuntu using the automatic install option called "along side Windows", the installer would have made root (/) and swap partitions only AND would automatically determine how much disc space to allocate to each partition based upon how much "unallocated" space remained on my disc). By having a separate boot partition, Windows was able to control the MBR of the disc (NB to do this I had to configure the MBR from within Windows 7). When booted, the machine immediately booted to the Windows boot screen showing both the Windows and Ubuntu operating systems on the machine. Selecting 'Windows' immediately booted into Windows 7 and I had access to all of the software installed on the Windows OS. If I selected 'Ubuntu', the Linux boot screen (grub) was shown and I was able to boot into Ubuntu. The downside is that I had to negotiate two boot screens at every start-up. In addition, as mentioned previously, my set up required some configuration of the boot menu from within Windows. It was a bit more complicated than using the "automatic" install options, but only because I chose to customize the installation. The upside of my multiple partition installation was that if I decided to discard the Windows 7 in the future, which I eventually did, I could simply install grub ("sudo install grub2 /dev/sda") to the MBR of the main disc (overwriting the Windows MBR) and the system would boot directly into Ubuntu, totally bypassing any mention of Windows. I used exactly the same partition configuration for the laptop, but the laptop was not a dual boot machine and booted directly into Ubuntu. On both machines, the install routine in Ubuntu correctly determined all of my peripherals and installed all of the appropriate drivers. Both machines worked perfectly "out of the box". I couldn't have had a better experience. But I had done lots of research before embarking on my installation and asked several questions on the Ubuntu Forum, just to confirm my understanding. My research paid off.
| Table 2: AMD Desktop | |
|---|---|
| Mobo | MSI 785GM-E65 AM3 AMD ATX | CPU | AMD Athlon IIX2 250 Regor 3.0 Ghz |
| Graphics | Nvidia GT 710 |
| Ethernet | Realtech, RTL8111/8168/8411 PCI Express Gigabyte |
The Ubuntu Experience
My experience with Ubuntu, which I used for nearly five years, could not have been better. My concern about not having the necessary software for my personal and hobby needs never materialized. For my personal computer needs, I used the excellent LibreOffice Suite of programs, which consists of a word processor (Writer), database (Base), spreadsheet (Calc), and presentation software (Impress). After using Microsoft Office for nearly 20 years in a university setting, I can't image a suite of programs that could replace Office Suite better than LibreOffice. It amazes me that schools and universities continue to recommend, and in some cases insist that students use Microsoft Office, when the free LibreOffice would do exactly the same job. What a waste of personal and taxpayer money. I also found programs within the Ubuntu repositories that I was previously unaware of, like Emacs. Emacs is not just a text editor, but so much more. I wish had access to Emacs when I was doing active scientific research, writing scientific papers and organizing lectures. Emacs would have been a huge personal help to me as a university professor. For my email client, I used Thunderbird, which I also used while using Windows. For a browser in Ubuntu, I used Firefox, which again, I also used in Windows. There was no difference in the functionality of either Thunderbird or Firefox in Ubuntu compared to those programs in Windows. Finally, since I was a Quicken user for my personal finances, I was worried about whether I would find a comparable program in Linux. Luckily, I found Gnucash almost immediately. There was a learning curve, since Gnucash employed a dual entry accounting system, but it did everything that Quicken did and arguably, did it better. In short, my personal computing needs were more than satisfied in the Ubuntu environment. As far as hobby needs were concerned, those were covered as well. I used the program 'CQRLog' for recording my contacts (QSO's) and the program 'fldigi' to make digital contacts. I connected my computer to my radio (an Elecraft K3) which automated a number of processes and made my hobby more enjoyable. Ubuntu was definitely a great choice for a initial experience with Linux.
Time to Upgrade Ubuntu
I began to consider what I would do after Ubuntu 12.04 in late 2016. I wanted time to consider and plan for upgrade. My decision came down to two choices: either install the newest version of Ubuntu LTS, which at the time was 16.04, or, completely change to a different Linux distribution. Upgrading to Ubuntu 16.04 was an attractive option and would be relatively easy. With proper planning, Ubuntu can often be upgraded from one LTS version to another "in place", without a major disturbance to the user data. Having a separate 'home' partition made an update even easier. Still, I was intrigued with the possibility of trying another Linux distribution. After several years of using Linux, I was much more confident in my ability to install and configure Linux and to deal with any problems that arose after installation.
I did have some experience with Debian, or at least a "lite" version of Debian. I used a Raspberry Pi for several years as my main amateur radio computer. The Pi uses the Raspian OS, which is pretty much a stripped down version of Debian. I've always been impressed with how well the Raspian OS ran software, even software considered to be resource intensive. Surely at least some of that performance was attributable to OS's Debian roots. As a Linux distribution, Debian is one of the more 'mature' versions of Linux and it has an impeccable reputation. It is primarily known for its stability and for its reliance on free and open-source software. The downside of Debian, if you consider it one, is that the software is often several versions older than the newest version available. That's in large measure how Debian maintains its stability. The newest versions of software are vetted for several years before they are allowed to join the Debian OS. I decided to give Debian a try.
From my readings and research, I got the distinct impression that Debian was a bit of a "diamond in the rough". Although praised for its stability and used by many servers on the World Wide Web, the install program in Debian used only free and open source software. That meant that if a free and open source driver was not available for a component of your machine, Debian might attempt to install a generic driver. The generic driver might or might not work as well as the proprietary driver. Graphics drivers seem particularly problematic (see below). Before I continue, I'll repeat a suggestion made by a man with far more Linux experience than me: the podcaster who does the podcast entitled "Don't Call Me Lenny". He suggests that if you are new to Linux, that you NOT start out with Debian. He suggests that new users of Linux try a distribution called "Point Linux", a Debian derived distro with many of the problematic installation areas honed to a finer point than ordinary Debian. I would definitely heed his advice.
Before Installation
- If you are certain that you want to try Linux and install the OS, it's a good idea to do a bit of research on your machine. For example, know what cards and chip sets you have in your computer at least for the important services. If you have installed any special cards, like graphics cards, knowing the commercial name and model of the card may come in handy. In addition, knowing which Wifi chip set or the network interface card that your computer uses may also be important if you have connection problems after the installation. In many cases this information is not difficult to come by. Sometimes, this information is on the box or on the bill of sale or invoice. You can also find out much of this information by querying the presently installed OS.
- You might also consider researching your computer under brandname and model. Some linux distributions maintain compatibility databases which list the compatibility status of certain brandname computers. For Debian, for example, there are lists of desktop and laptop computers that specify compatibility (see the debian wiki. Ubuntu maintains a compatibility list for various types of hardware. Forums are another great source of this information.
- One of the best ways to test compatibility of your computer with Linux, and also get a feel for the distribution, is to actually run the OS on your machine. You can do this without changing anything on your present OS. Download the latest 'live' version of Debian (or whatever distribution you decide to install) and run that from the CD/DVD optical drive on your computer. Make the disc by downloading the ' iso' file, and using the appropriate software, 'burn' the iso file to a DVD. After that operation you have a CD or DVD that you can boot from and run the OS. Make sure your computer will 'boot' from the optical drive. This may require entering the 'bios' on your computer and changing the 'boot order'. Your CD/DVD should be listed before your main disc. Once the boot process starts, you may be presented with the options 'Try Linux' and 'Install Linux'. Select 'Try Linux' of course. If all goes well, you should see the Linux Desktop. Remember that the OS is running from a relatively slow location (the optical drive) and Debian will seem to run slowly. The main purpose of running the OS 'live' is to make sure Debian recognizes the hardware on your computer. Once installed to the main disc, Debian will run on your computer much like it runs from the CD/DVD, but of course, much faster.
- Note carefully the functionality of everything on your computer. Be especially careful to note the following:
- The appearance and resolution of the monitor. Is the cursor and mouse responsive and do they move rapidly around the desktop? Does the keyboard function as expected? Are there any messages on the screen. If so, carefully note what they say.
- Note whether you have an Internet connection. Did Debian configure your Network Interface Card correctly? NB: If you decide to install Linux, make sure you are connecting to the Internet using your Network Card. Don't connect using wireless or Wifi during installation.
- Note the functionality of any wireless cards in the machine. Did Debian find and configure your wireless card correctly?
- Note messages from Debian regarding any problems it found. For example, on my desktop computer, which has an Nvidia Graphics Card, Debian sent a message to the desktop that the graphics performance was 'degraded' and that I should expect more 'disc activity' than normal. This told me that Debian did not find a driver for my graphics card and that it was using the default graphics driver, which was not a good match for my graphics system. On my laptop computer, I had good Internet connectivity using my ethernet connection, but I had no wireless connectivity. This told me that I would have to search for a driver for my wireless card once the OS was installed.
- Start the music application (probably the program 'rhythm box') and make sure that your music plays normally.
- Test any special keys that you might have on your computer. For example, if you are using a laptop and certain keys are designated to control sound, test that those keys are functional. If you have a "touch" screen, test it.
- Test anything else that you might have on your computer. Make notes of your findings. This may come in handy later when fixing problems.
After Installation
- Add a firewall. An easy to install and confire firewall in Linux is one called 'ufw', which stands for 'uncomplicated fire wall'. It can be found in the Debian repository.
- To install ufw, open a terminal session and type the command 'sudo apt-get install ufw'.
- To enable ufw, type 'sudo ufw enable'. Now the firewall is active. To check the status of the firewall, type 'sudo ufw status'. That command should report ufw as 'enabled'.
- Once enabled, you can 'allow' certain ports to receive traffic, either generally or from specific computers. Read about configuring ufw using the 'man' command ('man ufw' from a terminal) or read about ufw on the Linode website.
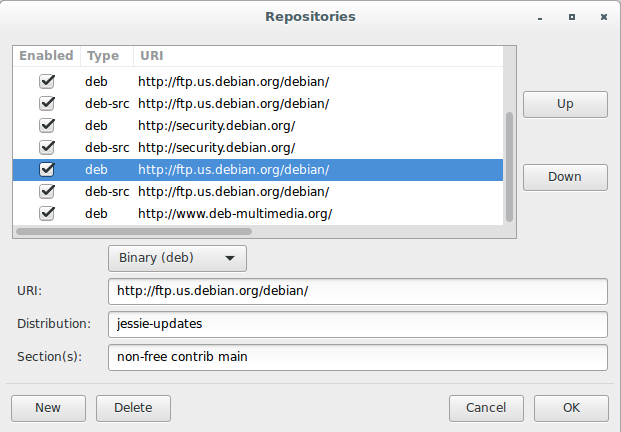
Fig: This figure shows the repository screen in Synaptic. Notice the 'non free' and 'contrib' additions to the sections. Make these additions for all repositories beginning with 'deb' or 'deb-src'.
Very good luck. I hope you have a great Linux experience.