HP8648 Calibration Tools |
If you are on this page, you probably need more details about the calibration or repairing of HP8648 RF generator. As is well known, the documentation and calibration details are very minimal, everything being buried deep inside the Agilent Service Software utility and 8648's ROM (CPU MC68HC000FN10).
The issue is that the Agilent Service Software (HP Service Support Software - 8648 Test Package) only supports certain instruments such as spectrum analyzer, power meter, multimeter, etc. Support depends on the installed drivers. The whole setup is capable of automatically calibrating or testing the performance of the HP8648.
Through extensive and methodical experimentation combined with a bit of ingenuity, I was able to identify the SCPI commands necessary to access and modify the calibration tables, as well as other parameters such as installed options.
As far as I know, this represents the first public disclosure of the calibration details for this instrument. The concise description of the testing and calibration procedure described in the manual, is not very accurate; several discrepancies have been observed when compared to the Service software.
All this has been implemented by Python scripts that can download the calibration tables or upload (rewrite) them back to the instrument, making them very useful for creating a backup in case one of the 93Cxx EEPROM memories becomes corrupted, or for editing certain parameters such as output level versus frequency corrections, modulation deviation calibration, and more. Examples in the Download section showcase features that may surprise :).
Python script was tested on HP8648B/C. I’m almost sure it will also work with the A or D version.
*For HP8648A script skips reading/writing the fields (fextlvl_frq, fextlvl_gain, fextlvl_ofs, fm_acfm_dac, atn_comp_frq, atn_comp_cal, ATTEN_BD, FREQ_EXT_BD) that are not required for this model, according Agilent Service Software.
The GPIB address of the instrument can be changed in the header of the .py file, default address 19.
Before any intervention, dump all 93Cxx EEPROMs using a programmer! Save these dumps in case a no-way-out situation occurs.
For example, if the configuration OPT value is invalid (i.e., not present in the list below), a FATAL FIRMWARE ERROR can occur, and GPIB communication will be disabled!
Restoration is only possible using an EEPROM programmer to refresh U59 content. Once restored, GPIB communication will be recovered.
Note: Certain parameters cannot be overwritten via GPIB; only read operations are supported.
This project is provided "as is" without any warranty, express or implied. The author assumes no responsibility for any losses or damages that may result from its use. It is intended solely for personal and experimental purposes.
All memories also contain checksum values. There are multiple sections, each with its own CRC.
CRC specs: CRC-16-CCITT, poly 0x1021, width 16-bit, init 0xFFFF, final XOR 0x0000
At startup, the RAM content is compared against each EEPROM CRCs.
- If they match, the instrument boots without any error.
- If they differ, the memory contents are reloaded into RAM (calibration restored).
In case the internal CRC of an EEPROM does not match its contents (e.g., corrupted memory), calibration restore failed, it is necessary to either rewrite it with a backup dump or perform a full instrument recalibration.
| EEPROMs SUMMARY | ||
|---|---|---|
| EEPROM | Location / Module | Description |
| U59 | A3 Motherboard under the fan | Contains SN, Model, Motherboard ID, OUTLLOSS_FRQ, OUTL_xDB (LF Attenuator), CONFIG_CAL (frequency range, level range and OPT), MOD_FM, MOD_PM, MOD_AM |
| U201 | A3 Motherboard under the attenuator | Contains OUT_LOSS_FRQ, OUT_xDB, atn_comp_cal, attenuator ID, OUT_TEMP_CAL. ( for HP8648A some of them located inside attenuator A7) |
| U18 | A5 Synthesizer | Contains fm_sens_frq/sgn/mult for PLL VCO |
| U35 | A4 Reference module | Contains the Time Base cal file (timebase) to control "refs_DAC_fine" and "refs_DAC_coarse". Values can be modified via front panel or GPIB - Time Base alignment procedure. |
| U803 | A6 Output module | Contains outllvl_frq/gain/ofs (Out_lf_data), out_lvl_frq/gain/ofs (Outlvl_data), OUT_PRE_PWR, out_tune_frq/dac |
| U804 | A10 Frequency Extender module | Contains fextlvl_frq/gain/ofs and fm_acfm_dac |
Parameters `GEN_LOSS_CAL` (general/generic loss array) only support 0 or negative values. Version A has 34 (0…33) values and B/C/D version 22 (0…21) according to Motherboard Repair Utility - Agilent Service Software. Same difference observed for `OUT_xDB`.
However during run of calibration test "AM Level and Distortion (8648A Only), it will zeros the general loss and attenuation arrays (output loss) by set zero for the first 22 values.
Version B/C/D still has all 34 values of "general loss" inside EEPROM if read attempt. The Python script will read and write the fields according Motherboard Repair Utility.
`CONFIG2_CAL` only support value 10, their purpose is still unclear.
Installed Options are defined by `CONFIG_CAL, 2, value`.
The software upgrade is NOT capable to enable new features without additional hardware! The single exception is "H01-RF remains in same state after power restart" which can be activated just by software.
Do not mix HP8648A OPT values with HP8648B/C/D! FATAL FIRMWARE ERROR can occur, GPIB communication will be disabled!
OPT INSTALLATION VIA GPIB COMMANDS
1. Standard configuration for HP8648C, no OPT:
SERVice:PRODUCTION:CALibrate:BEGIN
SERVice:PRODUCTION:CAL CONFIG_CAL, 0, 9000
SERVice:PRODUCTION:CAL CONFIG_CAL, 1, 3200000000
SERVice:PRODUCTION:CAL CONFIG_CAL, 2, 97
SERVice:PRODUCTION:CAL CONFIG_CAL, 3, -136.0000000000
SERVice:PRODUCTION:CAL CONFIG_CAL, 4, 14.5000000000
SERVice:PRODUCTION:CALibrate:END
SERVice:PRODUCTION:CALibrate:STORE CONFIG_CAL
2. OPT "H01 RF remains in same state" on HP8648B/C/D:
SERVice:PRODUCTION:CALibrate:BEGIN
SERVice:PRODUCTION:CAL CONFIG_CAL, 2, 105
SERVice:PRODUCTION:CALibrate:END
SERVice:PRODUCTION:CALibrate:STORE CONFIG_CAL
3. OPT "1EA High Power" on HP8648B/C/D (hardware HP A10 Frequency Extension module is required):
SERVice:PRODUCTION:CALibrate:BEGIN
SERVice:PRODUCTION:CAL CONFIG_CAL, 4, 22.0000000000
SERVice:PRODUCTION:CALibrate:END
SERVice:PRODUCTION:CALibrate:STORE CONFIG_CAL
ADDITIONAL GPIB COMMANDS (see also Download Section / GPIB command logs)
SERV:PRODUCTION:MEM:SCR (used to clear RAM content before EEPROM change)
SERV:PRODUCTION:PUP (used to Reboot instrument / Power UP )
Example:
SERV:PRODUCTION:MEM:SCR
SERV:PRODUCTION:PUP
SERVice:PRODUCTION:CALibrate:BEGIN
SERVice:PRODUCTION:CAL CONFIG_CAL, 0, 9000
SERVice:PRODUCTION:CAL CONFIG_CAL, 1, 3200000000
SERVice:PRODUCTION:CAL CONFIG_CAL, 2, 97
SERVice:PRODUCTION:CAL CONFIG_CAL, 3, -136.0000000000
SERVice:PRODUCTION:CAL CONFIG_CAL, 4, 14.5000000000
SERVice:PRODUCTION:CALibrate:END
SERVice:PRODUCTION:CALibrate:STORE CONFIG_CAL
SERV:PRODUCTION:PUP
| OPTIONS SUMMARY | ||
|---|---|---|
| Option | Description | Notes |
| 1E5 | High Stability Time Base | Automatically detected by hardware |
| 1E6 | Pulse Modulation | |
| H01 | RF remains in same state | |
| 1E2 | Audio Oscillator | |
| 1EP | Pager/Encoder | Supported only by HP8648A |
| 1EA | High Power |
Activated by CONFIG_CAL,4,22 → 22 dBm max output;Disabled (standard) = CONFIG_CAL,4,14.5 → 14.5 dBm max output;HP8648A supports only 13 dBm; High Power option not available for HP8648A. |
| HP8648A OPTIONS - CONFIG VALUE | |
|---|---|
| Value | Description |
| 34 | No OPT |
| 42 | H01 RF remains in same state |
| 162 | 1E2 Audio Oscillator |
| 170 | H01 RF remains in same state + 1E2 Audio Oscillator |
| 290 | 1EP Pager / Encoder |
| 298 | H01 RF remains in same state + 1EP Pager / Encoder |
| 418 | 1EP Pager / Encoder + 1E2 Audio Oscillator |
| 426 | H01 RF remains in same state + 1EP Pager / Encoder + 1E2 Audio Oscillator |
| HP8648B/C/D OPTIONS - CONFIG VALUE | |
|---|---|
| Value | Description |
| 99 | No OPT (also sent as 97 by Service Support Software). No difference observed. |
| 101 | 1E6 Pulse Modulation |
| 105 | H01 RF remains in same state |
| 109 | 1E6 Pulse Modulation + H01 RF remains in same state |
| 225 | 1E2 Audio Oscillator |
| 229 | 1E6 Pulse Modulation + 1E2 Audio Oscillator |
| 233 | 1E2 Audio Oscillator + H01 RF remains in same state |
| 237 | 1E6 Pulse Modulation + 1E2 Audio Oscillator + H01 RF remains in same state |

***Keep the description PDF file in the same directory as the Python GUI script to enable opening it via the "PDF DOC" button.
| Adjustment | Procedure Description (.pdf) | Python Script (.py) | Additional files |
|---|---|---|---|
| AM Level (8648B/C/D Only) | |||
| AM Level: FE (8648B/C/D Only) | |||
| Predistortion and Detector Offset (8648B/C/D Only) | |||
| Prelevel (8648B/C/D Only) | |||
| Output Level: FE (8648B/C/D Only) | |||
| Time Base DAC (All 8648A/B/C/D) | |||
| Motherboard Audio Path (All 8648A/B/C/D) | |||
| DCFM (All 8648A/B/C/D) | not required |
||
| LF Output Level (Most 8648B/C/D) |
Automated Adjustments for HP8648A:
1. AM Level and Distortion (8648A Only) - Done
2. Detector Offset: (8648A Only) - TBD
3. Output Level (8648A Only) - TBD
4. AM Modulator (8648A Only) - TBD
Note:
1.
OUT TUNE DAC accepted values: 0 - 4080, step = 16. Only multiples of 16 are stored exactly. Any value not divisible by 16 will be truncated down to nearest multiple of 16.
2. Certain parameters cannot be overwritten and can only be read (marked as ‘Media Protected‘). Attempting to write a new value will trigger a ‘258: Media Protected’ error on the display.
3. The SCPI commands are not case-sensitive.
![]()
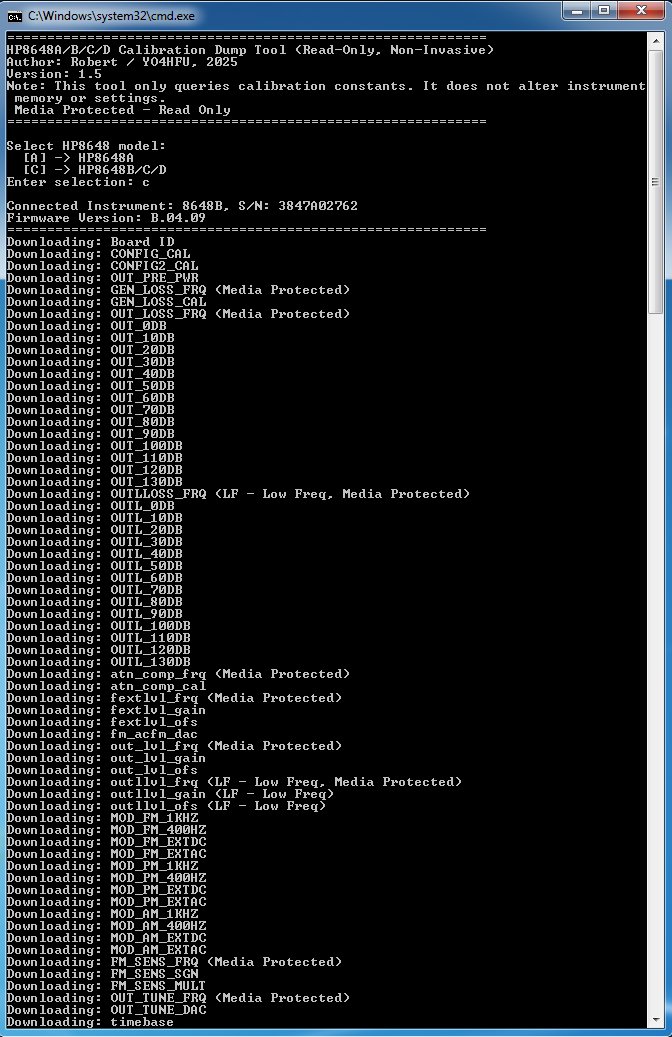
![]() HP8648A/B/C/D Calibration Downloading Tool v1.5
HP8648A/B/C/D Calibration Downloading Tool v1.5
(used to read/backup calibration tables – non-invasive operation)
Example: Screenshot, Calibration table, Download Log, Download GPIB Commands Log (VERY INTERESTING)
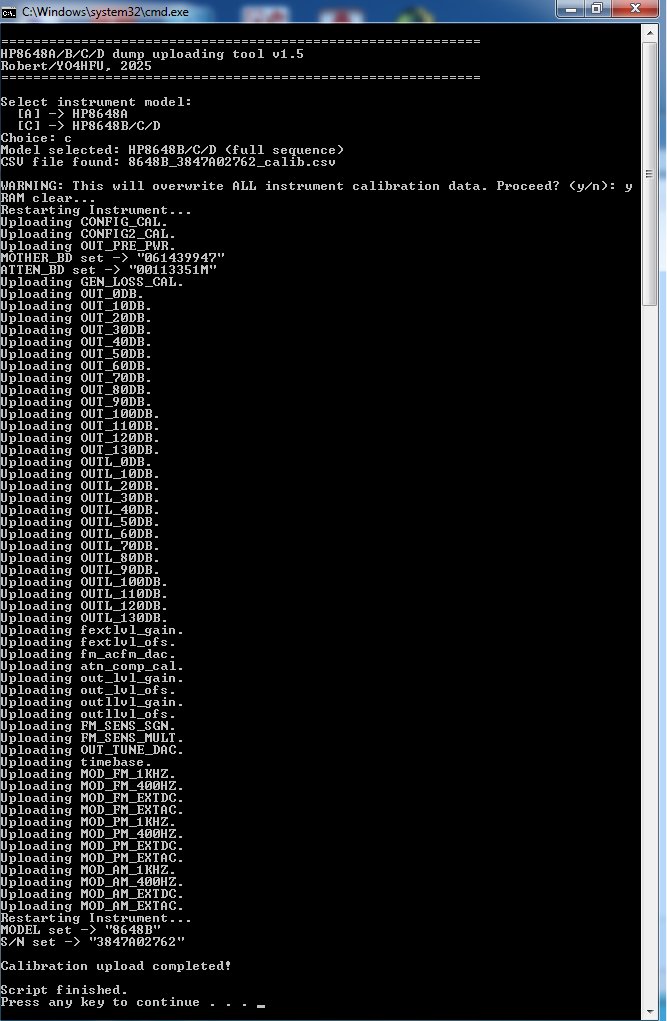
![]() HP8648A/B/C/D Calibration Uploading Tool v1.5
HP8648A/B/C/D Calibration Uploading Tool v1.5
(used to overwrite the instrument calibration table using backup file)
Example: Screenshot, Upload GPIB Commands Log (VERY INTERESTING)
![]() NI MAX v16.0 (GPIB communication / interface driver), received togheter with chineese NI GPIB-USB-HS interface. Check how to setup NI MAX GPIB.
NI MAX v16.0 (GPIB communication / interface driver), received togheter with chineese NI GPIB-USB-HS interface. Check how to setup NI MAX GPIB.
![]() Python 3 (link) - last WinXP supported ver.3.4.4; last Win7 supported ver.3.8.5
Python 3 (link) - last WinXP supported ver.3.4.4; last Win7 supported ver.3.8.5
![]() How to Install Python and Run Your Script – Step by Step
How to Install Python and Run Your Script – Step by Step
![]() HP8648A/B/C/D Internal latches list
HP8648A/B/C/D Internal latches list
![]() HP8648 Display messages
HP8648 Display messages