|
For weeks I
received e-mail from all over asking me what that strange noise was that could be heard on 14.080 most nights! I was
completely stumped and could not find the answer until I finally talked to
the A.R.R.L. technical department. What we were hearing was MFSK. Actually it was
MFSK16, a MFSK variant developed by Nino Porcino,
IZ8BLY which he calls Stream. MFSK16 has 16 carriers spaced
15.625Hz apart, operating at 15.626 baud. This occupies about 316Hz
bandwidth with a data rate of 62.5bps, or about 80 wpm. However it has
built in FEC error correction which reduces the text throughput to about
42 wpm or 31.25bps. My first contact was with Bill, K2ZEL in Florida who,
thankfully having the patience of Job, worked me through the QSO.
Wow! that is a fantastic mode. |
| First let us go through some of the features of the main screen. Fire up the program and you will see a screen similar to the above. So! what do we have? The top row is the Menu bar giving you access to all the required parameters to control the software. Then you have a row of quick access buttons which are really handy. These include clear screen, set volume, and AFC. The log window is next. This is where you will put in the QSO information. Remember that the Macros use this info so don't forget to fill this out during a QSO. The receive window is next followed by the transmit window. This is where you will type stuff in ready to send out. Below this is a set of 13 Macro buttons, all of which you can edit. |
Tuning a Signal |
|
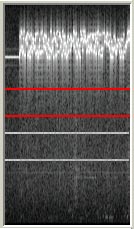
| Spectrogram
Operating
Frequencies Use USB above 10mHz and LSB below. | The screen shot at left shows the
Spectrum, or Waterfall Display.
The distance between the two red lines is 300Hz, similar to the
Mark and Shift frequencies of Rtty. These are at
1kHz and 1.3kHz. Ok, the broad white band is the MFSK signal and the objective is to get this placed between the two red lines. Notice on the lower left side of the signal there is a small white line. This idle carrier is transmitted briefly at the start of each over. Also notice the two gray lines below the red lines. These only appear when you put the curser in the spectrum window. They move up and down with the movement of the mouse. If you place them over the MFSK signal and click the left mouse button, the signal will snap in place between the red lines. However the MFSK signal has to be within 4Hz of the red line before the ALC will take over. I find that when you move the gray lines over the MFSK signal, if you align the bottom gray line with the idle carrier ( you can tell you have perfect alignment when the color of that segment of line changes color. On mine it changes to Cyan), then left click, it will be perfectly aligned and you will start to see print within a second. This delay is caused by the FEC decoder routine. |
|
Configuration With these setting you should be able to get on the air and start having fun |
Hardware
Requirements
|
| Using the Macro Buttons |
| There are 13 buttons at the bottom of the screen which will let you send out pre-written buffered messages. The first, named CQ is edited on the File>Preferences>General page. All the rest are easy to edit. If you right click on any of the remaining 12 buttons an edit window will open and you can change the button name by writing in the small window at the top. In the main window type the message you would like to store in that buffer. There are some special commands called Metacommands, commands that will allow you to do various things within the buffered message. These include automatically picking up the Others Call sign, Name and RST from the log window. A Time Stamp command is also included. If you click on the word Metacommands above I have arranged for a popup to display a list of these commands. Print them off ! |
|
Don't forget that this software uses the
computer sound card and the Radio must be interfaced to the Computer. That is no big deal, just follow the suggestions on my Hook-up web page. Please print off and read the help files.
There's a lot of great information in there. |
|