Digipan 2.0
by Ernie Mills, WM2U.
Please print this article and use it as a hand out at Club talks and lectures

tnx Dany Surquin, in .pdf format ON4NB  or in text http://www.on4nb.be/digipan.htm

Possibly regarded as the PSK standard interface for PSK31 and PSK63 operation. It is the result of a joint effort between Skip Teller, KH6TY and Nick Fedoseev. UT2UZ.  This is a very easy program to download, install, configure and operate. It is well supported and would you believe it is Freeware.
Digipan stands for Digital Panoramic Tuning and brings to the operator a panoramic display of the frequency spectrum in the form of an active dial scale display extending the full width of the computer screen. With existing transceivers you get a display coverage of 2000Hz to 3000Hz of spectrum space, which if the IF bandwidth of the rig is set wide open, you could see as many as 40 to 80 PSK31 stations simultaneously.
With this unique waterfall spectrum display you can immediately see unused frequencies  available for calling CQ. Unlike the Digipan 1.xx release(s), a second curser is not needed, a window to the right of the Rx window  copies up to 26 different QSO's simultaneously.  To work a station simply click on the line of interest and the curser jumps to the position on the waterfall indicator and your ready to go. Alternately click on the waterfall trace.Oh! try the right click menu on the Multi Channel window..... handy eh?


Screen shot of Digipan main window

A very nice addition to this release is the Lookup button, which even if you are in QSO, will take you directly to QRZ or Hamcall. This will display the information on the Call Sign that you have entered in the Log Bar. Very handy eh?  To configure this click on Options | Call lookup at.. and select your choice of providers. This button is actually a Macro and takes up the F1 spot. You can change it. The other macro Buttons are discussed below.
The Log Bar is next. It is self explanatory although there are some special features. If you left click on a Call Sign in the Rx window it will be put into the Call Box of the Log Bar. For Roundtable operation, a second, third, etc. call may be appended to the Call Box by highlighting the call and selecting Add call from the right-click menu. If this is done, all buttons using the <CALL> macro will also use the additional calls. A Name can be typed into the Name box or pointed to on the screen with the mouse, and double-clicking the left mouse button will copy that name into the Name window. A RST may be entered into the Rec'd box by double-clicking on any three-number "word" on the RX screen. Holding Shift and double-clicking on a word will append that word to the QTH box. By holding down Shift and double-clicking each word of a QTH in turn, a multi-word QTH can be entered into the log without typing.

Ok, lets get this show on the road. First off download the software from http://www.digipan.net/ , click on the download link, and install 
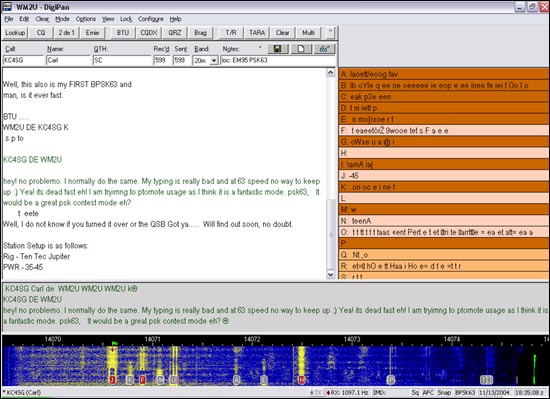
it. You have interfaced the Computer to the Radio eh?  If not go to my hookup page at http://www.qsl.net/wm2u/interface.html and do it.
NOTE: this from Skips web page: 
Digipan 2.0 works best on a 266 MHz or faster Pentium processor and requires Windows 95 or greater.
Note de ON4NB
 : I installed Digipan 1.7 on a PC running under Linux UBUNTU. It works without any problem  with the program WINE configured as a Windows XP, with the same limitations as those  quoted hereunder  for Windows Vista

Fire up the program and you will see a window similar to the above. Click on Configure | Personal Data, and fill in your Call Sign, Name,  and QTH. Now go to View and make sure all the options are selected except for underline sent text, then click on Options and select AFC, Snap and Rx. In the Mode menu item check BPSK. In the Clear menu you will find that you can selectively clear any or all of the windows. These settings are just for you to get up and running fast. You should go back later to select the various options to your preferences. Snap will make the cursor 'snap' to the closest signal.
Under the Configure menu, you can write your F(n) macros, your Ctrl-F(n) macros, it is a good time to save your Macros using the handy Save Macros menu link. Set the sampling rate to 11025Hz if it is not already set. For a good explanation of the sampling rate please refer to Peter Martinez' help write-up hereClick on Set-up then Sampling Rate. Don't forget to tell the program which is your active com port and while your at it select which line you are going to use for PTT switching. RTS or DTR! On this menu you can also adjust your preferences for window(s) color and font. I like to have both the Rx windows different colors so that I know which is the active window. The Multichannel window will tax your artistic abilities since you can set the channel backgrounds to indicate what the status of that copy is. The status options are Active Channel, Inactive Channel, No Carrier, and Multichannel coloring effect. The later is brilliant. You can set the channel background color to alert you to any channels calling CQ or if you put your friends call sign in there it will instantly alert you when he/she appears on band. Nice eh?

Note de ON4NB : If you use a portable PC which does not possess a port COM RS232, you will have to connect at first an interface « USB towards RS232 » before being able to settle this parameter - if the port COM  is not connected or not recognized, Digipan will give you an opening " error COM1 "        
So, using the settings above will get your system working. Read the help files to tune the settings for best performance and for you personal preferences.
The IMD indicator  (Intermodulation Distortion), is unique to PSK. Since the RST values, Readability, Strength and Tone, don't tell the operator much about the condition of there PSK  transmission, the IMD is used instead. This measures the ratio of the 3rd harmonic to the main signal and the result is logarithmic. A value of -25dB is considered good.

Hows this for a LID! You can see his bad harmonics out to the 15th

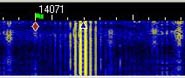
This waterfall screen shot  is an example of a badly overdriven sound card. Notice that you can count out to the 15th harmonic and it is splattering over 500Hz taking out at least 6 PSK31 QSO's

Click the Waterfall Drive in the Configure menu and set the microphone slider to about 75%. Now, into a dummy load, click the T/R button and send out a signal. Click on the Transmitter Drive also in the Configure menu and increase the Volume, and/or Wave slider, while watching the ALC indicator on the rig.  As soon as the ALC starts to read, STOP. This is the maximum power output you can use to maintain a clean signal. On my system this will typically be between 50 and 70 watts output.
Hey! now this will really bug you when a Moron opens up on Amtor right on top of ya 
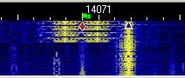
This waterfall screen shot shows a Pactor signal that fired up directly on top of my  PSK QSO, completely wiping out the Rx text. Some sick puppies out there eh!.
You can see that the Pactor signal could wipe out about 4 PSK QSO's. but the switching clicks are covering the complete display of the waterfall indicator from one side to the other. Please make sure your signals are not causing this type of splatter

It is a very easy log to use and edit
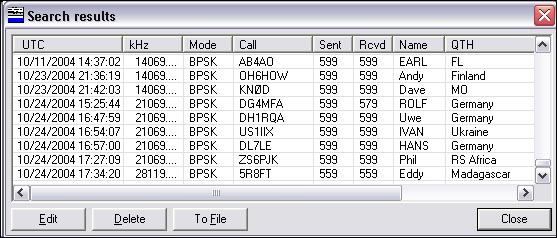
You will notice, just below the log buttons and to the right a bit, there are three buttons we have not talked about. These are your logger control buttons. The small "*" at the left of these shows you that you have not entered the latest info into the log yet. To do this simply click the Save button. The button with the eyeglasses on pops up the logger editing window, and from here you can Delete, Edit or Send all or some of the log to a file. This file can then be easily printed out or e-mail mailed.. 

I have never known another program that makes using the Macros this easy

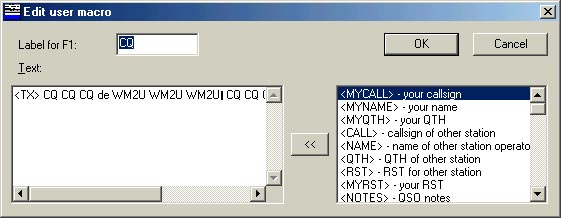
Before I let you go, just a quick word about Macros. Writing Macros in Digipan could not have been made any easier. There are twelve buttons along the top of the main window.  These are the F(n) macro buttons and if you click the small button marked with "^" you will be presented with twelve Cntl F(n) macro buttons. If you right click on any one of them, an edit window will open.
First off enter a label for your macro button in the small window at the top. The larger window to the left is where you write your macro. Now checkout the window to the right. These are your metacommands which you can embed into your macro script. Click the curser in the position on your text where you want to embed a metacommand, select the metacommand from the right window and simply click on the '<<' button to enter it. Neat eh!
To keep your transmitted text lookin! good, don't forget to add a <CR> carriage return to the end or beginning of the macros that you will be using to stack or queue. This will allow your text flow to be even and pleasing. I think the metacommands are pretty well self explanatory so we will not dwell on this point any longer. Click here for a complete list of Macro Commands.

Under Configure/Waterfall drive, adjust the appropriate Windows Recording Control level controls for a speckled blue background on the Spectrum Window, which is the window on the bottom of the DigiPan screen with the calibrated scale across the top. If you are using Windows 95, to get to the Recording Control window, select Options/Properties/Adjust volume for recording and press OK. Be sure either Microphone or Line level controls are checked for display. Press the T/R button on the Control Bar, and under Configure/Transmitter drive, adjust the Volume and Wave level controls so that the ALC is just sat on Zero. Once the ALC reads you could be distorting the output. Press the T/R button again to stop transmission and return to Receive mode.
Ok, now for those who want to work split. Some DX operators will work split especially in an attempt to control a pile up. Checkout the menu item named Lock. Click on LOCK and you can either switch into Split mode or switch out Split mode. Lock TX Frequency. When this is selected, the TX frequency is fixed at the position of the cursor, and the flag above the cursor changes to red. When you select a Rx frequency the little flag will stay at Tx and your curser will follow you to Rx. This allows you to transmit on one frequency and receive on another. Unlock TX Frequency When this is selected, transmission will occur on the same frequency as receive, as indicated by the diamond or triangle cursor, and the flag above the cursor will be green.
Having said that, it is possible to actually be Tx on one frequency and Rx on another even when Unlock TX Frequency is selected. To correct this rare situation click on Configure then select Sample Rate Corrections. You will be presented with either of two (2) windows, one to adjust the TX, the other the Rx. Skip, KH6TY then says "Adjustment is by trial and error. I suggest you try 1000 PPM increments for TX first, minus or plus, until the difference is close to zero, and then smaller increments. Then quit DigiPan to save the values."  Many thanks for that info Skip.
Setting up the DigiPan dial scale to read actual transmitted RF frequency: Under Configure/Band, mark the band you wish to be displayed on the dial scale as active, tab to the Spectrum Start box and enter the Spectrum start frequency in kHz, or kHz and tenths of kHz, and check if you want the dial scale to display the Tone frequency, USB, or LSB. If you select USB, which is the standard, the Spectrum start frequency to enter is the low end of the band segment you want to cover and if you select LSB, it is the upper end of the band segment. It is important to note that the Spectrum Start frequency is the "zero beat" frequency, which is the same as the transceiver dial setting, so it is suggested that the Spectrum start frequency, and accordingly the transceiver dial, be set about 0.5 kHz away from the first desired frequency of operation. As an example, for 20 USB meter operation of PSK31, starting at 14070, enter 14069.5 as the Spectrum start frequency. Set your transceiver dial to 14.069.5 MHz and DigiPan will tune from 14.069.5 MHz to 14.073 MHz for you. Do not touch the transceiver dial after setting it and the DigiPan dial scale will read correctly. Assign the frequency to a memory if you have one.

It is strongly recommended that the operation of PSK31 and PSK63 are practiced in separate bands. There was a problem when a few of the software packages that made it possible to switch between PSK31 and PSK63 on the fly, caused bad QRM to adjacent QSO's when switched from PSK31 to PSK63. If it is necessary to run switching tests, use the PSK63 section. It is therefore recommended that the following be adopted.
The calling frequencies for PSK31, that have been decided upon for the time being are:
1838.15kHz, 3580.15kHz, 7070.15kHz, 7035.15kHz, 14070.15kHz, 21070.15kHz, 28120.15kHz, 50.290mHz, 144.144mHz, 222.07mHz, 432.2mHz, 909mHz and
10137.15kHz, 18100.15kHz and 24925kHz suggested for the WARC Bands.
The calling frequencies for PSK63, that have been decided upon for the time being are:
1838.15kHz, 3582.5kHz, 7072.5kHz, 7037.5kHz, 14072.5kHz, 21072.5kHz, 28122.5kHz, 50.290mHz, 144.144mHz, 222.07mHz, 432.2mHz, 909mHz and
10142.5kHz, 18102.5Hz and 24925kHz suggested for the WARC Bands.

Use the widest IF filter available. If the IF filter is 3.5 kHz wide, stations between 14.070 and 14.0730 should be workable. If the IF filter is only 2.5 kHz wide, stations between 14.070 and 14.072 will be workable. Even though it may be possible to copy strong stations somewhat outside the filter bandwidth, attempted transmission too far from the filter passband will usually result in operation at greatly reduced power levels.
If you need to use LSB, check LSB, set the transceiver to 14.073 MHz, and the Spectrum Start frequency to 14073.0 kHz, and DigiPan will tune down 2.5 kHz or the width of the IF filter for you. DigiPan will remember the dial scale settings you enter, so when you change band, it will usually only be necessary to select the active band and the dial scale will read correctly. You can edit the default Band and Spectrum start frequency to any band and any frequency and the DigiPan dial scale will read correctly, as long as the frequency is entered in kHz. Just remember to always set the Spectrum start frequency and the transceiver dial frequency to the same value and select the same sideband on each.

That's it! Nothing to it eh! So click on a few traces on the waterfall indicator and see if anyone is sending out a CQ. If so click on the call sign and it will automatically enter  into the call sign window of the logging bar. If you arrange a Macro to say <TX><CALL> de <MYCALL><RX> and click on it your Rig will fire up and the station will see you calling him. While he is transmitting you can type your response in the TX window, stack Macros on the end of your text and even embed metacommands ready for transmitting in your turn. Oh! if you click on text, it will automatically be entered in the Name field and if you hold the shift key and click on text it will be entered in the QTH field.

Skips web page says: Digipan 2.0 works best on a 266 MHz or faster Pentium processor and requires Windows 95 or greater

Note de ON4NB : I installed Digipan 1.7 on a PC running under Linux UBUNTU. It works without any problem  with the program WINE configured as a Windows XP, with the same limitations as those  quoted hereunder  for Windows Vista

OK. A quick comment off Skip about Microsoft Vista, in part he says,  ".... Vista is a problem with Digipan because configure/transmitter drive and configure/waterfall drive no longer work because Microsoft left out sndvol32.exe" 

Skip said:
VISTA is not backward compatible with XP, so transmit drive and waterfall drive do not work in DigiPan. You have to set the transmit drive level with the VISTA speaker volume control and the waterfall drive with the microphone or line input gain under VISTA.

Note de ON4NB : Under Linux, as under Vista, you must adjust the levels  for Microphone, Line input and loudspeaker  by the sound card settings instead of Digipan, it is logical !

A comment about CAT control: 
If you are trying to achieve PTT with DigiPan and CAT, be aware that DigiPan does not support PTT by CAT command.

..... and this problem came in by Don, WA6FYU:    "Why am I not able to save the font size with digipan 2.0 ??"

Skip said:  DigiPan should save the font size if you set the font and then quit DigiPan to save the configuration. Upon starting, DigiPan should use the new font. If it does not, quit DigiPan, delete digipan.ini in \Windows, restart DigiPan, and re-enter your personal data and reprogram any macros you changed. This will return DigiPan to the virgin state and I have not heard of fonts not being saved. It could be that somehow your digipan.ini configuration file is locked or corrupt so changes are not saved.   thanks Skip
U
hmm by the way! In the modes menu you will find that there is a setting to allow the Rx of Pactor stations. Great thing this. :) You will, at sometime, be stomped on by a Pactor station either on purpose or maybe one of those infernal mailbox robots. Simply switch to Pactor mode, get the date, time, mode, and frequency of the occurrence plus any other relevant details and email them to the FCC. They are very interested in stopping this illegal Pactor interference. Skip has made it easy for us to email the FCC with the correct data by filling out an online form. It will send the information to the correct person, simply goto the Digipan download page at http://mywebpages.comcast.net/hteller/digipan/award.htm, fill in the Form and press the Send button.
Note:
If the PACTOR signal is merely adjacent to your QSO partner's signal on the waterfall, it may be affecting the AGC of your receiver, the effect of which can sometimes be reduced with passband tuning, IF shift, or a more narrow filter, but it is not considered interference, and should not be reported as such.
Finally a word from Skip, KH6TY on Super PSK63.
  • 100 wpm character transmission speed for contest exchanges and  macro transmission versus RTTY at 60 wpm
  • Only 1/5 the bandwidth of RTTY - capable of displaying 24 signals simultaneously on a waterfall or spectrum display
  • Fast, easy, point-and-click tuning using the mouse or keyboard arrowkey tuning
  • Capable of color thumbnail portrait transmission in less than 2 minutes
  • Faster sync recovery than RTTY, resulting in fewer errors
  • Requires much less power than RTTY for the same communications performance
  • Identical to PSK31 except for a wider bandwidth of 63 Hz
  • Improved polar path performance compared to PSK31
  • Works with any soundcard-equipped Windows computer and SSB transceiver
  • Initial testing on 20 meters between 14072.5 and 14080.0 KHz, 2.5 KHz higher than PSK31 on other bands
  • High-speed transmission of macros and brag files

Here are a few words of Skip, KH6TY on a few topics.

Question:  Sorry to bother you, but can you please answer a question? I use DigiPan 2 for contesting.  Is there a function in DigiPan that will allow a CQ to be sent over and over without having to keep pressing the macro for the CQ? I cannot find a command that allows this.
Skips Answer: There is no repeat macro function in DigiPan, but fldigi has one, and also has a multichannel display and a contesting log. My latest efforts have been working with fldigi as UT2UZ is not interested in DigiPan anymore. Go to http://www.w1hkj.com/alpha/fldigi-flarq/ and choose your version.

Question: Hi I saw you digipan article in the internet and I am having problems editing my QSO log.  When I click on the eyeglass and the log appears and I want to delete a QSO  it  gets deleted and I close the log  but  when I open it back up  it is back there again.  Same thing with editing  I get to edit  it  and when I close and open its still there basically it does not save. Is there any trick on saving after editing? 
Skips Answer: It works here. I wonder if his log file somehow got set on read-only.

Question: Please it's possible include in DIGIPAN just a section for contest please copy on MixW for serial number etc.. hi hi hi
I LOVE DIGIPAN I have just a little problem  impossible to using DIGIPAN in contest be cause, serial number it's not generate by your programme.  please I need a reponse
Skips Answer: DigiPan was intended to be a ragchew mode, so there is no serial number capability. Just configure MixW to be like DigiPan (unfortunately, though, MixW does not have multichannel decoding like DigiPan) and you can get serial numbers.


Well that should get ya! going and on the air fast. So what ya! waiting for? Hope to see your trace in the waterfall soon eh! Enjoy, Ernie WM2U