My 93 Thunderbird Under Construction
Installing QA1 Coil Overs
Have your car on stands or a lift that lifts the body, and not by the wheels, and have your old springs/shocks removed.
Using a safe spring compressor, compress the old springs and remove the top spring seat, and slide the spring off and carefully remove the compressor.
Remove the round rubber bumper from the old shock shaft.
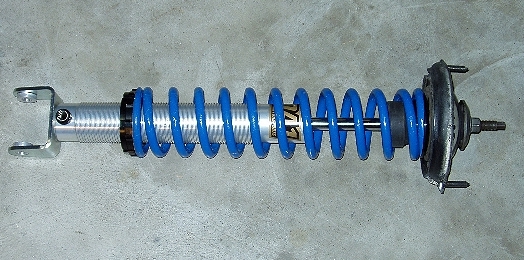
Note: the new coil over should have 2 aluminum QA!'s with 2 adjusting collars and 2 stainless steel adjustment bearings. The adjustment bearings are to prevent the springs from gouging the aluminum top piece and the adjusting collars, and to ease the turning of them. This would be a good time to put some type of light oil or WD40 on the spring ends and adjustment bearings to make turning them easier.
The 2 collars go all the way to the bottom of the QA1 threaded body for now,
Now slide on a adjusting bearing, your 2 1/2 x 14 spring, the second adjusting bearing.
You can slip on the round rubber bumper from your old shock. (this is not required. but added protection in case you bottom out some where.)
Now slip on the top spring seat on that came with the QA1s.
The last thing to go on, is the factory top spring seat, steel cap, lock washer and nut. Only tighten the nut so there are 2 or 3 threads from the shocks shaft showing. This will make turning the lower adjusting collars easier to make the initial adjustment.
Turn the lower adjusting collar and lock nut till it is as shown below, or hard to turn with out it
being mounted.

Turn the coil over so the the 12 position adjusting knob is pointed out, then slip the lower mount on to the lower control arm, and insert the mounting bolt with a flat washer on each side, and use either double nuts, or a self locking nut. Only mount it so it is snug. To get maximum weight transfer, these need to move freely.
Now, before you tighten the top mounting bolts, set the spring ride height setting to 6 3/4 inches. Put a stainless hose clamp under the lower collar nut to make sure it does not move. Make sure everything clears the lower mount, and you can lower the car some now to allow the top mounting bolts to go all the way through, and tighten the 3 nuts on the studs, and the large center mounting nut. Doing it this way will allow you to make the initial spring adjustment with out full spring pressure on it.
Do both sides, then lower to check ride height. A change of about 3/4 of a inch at the lower collar adjustment will equal about 1 inch at the wheel. I use the 4 position up from minimum for daily driving.