A RARE "5 Volt" CLEAN LINEAR USB Power Supply (for general operation)
Before we dig into the details on this receiver first lets cover a
nice QUIET non switching power supply to use with it first (for those who use
117 VAC for mains power). We have covered this topic in the
past with other radios that use a USB socket for operational power. What to do
about the excessive RF noise that ALL switching AC adapters emit for
use with a HF receiver ? CCrane in California USA still has
available (at the time this report was assembled) an excellent, RARE and fairly inexpensive ANALOG / LINEAR /
REGULATED 5 V 900ma
USB power supply that provides enough “cool” and CLEAN current for
operation with receivers that use a 5 pin MINI USB socket (CCrane Item # CWTPLP, Model: SR-0509U). Yes it has a good old power transformer and linear type regulator. If one is handy enough, can add four .01
disc ceramic capacitors across its internal 4 power rectifier diodes to
make it even cleaner (kills off diode hum for close indoor antennas,
see photo). We just soldered them across the top of each of the diodes.
But this is not a requirement of course AND DONE AT YOUR OWN RISK ! Please Note : This adapter only comes in a 117 VAC input USA version. Sorry, we are not aware of any 220-240 VAC version.
Super RF quiet LINEAR 5 V AC Adapter with MINI USB connector (left). Sold by CCrane in the USA.
The downside is that the CCrane power
supply has a MINI USB output cable and you need a MICRO USB for this
Russian SDR so of course it will not work out of the box. Not to worry
as there are simple adapters available on ebay and elsewhere. Example adapter here but a warning here that it will be a bit stressful on the receivers USB socket (so be very careful).
If one is electronic handy could just change out the DC output cable
for the proper one with a USB "Micro" plug (just dealing with the red
and black wires of course). The CCrane adapter above is screwed
together for easy access.
IMPORTANT - WARNING ! : With
the operational current consumption approx. 300ma (as indicated in the
manual), normal operation with this CCrane AC adapter is no problem at
all. However when charging the
internal lithium ion battery, current jumps to around 850 ma PEAK (NOTE : RECEIVER OFF)
and makes this supply operate HOT and near it's maximum rating ! It would be a good idea to use a 2
AMP USB switching type adapter when charging the internal battery to rule out any
possible heat failure problems down the road of the linear power supplies regulator.
If you are NOT a user of it's internal battery (used as a base tabletop receiver only) AND for those electronic savvy enough,
the battery can be CAREFULLY unplugged from the main PC board. The LED
charge indicator will just stay in constant "dimmer" RED. This way one will not
have to worry any overheating of the SR-0509U analog power supply. HOWEVER, the battery should be connected (and properly charged) when doing any firmware updates (see below) !
I will NOT be held responsible for any info that is listed here
ALL DONE AT YOUR OWN RISK ! |
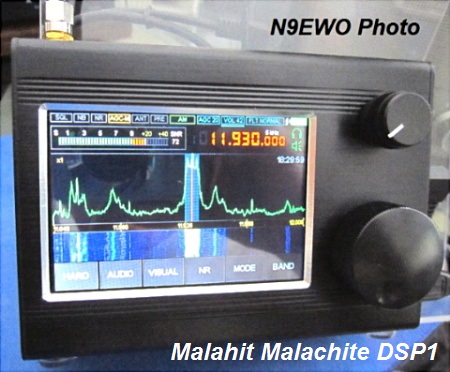
Solid Case / Front Mounted Encoders / Large Rear Mounted Internal Speaker / Cool Operator
Housed in a solid metal aluminum
body with a very attractive outer anodized black color. It is held
together with 8 metal screws for easy access. But of course one
only needs to remove 4 of them for EASY rear panel access (say to
jumpers 1
and 3 on the PC board). Being in all metal case rules out the use of
any MW internal loopstick antenna and it does not offer this.
The two mechanical smooth type "Volume" and "Tuning" encoders are FRONT
mounted where
they should be. These encoders also have a "push in" function so as
normal a bit of "side to side" play exists (but is not of any excessive
level). However we have to question the quality of the encoders used,
as with the test sample tuning encoder was slightly tight in one area of
rotation (time will tell here of course). The 2
different size plastic knobs are of a push on variety (use no set
screws).
UPDATE / TIP :
In use the test sample main tuning knob encoder (knob) started to not
take "push in" entries (tuning step). After investigation we discovered
that after a good 18 months of use the knob was NOT being pushed in far
enough to activate the encoder contacts as it was being blocked by the
case (so no tuning step function). To correct this bug, we removed the
"pull off knob" and to the tip of the encoder added a very tiny dot of
filler taken from a base sheet of some stick on plastic feet. This kept
the knob from bottoming out and fixed the issue completely.
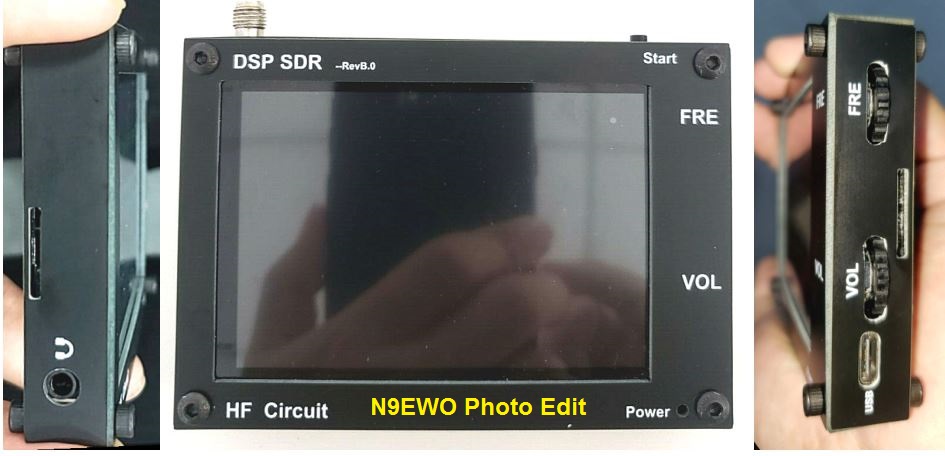
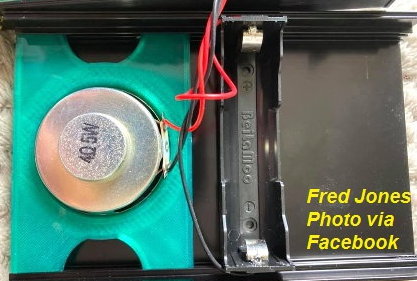
Internal rear mounted 50mm (2 inch) 4 ohm 3 watt speaker is provided. It is missing
any felt or fine mesh screen protection in the front of it for dirt / dust penetration. On
the right side of the cabinet is a single dual color LED for
charging status (RED and GREEN) of the included internal Lithium Ion battery. a on-off
"tac" type button, plastic mini type stereo headphone jack and a MICRO
type B USB socket for power and computer connection including firmware
updates.
Cabinet remains cool to the touch even after hours of operation. So no heat issues and is nothing to be concerned about.
Arrived Fully Assembled / Kit Versions are Available
Receiver was received fully assembled ready to go out of the box.
It normally comes loaded with latest firmware for instant fun (no
activation is required).
There are kit versions available (or at least were at one point ?) in this case the owner
downloads and updates the receiver with the latest firmware (link and
procedure both provided in the owners manual). Also it is important to
point out that activating the firmware is FREE for those who have fully developed their design or a specific receiver is assembled from a printed circuit board purchased from the authors.
For those who have purchased one of the rouge Chinese copies and desire
the correct firmware, then a cost is involved ($ 55. USD at the time
this report was compiled, see email address at the bottom of this
report).
PLEASE TAKE NOTE : Be
sure and FULLY understand the firmware update procedure before hand.
What will appear on the LCD screen after the firmware update is completed is :
"THE DEVICE SOFTWARE HAS
NOT BEEN ACTIVATED" with 32 numbers in green below this text. These
numbers are to be forwarded to the developer (email again as given in
the owners manual) where you will receive a 16 digit code back to
enter in. This only needs to be done once, so will not be a needed for
all future firmware
updates. (Please Note : This procedure may have changed by the time you read this).
I will NOT be held responsible for any info that is listed here
ALL DONE AT YOUR OWN RISK ! |
Firmware Updates : Could Buffalo Non
Computer Folks / 3 Times to Power Up -
firmware 1.0d and 1.0e only
Microsoft Windows program that is used to accomplish firmware updates is not intended for
consumer use. It's a application that is targeted for developer
programming called STmicroelectronics “DfuSe application programming interface”. Carefully follow instructions as given in the translated English manual.
Be sure and use a decent quality SHORT USB-Micro cable with NO adapters (say 1m / 3 feet or under in length).
TIP (DfuSe version 3.0.5) : Install the PROPER USB Driver (32 OR 64 bit, Microsoft Windows 7, 8.0 or 8.1) BEFORE
attempting any firmware upgrade. They are located in "Bin > Driver".
Drivers are all "exe" installs. We used Windows 7 with a 32 Bit
OS and had no driver or installation issues (going from firmware 1.0d
to 1.10b and to 1.10c / 1.10c Rev2). Using a 64 Bit OS was not tested but reports
that the 64 bit driver can have installation issues (if it can be installed at all?) on certain
computers with DfuSe.
It is possible to use the alternative Stm32CubeProgrammer
as
well (as recommended by the developer RX9CIM). Not tested and may
require Java (JRE only) to be installed.
This information is not found in the owners manual at the time this
report was compiled (see You Tube video link below). But via Mark
KD9NXV this is the answer for 64 bit computers (and
it's driver) including windows 10 computers. Again we have NOT tested
this programming software with Windows 7 (or any other Windows
operating systems).
IMPORTANT
: Before
performing any firmware updates , it is a good idea to shut off any
anti-virus programs. This is especially important with the Stm32Cube
program as it uses Java. Also
be sure that a properly charged battery is installed before you start
(of course any external USB battery cannot be used when doing firmware
updates).
WARNING : FIRMWARE IS NOT INTERCHANGEABLE BETWEEN DSP1 and DSP2 VERSIONS !
With firmware versions
1.0d and 1.0e (only) It requires that the power
button be pressed THREE (3) times
to power ON. This
was done to prevent undesired operation when moving it around. However
with firmware 1.0f and above it was returned to just one press to turn
on. Later firmware has a way to restore the 3 presses power on but
requires PC Board soldering. In testing we found ONE press to be MUCH
more preferable.
To power OFF, one pushes the same "tac" switch for approx. 3 seconds until a CW
stream is heard in the speaker.
Firmware Bug with 1.0d and 1.0e ONLY - Receiving VHF
A firmware bug as reported with version 1.0e by Vincent Tutor and as
also experienced with the 1.0d test sample. When listening to MW (AM
Broadcast) signal on say 1120 kHz and then switch to say a VHF
frequency (example: USA 162.550 weather channel) using direct keyboard
entry the receiver turns dead. If a memory channel where
a VHF 2 Meter frequency has already entered is accessed, then
AFTER enter the say 162.550 MHz frequency via direct keyboard entry,
THEN it receives normally. Oddly this does not effect higher
frequencies say in the 460 MHz area. Obviously this is a firmware bug.
Another way around this bug is to store one 2 meter frequency and then
the desired 162 MHz frequency in Memory (access the 2 meter one first
then the 162 MHz one after).
Anyway for the record and the way around it for listening in the VHF
High Band area. UPDATE : This bug was TOTALLY fixed as with firmware 1.0f.
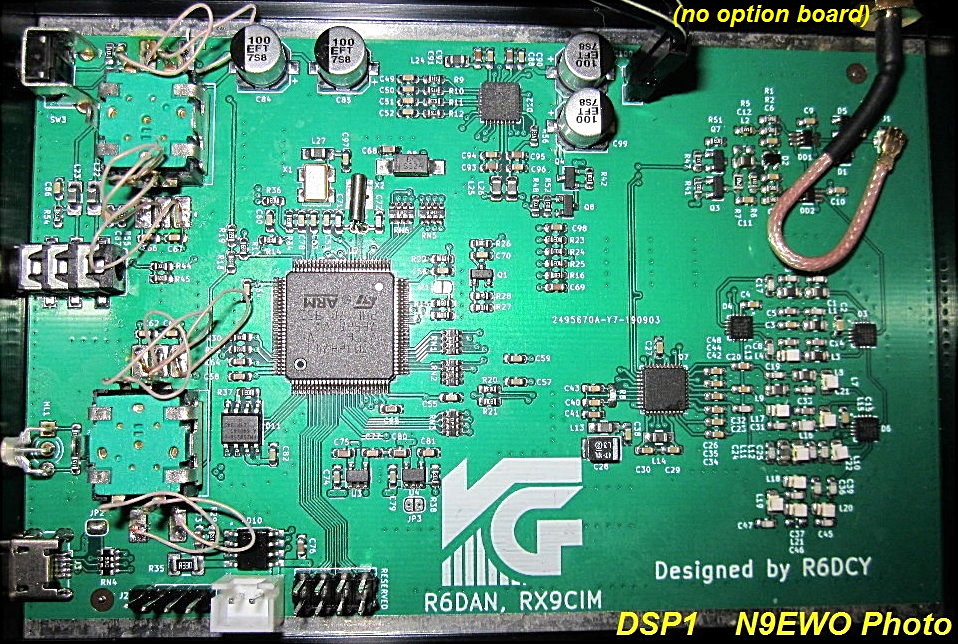
Basic Architecture using a STM32H743VIT6 Microprocessor / MSi001 Receiver IC / Internal Speaker / No Line Audio Output
RTL-SDR.COM sums up it's basic circuity layout as :
"This SDR runs on the MSI001 tuner
chip, which is the same tuner chip used in the SDRplay line of units.
However, unlike the SDRplay units which use a wideband MSi2500 ADC, the
Malachite-DSP uses an audio chip as the RF ADC. This provides a 16-bit
ADC, resulting in high dynamic range, but at the expense of the
available bandwidth which is only 160 kHz. A STM32H743VIT6 with ARM
Cortex A7 processor runs what appears to be custom DSP and GUI
software. The software doesn't seem to support DRM, but AM, WFM, NFM,
LSB, USB are all supported."
The stereo audio codec used is a NUVOTON (or equivalent manufacture)
NAU8822. It's integrated BTL speaker driver can provide a hefty 1W
output. The TOTALLY independent stereo head-phone driver to it's
1/8 inch phone jack is 40mW (at 16Ω). This does a not allow for
anyone to use a external speaker to be directly driven with the
headphone output. So if you desire to use a different external speaker
it will have to be a stereo amplified type using it's headphone output jack.
Excellent part here is the output can be selected to have either
Speaker output on, Headphone output
on or OR BOTH (just tap that icon area to toggle). This works out great
as the headphone out can also be
used for a always connected "defacto" line output to say feed a
external audio recorder. One just has to remember that the volume
control will affect the output level here (it's not fixed). NOTE : In
practice to archive proper "Line Level" this way (without having to
turn up the volume control to a excessive level) an external audio
preamp was added and then was easily brought up to a proper level
without have to blast the speaker audio. Preamp used / tested was the Rolls MP13 (using it's 1/4 inch phone jack inputs/outputs).
Front End Filtering / Optional "high Impedance" Front End Board / Included 19 Inch Whip Antenna
There are seven "front end" filters used.
- 0 to 12 MHz
- 12 to 30 MHz
- 30 to 60 MHz
- 60 to 120 MHz
- 120 to 250 MHz
- 400 to 1000 MHz
- > 1000 MHz
If this sounds vaguely familiar, it has the same identical "front end"
filter scheme as used in the "original" SDRPlay RSP1 receiver.
For improved HF reception with a (high impedance telescopic antenna) an add on board is (was?) available at an additional cost (not tested).
The optional PC board added :
- 4 "Front End" filters:
- LPF 500kHz
- Bandpass filter 500-1500kHz
- Bandpass filter 1500-4500 kHz
- HPF 4500 kHz
- An attenuator, adjustable in the range of 0-30dB with a step of 1dB.
- A source repeater with switching elements.
Included 19 inch Whip Antenna use is perfect for use
in the 144 MHz amateur and above. Of course it's no good for any MW /
HF / SW listening. Also whip use at
lower frequencies
is awash with microprocessor and LCD noise (external antenna using coax cable is a must, more information on this later).
Please see photo's at the bottom of this page for
internal PC board comparison and general parts layout differences as well as photo / additional information.
Near Full Spectrum Frequency Coverage with One Gap / All Modes
This DSP1 version of the Russian "Malahit - Malachite" frequency
coverage is near DC to Daylight from 50 kHz to 2 GHz. Gap exists
between 250 and 400 MHz. So for Military Air fans this will be a
disappointment. Unlike most scanner receivers sold in United States,
there are no gaps in the 800 MHz part of the spectrum.
Modes
provided are standard AM, USB, LSB, FM Wide and FM Narrow (CW / DSB and Sync added with later firmware). As is the
case with most SDR sets, this is totally independent of frequency. So
one can use NFM or WFM on HF if desired.
Accurate Battery Indicator / Charge Time
In the upper right hand corner on the LCD there is a battery icon that
indicates remaining capacity. It's unusually accurate. It has a 3 color
status. Green for good, Yellow for mid and Red for limited charge left.
if the "Vbat control" in the HARD menu is set at "Standart"
(Default) - the receiver will shut off automatically when the supply
voltage drops to 3.3V. Prevents total discharge of the battery. "Battery Low"
text is displayed in the Spectrum Scope area when it's about to be shut
off. In the "LOW"
setting (not recommended) - The receiver will continue to work below 3.3 Volts
until it does not allow components to operate. This is not good for the
Lithium Ion battery and could lead to premature failure.
TIP : The
actual current battery voltage measurement is available in the HARD
MENU (upper right hand corner). With firmware 1.10c and above this is
displayed over the top of the battery charge icon in the upper right
hand corner of the LCD.
It took 4 hours for a 2200 mah 18650 installed battery to recharge in testing, receiver OFF (starting with auto shutdown).
From mid-September 2020 the developers started to use the popular round
18650 type lithium ion battery HOLDER (for flat type only). (NOTE: Battery is not included
but is available in most parts of the world). (Fred Jones Photo via Facebook)
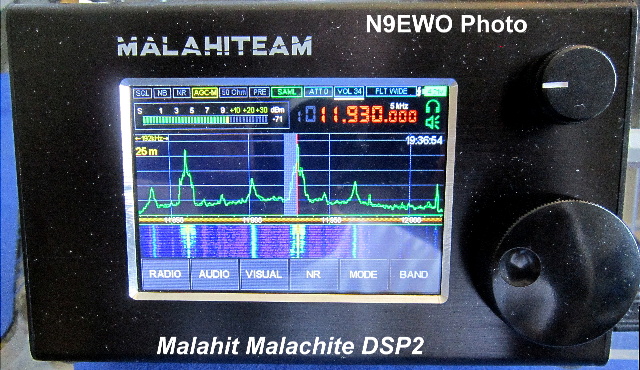
Beautiful Large 3.5 Inch Color Touchscreen LCD / Spectrum Scope with
Waterfall / Excellent Backlight Management / LED Backlight Interference
Issue
Beautiful super sharp full color 3.5 inch LCD includes touch
screen operation that also works with very little finger pressure (so
be it may need a extra 1/2 second to take, BUT only use a light touch).
It includes many features for backlight control and for maximum user
enjoyment.
Spectrum bandwidth is 160 kHz total with 3 scale settings. The scale settings allow for more detail and is very useful. This
scale setting Is toggled with a tap of the waterfall area. Some will
find the 160 kHz maximum bandwidth very limited. While this is true for
VHF-UHF frequencies, with MW and HF bands this is of little moment (is
more than adequate to be extremely useful).
Translated owners manual information on the backlight :
- Backlight brightness has adjustment - minimum and maximum value.
- The time after which the backlight level will be reduced to minimum (dimmed) value.
- The time after which the backlight will be turned off completely.
To change the settings, go to the VISUAL menu. Changes parameter values are performed using the encoder ENC_VOL.
To set the minimum backlight level, you must select the "BRIGHT MIN" parameter.
To set the maximum (working) value of the backlight level you must select the "BRIGHT MAX" parameter.
To
set the time after which the level will change backlight from maximum
to minimum, you must select the parameter "REDUCT TIME".
To
set the time after which the backlight turns off you must select the
"SLEEP TIME" parameter. This time is set relative to the "REDUCT TIME"
parameter. Complete shutdown possible only if the backlight is turned
off completely.
To turn the backlight off function on or off you must select the "LCD SLEEP" parameter. The value of the "LCD SLEEP ":
- Enable - Function of completely turning off the backlight is enabled;
- Disable - Function of completely turning off the backlight is disabled.
The sleep function is
easily deactivated (reset) by just taping the touch screen.
One can adjust the amount of Waterfall percentage (vs. the Spectrum Scope) viewed
on the screen. Also the color of the Spectrum Scope Screen trace
(Yellow is Default, the author prefers Green, easily changed) as well
as the height (sensitivity) of the Spectrum Scope trace. Spectrum Scope
fill can be turned off as well (as default). Called "FFT Fill" in the
VISUAL SETTING menu.
"Fly in the Pie" here is with the LCD backlighting (NOTE : Testing here based using EXTERNAL ANTENNAS with shielded coax feedline). Interference created by the
LCD's LED back lighting was experienced in the Mediumwave and lower
Shortwave bands (AM Mode). It sounds like a low level constant
heterodyne. With strong signals this gremlin will not be detected. Were
only able to eliminate this interference completely was to turn up the BRIGHT MAX
up 95 or 100 in the VISUAL SETTING menu. Good news is once the BRIGHT MIN kicks in (user adjustable
for the time this happens) the interference is reduced with any lower normal backlight settings but keep in mind
it does not totally disappear either.
Mind you this is a known hardware issue and at it's price point is not a glaring drawback (not a deal breaker).
UPDATE : This
minor MW / SW backlight interference is less of a problem as one tunes
up in frequency. By the time you get to the 31 meter SW broadcast band
it’s near non existent. Tends to be in "cluster – blobs" (that is it
does not destroy the entire band when it occurs). Also it is
indifferent (varies with band conditions). Using manual ECSS mode (zero
beat using LSB/USB modes) helps to reject this a bit. Again at it's
price point this should not be considered a major drawback. IMPORTANT NOTE
: This issue was addressed with firmware 1.0f and reduced (more like
nearly eliminated) with the later tested 1.10b. Downside is the LCD touch sensitivity has been reduced. So it takes a slightly LONGER touch to make happen (NOT HARDER).
PLEASE NOTE : If you make use
of a whip antenna and or close indoor antenna's around the receivers
cabinet then you will receive disconcerting noises
emitting from the microprocessor and LED backighting circuity on the MW
and SW bands. Our
test sample did NOT have the optional PC Board for proper testing with
whip antennas and plus we used external antenna's (with shielded coax
feedline) for most of this hands on test report. But were easily able
to detect excessive RF interference even without the option board (so
less less sensitivity) with whip use as attached on the top of the
receiver.
Firmware 1.10d added a "EMI Reduction" toggle in the HARD menu.
TIP : A quick way to turn OFF the LED backlighting is one quick tap of the power button. Another tap to turn
it back on (NOTE : Also may need to touch the LCD if it does not return after the second tap).
Mark KD9NXV adds this :
There are 2 types of touch screen disabling.
One
is push power switch momentarily to visually turn off screen.
This halts the RFI screen noise but what fun is that? We want to
see the cool waterfall and spectrum.
The
other is to disable capacitive touch sensitivity of screen while still
being able to see the waterfall, spectrum, s-meter. This is
accomplished by pressing and holding the volume encoder until a beep is
heard. The annoying display RFI noise stops and you can use knob
controls while in this state to change frequency, frequency steps,
volume, filter and attenuator. The touch screen is
inhibited. To make changes on menus and spectrum again, press and
hold volume again until beep is heard. Capacitive screen touch is
restored but so is noise, so its a back and forth routine when using
whip.
Decent Ergonomics / Direct Keyboard Entry / 10 hz is the Minimum Step - Tuning Resolution
Ergonomics are first rate. Everything is logical and straight forward
for such a small cabinet. Direct keyboard entry (tap the frequency display
area) is a royal treat and will accept entries in kHz or MHz along with
a backspace for entry "boo-boo's".
Some may call it's general operation difficult or "finicky". But most owners should adjust to that with some use ?
The frequency display shows resolution down to 1 hz. However the
receiver will not tune this fine period. So it has 10 hz as it minimum
tuning step and display. This is a slight drawback to it's otherwise
excellent manual ECSS and SSB performance (more on this later).
Sensitivity / 3 Preset Bandwidth Selections / Extremely Stable
Sensitivity is as good as any other modern communications set as
compared to at HQ (including the wideband Icom IC-R8600 as reviewed
here). See Preamp use as covered later in this report. Excellent.
Selectivity is razor sharp and has a similar scheme to what Icom uses.
That is 3 preset fully adjustable selections (NARROW-NORMAL-WIDE). Even
if there is no dedicated CW mode (UPDATE : CW mode was added with later firmware versions), one can archive proper bandwidth with
no problem. These can be selected via the "AUDIO SETTING" screen or
accessed by pushing in the Volume encoder knob. Excellent once again.
Each bandwidth setting has "Low Frequency "and "High Frequency"
adjustment (in 50 hz steps). Good news here is that one can adjust SSB
and AM bandwidths up to 15 kHz for when conditions warrant for greatly
improved audio quality.
Rock solid stability was observed from cold start up. Impressive and puts
most (if not all) other consumer portables to shame. Not aware of any TCXO being used.
Limited Dynamic Range / MW Intrusion into SW / No Attenuator
Dynamic range is adequate on the HF bands under most conditions and
using modest outdoor antennas. However during peak nighttime conditions
on shortwave-HF, if the RF Gain was up too far (and or the Preamp on which is big "no no" on MW and most of HF) and
using the test 55 Foot MLB antenna, nasty excessive overloading
occurred. Backing off the RF gain and or shutting off the Preamp
usually cured the nastiness here.
The manual gives this RF Gain Control recommendations :
Recommendations:
1.
The "LNA / MIX UP GR" and "MIX GR" parameters inherently work like
attenuator and it is advisable to use them when working with long
antennas, or in case of receiver overload.
2.
It is not recommended to use RF GAIN more than than 40 when working on
short telescope antennas and more than 20 when work with long antennas
(N9EWO : Hands on testing leaving it at 0 was best with any long
outdoor antennas).
A RARE exception to this was with a very strong local amateur station about 1 Mile
(2.4 km) away using approx. 100 watts that pretty much killed the ENTIRE HF band no matter
what we adjusted. There is no
attenuator provided without the option board. But even adding a good
EXTERNAL 20db attenuator did not help cure the problem when this bad. As recommended above using the "LNA/MIX UP GR" and or "MIX GR"
settings in HARD / Setting Mode cured any overloading but of course with much less sensitivity. Again this was a very rare
situation here mind you, but for the
record. This overloading was non existent with the Icom IC-R8600 and on
the same antenna.
Receiver is using the same identical front end filtering scheme and
MSi001 TV tuner chip as with the discontinued SDRPlay RSP1 (original
version not the A). So as it went with the RSP1 we experienced local strong medium wave (MW) stations bleed into
the Shortwave spectrum with the larger test antenna's. With an external
added 3.5 to 30 MHz bandpass filter it TOTALLY cured this issue. Also the same
identical characteristics we experienced with the AFEDRI SDR NET PC receiver.
NOTE : This was not as bad of an issue as with the tested SDRplay RSP1 or AFEDRI SDR NET
devices, but it was clearly detected in use. Again this interference
will vary with any given location. Many may never experience it
depending how close you are and strength of local MW station(s).
TIP : In testing when receiver overload was detected we found to activate the "LNA/MIX
UP GR" and or "MIX GR" and carefully increase the "RF Gain" to recover some
of the loss sensitivity. Yes this is downright weird but was very
effective in testing ("PREAMP" OFF).
 Chinese 3.5 to 30 MHz “Band Pass Filter” with SO-239 connectors (check on ebay or amazon).
Depending on where you live and antennas used , this may be a required purchase.
This will keep strong local MW stations out of the SW / HF spectrum.
Preamp - Use Conservatively (MW / HF) / Spurious Signals
There is a nice (20db?) preamp provided and is very useful more so in
the upper part of the SW spectrum and above (say 10 MHz). However it's primary use
was intended to be used in the VHF and UHF parts of the spectrum.
However under certain conditions is useful in the lower SW bands as well,
but more times than not it will just launch the set into overload during nighttime conditions with any proper outdoor antenna in use.
Using this receiver as stock even with a long whip SMA antenna for the
MW and SW bands is not so possible (as covered above). Loaded with spurious signals abound
from the Microprocessor and LCD backlight. See information given earlier in
this report.
If using any kind of a decent outdoor FM broadcast antenna (and or live in
a extremely RF rich large city location), best to leave the Preamp OFF.
Super Clean Audio Quality / Eight Preset Audio EQ Settings / All Mode Squelch
General audio quality is extremely clean and hiss free, downright excellent it is. Plenty
of punch with it's 1 watt speaker output. Large rear mounted 50mm (2 inch) speaker
even gives a bit of Bass response. Volume control has many low settings
so can work as a good nighttime radio.
There are no tone controls per say. however In the AUDIO menu
there is a EQ TYPE adjustment that allow for eight preset tone
adjustments : (EQ-OFF) SOFT, LIVE, CLUB, ROCK, BASS, JAZZ, POP, VOICE.
This feature is marked for WFM use only, but in practice it works in
all modes even USB and LSB. Yes just what you would see on a MP3 player.
We found connection to a AMPLIFIED
set of computer speakers GREATLY improves the audio and can hear how
fantastic the overall audio quality really is ! This is highly
recommended for any home use.
All mode squelch is another useful feature. EQ TYPE and SQUELCH are both located in the AUDIO
SETTING menu.
With FIRMWARE 1.10c a "Audio out" selection was added in the main menu.
Allows for easy toggle between the INTERNAL SPEAKER (Speaker) or
HEADPHONES (phone) or BOTH (Ph+Sp). Nice touch but one can still select
these on the touch screen as difficult as that can be as it's sure a
tight area.
FM Stereo With Headphones / RDS is Mixed Bag / CW Decoder Function
FM Stereo with headphones or with a set of powered stereo
speakers as plugged into the provided 1/4 inch stereo headphone jack.
Stereo mode is easily defeated and has a indication for when
FM Stereo is being received (when headphones are plugged in).
Firmware 1.0b and above has RDS (Radio Data System) feature. It
is
toggled on and off by touching the Spectrum Scope and of course only
while in WFM mode. PLEASE NOTE : It takes a extremely STRONG signal in order for RDS to function (firmware 1.10c). We detected a
low level
background tone that is added to the received signal when engaged with
firmware 1.0d (thankfully this was completely fixed with later
firmware).
While using the RDS mode the Spectrum Scope is switched to very slow rate and the Waterfall is disabled.
Built in CW decoder is also available and operates fine, but it takes a
signal with no interference and a bit practice to get it set right.
This is toggled in the MODE screen and then a "Min SNR"
needs to be adjusted with proper "flash" indication of the white tune
line on
the LCD. No it's not going to deal well with badly sent CW and cannot
expect it to do that. Still fun to have in it's feature set and very
useful but keep in mind it will take some adjustment to make work.
Frequency Display Error Correction and S-Meter Level Adjustments.
Test sample was only inaccurate about 2 hz HIGH (with firmware
1.0d, was 26 hz HIGH with firmware 1.10b and 1.10c for some reason) in received frequency
to
what was actually displayed at 10 MHz which is stellar in such a low
cost receiver. Located in the HARD menu is a setting
called "F correct". Tune in to a time signal station such as WWV
(exactly to it's proper frequency in LSB or USB using a wide bandwidth)
then adjust the F correct setting.
As it always goes with many wide band radio receivers it was still slightly
off (high) say in the UHF spectrum and above. But was well under it
sounding off frequency.
Another extremely neat feature is a adjustment for the S-Meter
calibration. User can make it less sensitive to match it up with
another receiver / transceiver (less sensitive only not more). S-Meter calibration was found to be decent out of the box with no adjustment's needed.
Excellent AGC Performance with "Four" Preset Decay Rates that are Fully Adjustable (plus OFF).
AGC
performance is simply excellent as well. FOUR preset decay rates are provided
(plus OFF) :
OFF, FAST, MIDDLE, SLOW and LONG (super slow). No major AGC bugs here , it's just
pleasant overall even with weak fluttery signals in MW and HF bands.
With the "AGC OFF" switched on there is a "MANUAL GAIN" that can still
be adjusted (works in all modes except WFM) that works extremely well
to help pull out very weak
signals. Alternatively one can use the "AGC LIM" setting (in AGC Fast)
to also
help in this regard without turning it OFF. Just remember to return
this back down after use to the 75 default (otherwise the AGC ,may
experience pumping issues). Also setting the EQ TYPE to VOICE helps as well for maximum audio recovery.
TIP : When
turning OFF the AGC completely , be sure and return the "MANUAL GAIN"
back to ZERO when finished. Otherwise the audio may blast when you go
to use it next time.
AGC Menu Selections FIRMWARE 1.10c :
AGC LIM - Maximum output sound level.
MANUAL GAIN - Amplification of the signal level in the AGC loop.
AGC MODE - OFF, FAST, MIDDLE, SLOW, LONG
FIRMWARE 1.10c
added a new PGA selection (PGA BST) and PGA Gain adjustments (unknown
what these are for, so no touch and leave alone).
Excellent Double
and Selectable Synchronous Detectors (with second LAST firmware 1.10c Rev2) / Auto Notch
Filter (all modes with firmware 1.10c) / DSB
With 1.10b firmware "Double Sideband" Synchronous Detector was added. After careful listening
and scratching our head for a long awhile if it was dong much of anything, have determined that it's wash (it does not do anything). Does not even appear to be even a "SynchroPhase"
type of a detector ? Good news is any fading distortion is very low anyway in the standard AM mode.
Firmware 1.10c added "Selectable Sideband" Synchronous
Detector (selectable Upper and Lower). Sadly this was also a complete wash.
That is it's completely useless to reject ANY adjacent channel
interference (also does not do anything at all in fact, maybe raises
the audio high end up slightly). Even the ICOM IC-R8600
fairs MUCH better here (it works to at least tame co-channel
interference decently.). Just use the excellent manual ECSS as covered
below.
IMPORTANT UPDATE :
Good news is that with a second 1.10c firmware update on July 26, 2021 (what
we call 1.10c Rev2), Double / Selectable Synchronous Detection is
NOW working and performs excellent as well. Holds lock on the weakest
of signals too. Now able to tune out interference from the adjacent
sideband as well as decreasing fading distortion. PLEASE NOTE : What I call Rev2 of the firmware 1.10c is my own marking. This updated version of 1.10c has no different file name to indicate the revision.
A list of the Sync Modes in the Menu FIRMWARE 1.10b (yes it is a bit confusing)
"AM det" Selections
SAM - Synchronous Detector
MAG - Magnitude Detector (standard Envelope Detector)
added in Menu FIRMWARE 1.10c
"AM det" Selections
SAM U - Synchronous Detector UPPER Sideband
SAM L - Synchronous Detector LOWER Sideband
A "DSB" mode was also added with 1.10b firmware,
however I do not see the purpose / use for this ? It can be
activated with AM or SSB modes. If someone can enlighten me on this,
please let me know.
Auto notch filter was also added with firmware 1.10b. Works
excellent with CW/SSB modes. We were unable to get to work with AM signals. However starting with firmware 1.10c AM mode auto notch was added and also works excellent.
Excellent ECSS Performance with firmware 1.0d only to get zonked with 1.10b (fixed with a simple menu adjustment tweak)
Excellent (manual) ECSS performance was experienced with
firmware 1.0d (no issues at all). This is of course using LSB or USB
mode zero beating a AM mode broadcast station. However that took a dive
with the also tested 1.10b firmware. A nasty BUZZ was heard with any
medium
or strong signal. We tried to decrease signal level / RF gain etc. with
no difference. Have a listen to the audio file below as recorded from
the HQ test sample. This can be a bit indifferent and cannot be
detected with weak signals . We hope this bug gets fixed with a future
firmware release ? NOTE :
For some strange reason when DSB is selected with LSB or USB this buzz
disappears. But then there is now a out of phase like sound that is
present (weird it is).
TIP : The cure
that eliminates this bug entirely is to be sure that the IF
filter "Low Freq" settings are adjusted up to at least to 150 hz
(not at zero where I was using it at) . This issue then completely
disappears ! Yes strange it is !
50 Memory Channels (5 Pages of 10 Channels Each) / No Alpha Tags
You have 50 total memory channels available. There are spread out in 5 pages of 10 channels each. Each channel stores : Frequency, Mode, AGC Settings, Bandwidth, Tuning Step, PreAmp, RF Gain
Setting. Are very easily viewed and accessed, except for selecting the pages which is a bit slow using the main tuning knob.
No Alpha tags are offered. Having only 50 memory channels will be is a
bit skimpy side for many. But having less here is not a bad thing which
makes it for easier management (especially with no Alpha Tags).
TIP :
One MUST keep in mind that the memory data not only stores
frequency / mode / bandwidth filter / tuning steps , but also RF Gain,
AGC Lim and AGC Gain, LNA/Mix Gr, Mix Gr etc. etc. for EACH memory channel.
So if you play with a memory channel with other menu settings and don’t
save it to THAT memory channel, and then access another memory channel,
it will appear that it's not saving entries.
Noise Reduction and Noise Blanker
One
never knows when something near the listening location will be needed
to combat local interference. The Malachit has a Noise Reduction (NR) plus Noise Blanker (NB) functions and work excellent.
When properly adjusted the Noise Reduction is simply breathtaking
without the "Donald Duck" or garbled sounds. Cleans up static and other
band noises decently. Just as with the AGC performance, it rivals or exceeds
more expensive DSP / SDR sets tested !
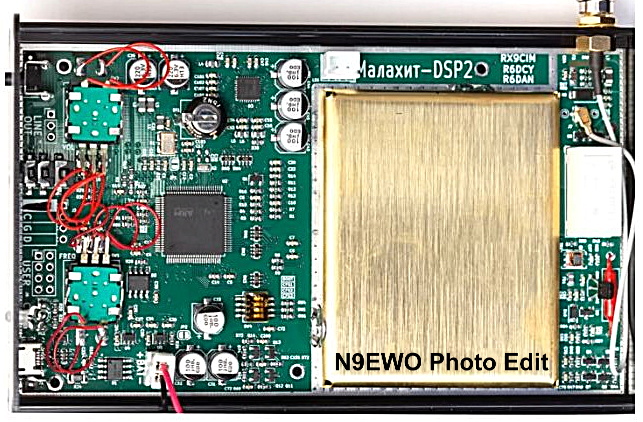
Watch Out for Stress on Internal U.FL / IPX Antenna Connector
Just as with the SDRPlay family of receivers
the Malachite / Malahit uses a extremely TINY and very fragile "U.FL / IPX" female plug to bulkhead female SMA patch cable. With the SDRplay products they use a fairly long and
flexible cable from the SMA female socket to the PC board. On the other
hand our Russian Malachite / Malahit test sample used a very short and EXTREMELY STIFF jumper cable.
This oversight led to bad INTERMITTENT connections over a few months of
use with no reception with the test sample.
We were able to CAREFULLY shape (bend) this extremely stiff cable
enough to relive the great stress off of it to make work again, however
(depending on what your sample is using here, this could be variable?)
one is probably best to source a more flexible replacement connection
cable here (just a tad longer say 6 inch length cable would be a good idea as well) ?). PLEASE NOTE : The FEMALE U.FL / IPX connectors only have a 30 mating cycle rating before replacement. So keep that in mind as well.
I will NOT be held responsible for any info that is listed here
ALL DONE AT YOUR OWN RISK ! |
 Our Russian Malahit DSP1 and DSP2 test samples both used a very short and
EXTREMELY STIFF with it's internal antenna cable to the TINY and
EXTREMELY FRAGILE "U.FL / IPX" connector on it's PC board as shown above. This
oversight led to bad connections over a few months of use with
intermittent no
reception. We were able to
CAREFULLY shape this extremely stiff cable enough to relive the great
stress off of it to make work again, however (depending on what your
sample is using here, this could be a variable) one is probably best to
source
a more flexible replacement connection cable here (just a tad longer
would be good as well) ?).
These are readily available and cheaply on ebay and elsewhere (no
soldering required). The caveat here as it could take more than one
sample (try) as the mating quality of these patch cables on the U.FL /
IPX female end varies greatly. (N9EWO Photo)
Our Russian Malahit DSP1 and DSP2 test samples both used a very short and
EXTREMELY STIFF with it's internal antenna cable to the TINY and
EXTREMELY FRAGILE "U.FL / IPX" connector on it's PC board as shown above. This
oversight led to bad connections over a few months of use with
intermittent no
reception. We were able to
CAREFULLY shape this extremely stiff cable enough to relive the great
stress off of it to make work again, however (depending on what your
sample is using here, this could be a variable) one is probably best to
source
a more flexible replacement connection cable here (just a tad longer
would be good as well) ?).
These are readily available and cheaply on ebay and elsewhere (no
soldering required). The caveat here as it could take more than one
sample (try) as the mating quality of these patch cables on the U.FL /
IPX female end varies greatly. (N9EWO Photo)
Other Operational Notes
To fully reset the receiver :
Will reset the current settings to defaults. Exit all menus and when
the main screen is displayed, hold down both encoders (Volume and
Tuning) until you hear a BEEP. All user settings, including those
saved in memory channels cells will be lost. (IMPORTANT NOTE : DO NOT have it connected to a USB port on a PC when this is attempted.)
To Set the 24 Hour Clock : Clock setting menu is
entered by by long pressing the HARD menu icon on the LCD (firmware 1.10b). Moving through the menu
items is carried out by clicking on the touchscreen. Parameter change
is carried out using the VOLUME ENCODER.To save the set time values the
VOLUME ENCODER is pressed IN and held until a BEEP is heard. Exit the
general menu list by pressing the HARD button.
To turn OFF the Spectrum Scope and Waterfall :
This toggle can be handy for reducing or eliminating self generated
interference as well as increasing battery life. This is accomplished in
the VISUAL menu, then select "Pan&Wtf" to "Disabled".