 Video Formats Information |
 Video Disc Formats |
 Linux Video Programs Comparison |
 Essential Linux Video Apps |
 Linux DVD Production Guide |
 DVD Ripping With Mencoder |
 Linux Information Pages |
Ruh's Linux Powered DVD Production Guide
ContentsChapter 1: IntroductionChapter 2: Creation of Video 2.1 From Existing Video Files 2.2 From DV Camera 2.3 From Analog Sources Chapter 3: Video Conversion/Encoding 3.1 Using Cinelerra 3.2 Using Kino 3.3 Using Avidemux 3.4 Using mpeg2enc 3.4a Encoding With mpeg2enc From Raw YUV Files 3.4b Encoding With mpeg2enc Using ffmpeg 3.4c Encoding With mpeg2enc Using MPlayer 3.5 Using transcode 3.6 Using ffmpeg Chapter 4: Audio Encoding 4.1 Pre-Conversion 4.2 Encoding with ffmpeg 4.3 Encoding with toolame 4.4 Encoding with Cinelerra Chapter 5: Multiplexing 5.1 Using mplex 5.2 Using tcmplex 5.3 Using lvemux 5.4 Common Multiplexing Problems 5.4a Buffer Underflows 5.4b Audio/Video Sync Chapter 6: Subtitling 4.1 DVD Subtitle Format 4.2 Subtitling MPEG Streams For DVD Using Spumux Chapter 7: DVD Menu Creation 7.1 Menu Background creation 7.1a Still Menu Background From JPEG Files 7.1b Moving Video Background Menu 7.2 Menu Audio 7.3 Menu Buttons Chapter 8: DVD Filesystem Creation 8.1 UDF Filesystem, Video_TS and Audio_TS Directories 8.2 DVDAuthor Chapter 9: DVD Image Creation/Burning 9.1 Mkisofs 9.2 dvd+rw-tools Chapter 10: Conclusion IntroductionWhat this guide is: Information on DVD production under the Linux OS that (hopefully) covers all aspects, from creation of the video to final burning.What this guide is NOT: A guide for video editing, compositing, filming, DVD copying, DVD ripping, game disc copying, video program installation help, or video formats/codecs information (although you may be able to use some of this information for those tasks). This guide is a compilation of information that I have acquired from various books, magazines, Howtos, IRC, various internet sources, and of course my own experimentation and testing. I have written this guide in hopes that it will help those unfamiliar with the process and save them all the time of countless hours of Google searches, man commands, and multiple DVD coasters. These coasters cost money and time to make, and are very frustrating. (Although I have found out that these seemingly useless shiny discs function very well as ornaments, throw toys, handy mirrors, antenna mounts, rifle targets, and various other neat items.) Although this tutorial is written for users of Linux, the steps and process are basically the same on any operating system, although the tools used may vary. Chapter 2: Creation of Video2.1 From Existing Video Files:Many times it is necessary to convert an existing video file to DVD format for burning if it is in another, non-compatible format such as Quicktime, AVI, DV, Nuppelvideo, etc. Since I have covered conversion later in this guide, I will only discuss preparation of the file for conversion in this section. For simplicity, I always convert a file to the desired framerate before I actually convert it to MPEG for authoring. Trust me, this is the best way to go, especially when you come across a file with some weird framerate. Some dumb files you get even change framerate in the middle of the file. So you want your file in 23.976 fps or 29.97 fps for NTSC or 25 fps for PAL. If the file is MPlayer readable, you are in luck: you can do this in one step. If it is not readable by MPlayer, then you will have to convert it to a format that is before you continue; I cannot help you here. But, assuming that MPlayer will read the file, with most files you can simply issue this command:mencoder -oac copy -ovc copy -ofps 29.970 -o outputfile.avi inputfile.avi If this does not work for you (it might not if the file is something other than an AVI), then you can try: mencoder -oac pcm -ovc lavc -lavcopts vcodec=mpeg4:vhq:v4mv:vqscale=2 \ -ofps 29.970 -o outputfile.avi inputfile.avi Be advised that this may take up loads of space for the file as the bitrate may be very high, depending on the video. If the resulting file is too large, you may raise the vqscale value, albeit at a loss of quality. Also, if you like, you may experiment with replacing the vqscale parameter entirely with the vbitrate parameter like this: mencoder -oac pcm -ovc lavc -lavcopts vcodec=mpeg4:vhq:v4mv:vbitrate=2000 \ -ofps 29.970 -o outputfile.avi inputfile.avi You may adjust the -ofps value of each of these commands to your desired framerate. The first command just copies the video to another file with a fixed framerate throughout. The 2nd and 3rd commands convert the file to an MPEG-4 AVI file (easy to convert to MPEG for DVD authoring) with a fixed framerate throughout. 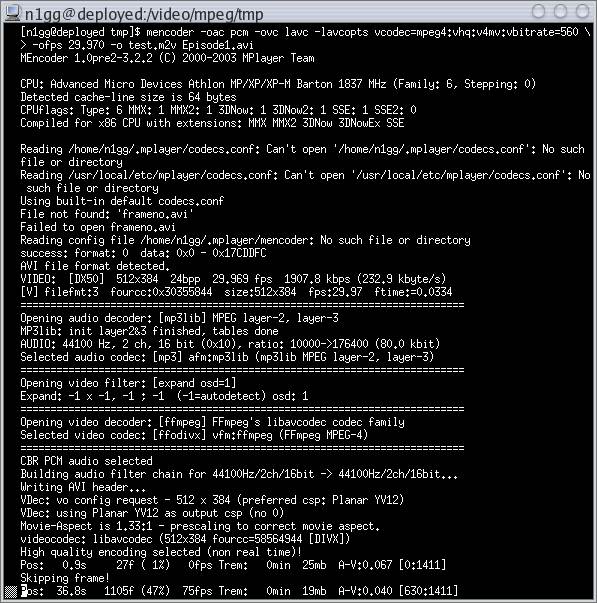
Once the file is prepared in this manner, you may progress to the conversion section. 2.2 From DV CameraDV video can be captured from a DV camera by using Kino or Cinelerra. DVGrab is another program that can capture DV video, but it doesn't deal with Quicktime DV files, which is the best for our purposes. If you want to be able to edit your video in Cinelerra, it will need to be in Quicktime DV format. So hereafter we will assume that all of your DV video will be captured into Quicktime format. Regardless of which program you use, you will need a properly installed and configured IEEE-1394 (a.k.a. Firewire or i.Link) interface in your computer, and the raw1394, ieee1394, and dv1394 modules installed as well. It is also possible to capture DV video with some versions of ffmpeg, but I will not cover that here; you can read the ffmpeg docs if you need to do this. Capturing from Cinelerra is done by setting the capture preferences to read from the 1394 interface and then selecting "Record" from the file menu. Kino is also very straightforward, although you may need to change the settings to match your TV standard (PAL or NTSC). It has many very good features, such as automatic scene splitting, and AVC camera control. Make sure that you set Kino's preferences to capture to Quicktime format. Then click the "Capture" tab, set the filename base name (no extension) and then press the "Record" button.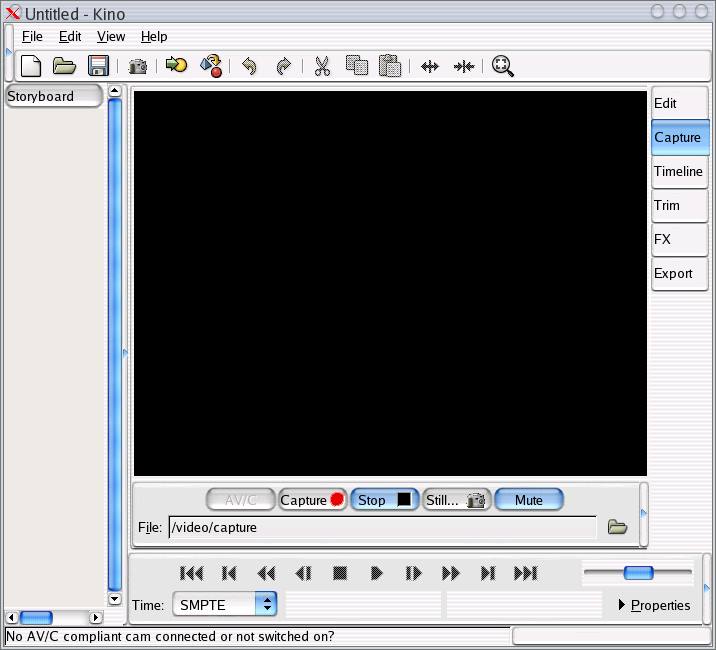
2.3 From Analog SourcesTo capture from an analog source such as Laserdisc, VCR, analog camcorder, etc., you must have an installed analog capture card or analog capture interface of some sort. The most common type is a BT878 based card. Most commonly marketed as WinTV cards, among other names, these cards are very economical solutions for analog capture, and are very well supported. There are many very good programs that you can use to capture analog video, and I will not discuss them in this guide, but make sure you capture your analog video in a compatible format (something that MPlayer will read). FFmpeg captures analog video very well in many formats. Nuppelvideo (using nuvrec) is great for slow computers- with the proper settings, good results can often be obtained on systems as slow as 233-300MHz. I have used nuvrec to record raw YUV video that is lzo zipped into an NUV container with very good results. The video takes up a large amount of space, but not near as much as just plain old raw YUV, and way less than RGB, and no quality loss results. Some people like to capture to MJPEG. Also, I-frame only MPEG-1 is very useful, as are other codecs that compress each frame individually.As I said before, I will not discuss all the ways of capturing analog video; you will have to chose a method that best fits your needs. You may even want to capture your video with (gasp!!) M$ Windoze if that is the best option that you have (such as if you have some crazy proprietary analog capture interface that is only supported under Windoze). Alternately, another way (and in my opinion the best way) to capture analog video is with an analog-to-DV converter box. Several manufacturers make these, and they function very well. Commonly referred to as ADC or ADV boxes, they have analog inputs and an IEEE-1394 output so that the computer sees a DV camera connected and receives high quality DV video. Using one of these will enable you to capture your video just as you would from a DV camera. Be sure to steer clear of similar boxes that use USB for the connection to the computer rather than IEEE-1394, as they are not usually of very high quality and are rarely standards-compliant. Many digital video cameras have an interesting feature called "analog pass-through". It is a feature that allows the camera to perform the same job as an analog-to-DV converter box. Chapter 3: ConversionOnce you have your video on the computer, you will need to convert it to a DVD compatible format. DVD video is MPEG-1 or MPEG-2 at either 23.976fps or 29.970fps for NTSC, or 25fps for PAL. Valid DVD video resolutions are:NTSC: 720x480, 704x480, 352x480, 352x240 PAL: 720x576, 704x576, 352x576, 352x288 The video bitrate can be constant or variable at up to 9.8 Mbps, although 3-6 Mbps is suitable for nearly all purposes. You must remember that the higher the bitrate, the less video will fit on the DVD. Some experimentation is required with different bitrates and different encoders to find the one(s) that suit your needs. Note that you will need to adjust settings based on the video that you are encoding. Some video compresses better than others. For instance, high quality master video will usually compress very well and give very good results at low bitrates, while other video, particularly noisy analog video (such as from a VCR) will need higher bitrates to output an acceptable quality picture. Also, if there is lots of motion in the background of the video you are encoding, the bitrate will need to be increased. An example of this is video of a boating trip, in which large parts of the picture are composed of moving water and splashes. Moving water and similar content with a random sequence of motion does not compress very well and needs high bitrates to be free of MPEG artifacts. So each situation is different. With practice you will be able to guess fairly accurately the proper bitrates for different video. NOTE: Do not allow yourself to be tempted to set the bitrate any higher than 8000 kbps with any encoder. Yes, yes I know that I said that the DVD specification allows a maximum video bitrate of 9800 kbps, but trust me, you don't want to set your bitrate there. If you do, sooner or later (usually sooner) you will get an output file that can't be multiplexed properly, is not compatible with hardware DVD players, has goofed up skips and things in it, or all of the above. So DO NOT set the video bitrate on any encoder (other than hardware MPEG encoders that are way out of most people's price range) higher than 8Mbps. Comprendo? Ok, let's move on. 3.1 Using CinelerraCinelerra is fairly straightforward to use for conversion to MPEG. Once you have opened your video, position the cursor where you want the render to start and click "Render" on the file menu. I am assuming that the video is already in a standard DVD resolution. If not, then you will need to use the "Resize" video plugin on the "Video Effects" page in the Resources window. Then you will see a dialog box that will allow you to select the output filename, select the rendering format, and change the encoding options. Select "MPEG Video" as the render format, then click the small wrench icon next to the "Render Video" checkbox (and make sure it is checked). Then another dialog box will appear. In it, select MPEG-2, punch in your desired bitrate and adjust the other settings if necessary. If you do not know what the additional options are, then it is safe to leave them on their default values. Click OK, then OK again on the first dialog box, and wait for your video to render. Cinelerra uses mpeg2enc to render its output MPEG video, so the output will be of high quality if you specified proper encoding settings.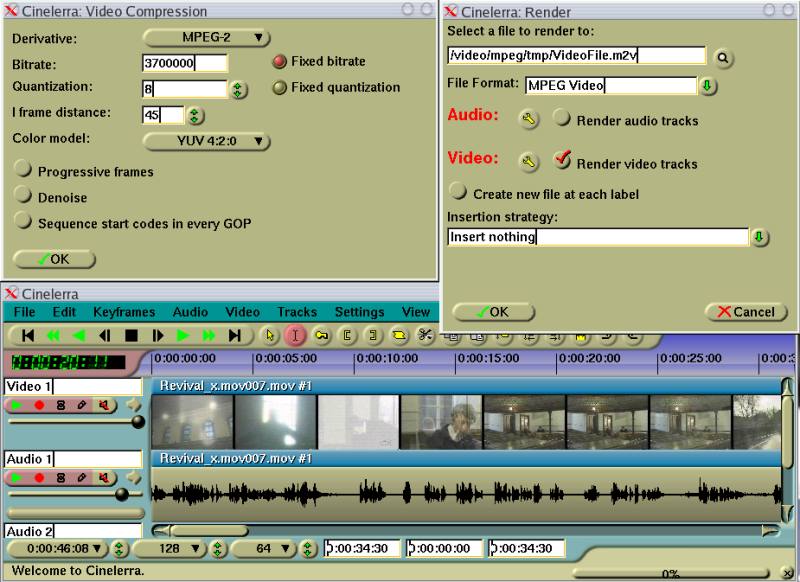
3.2 Using KinoKino can export MPEG video from DV files using mpeg2enc or ffmpeg. It uses default encoder settings, but this can be changed if necessary with some minor tweaking. After you have your video opened in Kino, all you have to do to convert it is to click the export tab, then the MPEG tab, type in your base filename for the output video, select "DVD" as the export type, and click the "Export" button. You may also select that you want Kino to generate a generic DVDauthor XML file to allow you to easily create a generic DVD filesystem for your video. Scene splitting can also be selected here. If you check these boxes, then Kino will encode each video scene in a separate MPEG file for you and automatically make each one a chapter in the DVDauthor file. When you have clicked the "Export" button, a progress bar will be displayed at the bottom of Kino's window, and time information will also be displayed.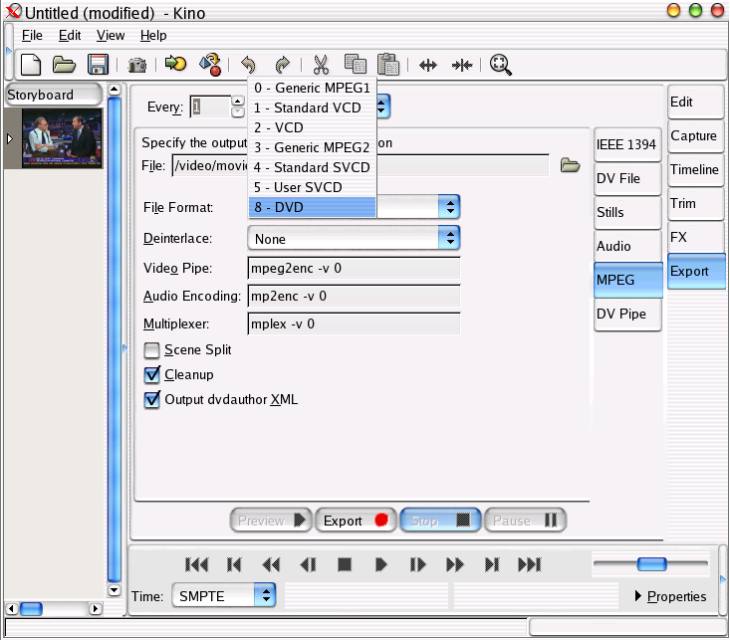
3.3 Using AvidemuxAvidemux is an excellent program for simple editing and video conversion. It has some very nice crop/resize/deinterlace features. Avidemux is good for conversion from AVI and Nuppelvideo files (and several others, but not Quicktime). It can work with MPEG files, but it must index them first before it can actually open them. This takes a good bit of time, especially on a slow system, so you may want to use another tool if your file to convert is an MPEG file and is medium to large size. Avidemux is one of the best tools to use to convert an AVI file to MPEG for DVD authoring (assuming that you have fixed the framerate as outlined above). Make sure that you get version 2 or later of Avidemux, as you will need the features offered by it. Avidemux also will encode some audio, but I will only cover the video here.Now, enough with the preliminaries, and on to the actual conversion. First, open your video file by clicking the "Open" button and selecting your file. Next, click the "V Filter" button and select any resize, crop, or deinterlace filters that you may want. After you have exited the video filters dialog, click the "V Codec" button and selecct either DVD (which uses mpeg2enc) or "DVD (ffmpeg)". I usually always use the "DVD (ffmpeg)" setting as it is more than twice as fast as mpeg2enc, and produces great quality at very low bitrates. mpeg2enc, the "DVD" setting outputs higher quality video, but requires much higher bitrates to do it. Usually it performs best at bitrates over 4Mbps. So it is up to you, whether you need the maximum quality and can spare the extra space taken up by the high-bitrate file, and the extra time needed to encode with mpeg2enc, or if you prefer speed of encoding and smaller files with great quality (I nearly always go for the speed). Then click the "Configure codec" button and punch in the encoding settings that you prefer. Single pass 600kbps minimum and 4000-6000kbps maximum bitrate should be suitable for most purposes. If you want the maximum quality, select "DVD" (the mpeg2enc one) and set it for two pass, with the maximum bitrate at 8000 kbps. This will not allow you to put much more than one hour on your DVD, and will take forever to encode, but will produce extremely high quality output. For all but the most demanding situations, you should use a lower bitrate, and two pass encoding is usually not worth the extra time it takes for the small quality increase. Ok, so after you have entered your desired encoder settings, exit the "Configure codec" dialog and press "OK" on the video codec dialog. You may now save your video using "Save > Save Video" on the "File" menu. Give the filename a ".m2v" extension. The main window will then minimize itself and the "Encoding in Progress" dialog will pop up, showing the speed of encoding (in fps), the current bitrate, the size of the video encoded so far, and the time remaining information. When the encoding is complete, the main window will reappear and you will have your completed elementary stream MPEG file. 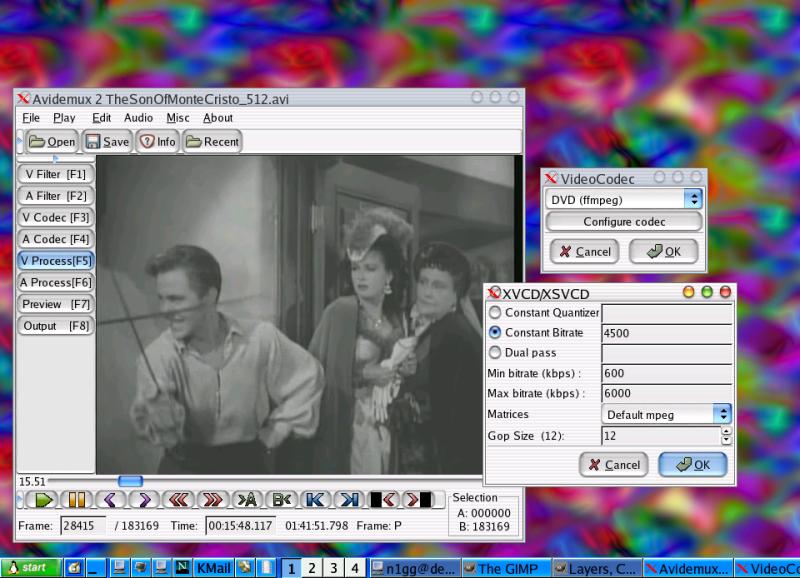
3.4 Using mpeg2encmpeg2enc is a high quality MPEG encoder that is based on the MPEG-2 ISO reference encoder (albeit with improvements). It is part of the MJPEGTools package. It's quality rivals some hardware encoders, but it is slow and will only encode from raw YUV planar video.3.4a Encoding With mpeg2enc from Raw YUV FilesIf you have loads of space on your hard drive, and your video is in raw YUV format, you can encode directly from those files with mpeg2enc. Simply issue a command similar to this:cat inputvideofilename.yuv | mpeg2enc -f 8 -a 2 -n n -F 4 -q 2 -b 4500 -o outputvideofilename.m2v 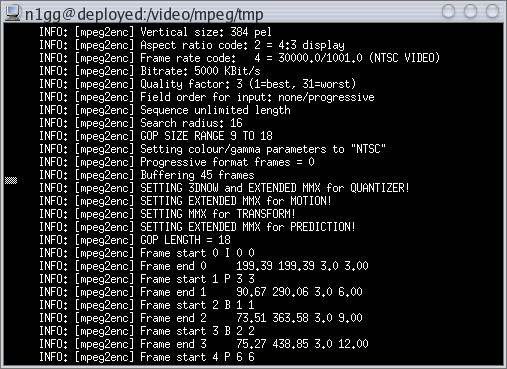
I will not go into all of mpeg2enc's options, as the manpage is very good, but some of the ones you will probably use are: -f n Where n is the format number of the output: 0=Generic MPEG1, 1=VCD, 2=XVCD, 3=Generic MPEG2, 4=SVCD, 5=XSVCD, 6=VCD Stills, 7=SVCD Stills, 8=DVD MPEG2 -b n Where b is the bitrate in kBits/sec. The default is 3800 for DVD. -n n/p/s Sets the video normalization: n=NTSC, p=PAL, s=SECAM -F n Where n sets the framerate: 0 = Display Framerate Code Table 1 = 24000/1001 (NTSC 3:2 pulldown converted FILM) = 23.976 2 = 24 (native FILM) 3 = 25 (PAL/SECAM Video / Converted FILM) 4 = 30000/1001 (NTSC Video) = 29.970 5 = 30 6 = 50 (PAL FIELD RATE) 7 = 60000/1001 (NTSC FIELD RATE) 8 = 60 -a n Where n sets the aspect ratio of the output video: 1=1:1, 2=4:3, 3=16:9, 4=2.21:1 -p Sets a 3:2 pulldown flag in the video. This is useful with 24fps Film source material. It tells the player to play the video as NTSC 60field/sec video using the "3:2 pulldown" method. Using this method is much more efficient than encoding the video as 60field/sec NTSC video. -q n Where n is the quantizer factor. When this option is used, -b sets the maximum bitrate. 3.4b Encoding With mpeg2enc Using ffmpegEncoding from actual YUV files can be frustrating, or impossible because of the huge file sizes required, so most of the time the sane thing to do is to use some intermediate program to convert your existing video to raw YUV and feed it to mpeg2enc "on the fly". ffmpeg can output raw YUV video through a Linux stdout pipe. Using ffmpeg, it is possible to encode with mpeg2enc from any type of file that ffmpeg can decode. The command that makes ffmpeg produce raw YUV output from another type of input file (or even an input pipe if necessary) is:ffmpeg -i inputfilename.avi -f yuv4mpegpipe pipe: | \ mpeg2enc -f 8 -a 2 -n n -F 4 -q 3 -b 5000 -o outputfile.m2v 3.4c Encoding With mpeg2enc Using MPlayerMPlayer can also output YUV video for anything that it can play. This is extremely helpful when encoding with mpeg2enc and in other situations also. MPlayer cannot output to a stdout pipe though, but outputs to a file named "stream.yuv", so the use of a FIFO is necessary to keep from having massive a massive YUV output file. In case you are not familiar with what a FIFO file is, it stands for "First In First Out". It is a special file that can only be created on Unix-like filesystems (such as ext2 or ext3, reiserfs, xfs, etc.). How it works is that the file will only contain the data that is being used at the time. In other words, it is sortof like a pipe, but has a file interface instead of using stdin/stdout. You will understand when you begin to use fifos.To encode with mpeg2enc and MPlayer: mkfifo fifoname.fifo mplayer -ao null -vo yuv4mpeg myvideo.mov & cat stream.yuv | mpeg2enc -f 8 -a 2 -n n -F 4 -q 3 -b 5000 -o outputfile.m2v 3.5 Using TranscodeTranscode is a very powerful tool, and comes with several helper tools (tcrequant, tcdecode, tccat, tcmplex, tcextract, etc.). It is capable of encoding from nearly any format/codec to nearly any format/codec. Transcode is often called the "Swiss Army Knife" of Linux video encoding. It works by using a modular system. Transcode has a plethora of options and is the opposite of user-friendly, but is extremely versatile and is loaded with features. There are some graphical front ends for Transcode, but most of them are geared toward DVD ripping, rather than DVD creation, so we will just go with the command line info here. (Command line tools are faster and who needs GUIs anyway? That stuff is for wimps! Hehee.)Transcode can encode MPEG-2 video using either mpeg2enc or the ffmpeg libraries. A sample command for Transcode to encode with mpeg2enc is: transcode -y mpeg2enc,null -F 8 --export_prof dvd-ntsc -V -Z 720x480,fast \ -w 3800 -i inputvideofile.mov -o outputfile The -y option specifies the export encoding modules (Video,Audio). You can also specify a -x option for import modules. (-x mplayer,null is sometimes faster than the default as it uses mplayer to decode the video). The -F 8 option tells the encoder to produce DVD compliant MPEG2 video. The --export_prof dvd-ntsc sets several options in transcode to make the video more suitable for DVD creation. The -V option tells transcode to use YUV for the video processing rather than RGB. This speeds up the encoding considerably, but may not work with all input files. If this creates problems, you may remove this option. The -Z 720x480,fast option gives the output resolution. You may leave it out if the source video already has the correct resolution, or you may change it to your desired resolution. The -w 3800 option sets the bitrate to 3800 kbps. Adjust as necessary. And of course the -i and -o options set the input and output files. The output filename should be given without an extension, as Transcode will append one for you. When Transcode is encoding video using the ffmpeg encoder, you will notice at least a 2X increase in speed, but the method is a little bit different. Transcode needs an external text file in the directory that gives settings for ffmpeg named "ffmpeg.cfg". A sample of what should go in the file for MPEG2 encoding is:
I have provided this text file for you here: ffmpeg.cfg And the command for encoding would be something like this: transcode -x mplayer,null -y ffmpeg,null -F mpeg2video --export_prof dvd-ntsc -V \ -Z 352x480,fast -w 3500 -i inputfile.mov -o outputfile 
As you can see, the options are about the same as the previous Transcode command, but this uses ffmpeg for the encoding. As before, the -x option is not required, but I find that sometimes (not always- it depends on your input video) it speeds up the process. Also remember that the -V option may or may not work, but will speed up the encoding if it works. So try it first, then leave it out if there are problems (It usually works though). I strongly recommend reading some of the Transcode documentation or at least looking through the output of transcode -h for additional information. There are many many Transcode options that I have not covered and some of them may be of use to you. 3.6 Using ffmpegAnd now for one of my favorite tools to use: ffmpeg. It has (in my opinion) the perfect balance of features, ease of use, and quality.ffmpeg versions 0.4.8 and later can be used to encode MPEG-2 DVD video. ffmpeg MPEG-2 video output is not quite as high quality as mpeg2enc, but in my opinion is more than adequate for all but the most demanding video requirements. When encoding lower bitrate output video, ffmpeg does better than mpeg2enc and other encoders-- i.e. a file encoded at 7Mbps with mpeg2enc will look a little better than the same file encoded by ffmpeg at 7Mbps, but a file encoded at 3.5Mbps will look considerably better when encoded with ffmpeg rather than mpeg2enc at the same 3.5Mbps bitrate. The best thing about ffmpeg is SPEED. It offers about a 3X+ increase in encoding speed over mpeg2enc, making the time spent encoding reasonable on even slow machines. ffmpeg is easy to use compared to Transcode (the option lettering makes much more sense), but is still a commandline tool, so you will find it helpful to run ffmpeg with no options and take a look at the helpful output. Also the "ffmpeg-doc.html" file that comes with ffmpeg is very informative and has many examples. So on to the commandline: ffmpeg -i inputfile.avi -an -f mpeg1video -vcodec mpeg2video -hq -b 3700 \ -bufsize 1835 -maxrate 6000 -s 720x480 -r 29.970 -aspect 4:3 ffmpegoutputfile.m2v As you can see it is fairly straightforward and should lend to modification quite easily. The -an option tells ffmpeg not to encode any audio. The -f mpeg1video option makes ffmpeg output an MPEG-ES stream. If you don't insert this into the commandline, ffmpeg will output an MPEG-PS file, and you will have to extract the ES from the file. The -bufsize 1835 option sets the video buffer size to 1835 kbps, which is the standard for DVD MPEG2 video. The -hq option sets the high quality flags in the encoder. This will slow down the encoding a little, but sometimes provides for a little better output. The other options are pretty much self-explanatory (-b = bitrate, -s = size, -r = framerate, etc). If you have ffmpeg 0.4.9 or later, the -target option becomes available, eliminating the need for the -bufsize option: ffmpeg -i inputfile.avi -an -f mpeg1video -vcodec mpeg2video -hq -b 3700 \ -target dvd -maxrate 6000 -s 720x480 -r 29.970 -aspect 4:3 ffmpegoutputfile.m2v Two other options of note have been added in ffmpeg versions 0.4.9 or later: -ildct and -ilme. They set flags for interlaced encoding in ffmpeg's MPEG encoder. Why is this of note? Well, many times it is needful to encode interlaced video if your source material is interlaced. If you encode interlaced source material (such as from a TV broadcast) as progressive MPEG video, certain set-top DVD players will output jerky video when playing the DVD. It is important to note that if you are testing this, it only makes a difference with actual hardware DVD players, not on a computer, so you will need to actually burn the DVD to test this. The safe thing to do is to always use these options unless you really know what you are doing and are sure that your source video is progressive: ffmpeg -i inputfile.avi -an -f mpeg1video -vcodec mpeg2video -hq -b 3700 \ -target dvd -maxrate 6000 -ildct -ilme -s 720x480 -r 29.970 -aspect 4:3 ffmpegoutputfile.m2v Many times if you are encoding from DV files, it is necessary to pre-convert to YUV with ffmpeg using a pipe and feed it into ffmpeg for the final MPEG encode: ffmpeg -v 0 -f dv -i inputfile.dv -f rawvideo -pix_fmt yuv420p -an pipe: | \ ffmpeg -f rawvideo -pix_fmt yuv420p -s 720x480 -r 29.97 -i pipe: -an -f mpeg1video -vcodec mpeg2video \ -b 3700 -target dvd -maxrate 6000 -s 720x480 -r 29.970 ffmpegoutputfile.m2v Or if you have multiple DV files: cat filnameprefix*.dv | \ ffmpeg -v 0 -f dv -i pipe: -f rawvideo -pix_fmt yuv420p -an pipe: | \ ffmpeg -f rawvideo -pix_fmt yuv420p -s 720x480 -r 29.97 -i pipe: -an -f mpeg1video -vcodec mpeg2video \ -b 3700 -target dvd -maxrate 6000 -s 720x480 -r 29.970 ffmpegoutputfile.m2v Note that ffmpeg has trouble reading Quicktime DV files, but does just fine with raw DV files or DV AVI files. You may want to take this into account if you have already captured your video into the Quicktime file format. 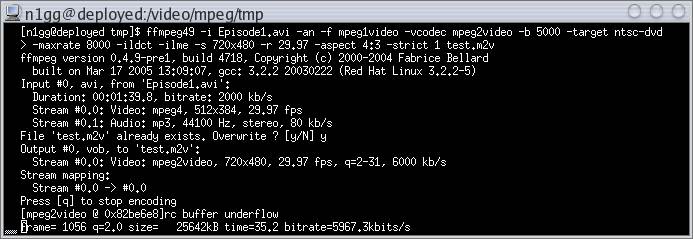
Regardless of what encoder you used to encode your video, if you somehow ended up with an MPEG-PS file (*.mpg, *.mpeg, *.vob) as your output encoding file, then you will need to extract the elementary MPEG stream from the file. This can be accomplished fairly easily with tcextract: tcextract -i mpegfile.mpg -x mpeg2 > outputfile.m2v Or if you don't have tcextract, you may use MPlayer for this task: mplayer -dumpvideo -dumpfile outputfile.m2v -ao null mpegfile.mpeg Thus you will have your MPEG-ES output file, ready for multiplexing. Chapter 4: Encoding AudioSo now you have your video. You want some sound too don't you? Well then read on...DVD audio can be in a number of formats, including Dolby Digital (AC-3), MPEG audio, PCM, SDDS, and DTS. North American standardized DVDs must contain either one AC-3 or PCM audio tracks, and any other tracks of any format desired. PAL DVDs must contain either one MPEG audio, AC-3 or PCM audio track, and any other tracks of any format desired. The sample rate of the audio must be 48kHz, and bitrates vary based on the compression used. AC-3 bitrates can be anywhere from 64kbps to 448kbps. MPEG audio can be either MPEG-1 or MPEG-2 at bitrates from 32 to 912kbps. DTS bitrates can be from 64 kbps to 1536kbps. The DVD specification allows for up to 8 audio streams, each with as many as 8 channels. (!) 4.1 Pre-ConversionWell, as with the video, sometimes you need to convert the audio to some easily readable format to make the rest of the conversion quick and painless. You often can just directly convert between formats, but sometimes there will be sync problems, so I recommend always pre-converting your audio to PCM/WAV format with the proper samplerate (48,000 Hz) before actually encoding your final audio. You can do this painlessly using MPlayer:mplayer -vc dummy -vo null -ao pcm -srate 48000 inputfile.avi Of course your input file does not have to be an AVI file as in the example, but any file with some sort of audio that MPlayer is able to read. This command will output a file named "audiodump.wav". You can also use Cinelerra or Avidemux to perform this step if you like. Doing this pre-conversion will ensure that the encoding to your preferred format will be fast, and may eliminate some problems later on with audio sync and other issues. 4.2 Encoding with ffmpegffmpeg is my audio encoding program of choice. It is very fast, simple to use, and produces good output. It can encode audio to PCM, AC-3, and MPEG (and other codecs not useful for DVD).Invoke ffmpeg like this: ffmpeg -i audiodump.wav -ab 128 -acodec ac3 outputaudio.ac3 Or for MPEG audio: ffmpeg -i audiodump.wav -ab 128 -acodec mp2 outputaudio.mp2 You don't really have to specify the "-acodec" option as ffmpeg will usually autodetect this based on the extension of the output filename, but it doesn't hurt. Also, you may specify "-ac 1" if you only want one channel in the output (and you have multiple channels in the input file), or "-ac 2" if you want 2 channels. 4.3 Encoding with toolametoolame is an excellent MPEG layer 2 audio encoder. Like ffmpeg, it is very fast. Unlike ffmpeg, toolame only encodes to MPEG audio, but it does an excellent job.If you want the default bitrate of 192kbps, the commandline is very simple: toolame audiodump.wav outputfile.mp2 Or if you want to specify another bitrate: toolame -b 384 inputfile.wav outputfile.mp2 Other options will be explained when you run: toolame -h Some people say that toolame gives the highest quality MPEG audio; I don't know: ffmpeg does fine for me, so I use it, but everyone has their cup of tea. 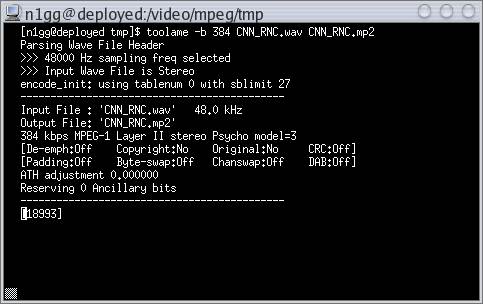
4.4 Encoding with CinelerraCinelerra can also encode your DVD audio for you. Although it is not as fast as the above mentioned programs, it comes in handy to be able to render audio with Cinelerra, especially when you are also rendering your video with Cinelerra. Usually I render to a Quicktime DV file with uncompressed audio and encode everything later when I use Cinelerra for editing, but if you don't have enough disk space, you may need to just use Cinelerra for the whole deal.You can render audio in Cinelerra just like you render video: select "Render" from the file menu, select the output format in the render window, click the little wrench icon and adjust your settings, select your output filename, and click "OK". Progress will be displayed just like when rendering video. Chapter 5: MultiplexingMultiplexing is the task of smashing together the elementary video and audio streams into one MPEG-PS file. MPEG data can have 3 different formats, MPEG-ES, MPEG-TS, and MPEG-PS.MPEG-ES is MPEG Elementary Stream, and is the type of MPEG that is not in an actual container yet, but is the raw data stream. The "filename.m2v" files that you have encoded so far are elementary streams. Also any MPEG audio alone is an MPEG-ES file (MP2 and MP3 files). MPEG-TS is MPEG Transport Stream, and is a type of MPEG format that is made for streaming, such as the MPEG video and audio coming over your digital cable or digital satellite TV. And finally MPEG-PS is MPEG Program Stream, and is the type of MPEG found in MPEG files and on DVDs, VCDs, SVCDs, and most other containers of MPEG video. There are a number of tools that you can use to multiplex your video and audio. I have covered my three favorites here. 5.1 Using mplexmplex comes with the MJPEGTools package, and is very good at it's job. Although I have occasionally used other multiplexers for several reasons, I mainly stick with mplex. One drawback of mplex, though, is that it limits the output filesize to 2GB or less. This is not a major problem, but is sometimes irritating. mplex is run like this:mplex -f 8 -o outputfilename.mpeg inputvideo.m2v inputaudio.ac3 So how do you multiplex streams that would exceed the 2GB limit? By adding a %d in the output filename of mplex: mplex -f 8 -o outputfilename%d.mpeg inputvideo.m2v inputaudio.mp2 The result of this will be files of 2GB or less in size named "outputfilename1.mpeg", "outputfilename2.mpeg", "outputfilename3.mpeg", etc. When put into the DVD filesystem, this will have no effect on the final product, it just gives you extra files to have to deal with. Notice the "-f 8" option in the command. This tells mplex that it is multiplexing video for DVD rather than the other forms of MPEG-PS output that are available (generic MPEG1/2, VCD, SVCD, etc.). 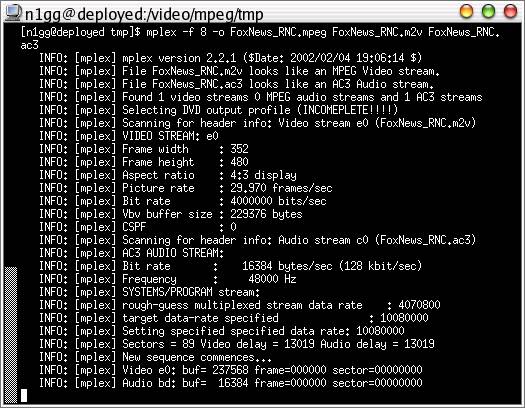
5.2 Using tcmplextcmplex is part of the transcode package, and sometimes will work when mplex fails. It is about the same as mplex as far as features, but it doesn't suffer from the 2GB output filesize limit. Sometimes tcmplex will finish multiplexing a file when mplex fails for some reason, but once in a while the audio will be out of synchronization with the video when dealing with AC-3 audio stream(s). You can try some of the options available to fix this problem. Run tcmplex alone for a list of possible options.A sample tcmplex command is this: tcmplex -m d -o outputfilename.mpeg -i inputvideo.m2v -p inputaudio.mp2 Sometimes tcmplex will mess up the audio sync by a small amount when dealing with an AC3 audio stream. You can fix this by appending a "-D 200" option to the command: tcmplex -m d -o outputfilename.mpeg -i inputvideo.m2v -p inputaudio.ac3 -D 200 This will shift the AC3 audio stream by the proper amount (200ms). Again, tcmplex has several MPEG output profiles, so the "-m d" option tells tcmplex to output an MPEG file suitable for DVD. 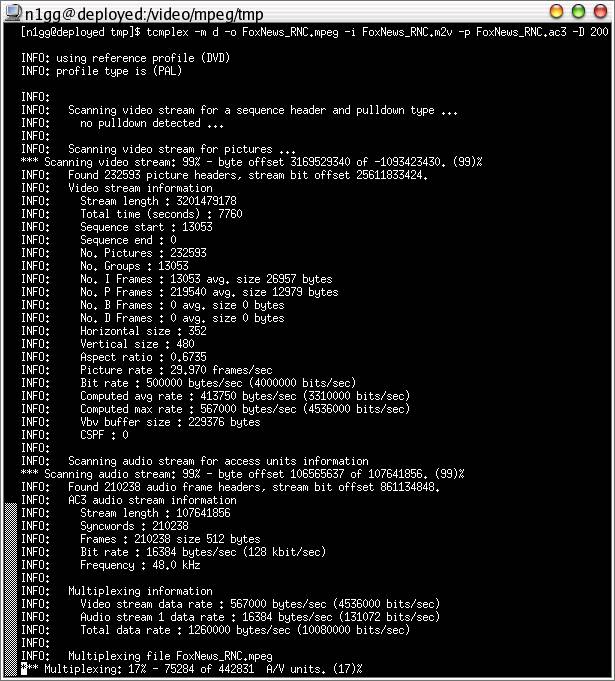
5.3 Using LvemuxLvemux was created by the same people as LiVES. It works well, sometimes when mplex and tcmplex fail, but suffers from the 2GB output filesize limit.Lvemux is run like this: lvemux -v videostream.m2v -a audiostream.ac3 -o outputfile.mpeg As the above programs, when Lvemux is run with no options, it will spit out all options available, such as for 3:2 pulldown, etc. 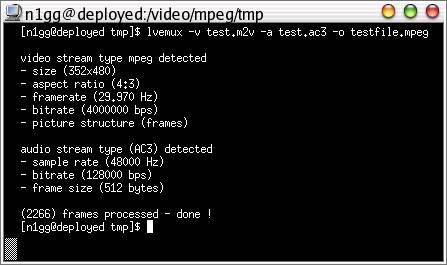
5.4 Common Multiplexing ProblemsSeveral problems often come into view when multiplexing MPEG files, most of which could have been prevented earlier in the DVD creation process.5.4a Buffer UnderflowsThe most common problems that arise related to multiplexing are usually buffer underflows. This is a result of bitrates that go over the allocated maximum for a DVD video stream. To fix this, you will need to re-encode the video at a lower bitrate. Often this happens when a high-motion scene is encoded, even with the proper settings, and the encoder used is not capable of sticking within the maximum bitrate limits specified. Some encoders have a "strict" setting (such as ffmpeg) that tells the encoder to follow the limits exactly. Such settings are useful in situations like this.Also, you may try using a constant bitrate setting rather than variable. This will often solve the problem, but can change the output quality and size of your video. If these methods don't work or are not an option, you can try using a different encoder. 5.4b Audio/Video SyncFirst of all, if you are a Windoze user reading this section only to try to fix your audio sync problems, FORGET IT. Although some very good video programs exist for the Windoze platform, (Premier, Avid DV, etc), the Linux video tools are so much more advanced, and give a much higher success rate in this area. I would advise you to get rid of that two-bit wannabe beta tester's crash-laden overbloated bug-haven (think tropical rainforest) security-less greed-machine operating system, and get something UNIX derived or UNIX based (Linux, FreeBSD, QNX, IRIX, BeOS, MacOS X, etc.).Most of the time, A/V sync problems are a result of a framerate mismatch or an audio sample rate conversion goofup. Make sure you did all your conversion correctly, and that your original video was correctly in sync. Sometimes the multiplexer is to blame. Certain multiplexers do a better job on certain streams, this is why I have covered three different multiplexing programs above. Personally, I have never had a sync problem with mplex from the MJPEGTools package. Most of the multiplexers are able to shift the video or audio in the MPEG file header. Often this is an easy fix of the problem. If the audio is in sync at the start of the file, but gets off as the file reaches the end, I would try using a different multiplexing program altogether. If the file is still not correct, then it is most certainly a problem with either the original video, or the encoding was not done properly. Chapter 6: SubtitlingSubtitling is an integral part of many DVD productions. Although I personally have used subtitles very rarely, this guide would not be complete without some information about subtitles.Many times it is necessary to subtitle video if the audio language needed is not available, or for the hearing impaired, or to add commentary. The DVD specification allows for a very nice subtitling method. Instead of having to render the text on the video itself (which would mean you could not turn the subtitling off), DVD implements subtitling as a series of images overlayed on top of the video. This way, you can switch between multiple subtitle tracks, or turn them off altogether. Although this takes up more data space than plain text subtitles, it is far more versatile: the fact that images are used makes it possible to subtitle using any font and even nonstandard characters and images. 6.1 DVD Subtitle FormatThe DVD subtitle specification allows for 4-color images with a transparent background. They can be created in nearly any format, but must be converted to the special DVD compliant stream before they can be put into the DVD structure.6.2 Subtitling MPEG Streams For DVD Using SpumuxSpumux is one such tool to create DVD subtitle streams. Although there are many tools for subtitling, Spumux is very useful in many areas and I have experience with it.It accepts several image formats, including PNG, which I find to be the most beneficial format (not just for DVD operations but for many other things as well). First you must create your text images. You may do this with your favorite image editor (IMHO, if you have a brain, it's Gimp), or you may use a text-to-image tool to make the images from your plain text such as Fly (which i will not cover here). Spumux will also accept subtitles in a number of text formats. See the manpage for a list of them. Since using spumux with text files can be extremely complicated, and there are multiple options for file formats, etc., I will only cover using PNG images for subtitling here. So open Gimp, (or whatever image creator that suits your fancy), and create a new image with a transparent background. Actually you may have a colored background if you like, but bear in mind that this may distract from your video. Sometimes this is necessary, such as if you have white text on a white-dominated video scene (such as snow), but most of the time this is distracting and looks cheap. Choose a color for your text. I have found that most of the time the best color for subtitle text is a light gray or white. Then use the text tool to create your subtitle text, and slap it onto the background. Be sure that you do not use more than 4 colors in your image, as spumux will reject the file if it has more. The DVD specification only allows for any 4 colors in a particular subtitle stream If you did use more than 4 colors, such as for a fancy gradient text or something, or possibly if you used anti-aliased fonts, you may set the image type to indexed, and dither the image down to 4 colors. In Gimp, right-click on the image, go to the "Image" sub-menu, the "Mode" sub-sub-menu, and select "Indexed...". Optionally, you may get to this dialog using the keyboard by pressing "ALT+I". Then make sure that the "Generate Optimal Palette:" option is checked, and set the number of colors to 3 or 4. Then save the image as PNG. It is interesting to note that since the DVD subtitle method is to use images, you may put, well, images into the subtitle stream, and they will display just like text. Of course you are still limited to 4 colors, but this comes in extremely handy for foreign language subtitles, and when you need special fonts and text styles. Now you must create an XML file for spumux to read to know what it is supposed to do. The format of the file is fairly simple, and lends to modification easily. Here is a sample of the contents of an spumux file with three subtitle images to be overlayed on top of the video:
I have provided this text file for you here: subtitle_spumux.xml The first image begins at 10 minutes and two seconds, and goes until 10 minutes and 8 seconds. Notice the line "force="yes"" in the first subtitle tag section. The "force" parameter tells spumux to display the subtitle on the video regardless of any settings in the player. With this option set to yes, you cannot turn the subtitle off on the DVD player. In most cases, this should be set to "no", as you will want to make the subtitles an option, instead of being forced. The "xoffset" and "yoffset" parameters tell spumux where the image should go on the video. They specify the placement of the upper left hand corner of the subtitle image. You will need to adjust these placement parameters based on the size of your images, and where you want them to appear on the video. Of course you can add as many more subtitles as you need to this example and modify it according to your needs. Name the file "subtitle_spumux.xml" or something similar. When you have created your images and your spumux XML file, then you must add the subtitles to your multiplexed MPEG File. You do this by running spumux: spumux subtitle_spumux.xml < input_mpegfile.mpg > output_mpegfile.mpeg If all went properly, spumux will spit out some data about the images that it added to the subtitle stream, and stop without errors. This may take some time, depending on the size of your input MPEG file, as spumux will write a whole new file for the output. Assuming that spumux finished cleanly, you now have your final MPEG file, ready to be put into the DVD filesystem. Chapter 7: DVD Menu CreationDVD menus are an integral part of many DVD productions, but are not required. They can be utilized to select different titles on the DVD, chapters, subtitles, audio streams, etc. The DVD structure allows for very complex menu setups, but with little effort you can create simple, professional menus.If you don't need or want a menu for your DVD, you may skip this chapter and go on to DVD Filesystem Creation (Chapter 8). However, I recommend that you at least read through this section as I'm sure you will want a menu sometime. A DVD menu must conform to certain standards: It must (obviously) be in a DVD supported resolution It must have audio (the audio can be silent if you wish) The menu buttons must contain no more than 4 colors. There are some GUI programs available for DVD menu creation that simplify the process (QDVDAuthor, and others), but at the time of this writing none of these tools were complete and lacked some important features. Besides, creating your menus from scratch is not very hard, gives you complete control over the process, and lets you take advantage of all possible features. 7.1 Menu Background CreationThe most obvious component of a menu is the background. The menu background can be made from either a still image or moving video.Still menu backgrounds give a sense of simplicity, while moving backgrounds can spice up the DVD experience and sometimes add professionalism (if not overdone). 7.1a Still Menu Background From JPEG FilesYou can create an MPEG-ES file from a still image using jpeg2yuv and mpeg2enc, both from the MJPEGTools package. Optionally, you can probably use ffmpeg by itself and maybe transcode, but jpeg2yuv/mpeg2enc work well and are not difficult to use for this task.First create your image with the proper aspect at a DVD acceptable resolution. Save the image as a JPEG file with a high quality setting. The command for jpeg2yuv to make a 30 second .m2v file from "image.jpg" is: jpeg2yuv -n 899 -I p -f 29.97 -j image.jpg | mpeg2enc -f 8 -n n -o menu.m2v Using this command, jpeg2yuv will convert "image.jpg" to a stream of identical YUV planar images and feed them into mpeg2enc, which will encode them into the MPEG-ES stream "menu.m2v". The "-n 899" option tells jpeg2yuv to send 899 frames to mpeg2enc (about 30 seconds at 29.97fps). The "-I p" option tells jpeg2yuv to make the frames progressive, rather than interlaced. The "-f 29.97" option tells jpeg2yuv to make the output stream 29.97fps. And of course the "-j image.jpg" option specifies the input JPEG file. 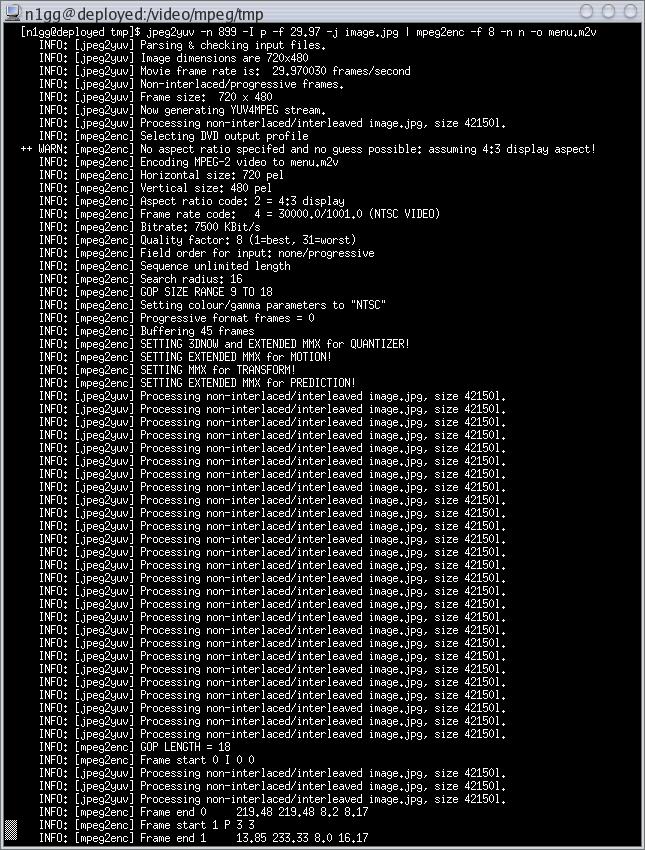
7.1b Moving Video Background MenuYou can also use any MPEG-ES file with moving video for a menu background if you choose. This opens up myriads of possibilities for the menu, including things like chapter selection preview video thumbnails, animated selection text, beautiful moving background scenes, short introductions to the main title in the background, etc., etc. In other words the possibilities are only limited by your video content creation and editing abilities.I use Cinelerra when creating my menu background videos, as it has text tools and other things useful for the job, but you can use any method or program you like to create your menu video. 7.2 Menu Background AudioThe audio for your menu is created in the same way as your main title audio, and must adhere to the same specifications. Your menu MPEG file must have an audio track, but if you don't want any sound with your menu, you may just use a blank audio file.When you have both your menu audio and video, multiplex them as you did your main title. 7.3 Menu ButtonsThe other component of a DVD menu is the buttons. You have to have some way of selecting what you want, and the buttons make it possible.Menu buttons are actually implemented as subtitles on the video, so the same rules apply for the colors, etc. You don't need to make individual images for each of the buttons; just make one fullsize transparent image with the selection buttons on it, and spumux will autodetect the images and number them. A good way to create the button image is to extract a single frame from your background video file, open it in an image editor, create a new transparent layer on top of the background, create the buttons on the transparent layer, and then delete the background layer. You can use Avidemux or Cinelerrra to save one frame from your background video as a JPEG, PNG, or BMP file. I believe that MPlayer can do this as well. Optionally you can create another button image file that will be displayed when one of the buttons is activated. Name your menu button image "menumask.png" or something similar, and your selected mask "menumask_selected.png" or similar. 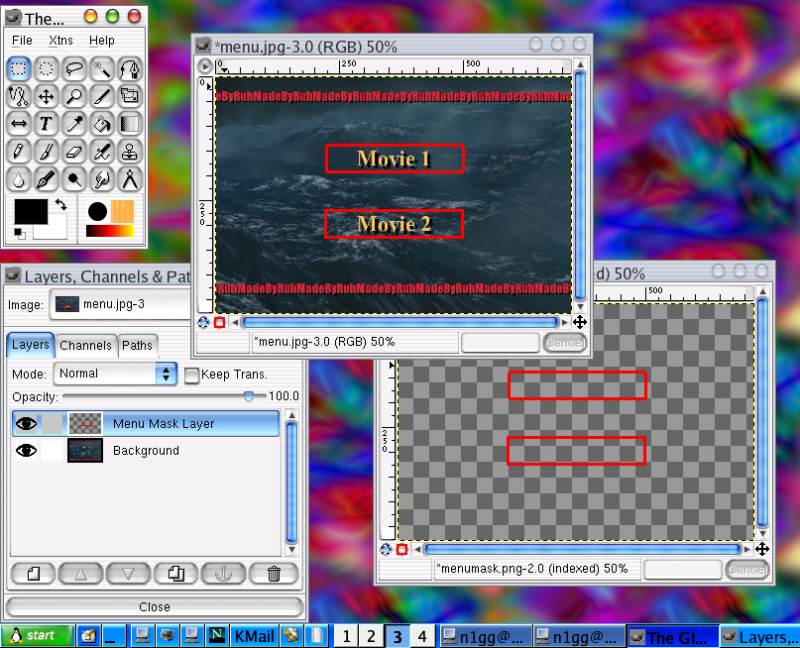
As I mentioned, the additional selection mask image is not required, but is nice to have sometimes when you want the buttons to change color when clicked or something similar. If you do not use the optional image, the buttons will remain the same even when they are selected. So assuming that you have created your file properly, you can begin creating (another) XML file for spumux. The contents of this XML file will be a little bit different than one used for subtitles, but should be easy enough for you to figure it out:
I have provided this text file for you here: spumux.xml Notice that the "highlight=" and "select=" parameters specify the images. If you chose not to use a selection mask (I usually do not find it necessary), just set the "select=" option to the same filename as the "highlight=" option. Save your XML file and then run spumux: spumux spumux.xml < menu.mpg > menu_final.mpeg Now spumux will spit out information about the buttons that it found and re-write the menu MPEG file to a new file with the buttons inside it. Sometimes spumux will have trouble detecting which buttons are which or the correct order. You can tell this by looking at the output of spumux concerning the placement of the buttons and the order in which they were digested by spumux. If it makes a mistake, you can either modify your image to make it easier for spumux to figure it out, or you can add additional parameters to the XML file to direct spumux to the proper order and placement of the buttons. Consult the spumux manpage for more information on this. But most of the time spumux does a good job of figuring out what you had in mind. 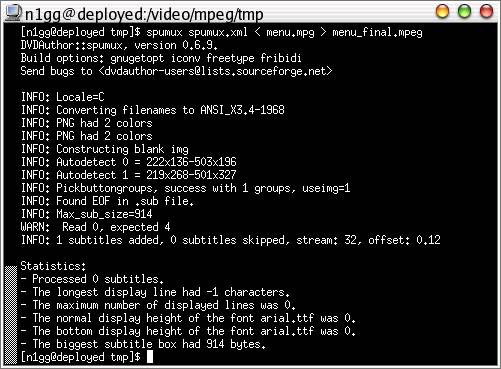
If all went well, you can now start creating the DVD filesystem. Chapter 8: DVD Filesystem CreationBefore a DVD can be burnt, it must be assembled into the proper layout for hardware players to read it.8.1 UDF Filesystem, Video_TS and Audio_TS DirectoriesDVD uses the UDF filesystem on top of ISO9660.On a DVD you will find two key directories: VIDEO_TS and AUDIO_TS. For most DVDs, only the VIDEO_TS directory is used. In these directorie(s) are contained three types of files that make up the DVD: VOB files, IFO files, and BUP files. The VOB files are 1GB or smaller files that contain the video and audio. VOB files are actually MPEG-PS files with extra data packets for hardware DVD players. The IFO files are files that tell the player where certain data is contained in the VOB files. They are like index files for the video. And the BUP files are backups of the IFO files, in case the DVD were to be damaged and not all the IFO files were readable. The DVD specification arranges the DVD in this manner: The main part of the DVD structure is the VTSs (Video Title Set). There can be as many as 99 VTSs on one DVD, each containing as many as 99 chapters. Each VTS can have as many as 8 audio tracks and 32 subtitle tracks. Contained within each VTS can be multiple menus (VTSMs) and titles. Optionally, there can be a VMGM (Video ManaGer Menu), which selects between the titlesets. The VMGM is the highest level of the DVD structure. It is also known as the "Top Level Menu" on many DVD players. You may wonder why you would need a VMGM if you can have menus at the VTS level. The reason is that all the titles and menus in a VTS have to have the same video, audio, and subtitle settings, so if you have different settings on certain parts of your DVD, you will have to put the differing parts in separate VTSs. Sometimes the VMGM is used to show a short company logo clip (like the "THX" clip), before jumping to a VTSM. A VMGM can only jump to another VMGM, the first VTSM of a titleset, or the start of a titleset. A VTSM menu can only jump to another VTSM in the same titleset, a title or chapter within the titleset, or the first VMGM on the disk. It can get pretty confusing deciding at what level to place your menus since it is often possible to perform the same tasks in multiple ways. 8.2 dvdauthordvdauthor is the Linux program for creating DVD filesystems. It is an extremely powerful and versatile tool, and is capable of implementing almost every feature allowable by the DVD specification.dvdauthor can be run by specifying the options on the commandline or by reading parameters from an XML file. Using an XML file is nearly always the best way to create the DVD, as specifying so many parameters on the commandline is clumsy at best. Here is an example of a simple 1 title, no menu XML file for dvdauthor:
I have provided this text file for you here: dvdauthor.xml As you can see, the XML file format is not too formidable, and allows you to create complex DVD projects that are still readable by human eyes. Here is another sample of a DVD with one titleset, a VMGM logo video, a VTSM, and two titles with chapters:
I have provided this text file for you here: dvdauthor2.xml When you have created your dvdauthor XML file, you may run dvdauthor to create the actual DVD directory: dvdauthor -x dvdauthor.xml dvdauthor will then proceed to spit out a bunch of information about its progress and information about the input files. Sometimes dvdauthor will complain like crazy (several thousand times--literally) about some AC3 streams having backwards audio PTS or something. You can safely ignore these warnings. I have never had a problem with DVDs created with these. When dvdauthor gives a warning, it will not stop, but will finish and do the best it can to produce the DVD, but if an error is encountered, dvdauthor will stop and you will have to fix the problem. 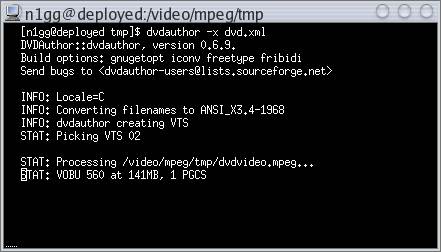
Assuming that dvdauthor finished with no errors, you can test your dvd with Xine: xine dvd:///path/to/DVD/VIDEO_TS/ Notice the slash at the end of the VIDEO_TS directory. If you don't add this, Xine will complain and won't play the DVD. Or you can use MPlayer, but be advised that MPlayer will not play any menus, only main titles. This command will play the first title in the DVD: mplayer -dvd-device /path/to/DVD dvd://1 If Xine or MPlayer played the DVD fine, you are ready to create your DVD ISO image and/or burn your DVD. Chapter 9: DVD-Video Image Creation/BurningISO image creation and burning are the last stages of the DVD creation process.Making an ISO of your DVD is not always necessary, as most burning tools can create the image on-the-fly, but many times it is useful for easily dealing with your DVD projects (transporting between computers, etc.). Also, depending on what burning program you prefer, you may be required to create an ISO image. 9.1 MkisofsMake sure that you have a recent version of mkisofs, as older versions do not have certain options for creation of DVD ISOs.You may create a DVD-Video ISO using mkisofs by issuing this command: mkisofs -dvd-video -udf -o dvd.iso /path/to/DVD This will output the "dvd.iso" file into the current directory. 9.2 dvd+rw-toolsdvd+rw-tools is a very good collection of simple tools for burning DVDs.Originally dvd+rw-tools was for the DVD+ format, hence the "+" in the name, but DVD- writing capability has been included in all recent versions. There are other DVD burning tools available, but personally I have found no reason to use anything but dvd+rw-tools, as it does everything needed and supports nearly any standard burner. There are several very nice GUI front-ends for dvd+rw-tools, such as k3b, but I will focus on the commandline (how'd ya guess). dvd+rw-tools contains several tools, including tools for dealing with RW discs (format/erase, etc), but the one you will be using most is the growisofs burning program. growisofs can either burn ISO images (or other types), or invoke mkisofs automatically and create the image on-the-fly. Run growisofs like so: growisofs -dvd-video -dvd-compat -speed=4 -udf -Z /dev/dvd /path/to/DVD This command will burn the DVD directory to the disc in the /dev/dvd drive. The -dvd-compat option tells growisofs to finalize the DVD, thus making it more compatible with hardware players. It is only required for DVD-R/RW discs, but is always best leave in unless you specifically need an un-finalized DVD (an example of this is later editing of a write-once +R DVD). The -Z device option tells growisofs which device name to write to. If the -speed=x option is omitted, growisofs will try to burn at the maximum speed supported by both the drive and the blank media. If you are wanting maximum compatibility with multiple hardware players, then limiting the speed to a low value (4X or less) is always a good idea (the same applies to CDs). Like previous commands, you will learn more about the syntax and extra options that you may need by looking at the growisofs manpage. If you need to burn an ISO image, then the growisofs command would be: growisofs -dvd-video -dvd-compat -udf -Z /dev/dvd=/path/to/dvd.iso Notice the "=" between the device name and ISO file path. This tells growisofs not to use mkisofs, but to put the ISO file directly on the DVD device. Be sure that you do not put any spaces around the equals sign or growisofs will complain. When growisofs is burning, it will output progress information and some general information about the burning process. After it is finished, eject the DVD and smile with pride- you are done. 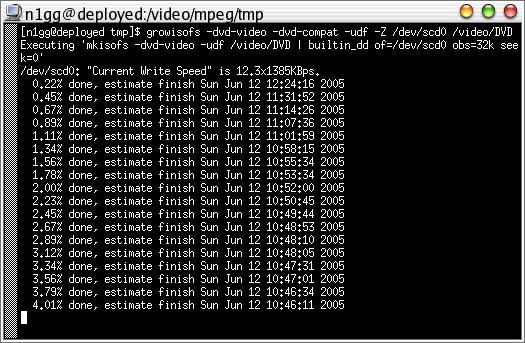
Chapter 10: ConclusionWith this information, anyone with basic Linux knowledge should be able to produce professional quality DVDs. I have put much effort into gathering and compiling this information. Hopefully it will be of use.God Bless and Happy DVD Creating! |