My intent is to get Phase 1 functioning by the January contest, and
have additional phases (222/432 and beyond) complete for June.
I
also have a desire to have APRS signals coming from the BlazerRover.
I have KAM KPC-3 and a Casio Casiopeia that I will likely use for this.
I'd also like to build a display unit that I can mount in the overhead
console to display the current grid location of the BlazerRover.
For
the June '99 VHF contest, I went to Taum Sauk Mountain (EM47pn), and did
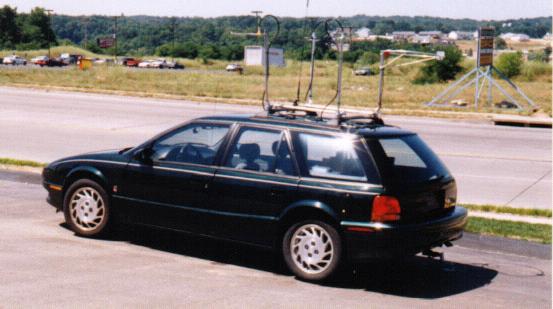
ok, despite less than average conditions. I had a MFJ
1762 3-element beam for 6m and a Cushcraft
13B2 for 2m, along with the Mirage B3016 above for power on 2m.
Obviously, that beam was no fun to put up and take down! For the
BlazerRover, I would like to have typical mobile antennas permanently
mounted, with an eye toward the quick erection of beams for stops.
9
November 1999 - I acquired some 8-gauge very flexible
black and red cables (from Gateway
Electronics) for running from the battery to the cabin, as well as
some solder lugs for mounting the cable to the battery. The
battery connections are very easy to get to on the Blazer, so that'll
help.
I posted a question to the W6YX VHF list about wiring through
the firewall, and it looks like there are many folks out there who have
done this before! After removing a couple of the driver's side
interior moldings and peeling back the carpet, it feels like there is a
hole in the firewall that appears to be designed to push cables
through. I didn't pull the carpet back far enough to see it,
though.
However, now that the lugs are on the power cable, it's time
to try running the cable through the firewall hole!
29 November
1999 - Wiring through the firewall became a snap! Through
an e-mail from xxxxxx, I was told of an already existing hole in the
firewall just above where the clutch would be if I had a 5-speed.
After peeling the carpet and padding back, I was able to find a grommet
housing an already existing wire through the firewall. I moved it
out of the way, installed another grommet in the hole (to protect my
cables), ran the two power cables and the existing cable through it, and
re-installed the carpet and plastic moldings.
I attached the power
cables to the fuse block located on the driver's side, toward the front
of the engine compartment. It was conveniently labelled with B+
and a good grounding post. We'll see if there's too much noise
generated this way.
I ran the power cables
to the back along the door moldings, but now think I would like to move
them to the center of the vehicle, running along or under the center
console. It seems like it will work
better, and I won't have to worry quite so much about pinching the
cables when collapsing the back seat.
For mounting the radio body, I removed the cargo cover
housing (this
is a roller device, kinda like an old window shade) by flipping the
mounting clips. This is the same way you would get to the tire
jack. On the plastic panel that remained, I mounted the '706 mounting bracket,
and then the '706 with the antenna jacks pointed up. After
replacing the cargo cover housing, I was left with a radio I could
access easily, and cover up using the cargo cover.
Now to find a
mount and location for the '706 head.....
I also installed a lip mount
for my Comet 6m whip. This went on the passenger's side, with the
cable running up the back door so it could descend into the cargo area
from the hinge. This seems to work pretty well, and gives me some
ideas for bringing in other coax as I attach more antennas.
I have an
idea for building a mount to attach to the existing ball mount hole to
provide a brace for a mast (for beams on portable operations).
This mount would support a Hustler ball mount for my 160m mobile
antenna, and might even give me a place to install the High Sierra
screwdriver antenna.
7 December 1999 - Over the weekend,
I finally got power to the radio and checked out the Comet 6m
whip. It seems to be working well based on the meter readings in
the '706.
To-do's for this week:
After all this is complete, the next task is to mount one of my loops
atop the cargo carrier. I'll probably go with the PAR for
now. Why? Well, both the PAR Omniloop and the KB6KQ Maxiloop
(which I've got mounted on the patio) have typical u-bolt mounting
supplied, while the M2 HO-LOOP uses mobile whip mounting hardware (like
the Hustler masts). Given how I want to mount things on the roof,
the u-bolt mounting environment should work better. In any case, I
can change it out if I don't like it.
20 December 1999 -
This weekend found me getting the power cables re-routed next to the
center console, the head separation cable for the '706 routed down the
center, and the radio functional with the Comet whip. I also got
the power distribution stuff installed in an old wine crate to keep the
cables somewhat in check. I seem to have little or no noise on 6m
with this setup, which is nice to hear. I'll have to see how HF
responds once I get those antennas on-board.
The next big steps are to get the
cable management devices installed (to keep the cables intact), and to
figure out how to mount the PAR atop the Blazer.
I did hear a couple
of stations from Alaska on 6m on the '706 last weekend, which was the
first time I'd heard the frozen north -- not enough "umph"
though to work them. Maybe next time!
No photos yet, but
I'll thread them in when I get them!