This export function is intended for sophisticated post-processing, long-term
propagation studies etc. It offers a simple (text-file based)
interface to other programs like MS Excel. Data are written to the output file
periodically (one 'line' at a time), with a user-defineable
write interval. To configure and activate the
text file export, select Export Calculated Data in main window's File menu.
This chapter covers:
See also: Spectrum Lab's main index ,
interpreter , watch &
plot window (similar flexible export, with a built-in "function plotter"), sample
applications .
The following table defines what will be written into the exported
file, and how the data shall be formatted. It also contains
numeric expressions for all "exported" values.
(Note: There is also a simpler export function for the FFT results, see chapter
"Exporting the FFT results").
The export definition table can be modified in this dialog, which can be
opened from SpecLab's main menu (under "File"):
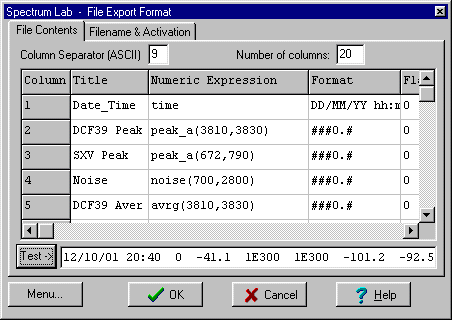
The controls on this tab of the File Export dialog are ...
-
Separator (ASCII)
-
This is the character code used to separate the columns in the exported text
file. To post-process 'spectral' data with Excel later, use the TAB
character (code 9). If you use the semicolon (code 59), Excel will also import
the file properly.
-
Number of columns
-
Enter the number of columns for the exported file here. The definition table
(below) will have one LINE for every COLUMN of your exported text file, so
the number of COLUMNS entered here will immediately affect the number of
LINES in the definition table. Currently, up to 30 columns are possible.
-
File definition table
-
In this table you must define WHAT shall be exported. I decided to use a
simple macro language for this purpose (see examples below). Furthermore,
you should define a Title for every column in the exported file, and how
a number (etc) shall be formatted for the output. The following items belong
to the file definition table:
-
Column
-
This is just a table index running from 1 to the number of lines in the table.
It can be used to re-arrange the COLUMNS in the exported file. Holding the
mouse pressed on the number, and move a line in this table up or down.
-
Title
-
You must supply a name for each column here. The column titles will be written
into the first line of every exported file (separated by the specified
character), making it quite easy to create diagrams with Excel (etc). The
title may consist of up to 20 characters.
-
Numeric
Expression
-
This is a versatile way to define WHAT shall be put into a column of the
exported file. Up to 80 characters for the definition are allowed. Some
examples:
time returns the current
time (date+time)
noise(freq1, freq2) calculates
the noise in a frequency range
avrg(freq1, freq2) calculates
the average in a frequency range
peak_a(freq1,freq2) calculates
the peak AMPLITUDE in a frequency range
peak_f(freq1,freq2) calculates the peak FREQUENCY in a frequency
range
If you need other functions, look at these
interpreter functions .
-
Format
-
defines how a numeric (or other) parameter shall be formatted for the text
output. Some examples:
###0.# number, one to four digits before and one digit after
the point if required (non-zero)
hh:mm formatted time+date, only hour:minute.
For an overview of formatting options, look
here . The format string
may be up to 20 characters long.
-
Flags
-
The least significant bits of the "flag" value define into which of the two
exported files the current line shall be active. Possible "flag" values to
control this:
0 = data shall be written into both export files (only for backward
compatibility !)
1 = data shall be written into the first export file
("#1") only
2 = data shall be written into the second export file
("#2") only
3 = data shall be written into both export files ("#1" + "#2").
The other "flag" bits are reserved for future applications.
-
TEST #1, TEST #2
-
These buttons were used during program development.
Clicking a button generates one line in the "exported" text format,
but the result will not be written into a file.
Instead, the result will be displayed in the field on the right side of the
button.
"Test #1" produces an text line for the 1st export
file, "Test #2" for the 2nd export file,
depending on the "Flags" value.
Notes and Hints:
-
To see the values of the exported data immediately, some (or all) of the
exported items can be shown in the watch & plot window.
For example, enter the Expression "export.value[2]"
in a line of the watch list. The Result in the watch window will then
show the latest value written to the export file. The displayed value in
the watch window can be formatted the same way as for the text file
export.
-
The value calculated in a column can accessed anywhere (in SL's interpreter)
by reading "export.value[X]" as part of an
expression. More info can be found in the description of the
interpreter and the
Beacon monitor example.
-
The export definition table can also be modified(!) with
the interpreter, but this is only used for very special applications.
-
If a resulting value shows "1E300", there has been an error in the calculation.
This is often caused by a syntax error in your expression ("formula"), or
an illegal frequency range passed to one of the interpreter's analysis functions
(see above).
-
It's possible to produce
two export
files with different contents. To define which data shall be written
to the 1st file only, and which to the 2nd, use the
"Flags" value in the export definition table.
The names of the exported files are defined on another tab sheet of
the export control window.
See also: chapter overview
The filename, activation and some more "special features" of the export function
are defined one the tab "Filename & Activation" of the export definition
dialog. Controls are:
-
Active
If this option is enabled (checked), the file export function is active and
will append lines to the text file in regular intervals.
-
Power Fail Safe
Set this checkmark if there is the chance of occasional power failure of
the PC. If this option is set, the export file will only be opened for a
very short time for the actual write access, and then closed again. This
may reduce the risk of losing logged data due to power fails or system crashes.
However, this may be a performance penalty (more hard disk accesses with
than without the "Power Fail Safe" option).
-
Export File #1
Defines or displays the name of the first exported file. Note that the name
of the export file can also be modified from the interpreter. This file can
be erased (deleted) from the menu on this tab. You can enter the name of
an export file via keyboard, or double-click into this field to open a file
selector. For automated operation, you can change the name of the exported
file(s) via command interpreter (for example, to start a new
export every couple of hours, with a filename assembled from date+time).
Export file #1 will only contain data columns with bit 0 in the
"flag"-value set (1 or 3).
-
Export File #2
Defines or displays the name of the second exported file. To define what
shall be written into file #1 and what into #2, use the
Flag value in the export definition table. The
2nd export file can be started and stopped independently from the first file,
also via interpreter command.
Export file #2 will only contain data columns with bit 1 in the
"flag"-value set (2 or 3).
-
(format-) Definition File
The file where only the definitions ("file definition table" from the previous
chapter) may be saved.
- >
Use Write Interval
If this checkmark is set, a new exported line whill be written at the specified
interval; otherwise it will be written whenever a new spectrum has been
calculated (from the "main" spectrum analyzer).
-
Whenever a spectrum has been calculated... / Before writing a line to the
file... / After writing a line...
Lines of interpreter commands which may be executed before an exported
line is appended to the file. Not required for normal operation, only for
some "very special" applications, where -for example- the exported lines
were processed immediately by another application.
See also: using two export files;
interpreter commands for "export"
back to top of page
For some applications it was necessary to log the results from the FFT
calculations for further post-processing. For this purpose, use the third
tab of the export definition window. It can be opened from SpecLab's main
window under "File"..."Text File Export".
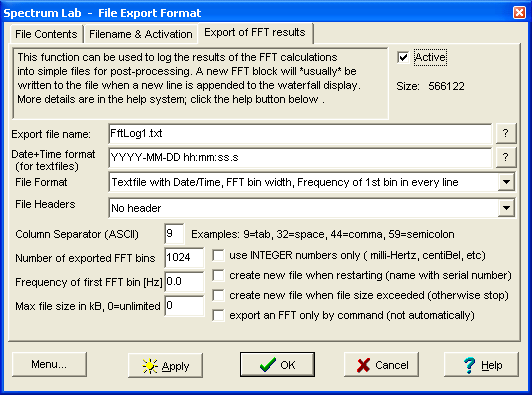
In contrast to the more flexible export function for "any" numeric expressions
(see previous chapter), the "FFT export function" writes the results of the
main spectrum analyser into a file - preferably simple text files.
Typically, these files contain..
-
A timestamp ("when have the data for this spectrum been collected")
-
The most important parameters to interpret the following FFT-bins:
- the width of the FFT frequency bins in Hertz, and
- the center frequency of the first exported FFT bin (also in Hz)
-
the FFT frequency bins themselves, possibly a limited number to save disk
space. They use the same unit as the main spectrum analyser (linear or
logarithmic; amplitudes only or complex depending on the current FFT settings
- see FFT options ).
An example for a file created this way is given below, here: ASCII format
with timestamp and compact FFT-info:
YYYY-MM-DD hh:mm:ss.s BinW_Hz F1_Hz dB_0 dB_1 dB_2 dB_3 dB_4
<<<< header

2004-06-12 14:05:29.5 1.3 47.1 -78.0 -56.7 -48.3 -52.4 -75.8
<<<< data...

2004-06-12 14:05:29.8 1.3 47.1 -82.1 -56.7 -48.8 -52.8 -73.8

2004-06-12 14:05:30.1 1.3 47.1 -83.0 -57.6 -49.5 -53.8 -79.6
(Note: the TAB separator characters could not be displayed in the HTML code)
The column titled "BinW_Hz" is the FFT bin width in Hertz, the column "F1_Hz"
is the center frequency of the first exported FFT bin, also in Hertz. The
titles for the FFT bins (here: in dB) have a sequence number as a suffix,
because some visualisation tools want to have unique names for all data columns.
If the FFT export format is set to "ASCII/TEXT", the
format of
the timestamp can be defined, depending on the required resolution,
and if a calendar date is required too. In the above example, a full timestamp,
including date and time with a resolution of 0.1 seconds was used. This is
a quite lengthy notation, other possibilities can be found in the specification
of the format string for numeric
values. If you leave the field "Timestamp format" empty, there will be
no timestamp at all in the exported data. If there is a format string for
the timestamp, it will be displayed in the header to allow automated parsing
of the logged files.
Additionally, there may be a header at the beginning of every FFT logfile
which makes it easier to import the data into a spreadsheet (etc) for post
processing later. You can leave the header away to keep thing simple.
If the FFT parameters (and audio sampling rate) are never changed, leave
the FFT-info away to save disk space and to simplify the file-reading routine
in your program.
The FFT export file
name can be entered in the export definition window. To select
a simple filename, double-click into the field to open a file selector.
Alternatively you can enter a string
expression (instead of a fixed filename) like this:
"Spectra"+str("YYMMDDhhmmss",time)+".txt"
This string expression (entered in the field "export file name") automatically
produces a filename which contains the current date+time. This is especially
helpful if the file size is limited, and the option "create new file when
file size is exceeded" is selected.
For special application, you may not want to export every FFT as explained
above, but only if something "special" happens. For example only once per
minute regardless of the waterfall scroll interval, or whenever the signal
power in a certain frequency range exceeds a certain value. All this can
be done with the following interpreter commands
, in conjunction with the periodic or
conditional actions . The
token "export" can be abbreviated as "expt".
-
fft.export.active=1
turns the export of FFTs on .
-
fft.export.active=0
turns the export of FFTs off, but doesn't affect the export file. Typically
used in a conditional action to temporarily pause the export
of FFTs.
When called as a function (without the formal assignment), fft.export.active
returns ZERO if the export is passive, or ONE if the export is active.
-
fft.export.open(<filename>)
Turns the export of FFTs on, using the specified filename.
-
fft.export.close
Close the FFT export file, and turns the export of FFTs off.
-
fft.export( <what> )
exports a single FFT from the specified analyser channel in
the moment this command was issued.
Note: You should only use this command together with the option export
an FFT only by command on the control panel shown above.
The parameter <what> specifies the analyser channel(s), or (when enabled)
the long-term average channel as explained
here . A few examples:
-
fft.export(#1)
exports the FFT from the first analyser channel (momentary spectrum).
-
fft.export(#1 , #2)
writes the latest FFTs from the first and second analyser channel in a single
line of the FFT export file.
Only works if the spectrum analyser runs in dual-channel mode (not in RDF
mode) !
-
fft.export( #LTA1 )
exports the long-term-average spectrum .
back to top of page
The text files generated by Spectrum Lab can later be used for post-processing
with Excel or a similar spreadsheet program.
You will usually turn the file export on and off from the configuration dialog
shown above. For very special applications, you can alternatively turn the
export on and off with from SpecLab's interpreter (a kind of macro programming
language).
To see the values of the exported data immediately, some (or all) of the
exported items can be shown in the watch & plot window.
See also: "Applications" for SpecLab,
interpreter commands for "export"
.
back to top of page
Benötigen Sie eine deutsche Übersetzung ? Vielleicht hilft dieser Übersetzer - auch wenn das Resultat z.T. recht "drollig" ausfällt !
Avez-vous besoin d'une traduction en français ? Peut-être que ce traducteur vous aidera !