 Servers ServersI use several computers. For my server node I used an old Windows Vista Ultimate machine. Any 'pro' or 'ultimate' version of windows already has 'IIS (internet information service)' built in, although they may not be installed. To check, go to 'administrative tools' in your windows start menu. If you see 'IIS manager' then the feature is installed. If not, go to your control panel and select 'programs' or 'programs and features'. On the left select 'add or remove windows features'. Be sure to check everything to do with IIS, http, and ftp. I am not going to go into how to build a web site, or how to configure the
servers, but lets assume that a standard web server runs on port 80, and a FTP
server runs on port 21. Those two ports are the ones we are concerned
with. Other servers and applications use different port numbers, so adding
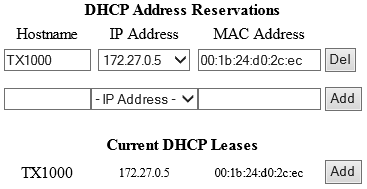
them to your node is very similar. Connect to the node where you want to host a server or
device. Click on the 'setup' menu and log in. The first screen shows
general information about your node and allows you to make some settings.
Other menu items are also available on the top of the screen. Connect a device and forward ports 'Port forwarding' is how you direct certain traffic to the correct server. For example, if someone wants to go to a web site they type 'http' :// web address here. The 'http' tells the server at the web address that it wants port 80. In a similar fashion, a 'ftp' :// address tells the server that it wants port 21. So, when a person wants to view your server they can go to your node address with an 'http' request and view whatever is on your server. An example is http://KC3APN-BASE The 'http' directs the server at 'KC3APN-BASE' to watch for and use port 80 for transferring information. Common Ports
IRC Chat Server IP Camera We want to forward the ports to the correct device. You can have multiple devices and server applications either running on or connected to a node. To forward a port, select the host name from the 'LAN IP' pull down menu. Enter the outside port (requests come in from outside). Now enter the LAN port that the request will be directed to. Usually these numbers will be the same. Be sure to press the 'add' button. Add as many entries as you wish. If you make a mistake you can press the 'del' button next to any entry to remove it. Just a note, you will usually select 'wiFi' as the interface unless you are operating a gateway and want to access the node from your home router or internet connection. If this is the case select 'WAN' as the interface. I usually select 'Both' under the 'type' menu. You can select 'TCP, UDP, or Both' from this menu. Some server applications want one or the other so I just use 'both'. When you are finished making entries be sure to press the 'save changes' button near the top of the page.
This is where you list what services are available on your
node. You can make a clickable link that will show up on your node status
page when others visit your node. In my example I have a web server, a FTP
server and an IRC server. To make a link to a service. Enter a name for
the service. It is suggested that you always include your call sign in
this name so your service name does not duplicate any other mesh users service
name. Adding your call sign keeps it unique. You can add as many services as you like. If you wish to remove one press the 'del' button next to the entry. Be sure to press the 'save settings' button when you are finished.
|
 Web server
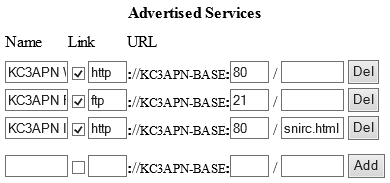 Advertised
services
Advertised
services