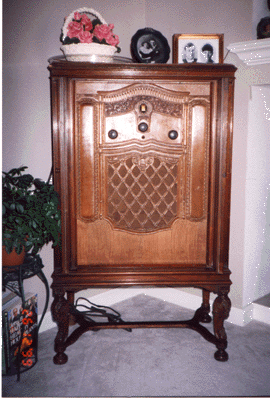
This is probably the most aesthetically pleasing antique radio that I own. I know this because my wife actually allows me display it in our living room. This radio was given to me by a fellow member of the Colorado Radio Collector's Club. He had kept it for a number of years, but never had the time to work on it. It was in pieces when I got it. Several of the structural pieces were missing and or broken, and the trestle support was broken in several places. There were two separate chassis, one for the audio/power supply, and one for the RF deck. A separate electrodynamic speaker also came with the set; it weighs about 20 lbs or so, and still had the original warehouse tags on it (dated 1929). It was in pretty good condition.
This set is an AC operated TRF set. It has the following tube complement: four type 26 triodes, RF stages; a 27 triode detector; a 26 triode audio preamp; a type 10 ( or 50 ) final audio tube; and two type 81 rectifiers. The RF design is quite conventional for the time period, and looks like many other AC operated sets of the time.
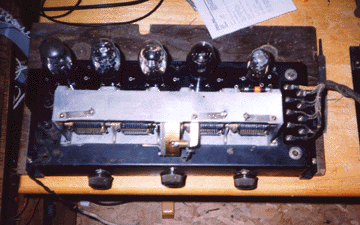
The electrical stuff appeared to be mostly intact, so I set to work on that first. Initially, I was a bit dismayed to find that the main audio tube used in this set was a type 50 triode, a tube now beloved by audiophiles and completely out of reach of my budget. A bit of research, though, showed that two models of the K24 were built, one with the 50, and another with a type 10 triode. I decided that if the set was ever to play again, I would have to rebuild the power supply and change the bias network so that a 10 triode could be used. This turned out to be a pretty straightforward modification, since Rider's has BOTH schematics. I replaced the biasing networks in the audio section to accomodate a 10; I disconnected the various filter capacitors in the circuit and neatly stuffed the wires into the main condensor box. I replaced with modern equivalent capacitors. None of the electrical modifications are visible unless you take the audio/power supply chassis apart. Here is what the audio/power supply chassis looks like:
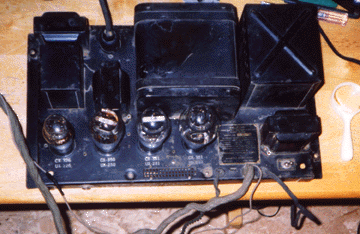
The big black box in the middle is where all of the original capacitors were. In front of it are the two '81 rectifiers. To the left of these is the 10, and the tube to the left of it is the 26. The heavy cord coming out of the chassis goes to a large connection strip, which bolts onto a row of connections on the RF deck.
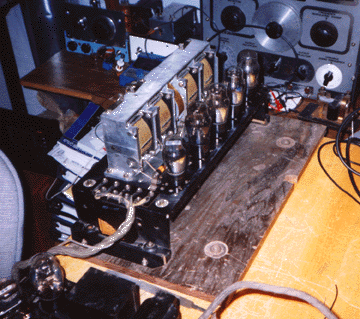
The RF deck only had a few minor problems. A couple of the wire grid resistors were open, so I snuck in small modern equivalents across them, careful to keep them out-of-sight. The grid leak resistor of the detector was open- I snuck a modern resistor underneath the chassis and kept the original fuse-type grid leak in place. The main tuning capacitor was frozen in place- some judicious adjustments and a LITTLE bit of lite oil freed it up nicely. Here are a couple of views of the RF deck:
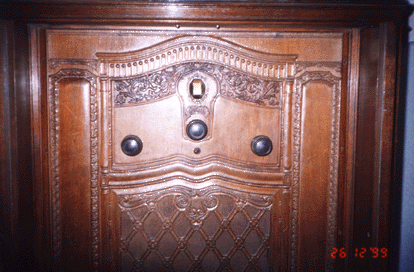
Beautiful, isn't it?
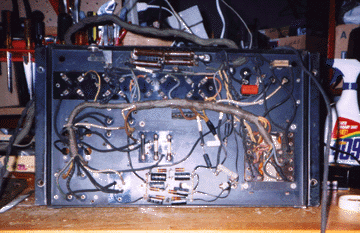
The picture below shows what the underside of the audio/power supply looks like, with the modifications that were made. No holes were drilled, all mods are reversible. There is an additional cover plate which bolts onto the bottom of this chassis, so none of this is exposed. There was very little room, heighth wise, under this chassis, maybe 3/4"!
After all the electrical changes/fixes were made, I plugged in the speaker, and powered the set up with a small clip lead attached to the antenna post. I was immediately able to pull in some of the stronger stations in the Denver, CO area. When I connected it to my external inverted L antenna, it REALLY worked well. After I had the set working nicely, I stuck it up on a shelf and waited until my furniture-maker friend, John, could get the time to build the various structural elements and missing pieces for the radio.
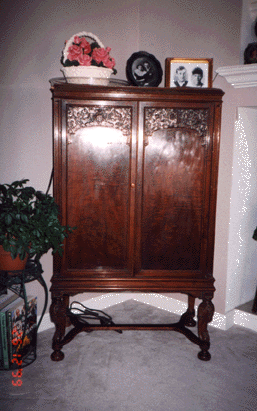
I had to cut the trestle support off and gave it to John to see if he could make a replacement. Using the old one as a template , he quickly made a new trestle out of 3/4" birch plywood; it looked great. Eventually, I brought the whole thing over to John's shop, where the original dowelling holding the trestle to the legs was drilled out, and replaced with new dowels. The trestle fit perfectly. The cabinet was now on a solid footing. Next, a pice of wood was cut to serve as a spacer and support piece for the speaker; the speaker and spacer bolt directly onto and underneath the RF deck. The weight of the RF deck and speaker are supported by two wooden rails, which were missing when I received the radio. John built a couple of new rails and glued and screwed them into place. The RF deck and speaker now could slide right into place. The audio section bolts directly onto the base of the cabinet. As can be seen in the picture at the top of this page , below the speaker is another wood panel which conceals the audio deck. Not having the original panel, this replacement was a guess- I think it turned out well. The back of the cabinet, not seen in the photos, needed a couple of new frame pieces and a replacement 1/4" plywood panel. The cabinet work was done. I then cleaned the whole cabinet thoroughly with mild soap and water; then applied a finish restoration product, and allowed it to dry for a couple days while a space was cleared out in the living room for the set. Finally, I put everything together in the living room, where the radio now commands a position of prominence.
This was a fun project, and I think the final product turned out nicely.