Note: This page started more as a note to myself documenting what I had done for future reference (read that as, "In case it ever breaks and I've got to work on it again..."). But later I thought some people might be interested in seeing 1) the troubleshooting approach I used in working on this and 2) that even "seasoned" builders have problems.
I purchased the G-QRP Two Tone Oscillator from Kanga US back in late 2001 and didn't get around to building it until late 2002. I've had a fair amount of kit building experience and most of the kits I've built work on the first try. But every once in a while, one comes along that humbles me a bit...
The instruction included were marginal to start with. The board isn't silk-screened, so I had to be careful to get all the right components in the right places. But it still took only about half an hour to assemble the circuit board.
I don't like soldering and unsoldering connections. Maybe it's just me, but even with a professional desoldering station and a lot of care, I tend to lift traces. Because of this, I decided to loosely mount the board and wire the switches up prior to testing the circuit. And then the problems began...
Basically, I had a one tone oscillator. The 1,500 Hz oscillator worked fine, but the 1,000 Hz oscillator was dead.
Of course the first step was to check my solder job and look for any cold joints or bridges. I didn't find anything there, so I did what any red-blooded ham would do and started playing with the pots. Well, suddenly +5 volt supply dropped way down. By now I was convinced I had a solder bridge, so I looked a while longer. This was on a Sunday evening, and I finally gave up in frustration and went to bed.
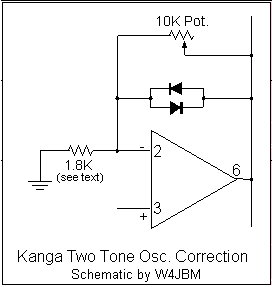
The next few evenings I spend an hour or so troubleshooting. Since there were two sections, I started by comparing them to each other. I pulled the op-amps and started with resistance tests. I quickly found my first problem. The pot used to adjust the feedback on the oscillators is shown with one leg connected to the inverting input of the op-amp (pin 2) and the wiper arm connected to the output of the op-amp (pin 6). In the 1,000 Hz oscillator section (in the middle of the board), the second leg of the pot (which is suppose to remain unconnected) was tied to the +5 volt supply.
Proud of myself, I used a hobby knife to put two small slices in the offending trace and peeled it away. Well, that stopped my problem with the +5 volt supply dropping out when I adjusted the pot. But the thing still didn't oscillate.
I thought the two diodes in the feedback path (which paralleled the pot) might have failed because of the connection to +5 volts (although I couldn't think of a reason they would have). I pulled the op-amp out and used the diode checker. I had about a 0.6 volt drop each way, so the diodes seemed to be fine.
I went through the resistance measurements again and tried to compare them with what I'd expect from the schematic. With the op-amp removed, I measured the resistance from the output (pin 6) to ground. It was lower than expected. At first I thought I had it made, but then I remembered the resistances measurements were similar between the two oscillators--and one worked while the other didn't. My first thought was a leaky capacitor, but as I traced things out I found a resistor that wasn't shown on the schematic. There was a 4.7K ohm resistor from the inverting input (pin 2) to ground.
While this explained why my resistance measurements didn't make sense, it still didn't help me understand why the oscillator wouldn't oscillate. I used an old trick of bending one pin of the chip out (so that one pin wouldn't go in the socket). I tried this on the inverting input and the non-inverting input in both the oscillating oscillator and the non-oscillating oscillator. The sections still seemed similar enough in how they behaved that I couldn't see any problem.
Finally, I decided that maybe there just wasn't enough gain to make things oscillate. The gain would be set by the 10K pot (call that R0) and the 4.7K resistor (call that R1). The gain is figured by the equation A = (R0 + R1) / R1. To increase the gain, I needed to reduce the value of R1 (or increase the value of R0, but that would be more difficult since R1 is the potentiometer). I connected my resistor substitution box in parallel with R2 and set it to 4.7K ohms. (Since I had two 4.7K ohm resistors in parallel, the resistance was half this.) The section suddenly began to oscillate!
So I'd found the problem. I replaced both of the 4.7K ohm resistors (which weren't even shown on the schematic) with 1.8K ohm resistors.
The problem was solved and now maybe I can get that transverter that's been sitting on the shelf almost finished for over on the air!
P.S. Please don't get the wrong impression about Kanga. I've dealt with Kanga US in the past and always found Bill to be helpful and willing to go the extra mile. I bought this kit on clearance and waited a year to build it, so I wanted to try to get it working myself without bothering anyone. I still wouldn't hesitate to recommend Kanga kits and I don't doubt for a minute Bill would have helped me get it working if my stubbornness and pride hadn't got in the way of asking!
Copyright © 2002-2009 by Jim McClanahan All rights reserved.
All trademarks and brands are the property of their respective owners.