| Homepage / | W2WDX Station Info / | Modes / | Other Links |
| New Additions / | QSL Info / | Amateur Articles |
click here to go back where you came from.
Here are some construction details with technical drawings.
In determining your operating habits one has to come to grips with the perpetual changes in fancy that comes with this hobby. One year your into building, then digital modes, then DX'ing. Then you find out about vintage operation and AM, then you dabble in microwave and maybe ATV next.
 This hobby offers such a plethora (I love that word) of opportunities for something new to explore. The downside is it takes up too much damn room!
For the W2WDX station I had to consider how I operate. Being the scatterbrain I am, I realized that I like to jump around from one thing to the next at a moments notice. So, a workstation approach seemed a step in the right direction. I obviously needed a chair with wheels, so I can zip along and operate my wide station. This demanded a work space with no obstruction to my legs as I roll along across the table from end to end. Hmm ... a table with no legs in the way, but can still support the gear? How?
Another issue was incorporating a high-end computer station into the workspace without compromising either its use, nor interfering in the operation of the radios. I use a computer for several aspects of the station including modeling, logging, digital modes, general CAD (Computer Aided Design) applications and of course video games (particularly handy during those long net ragchews awaiting my turn). I also have a spark of interest in ATV and intend to apply the computer as the primary means to handle video and programming. A computer is a very important tool in my method of operation.
My choice has been in recent years of acquiring, restoring and using vintage gear. Now they don't call these boatanchors for nothing. This stuff is real heavy. And a single HF station can take up as much room as a city block! All those separate accessories;
 the wattmeter, monitor scope, VHF transverters, external speakers, displays. Hey ... Ya gotta have 'em, right! Take my Yaesu 101 station. Now I wasn't happy just using the FT101 transceiver. No! I had to have the FL101/FR101 twins station with all the dressing. So if you line up the transmitter/receiver and all its accessories end to end, it stretches over 9 feet! Maybe my chair should have little motors on those wheels! In addition, I have a Hammarlund SP-600 receiver which, not only large in size, weighs nearly 100 pounds!
Now, weight was another factor. I calculated the gear weighing in at a little over a quarter ton! So the workstation had to be able to support the weight of two NFL linebackers, and transfer that load evenly to the floor. The station also had to be sturdy and feel completely rigid when I or anyone else leaned on it. I always hate going to another Ham's station and feeling the table wiggle under my arm, evoking an image of the whole thing crashing down on my toes at any minute. Brrr....! So I must make it strong and stable. Time for some over-designing! And I had to centralize the computer too. And I didn't want the CPU up on the table with the radio equipment, so I would have to devise a method for mounting it underneath, yet still keep it accessible. I also had to consider cabling all the gear up, which includes coaxial cable and antenna switching. I also decided I wanted everything off of the floor as well, to facilitate easy cleaning and vacuuming. I also wanted space for any new acquisitions. This was getting fun.
In most cases you would think that the mode of operation would not effect the design of a workstation. In the case of a station using the modern multimode, all in one,
 full bells and whistles, rice burners; an operator can sit in one spot and do it all. In my case this is different. I have a station that will be used for digital modes, on numerous bands, and a specialty of AM operation and all its associated specialized gear.
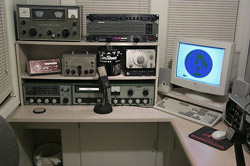
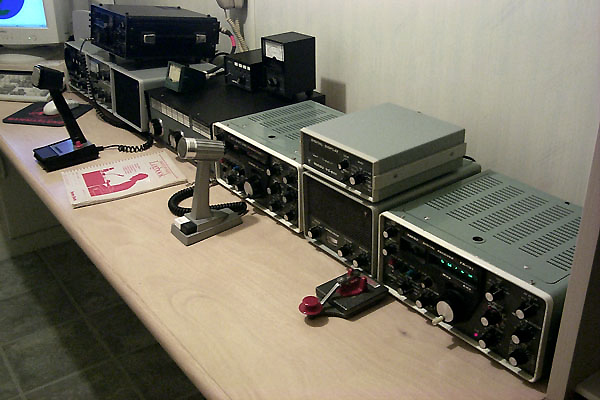
It was important to me to have all my AM gear in one location. There is a Hammarlund HQ-100 and SP-600, and a Heathkit HR-10B for receive. Transmitters consist of a Heathkit DX-60B, a B&W 5100, and a Globe King 400B for HF. For 2 and 6 meters there is a Clegg Interceptor B for receive, and for transmit a Clegg Zeus and a Clegg 22'er. In addition the AM station has several audio processors including EQ, compression, and mic preamplification. The image shown here at the right, does not show all this gear yet. Some is still in restoration and others were not yet acquired when the image was taken.
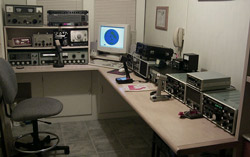
For SSB operation, there is the full Yaesu 101 station including the FL-2100B amplifier, a Drake TR-4 with the MS-4/PS and W-4 wattmeter for HF. For VHF there is a Yaesu FT-221R Allmode, and an RF Concepts 2-317 brick amplifier powered by an Astron VS-50M PS. The position calls for a great deal of real estate.
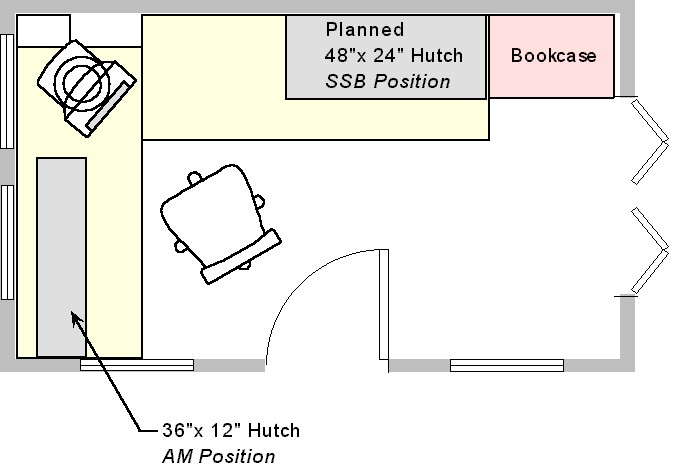
The room I had available for the station was fairly small. I actually like a small room for two reasons. First I was one of those kids who liked to play in the closet; I feel most comfortable in small spaces. Secondly, small spaces are very conducive to good acoustics for microphones. Below is a floor plan of the room as it existed before anything was placed in it.
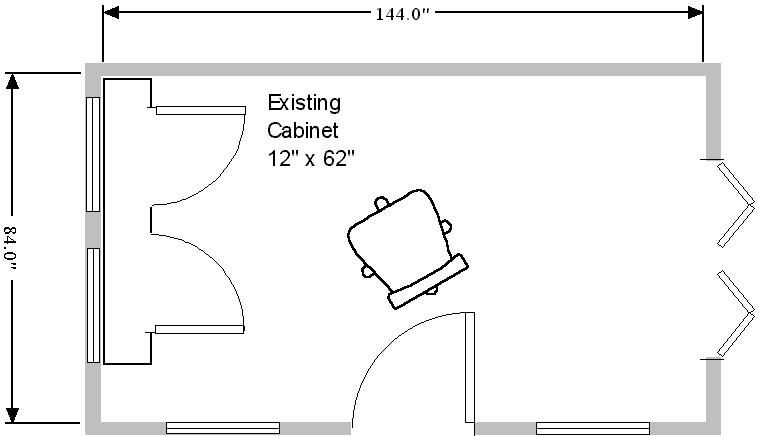
I may be getting ahead of myself, but here is a floor plan of the completed workstation in the same room, showing all the components of the tables, hutches, and the computer monitor as a point of reference.
Since I was trying to makes the station clean, I gave considerable thought to the aesthetic appeal of the station. Why not make it look nice as well. Personally, I love looking at Ham gear from my point of view of being a Ham. But from the view of of having a nice decor in my home, the reality is, a radio station looks like doggie doo! Then of course, there is that all important issue I mentioned briefly earlier. The Wife Factor!
There was no way I was gonna be relegated to the basement! This room, which we were not using, was nearly perfect for a station, but I had to address the needs of making it work in my family living space. And my family is comprised of me and my wife, Alison. She is not a Ham. [deep foreboding music here...dun, dun duuuunn.] She simply would never be able to look at a piece of gear and get that tingly feeling we Hams get. And a whole quarter ton collection of it, ... ACK!! The Wife Factor effect.
Now, by definition; The Wife Factor: a pervasive opinion of a female human spouse that any item that plugs into the wall that is not used for a practical function, is inherently ugly and should not be permitted to be seen by any living sentient being entering the living space. Now this includes things like stereo equipment, televisions (sometimes), power tools (after all, hand tools would work, right). One other item that should be included are any paintings of dogs playing poker, even though this doesn't plug into the wall. Computers are now OK though, especially those cute little IMac's; they come in pink for good reason. With The Wife Factor explained, while working on this project and sitting at my computer designing, with a jar of sweet gerkins to keep my company, I had a brainstorm. Mmmmm ... Gerkins ... pickles ... pickling? ... YES! ... Pickled Oak!!! She always talks about getting some stuff in pickled oak ... Damn I'm brilliant! The Wife Factor defeated.
Now the design of the SSB position table. Several problems existed. I had to make it sturdy, I needed clear leg room across the length of the table, it had to be at the same height as the desk top now installed, and it needed to be at least 80 inches long. This length was determined by the space needed for the gear. Eighty inches; this number was ringing bells and I couldn't think of what. Then it hit me ... The height of a standard door! So off to Home Depot I went. Looking in the door department I found a standard wood door, made of Luan. Luan is a very nice wood to finish and does nice job of impersonating oak. Since the majority of the structural materials were to be oak (for strength), Luan was a good cost effective alternative to an oak door, which was five times the price. I paid $14 for the door! The door measured 80 x 30 inches and was 1.25 inches thick. A depth of 30 inches would allow me to have very deep gear and still have plenty of room in front of the gear for mics and writing. With the door in my cart, I searched now for some half-round oak to mount on the front edge of the "desk/door". This was to provide a nice rounded edge for comfort. I decided on 1.5 inch diameter oak half-round stock, which was about a quarter inch thicker than the door. This was so when one edge was flush with the top, there would be nice lip underneath to grab when pulling myself on my wheeled chair. This half-round was mounted to the table front edge with finishing nails and Elmers wood glue, clamped firmly until the glue cured.
Next, the structural reinforcement and legs for the table. A Luan door is not the strongest thing in the world, but looks great once finished (explanations of the finishing comes later). So I needed to build a structure underneath to reinforce the door and provide and adequate means for mounting legs. I used two 80 inch lengths of 6 x 1 oak stock. I had the staff at Depot cut them to the exact length of the door. These would be attached length wise underneath with six large wood screws, three on each end into the frame work of the door, and glued completely to the unfinished bottom of the door, with Elmers wood glue. I cannot over emphasize the importance of using only Elmers Wood glue here. Not the regular white Elmers glue, the beige Wood Glue. This stuff will bond superbly to the wood pieces and ensure the structural integrity of the bonds. These pieces were also clamped in four places while the glue cured. I needed some pretty long reaching clamps for the piece that runs down the center of the door. It needed a clamping reach of at least 17 inches. These were rented or borrowed.
Many years ago, my dad bought me a train set for Christmas. He bought a big piece of plywood and used pipe and pipe flanges for the legs. It was fairly heavy duty as I recall, and the treaded pipe allowed for some adjustment to level the table. I decided to try this for this project. I had one problem to solve. I needed to support the table, but still allow the door to open fully on the existing cabinet that sat under the AM operating position. This meant that one leg could not be placed near it. So I decided to add one more leg than the original design called for. Now I know what you are saying, it would seem I would have to eliminate a leg, not add one. I had originally decided to use six legs distributed evenly. Now I decided to use seven, with one leg omitted near the swing range of the door, underneath the computer position, near the intersection of the desktop and the doortop. If you examine fig 1.1 below, you can see this arrangement.
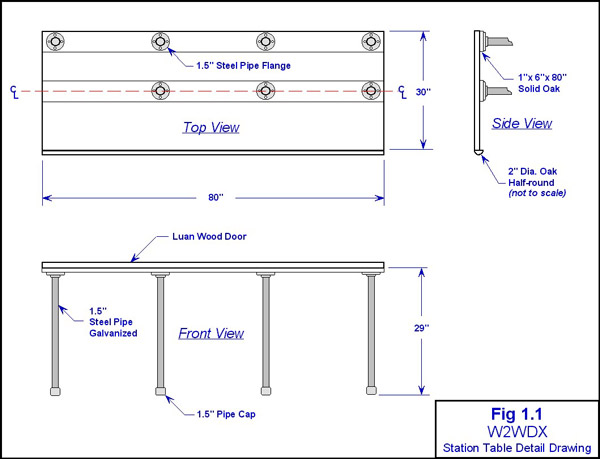
The Table for the SSB Position
Click here for a larger image.
To finish off the legs, 1.5 inch pipe caps were screwed onto the ends, or feet, of each leg. And also small plastic discs, commonly used for furniture on carpets, were placed underneath each cap so the weight on the legs would not damage the floor. Believe it or not, the flooring was also specially chosen for this project. Once again Home Depot provided the easy peel and stick simulated stone vinyl tiles. I wanted a surface that would make the chair roll easily, and provide an easy to maintain sweepable surface.
Finish on the Table for the SSB Position
 underneath but off the floor. We here on Long Island are lucky to have an IKEA, and on one my last visits I remember seeing these wonderfully strong looking tubular-steel under-desk mounts for computer CPU's. I hoped they were not some proprietary thing only useable with their desk, like so much of their accessories are. To my great satisfaction, I found this item and discovered that it used a simple, but very beefy, steel mounting flange to be screwed into the underside of a desk. The tube was adjustable so many different height CPU's could be placed on it. I scoffed up my new found doo-dad and brought it home to my new table.
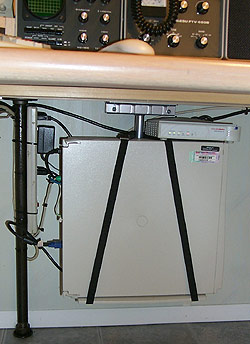
This device was perfect for my application. As I said before, it constructed entirely of heavy gauge steel. The whole device weighs about six pounds. It is comprised of a tee shaped mounting flange (seen here from the side), from which a two-piece adjustable telescoping steel tube extends straight down to an L-shaped steel platform for the CPU to rest upon. This platform also has a neoprene foam mat for the CPU. A nylon strap is used to hold the CPU in place which is attached to the platform and then wrapped around the tube just below the mounting flange. Once tightened this hold the CPU firmly in place.
I decided to mount the CPU flat against the wall with the disc drives facing to the right. This saved leg room and also hides the CPU completely from view. It also leaves the access panel to the inside right in front and also allows access to the rear connections. The power strip is mounted with tie wraps to one of the table legs, and the cable modem is sitting on top of the CPU. Never again will I use a telephone modem after having the speed of a cable modem. This image also gives you chance to see one of the legs supporting the table. At the top you can see the pipe flange, the pipe itself, the pipe cap and plastic disc at the bottom. You can also see the 1 x 6 inch oak support rail mounted under the table, which the pipe flange and the CPU mount are attached to. The UPS/Battery Back-up for the CPU is actually located on the table directly behind the Yaesu Monitor Scope in this image, once again out of sight.
You may also notice a lack of cables on the floor. That's because there are none on the floor. The one black cable you see is the main 110VAC power for the station. the 220VAC main is located more twords the right and out of this image. All other cabling runs behind the gear, on the table tops. The only exposed cables in this station are the microphone cables.
I decided all coaxial cabling inside the shack itself was to be 9913F type. It was low loss and still resonably flexible. I made an accurate inventory of all coaxial lengths and quantities and placed an order with CABLE X-PERTS Inc, in Wheeling, Illinois to custom manufacture to my specification, which they did quickly and with a high degree of quality. I recommend this company highly. The system uses switching, located underneath to connect various gear together as needed. I can connect any transmitter to my amplifiers or not. I have numerous Dowkey coaxial relays to switch between transmitters and receivers in any combination with any antenna combination. All antenna selection switching is handled remotely at the towers. Only two coaxial cables enter the shack; one for VHF and another for HF. One last detail was to makes the cables entering the house easily removed inside, pulled outside and then attached to a grounded coaxial connection for lightning protection. Any strike has a direct connection to ground with a reduced chance of arch over, as far as the coax is concerned.
| Homepage / | W2WDX Station Info / | Modes / | Other Links |
| New Additions / | QSL Info / | Amateur Articles |