Gates Radio M-5078 Commercial SW AM/CW Transmitter
Restoration Details - Part Six
Transformer Restoration Continued
Dated: April 17, 2012
It has been a few weeks since I have added anything to this article. Work has interfered with play, so I haven't been able to work on the Gates (or this article) as planned. The shop is full of radios right now; to restore and get sold. So the benches have been full with no room or time for much else. That should be a good thing, right? Hmm...
In the process of working on this radio and writing this article as I proceed, I gave away one of my little trade secrets for decals, and that's just fine. However, we (my partner and I) did realize that there may be a need for these decals in the community. I have scanned so many decals and stickers, for Collins, Hallicrafters, R390a's, etc. that I have a big library of reworked images and artwork. So we have decided we are going to make available for purchase as many of these decals, labels and stickers as we can. We don't know the cost structure yet, but we will figure that out soon enough. Also we are not even sure what decal artwork we have. They will have to be cataloged, organized and printed. So it will take some time to have it all ready for market. But I will let ya'll know when the time comes.
Do any of you have an interest? (message me) I ask because for the casual home DIY'er the imaging process is painstaking, the decal sheets are expensive, and the High-Resolution printers needed to make very high quality printings are also expensive.
Transformer Housing Stripping & Repainting
I don't know about you, but I plan on being around at least another forty years. That being said, when I fully restore something I want it to look & perform as new and last that way for decades. Both for myself and my customers. So painting and the prep work that goes into it are a crucial step.
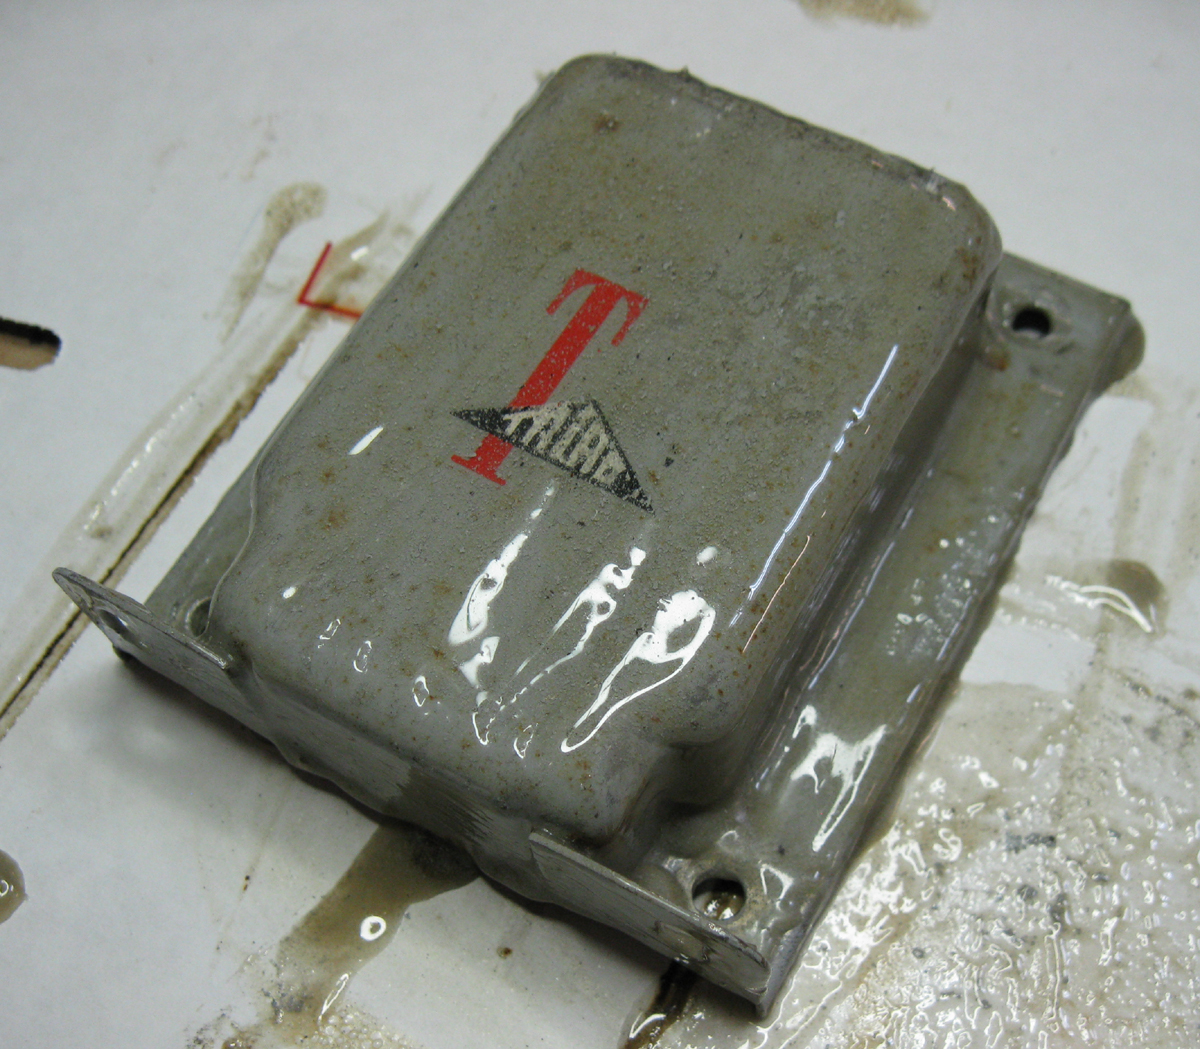
In Part Five, I showed how I repainted the UTC Modulation Transformer. It had little rust and was simple to refinish. However in the case of the HV & Choke iron, significant rust had formed and this called for a complete chemical stripping and rust inhibiting treatment. Also I had decided to prime and paint, instead of simply repainting.
Chemical Stripping
I have not ever been a fan of sitting there for hours and sanding paint off something. Who is? I have always used chemical strippers to remove old paint. Any good paint stripper will work. I am a big fan of Original Rock Miracle Paint and Varnish Remover. It works great on wood, metal surfaces and strips varnish, enamel, & lacquer paints in a few minutes. However you should always keep in mind it does the same to epoxies, vinyls, phenolics, acrylic, & urethanes, so caution should be used. I generally only use it on components that have been completely removed from the chassis and never inside a radio. The primary active ingredient is Methylene Chloride.
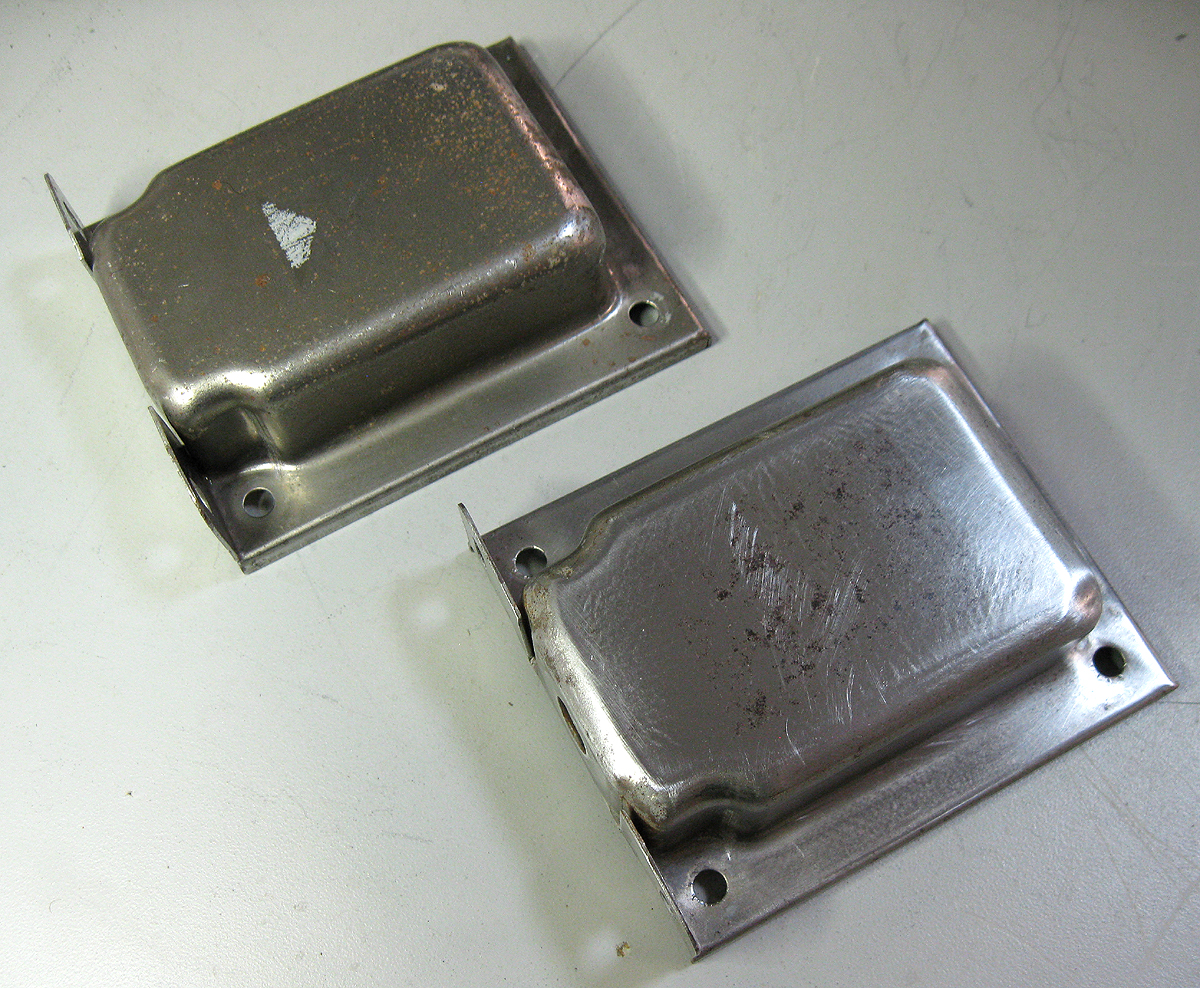
It's simple. In the image below you can see the transformer housing has had a liberal amount of remover applied onto the paint. You let it sit for about 20 minutes, then rinse it with warm water under the tap using a stiff brush. This stripper is water soluble so it comes off with water along with the old paint. If after you are done rinsing, and any paint remains, repeat the procedure and all of the paint will be gone the second time around. Good stuff!
Rust Treatment
Once again, sanding is required to remove surface rust, and smooth the surface for painting. Again do not use course grades, start at 600 and work your way down to finer grades till you see few surface scratches. Use water when sanding. Wet sanding helps keeps the sandpaper cool, and carries away the dust so the sandpaper doesn't bind up.
Once you complete the sanding, treat as mentioned in Part V with a rust converter. Below is an image of one side of the housing after stripping and the other after sanding and rust conversion. The one top is stripped and on the bottom is the finished sanded and rust converted example.
Priming
One thing I have not mentioned is primer. The UTC transformer was in pretty good condition so complete stripping and priming was not important. However, since these housings were in need of complete refinishing, using primer is a good step to ensure a long lasting and good looking final finish coat.
For metal painting I always use a Zinc Chromate based primer. Again PTI makes a very good green Zinc Chromate primer. Again, completely wipe down the piece with isopropyl alcohol using a clean cloth until no sanding dust shows up on your cloth. I use one light coat of primer and let it dry completely, usually for 72 hours or more. Basically until it feels hard. Then I lightly sand it using the finest grade paper. I wipe down with alcohol again as before and letting that dry, and then apply another light coat of primer. Inspect the coat and make sure no inconsistencies appear in the surface.
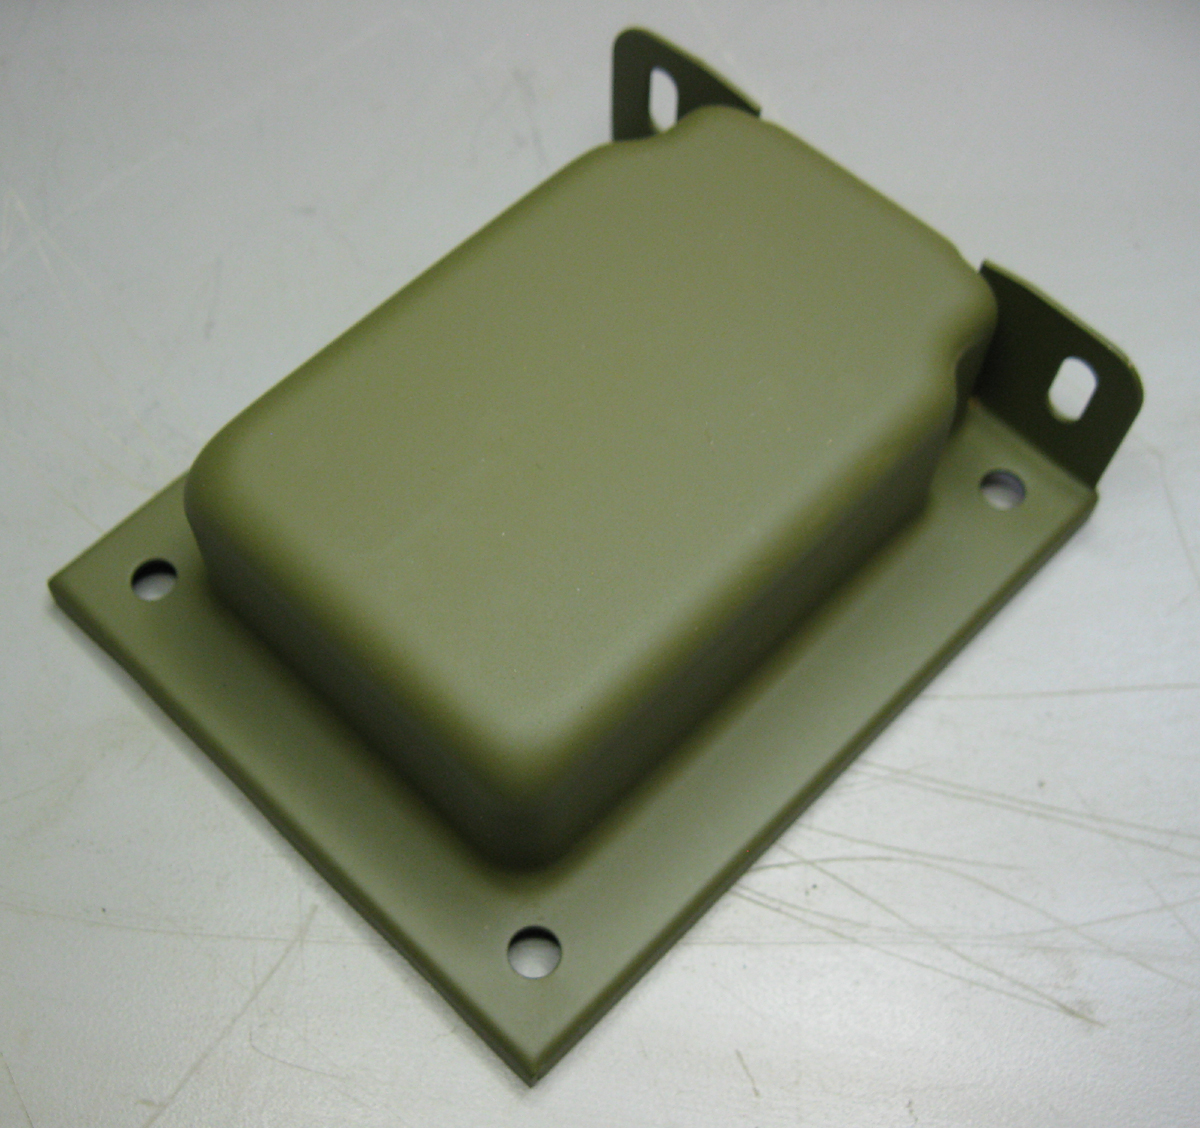
After letting the second primer coat dry completely, wipe down with alcohol again and apply several light coats of your final paint. In this case, I used the same PTI Federal Grey I used on the UTC transformer.
Application of Water-Slide Decals
The Prep
First I should mention that it is very important to make sure the newly painted surface is fully cured before applying decals. If you pick up the piece and it still smells like wet paint, it is still out-gassing the carriers and dryers in the paint. This will cause bubbles to form under the decals even after they dry, so patience is key here. I generally will wait a week or more for a newly painted piece to cure by air, a little less for oven cured paint, before applying the decals. Don't skip this step! The adhesive for the decal is gelatin, and it will separate from the smooth painted surface very easily if the paint is not fully cured and still out-gassing.
Once you have your decal printed, its time to cut them out. Now you'd think it's just chop, chop, chop and all done. Of course not! If you haven't noticed already I have a method for everything (my partner says I am truly insane in this respect!) So let me explain the theory.
It is very important to make sure the edges of the decal have no flaws or micro-tears. The reason is simple. Longevity. Since the adhesive is gelatin based and water soluble, making sure the edges of a decal are sealed (more on that later) is important so as to not let moisture soften the edges of the decal and cause it to peel prematurely. It also helps prevent cracking and splitting of the decal when it's being applied and as it dries. Not to mention the slightest tear in an edge make make the decal split when you apply it and move it around into position.
So, do not use an x-acto knife or razor to cut out the decal. Use a very sharp pair of fine scissors and go very slowly. I use a nice pair of angled fine surgical scissors for this. Works superbly! Use a magnifying glass if you have one. I have one of those big ones with the circular light in it. If you were observant before destroying the original you could see the original edges. Try to duplicate those, at least for historical accuracy reasons. You will notice there is a certain amount of overlap. Leave some of the clear border and do not cut to closely to the image of the decal.
The important thing to remember is perfect smooth edges, with no ragged cuts along the edges. So go slow and careful. If you Homer it (DOH!), that's why you printed several copies of the decal. Don't use the bad one. Toss it and simply start over anew.
Dealing with "White"
Now as described earlier, most printers will not print white. And I am sure many of you do not have an Alps MD-5000 with a white cartridge. So I have printed these decals with a standard color laser printer, so that you will see the process for white as you will most likely experience it. Remember, white will print as clear on a clear decal sheet.
It is important that the surface be smooth under the decal. Any defect in the surface under the decal will show as a ripple or bump in the decal. It may also cause the decal to not adhere cleanly to the surface; and bubble or crack over time. This is why you must be very careful in the following step.
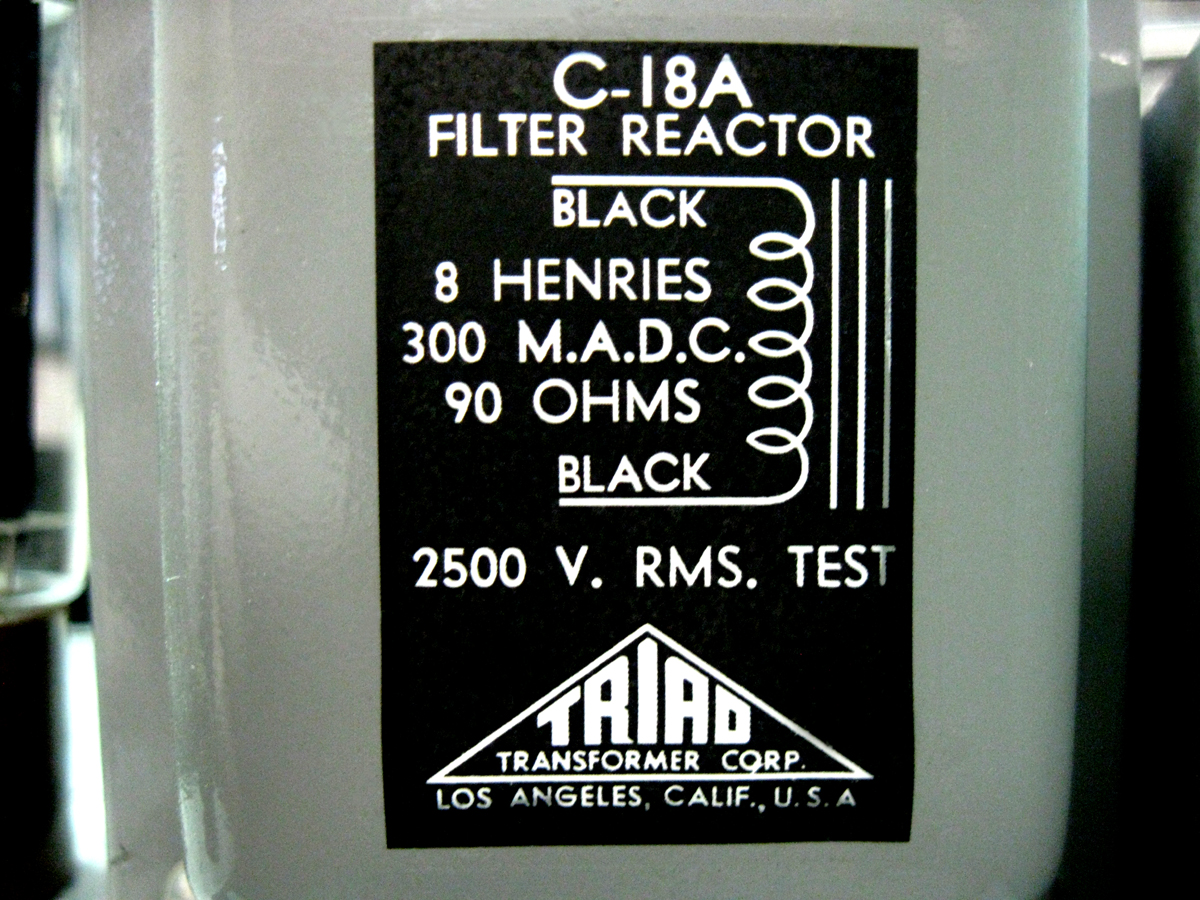
Since the lettering on the Triad logo and the lettering on the specifications decal are to appear white, and since they are clear on the decal, we must paint the transformer with white paint ONLY in the places where we will have this lettering. So we first must figure out exactly where we are going to place the decal, and where the white underlying paint must be. The best way to do this is by creating a mask.
You may remember earlier when we described how to print the decals in Part V, that I suggested after checking the scale of your decals with plain paper, that I mentioned a "transparency" sheet. This is a clear sheet of plastic designed for printing on printers. (Mostly used for presentations on overhead machines and artwork.) These can be bought at any office supply retailer. Print out a decal sheet on this transparency and cut out one of the decals, leaving a lot of overlap. This is not the actual decal of course so the bigger the better. This will just be your guide for making and positioning the mask we will make.
You will need the following:
- Small sheet of wax paper
- Wide masking tape, 2" is good
- The transparency
- Some newspaper
- A Pin
- Thin light cardboard - like the type on the back of a note pad
- An extra fine tip marker
- An X-Acto knife (new and sharp blade please)
- Straight edge
- White spray paint
Boy ... when I write it out like that it seems like a bit much!
First lay out your wax paper onto the cardboard and tape it down to the board. Next, take a length of masking tape and lightly apply it to the wax paper. Carefully overlap several strips if your decal is wider then the tape. Don't not press the down onto the wax paper too much, we will be removing it at some point. However do make sure it is flat with no ripples, folds or creases. Take your transparency and lay it over the masking tape, lining it up so that the area where you need white is under a single strip of tape, if possible. Tape the transparency flat to the wax paper/tape strips so it stays in place.
Now, take the Pin and locate a solid area of color (other than the white area) and poke a small hole through the transparency, the tape, and into the cardboard below. You will see this hole is chosen to be a point where the mask edge will originate, so chose a point underneath an area of solid color on the decal adjacent to where the white is needed. It doesn't need to be a big honking hole, just enough to insert the fine tip marker through. Make several other holes to complete a square or triangle or whatever geometric pattern needed for the white paint. (See images above and below.)
Once you have made your holes, remove the transparency and put it aside (we will use it again later.) Now very carefully cut out the pattern using the holes you made as a guide. If the area that needs to be white is a triangle you have made three holes one for each corner, and square you have made four and so on. Line up the corners with the straight edge and cut the tape along this edge. Be precise and careful and keep the corners neat!
When you are done, remove the center piece of tape you have cut out carefully from the wax paper. Leave the rest (the actual mask) there on the wax paper for now. Take your transparency with the holes in it and use it on the piece you are applying the decal to find the right position. Once you have the transparency "decal" lined up where you want it, tape it down to the piece. Using the fine tip marker use the holes to make tiny dots on the object; poking the marker lightly through the holes in the transparency. These will be you guide marks for placing the mask. Once the marker has dried, remove the transparency. You do not need it anymore and it can be tossed. I stuck mine on my cat, for a giggle!
Now very carefully, making sure not to tear or stretch it, remove the mask from the wax paper. Carefully line the corners up of the mask to the dots on the piece and secure the mask to the item. Firmly smooth the tape down, making sure the edge is smooth. Once this is done tape some newspaper with some additional tape around the piece to prevent over-spray of the white paint.
Now spray very light coats of white paint over the mask. A light coat is very important. We only need it to be white, not be a coat for protecting the piece. Paint for color, that's all.
Before the paint dries. carefully remove the making and newspaper, being VERY CAREFUL not to smear the paint or the edges of the still wet paint. Let this dry completely for a few days.
If you were lucky and the paint laid down in fine coat, and the edges of your mask didn't make a hard seam in the white paint, you may not have to do much preparation for the decal other then wiping it down with alcohol. If the edges have ridges or some other defect at the transition between the white paint and the bottom paint, you will have to smooth this out so as to not have ridge line running underneath you decal.
One method is to use a eraser on a pencil dipped in rubbing compound and very softly rub the edge as to only remove the rough edge, but not any of the paint. Wipe it off carefully as to not scratch any of the paint. But get the surface smooth, most important!
Applying the Decal
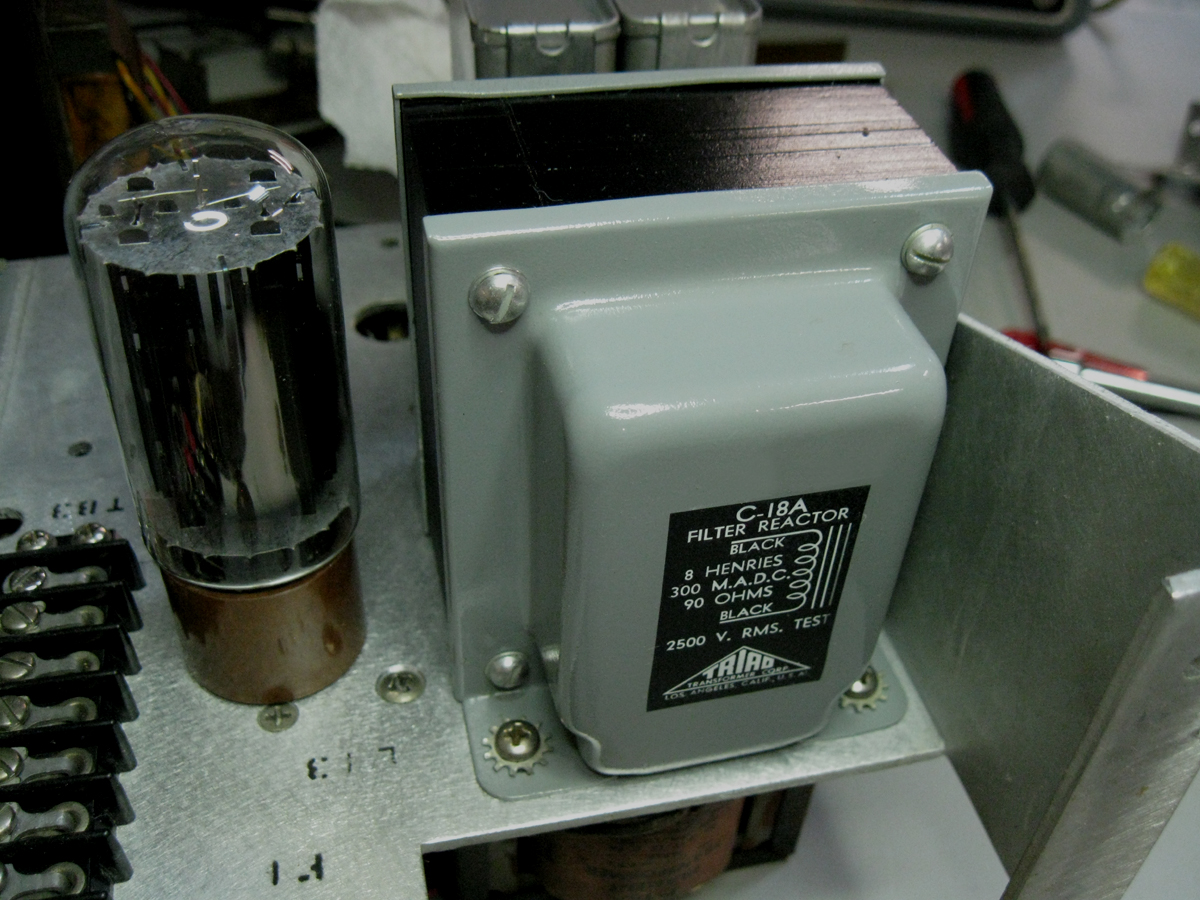
Wipe down the area where the decal is to be applied with alcohol. Make sure the alcohol is dried up before starting to apply the decal. You can now apply the decal as described in Part V. Just make sure you line up the decal with your white areas carefully. As you can see on the right, the vertical line representing the core does not have the white paint lined up correctly. The gray paint of the choke is showing. So it is very important to make sure the white paint is properly applied and the decal aligned correctly.
Now that looks just dandy ... eh?
Painting the Laminates
The final step is the painting of the laminates of the transformers. In this case they are painted a different color from the housings. Black in this case. The first thing to do is make sure the transformers are "bound" and sealed before doing any sanding and painting. By bound I mean securing the laminates with the screws used to hold the outer housing in place and keep the laminates tight. However it is important to not simply put the screws in palce against the laminates themselves. This may cause the laminates to bow. The housing also serves to distribute the force of the screws across the length of the laminates, preventing this bowing. If the laminates separate much, either from this bowing or from loose screws, the transformer will hum and buzz.
There are two approaches you can use while prepping and painting the laminates. The first is to paint the laminates before you disassemble them with the housings still in place. I don't recommend this method for one simple reason. If you do have to sand a little rust off, it could get inside the transformers windings and have a negative impact on performance or even cause a short. But many folks do it this way, without incident, or so they say.
The other method is of course the "hard way", but it also assures a level of safety. I produce a "O" shaped (or sometimes a "U" depending on the transformer) jig made from 1/4" steel stock. I cut it out to match the shape of the edge of laminates where the housing normally touches and drill holes for the screws. It's a bit frustrating for me right now since my little machine shop is not set up in my shop right now, but instead my milling machines, lathes, cutters and metal bending equipment is at my residence. Makes it tough to fit something when the tools are not right at hand. Grrr... Fortunately, I had two jigs in the shop from previous transformers that happen to fit these two transformers from the Gates.
These jigs hold the laminates securely and distributes the forces evenly across the surface. It gives me full access to the laminates and also allows me to mask off and seal the rest of the windings and wiring. I can now sand, and prep the laminates and paint them in the same tension they will be held at when the transformer is fully assembled. It also allows the paint when dry to hold the laminates in place while assembling them and helps reduce hum and buzzing.
Once this jig is in place the procedure is nearly the same for prepping and painting as for anything else. Just make sure you carefully cover (mask) the windings and wires. Below the images show the transformer with the jig, the prep & masking and the final painting.
This last image is of the reassembled & completely restored choke transformer.
Looks as good as NOS!!!
I think its time to draw attention to a few points on what a full restoration is.
First, it may seem that the methods I describe here are ... well ... driven by some obsessive-compulsion. Not so! Perfection is not an achievable reality. However, there is something to be said for details. I have made a philosophical engineering choice. When you perform a full restoration there should be a minimum requirement for historical accuracy or at least a level of accuracy that is achievable with modern equivalents. The manufacturers strove to make things a certain way, not because they were perfectionists but because they were striving to make a quality product. Additionally the nature of the technology at the time demanded more care for performance, safety & reliability. In a true restoration, it is smart to do research to ensure your unit is brought back to its original condition for the same reasons. Otherwise, you are simply refurbishing something, not restoring it.
Much of what I have discussed so far has been cosmetic. This is true. As I said in the beginning, the radio was functional and the major components checked out as OK. So once the radio is restored cosmetically and reassembled, we will go through the process of testing & troubleshooting the electronics and replacing any faulty components. Then we will align and test the radio. So all that is coming.
More coming soon!
73'
John LeVaseur. W2WDX
All text and images contained herein are under strict copyright.
Reprinting or publication in any medium is not allowed without express written consent of the author.
Copyright 2012 John LeVasseur