
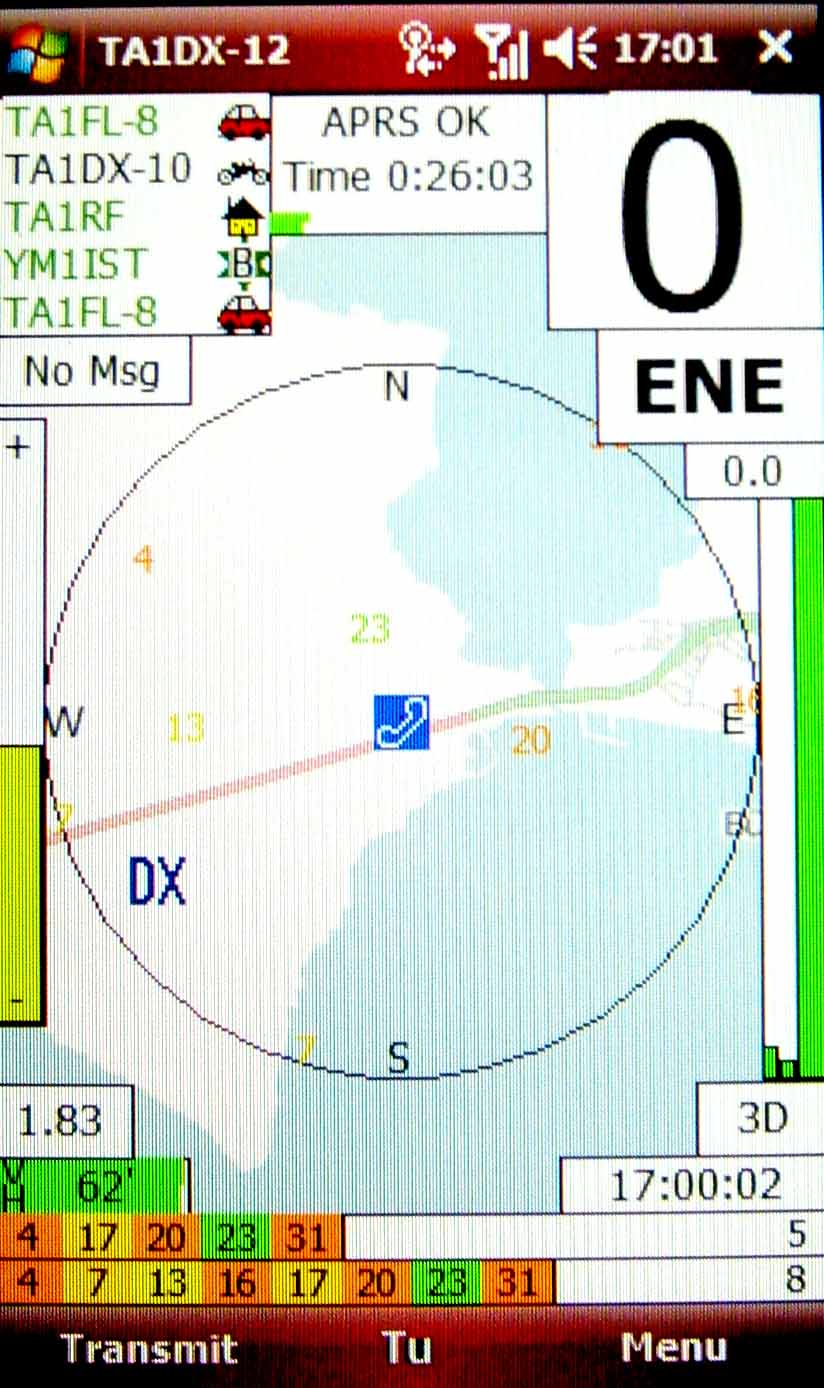
Windows Mobile işletim Sistemli (GPSli veya GPS siz) Cep Telefonları ile APRS Çalışmak
Artık pek çok cep telefonu dahili GPS ile birlikte satılmaktadır. Hatta yeni versiyonlarında Windows Mobile ( Win CE) işletim sistemi de bulunmaktadır. Hem amatörseniz hemde böyle bir telefona sahipseniz APRS çalışmak sizin için çok basit. Aşağıda açıkladığım 3 programdan birisini yükleyip hemen APRS sistemimize dahil olabilirsiniz. Bu şekilde hem eğlenceli hemde acil durumlarda yerinizi, size yardıma gelebilecek kişilere en doğru şekilde iletme imkanına kavuşursunuz.
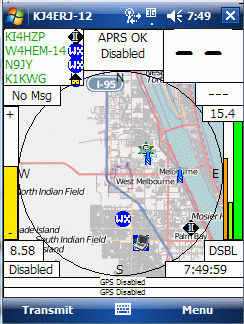
Aşağıdaki rota, LG KG 735 cep telefonumla çizilmiştir. 2010-02-08
C- AGWTracker Pocket PROGRAMI İLE:

1- APRS CE programını buradan ya da buradan indirin. ( http://www.aprsce.com/index.html ) Program Register olmadan da tüm fonksiyonları ile kullanılabilmektedir. Register olmadan kullanmanın tek sakıncası, programı kapattığınızda, tüm ayarların silinmesi, tekrar açtığınızda hepsini yeniden girmek zorunda kalmanızdır. Bunu yapmamak için 40 dolar ödermisiniz? Size kalmış..
2-Program için gereken haritaları buradan indirin,
3-Programı activesync yada blutoth kullanarak telefonunuza aktarın.
4- Telefonunuzda, APRS CE logosu üzerine tıklayarak programı çalıştırın.
5- Kurulum bitince ekrana tıklayın,
SETUP menüsü Station seçeneğinde:
STN sekmesine işaretinizi ve Preferred Units of Measure penceresinden Metric seçin,
Icon sekmesinden, harita üzerinde görünecek logonuzu seçin (Tavsiye: WinAPRS)
Pos sekmesinden Transmit Position Reports kutucuğunu tıklayın, Telefonunuzda GPS var ise Use Mobile Position Reporting Rate of every .. minutes tıklayın ve seçin,
Ops sekmesinden My Alias: WIDE, Digipeater Path: WIDE3-3 , Comments, Status kutucuklarına mesajlarınızı yazın, Size mesaj yollandığında programın otomatik olarak yanıt vermesini istiyorsanız Message Auto Reply kutucuğunu işaretleyin ve mesajınızı yazın,
Trk sekmesine dokunmayın,
Limit Sekmesine dokunmayın,
OK deyip kapatın,
5-Tekrar SETUP menüsü Communications seçeneğinde:
TNC sekmesine dokunmayın,
GPS sekmesinde telefonda GPS var ise GPS Enabled ve Get GPS Data From this serial port sekmesini tıklayıp sadece GPS portunu seçin (bende 5),
Net sekmesinde internete data aktarımı için Enabled ve Auto Reconnect tıklayın,
Host Adress:
turkiye.aprs2.net
Port Number:
14578
Ok deyip çıkın.
Map sekmesine tıklayın, OPEN den harita seçin, Ben PE1DNN sayfasından indirdiğim Greece haritasını kullanıyorum.
Bol APRS li günler dilerim. Mesajlarınız için [email protected]
1- http://groups.yahoo.com/group/aprsisce/ e-posta grubuna üye olun, yada doğrudan buradan yada son versiyonunu buradan( 3 Nisan 2010) yada buradan (16 Haziran 2010) programı indirin. İnecek olan zip dosyayı bilgisayarinizda açın, çıkan dosyayı cep telefonunuza yükleyip çalıştırın.
2- Cep telefonunuza yükleyin, çalıştırın. MENU>CONFIGURE kısmına işaretinizi ve UI-View'de kullandığınız Validation number'ı girin. ya da buradan alın.
3- OK .. herşey tamamdır.
4- İnternet bağlantınızı yapın, Haritalar vs internetten otomatik inecektir. (Google Earth gibi) Dikkat: haritalar için internete ihtiyaç duymaktadır, Günlük kullanım 6 Mb civarındadır.
5- Sorularınızı bekliyorum. [email protected]
Son versiyon açıklaması: 20100403
Here's what's new in the APRSISCE6P100403.zip and APRSIS32100403.zip MAJOR BUGFIX: If you're running as an IGate, the program was gating messages received over RF back out via the SAME RF! This is fixed to only transmit messages heard from -IS, not RF. Corrected timestamp in Telemetry popup to be local time instead of GMT "Group" messages per spec (ALL QST CQ APRSIS-CE - aprs101.pdf Page 72) (Julian G4ILO) (I'm planning to have the client always capture and display messages addressed to "APRSIS-CE". and/or "APRSIS-32" (both will do both) just like all Kenwoods display messages addressed to "KW" - see page 73 (83 in reader) of aprs101.pdf. I'll also be adding ALL, QST, and CQ per the spec). Sending messages to any defined "Group" automatically disables Ack and won't go into Pending Messages nor retry (If it's truly a group, noone will ack anyway!) Allow the configuration of other "promiscuous" callsigns for which messages would also be received to support upgraded callsigns (Colin M6XSD 2E0XSD) Support user-configurable <MessageGroup>xxxx</MessageGroup>. Messages addressed to these callsigns will be received and displayed but not notified nor acked. You can use this for promisuously receiving messages from other callsigns, hopefully your own upgraded calls! Callsigns are complete and must include -SSIDs to match. Note that for many of these new messaging features to work, you need to add t/m (DON'T do this yet!!!) to your filter or have the appropriate calls as buddies (THIS works). I'm still working on that one... t/m will give you a stack of calls at 0,0. Clear residual course/speed display in station popup if most recent packet didn't contain one. Calculated speed will still display between position updates. Record and recall last known altitude (<Altitude>) in XML configuration file. This will allow a momentary GPS position to be remembered and used when GPS is disabled. You can also manually edit this to set a fixed position altitude. If you drag the map and hit Transmit, the altitude probably goes back to zero. Internally define telemetry even if disabled. Disabling telemetry only disables transmission, not internal tracking and definition. (You'll soon have a local battery graph!) Add Configure / Beacon submenu to turn on and off components of the beacon. "Why" adds the Transmit Pressure that triggered the beacon. Simplified internal handling of many of the Enables. Let me know if I broke anything with the check-marks. Reorganize packet information extractor in preparation for better message handling - Again, let me know if anything broke! Toggling Configure / Beacon / HHMMSS on automatically turns on Configure / Beacon / Timestamp. Turning off Configure / Beacon / Timestamp disables HHMMSS. Don't IGate duplicate packets from IS to RF, probably heard it direct or via a digi? Display Telemetry Interval and version on ME's Telemetry Popup (Dave N8PU) Optimize display of Altitude and add diagnostics. I saw one instance where altitude was not displayed for a portion of a track even though the packets included it. Found that issue and fixed it on 4/2/2010! (I think) Internal diagnostic messages have been categorized and divided into TraceLogs. They are now individually enablable (Enables / Logging) and separately viewable (Enables / View Logs). There will be a Wiki Page describing their entire operation. Beacon transmit pressure has been modified to only consider Start/Stop and Heading if the current GPS coordinate is different than the last beaconed coordinate down to the transmitting resolution. This should reduce the "Duplicate Position" errors showing in aprs.fi's raw display. The Last: coordinate is displayed in the Me popup on APRSIS32. Altitude is now preserved (not slammed to 0) when a packet is received without altitude. This was causing the displayed track altitudes to disappear depending on the last packet received. Only transmit outgoing messages via RF interfaces if the target station is known and was heard via RF to start with. If sending a message to a group message target, don't request and ack, there probably won't be one coming back. The Telemetry popup now includes the Telemetry Interval when looking at Me.
C- AGWTracker Pocket PROGRAMI İLE:
http://www.agwtracker.com/ppc.htm ve http://antrak.org.tr/index.php?id=306&option=com_content&task=view sayfasından inceleyebilirsiniz.