
During recent data transmission tests within the Bolton RAYNET Group, the WinDRM program has proved to be very successful at sending files over both VHF FM and MF SSB radio channels.
As well as supporting digital voice transmission, this program offers a number of clear advantgages for simple data transfer, compared with other programs:
a) rapid and free download (only 360kB);
b) runs under Windows 98, ME or XP (but needs a fast-ish PC >400MHz?);
c) compatible with existing soundcard/serial port interfaces, such as the one described here;
d) simple to set up and operate (see below);
e) sends files in any data format (documents, pictures, sounds, etc.), and was measured as being more than twenty times faster than the MT63 mode for sending a text file.
There is little to do in the way of "installation": the executable program windrm.exe is contained within a .zip archive file which can be quickly downloaded even on a dial-up modem. In addition, a small .dll driver file should be downloaded in a separate .zip file.
Just unzip both of these into a convenient folder, and put a shortcut to the .exe on your desktop, and you're ready to go!
The program finds the soundcard automatically, and it does not make any changes to the registry or install any hidden files, and can even be run from a floppy disk.
First, make sure that you don't have any other datamode program (e.g. UIView or MultiPSK) running, or there will be contention for your PC's soundcard and serial port!
Check that the PC soundcard is connected to the radio receiver, and then run the program.
You're already almost ready to receive, but there are just a few things to set up before you use it for the first time:
1. On the Setup menu, select Display: Input Level.
2. Open the squelch on your FM receiver, and observe the green trace on the display. If it is about two-thirds of the height of the window (as shown below), omit step 3.
3. On the Soundcard menu, select Open Mixer, RX Input. This brings up the level controls for the audio inputs: adjust these until the green line indicates the correct input level.
4. On the Setup menu, select Display: Waterfall, and close the receiver squelch.
5. You're now ready to receive files
There are a few more things to set up the first time you use the program:
1. If your interface uses a COM port to control the PTT, on the Setup menu, select PTT Port, and choose the correct one.
2. Next, on the Setup menu, Callsign, enter your callsign.
3. On the DRM Settings menu, DRM TX settings, select Default, then click OK.
4. Click the TX Pic button on the right of the window, then Add File. This brings up the Windows Explorer, from which you should select a short file (5kB or less).
5. Make sure that the 1 Instance and Long Leadin buttons are selected.
6. Tune your transmitter to a clear channel (and preferably connect a dummy load). Use the set's modulation level meter (or if it doesn't have one, listen to the transmitted output on another receiver).
7. Click on TX in the Select Files window. This should turn on the transmitter, and start to send the file
8. On the Soundcard menu, select Open Mixer, TX output. This brings up the level controls for the audio outputs: adjust these for the correct modulation level. Repeat steps 7 and 8 if necessary.
9. You should now be ready to transmit files (don't forget to re-connect your antenna!). Using the Default mode, a 20kB file takes around 90 seconds to send, so be careful when choosing large files for transmission: use data compression on the source files (JPEG for pictures and ZIP for others) where possible.
Try the program for the first time with a local station, with whom you can set up a noise-free channel. It may be necessary to make a further adjustment to your modulation level, so be methodical in your testing.
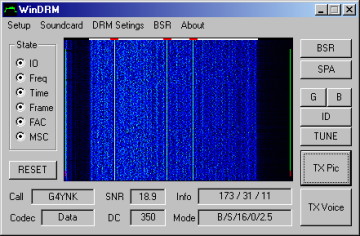
During reception, three vertical bands should be visible in the waterfall display. When operating in a channel with good signal-to-noise, the display should look like the example below (the SNR is 18.7dB, and all the State indicators are showing). The green stripe at the right-hand side of the waterfall display shows error-free segments; this changes to red if errors are detected.
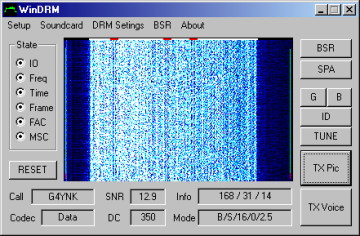
But if the sending station has their modulation set too high, the distortion will be evident on the waterfall display: now the three vertical bands can no longer be seen:
As the file is being received, the boxes under the waterfall window will show the callsign of the originating station, the channel signal-to-noise ratio (SNR), and the number of segments as they are received. If noise or distortion in the channel cause a segment to be lost, it can be re-sent in response to a BSR (bad segment request). (see below).
Once the file is correctly received, it should open up in the correct application, e.g. a .doc file will open MS Word, etc.).
We have successfully tried the following file types:
documents: .txt, .doc, .pdf, .eml(email);
pictures: .jpg, .bmp, .gif;
sounds: .mp3;
spreadsheets: .xls;
compressed: .zip.
A copy of each file received is automatically stored in the /Pictures sub-folder.
While covering a recent equestrian event, I used WinDRM to send six Excel spreadsheets showing all the riders and their times from my field checkpoint back to the control station. I was operating from a small tent (in the pouring rain!), but only needed my battery-powered notebook PC connected to my FT817, and the 18kB (zipped) file took only 1 min 15 sec to transmit. The control then had all the information on their screen, and could even have printed it out directly.
Copying down the same information sent by telephony would have taken many minutes, and may have been subject to errors.
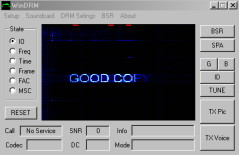
Along with some other digimode programs, WinDRM can send sound files which will display visual messages in the receiver's waterfall window. These files can be generated in another program, and the .wav files must be stored in the same folder as the windrm.exe program.
There are two versions of these sound files (make sure you use the version which matches your program):
for WinDRM version 2 (November 2005)
for WinDRM version 3 (March 2006)
The files are:
"g.wav", which sends the message "GOOD COPY" with the G button;
"b.wav", which sends the message "TRY AGAIN" with the B button;
"tune.wav", which sends a test sequence with the TUNE button;
Also, a custom file "id.wav" may be created, which will send the originator's callsign with the ID button.

On the BSR menu, select TX ARQ, Auto Open BSR Request and RX ARQ. With these enabled, the receiving station will automatically send a BSR message back to the originator, if it misses any data in a transmission. The originating station should then automatically re-send the missing segments.