A FPGA Based ADS-B Receiver and Decoder
(C) Günter Köllner, DL4MEA 07/2011

The Mode-S Beast is available at Jetvision's web shop:
http://shop.jetvision.de
Scope
/ Überblick:
On this page you will get an overview over the final project "Mode-S
Beast", as I can provide it to you in order to build up a passive radar
ground station. I did describe the development on its own page here.
Basically
this is a high performance Mode-S receiver and decoder. Internally it
supports one antenna and so the basic unit as shown on the left will
give you an overview of the air traffic by just connecting an antenna
and a PC via USB.
Optinally either 1 or up to 3 external miniADSB
receivers with their own antennas can be connected. This for example
allows you to connect an omnidirectional antenna to the internal
receiver and in parallel a
high gain antenna like a yagi towards an area of special interest
that you would not see on the omni, for example the next local airport.
Such examples are shown later.
A
second usage of this feature is splitting the 360° circle
into 2, 3
or 4 segements. FRUIT, that means overlapping signals due to the
uncoordinated transmission of the signal by the aircrafts, will then
just come from those within the area that the antenna sees. Such a
system has been built by F5ANN using 2 antennas.
Necessary software
on the PC: The output protocol is the so called
"AVR-Format", an open format just like hexdump. Currently COAA
PlanePlotter supports this format nicely, a evaluation
version of Jetvision's Globe-S also worked together with the Mode-S
Beast.
Note:
If you click on the pictures of this page, you will mostly get the high
resolution version.
|

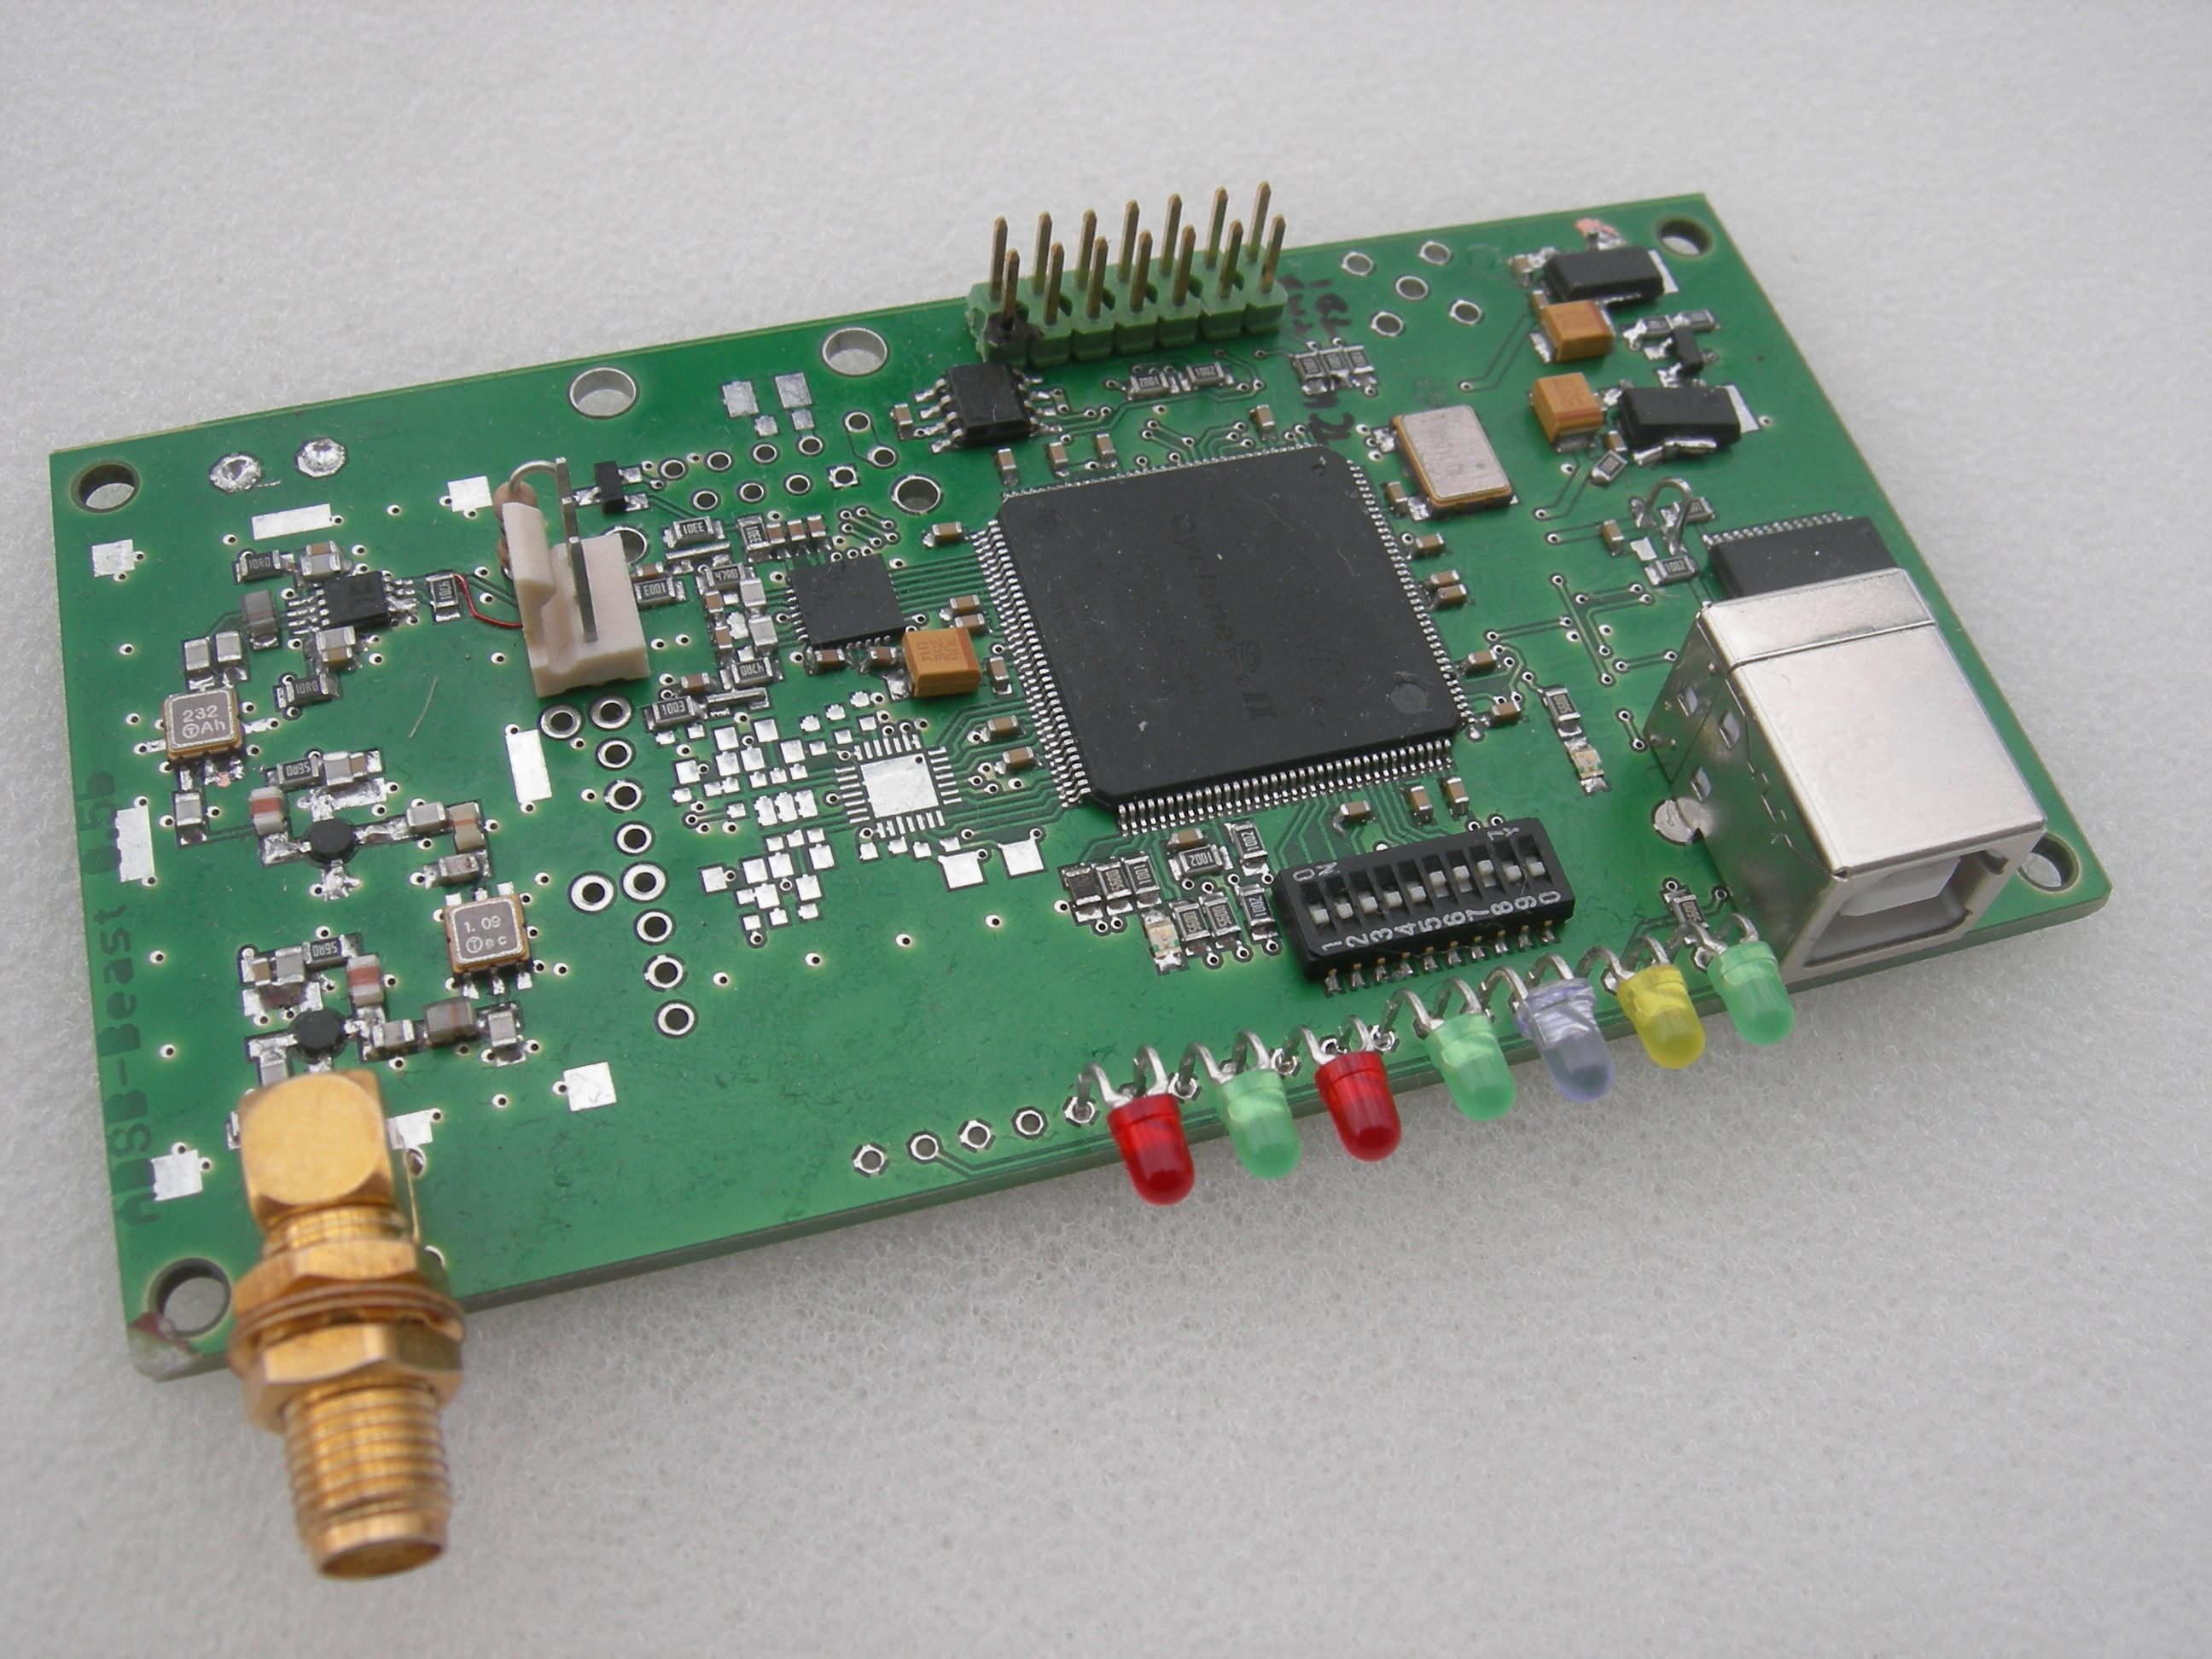
The Mode-S Beast equipped for 2 channels: one internal
receiver plus connector for one external miniADSB.
Size is 100mm wide x 53mm deep. It perfectly fits into the 100mm euro card boxes.
(Picture of preliminary product version V1.0beta, still manually soldered)
|
Major Features:
A list of features of the Mode-S Beast:
- Integrated
Mode-S Receiver and decoder for one antenna: All you need
to do is connecting an antenna to the SMA connector, a PC to the USB
interface, install the FTDI driver,
run COAA
PlanePlotter on the PC, do a few configuration steps and you
are ready to see the air traffic around you.
- Decoded frame
types: DF-0, DF-4, DF-5, DF-11, DF-16, DF-17, DF-18, DF-20
and DF-21
- Alignment
free! The Mode-S Beast will not require
any alignment but still provide highest sensitivity in order to receive
even the weakest frames.
- No doughnut
effect - Promised!
I live 20nm from the Munich airport and I can see planes in 250nm
distance at the same time a landing aircraft passes 3000ft above me.
- Integrated
CRC check for DF-11 (with exception of the Interrogator
ID) and DF-17, 1 Bit errors are corrected according to the possiblities of the Mode-S CRC polynome.
- Open
interface protocol:
There is no secret about the output format, no restriction, no secret
how to bring it into work. Plug it and connect any serial terminal to
the COM port and you see the output as described.
- Open concept:
The block diagram and internal operation is documented.
- One improved
miniADSB receiver is included on the PCB, up
to 3 external miniADSB
are supported.
- The noise
figure of the Mode-S Beast
is around 2dB, while comparable units are in a range of 5dB.
This
results in a 3.5dB signal gain. A matched receiver design results in a
flattened passband and so an improved quality.
- FPGA based
decoding allows signal oversampling and does not
impact any bottlenecks
- Noise
surpression: With a two algorithms running in
parallel that are optimized for weak signals up to 25% more
frames
are decoded.
- Power
supply via USB:
Normally the unit is powered totally from USB. Just if operating
standalone using either Ethernet or Bluetooth,
an external 5V/500mA
has to be provided externally.
The Mode-S
Beast supports configuration through miniature DIP
switches and solder jumpers:
- Baudrate:
The baudrate has to be set up according to the interface that is
used (115200, 230400, 921800 and 1MBit/sec)
- Planeplotter
direct UDP entry: For Planeplotter, in order to understand
direct UDP input via Ethernet, the prefix 'AV' has to be added to the
output.
- DF-17/DF-11 only filter: Only
DF-11 and DF-11 Mode-S frames will pass the receiver. Use this in case that you
have a limited bandwidth or computer performance
- MLAT
information: Each
frame is headed with the value of a 12MHz counter that indicates the time
of arrival of each frame.
- CRC disable:
Normally all
DF-17 and DF-11 frames are pre-checked and only forwarded in case of
correctness. For a later bit error correction (see chapter below), this
check can be disabled.
- DF-0/DF-4/DF-5 surpression
filter: In
order to reduce the load of the interface and of Planeplotter, all
these frames, which contain only redundant information, are
filtered
- Hardware
handshake:
A hardware handshake can be enabled between the interface device and
the FPGA, causing the frames to be stored in the FPGA FIFO as long as
the interface is unable to handle data. A LED on the board makes the
operation visible.
- 1
Bit Forward Error Correction: All DF-11 and DF-17 frames which have
just a 1 Bit error are corrected (this is a feature of the Mode-S CRC
polynome)
- Mode-A/C decoding: In addition to Mode-S frames, also Mode-A/C signals are decoded.
- foreseen: MLAT counter 100MHz option with optional 1pps reset: For enhanced resolution, the MLAT counter
can be configured to run on 100MHz and a 1pps signal.
- foreseen: Decoding of overlapping signals: Since the 1090MHz channel is shared and there is no collission detection by the transmitters, overlaps occur occassionally.
Why this crazy name "Beast"?
Well, my Mode-S experience started with PIC decoder,
and
then I proceeded step-by-step into the FPGA world, and also into the
high performance decoding. While with the PIC the received frames just
appeared
like a drop-by-drop, with the Beast the screen just races. Also, we had
several problems how to handle the message load (I've seen a maximum
of 1100 verfied messages per second) in Planeplotter. Finally
I
saw problems on the USB interface together with my slow Mode-S laptop
(600MHz
Pentium) and so even had to contact FTDI support how the FT232R is best
able
to handle that.
All together, this piece is a little beast and bothers all components
involved.
But be sure, all the issues are solved and the Mode-S Beast
will safely work for you.
What are the advantages of a FPGA against a microcontroller like PIC and ATMEL?
The Mode-S data signal has 1MBit/sec, so it is pretty fast. It does not
have a standard data format that would allow reception with a microcontroller's
internal hardware interface like RS232, I²C or SPI, so it must be
sampled using the CPU and standard processor commands step-by-step.
Therewith and and even then just by using a couple of tricks, all these
µC are just able to look at the signal once per each signal
information, mostly in the middle. Even worse, the µC just gets a
0 or a 1 information from the comparator, so it either has a 01 or a 10
in order to decide each data bit's value.
Next, the µC has just one CPU and it cannot do several tasks at
the same time. So while calculating the checksum, handling the serial
interface or while serving the USB port, it cannot handle frames at the
input. There is always a gap in the reception when performing these other, also important tasks.
With the FPGA one actually constructs a dedicated hardwarecircuit
for the given task, same as many years ago one took TTL or CMOS gates,
flipflops, shiftregisters from the shelf. The "code" is not a sequence
that is executed by a pre-given hardware, instead hardware pieces are
connected in order to work as needed for the task.
With such a circuit it is easily possible to sample the incoming signal much
more often. The Mode-S Beast samples 16 times more often, and then does
averaging over each 8 samples per half bit information. So if just one
sample was correct and 7 wrong, still a valid result can be concluded. But, even
better: Since there is a AD converter on the board, the FPGA gets level
information within each sample, ranging from 0 to 255. So each half bit
generates a value from 0 to 2040. While a µC has just a
decision resolution between 0 and 1, the FPGA has a decision resolution
between 2040 different values. It can resolve the signal much better,
and so it can read much better from noise.
Second, in the FPGA there is no CPU that can do just one task at a time, instead everything functionality is built
up by dedicated hardware gates. The receiver is always working, and in
parallel there is a RS232 frame builder working all the time. All units
do not interfer with each other because they all do have their own
hardware and don't share any ressources. So there is no loss of
information while other tasks are performed.
I'll make this visilible with some drawings soon, but now just a little text:
Availability:
The
Mode-S Beast is available as a SMD pre-equipped PCB for completion
through the user. The board will come tested and with all parts that
are needed for getting it into work.
At this early point I want to put a warning!!!
This project needs the user to have some minimum, basic PC knowledge:
- Connecting a USB device to the PC
- Downloading and installing the FTDI FT232R
driver from the web
- Identifiying which COM port became created by the new
device in Device Manager
- Downloading Planeplotter from the web and
doing some minor configuration steps in in it (here described
in detail)
Some more knowledge is needed for the purpose of:
- Adding of the Lantronix Xport Ethernet or the BTM-222 bluetooth
interfaces
This is not a plug-and-play set-up like for example the Kinetics SBS-1
family.
I would comapre it to be a little bit more difficulty than installing a printer.
You've been
warned! |
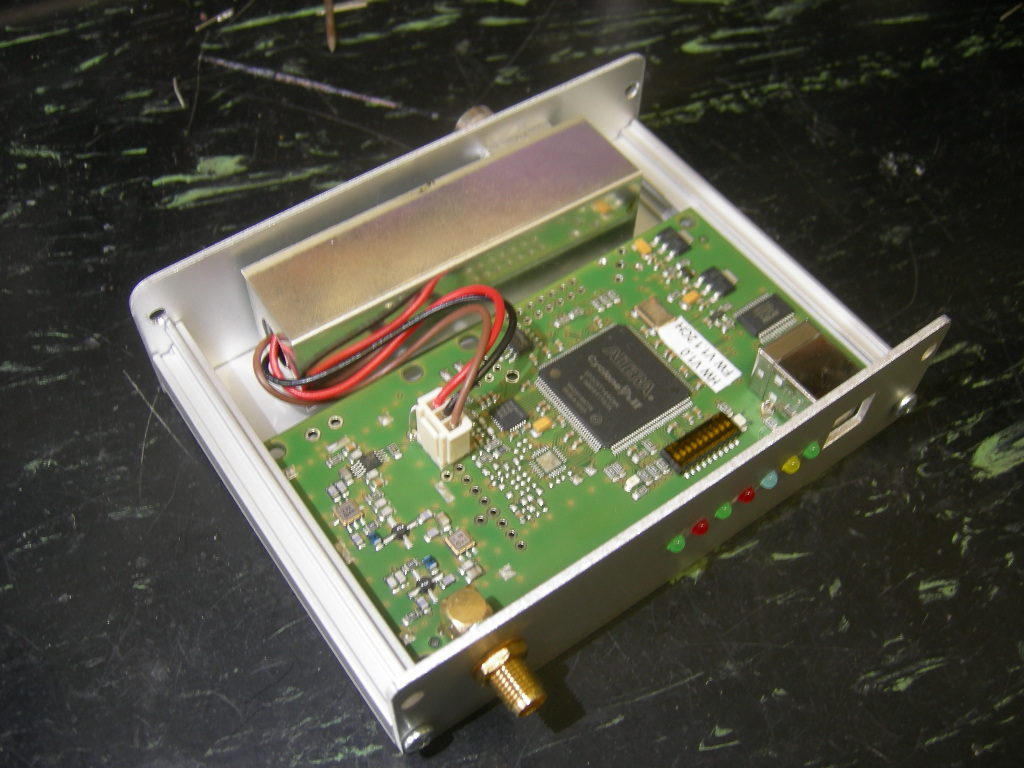
The ready unit that
you get when applying the kit into the the foreseen box
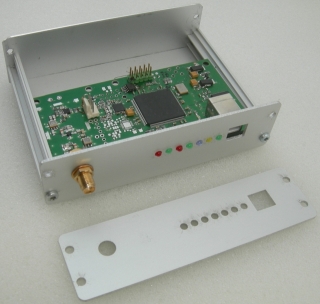
This is a 2CH Mode-S Beast with the additional miniADSB
receiver installed (the ready made ones that come with the Beast
are equipped with a right angle flange connector,
back wall comes predrilled)
 |
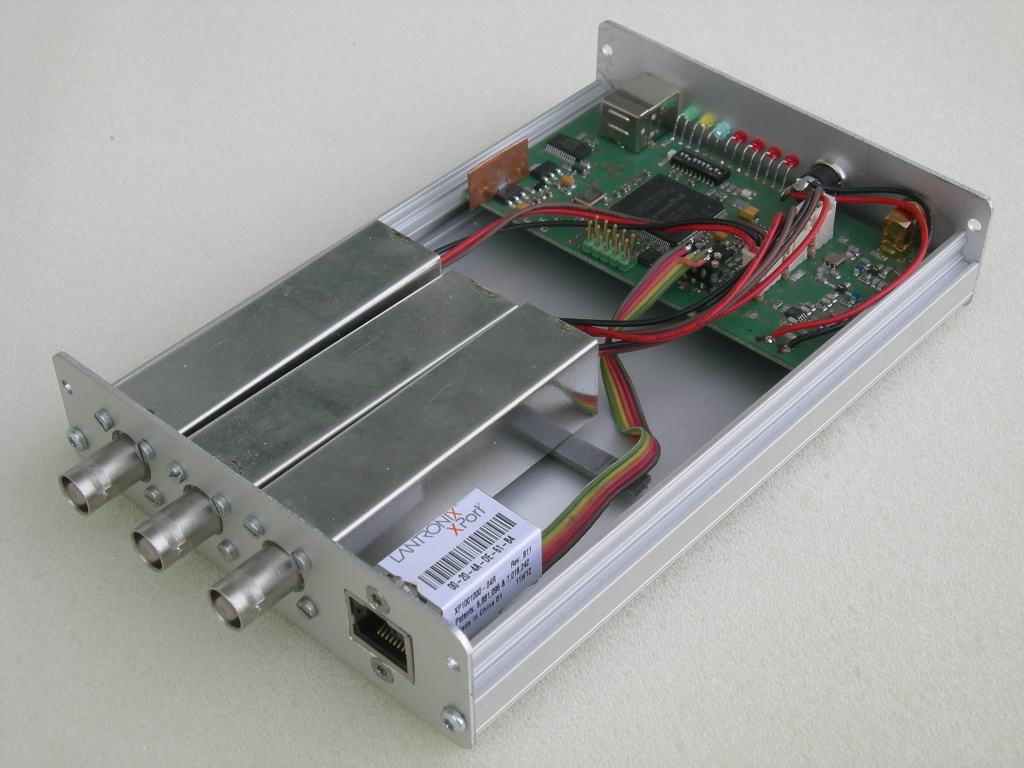
The Mode-S Beast with Lantronix Xport Ethernet Extension
Pictures
below show the Mode-S Beast with 2 antenna possiblity and Lantronix
Xport Ethernet interface (very high resolution when clicking on the
pictures):
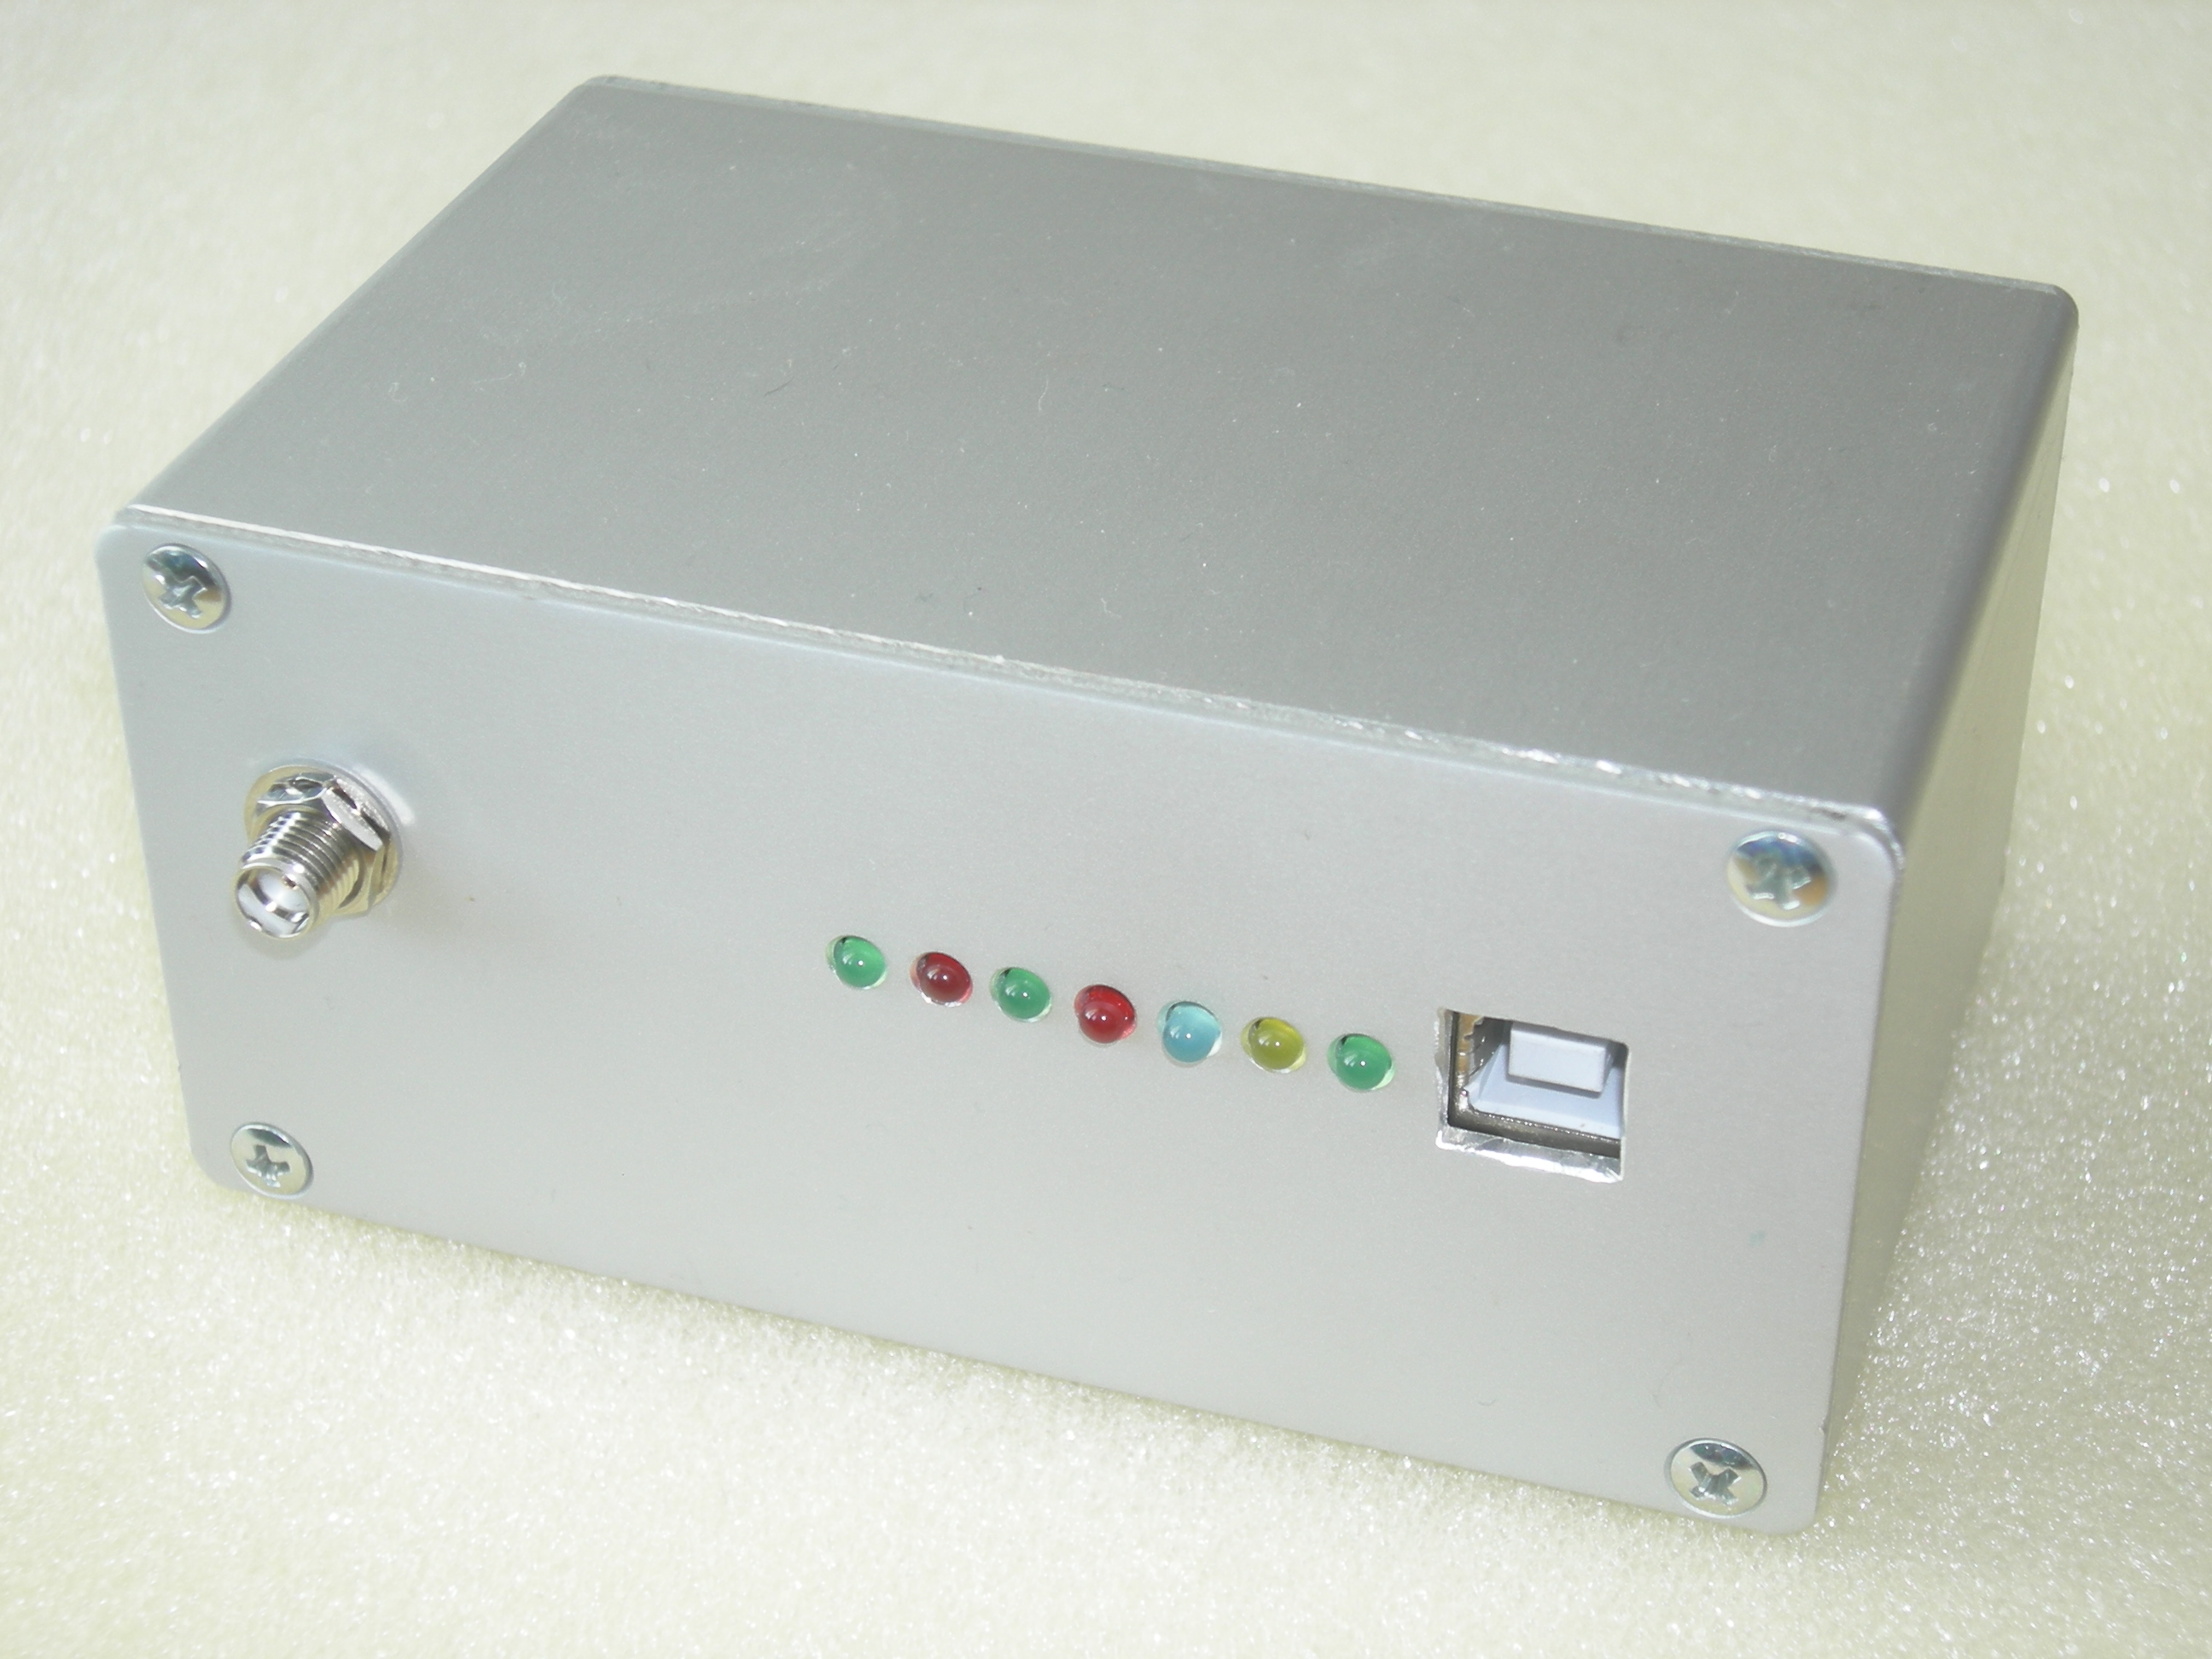
Front Panel

From left to right:
- SMA connector for internal receiver
- green and red LED of internal receiver channel
- green and red LED of 2nd receiver channel
- blue LED for overall frame reception
- yellow LED showing USB RS232 transfer
- green LED for power on
- USB connector
|
Rear View

From left to right:
- BNC connector of extra miniADSB receiver
- Ethernet connector
- +5V external power supply for USB less operation
|
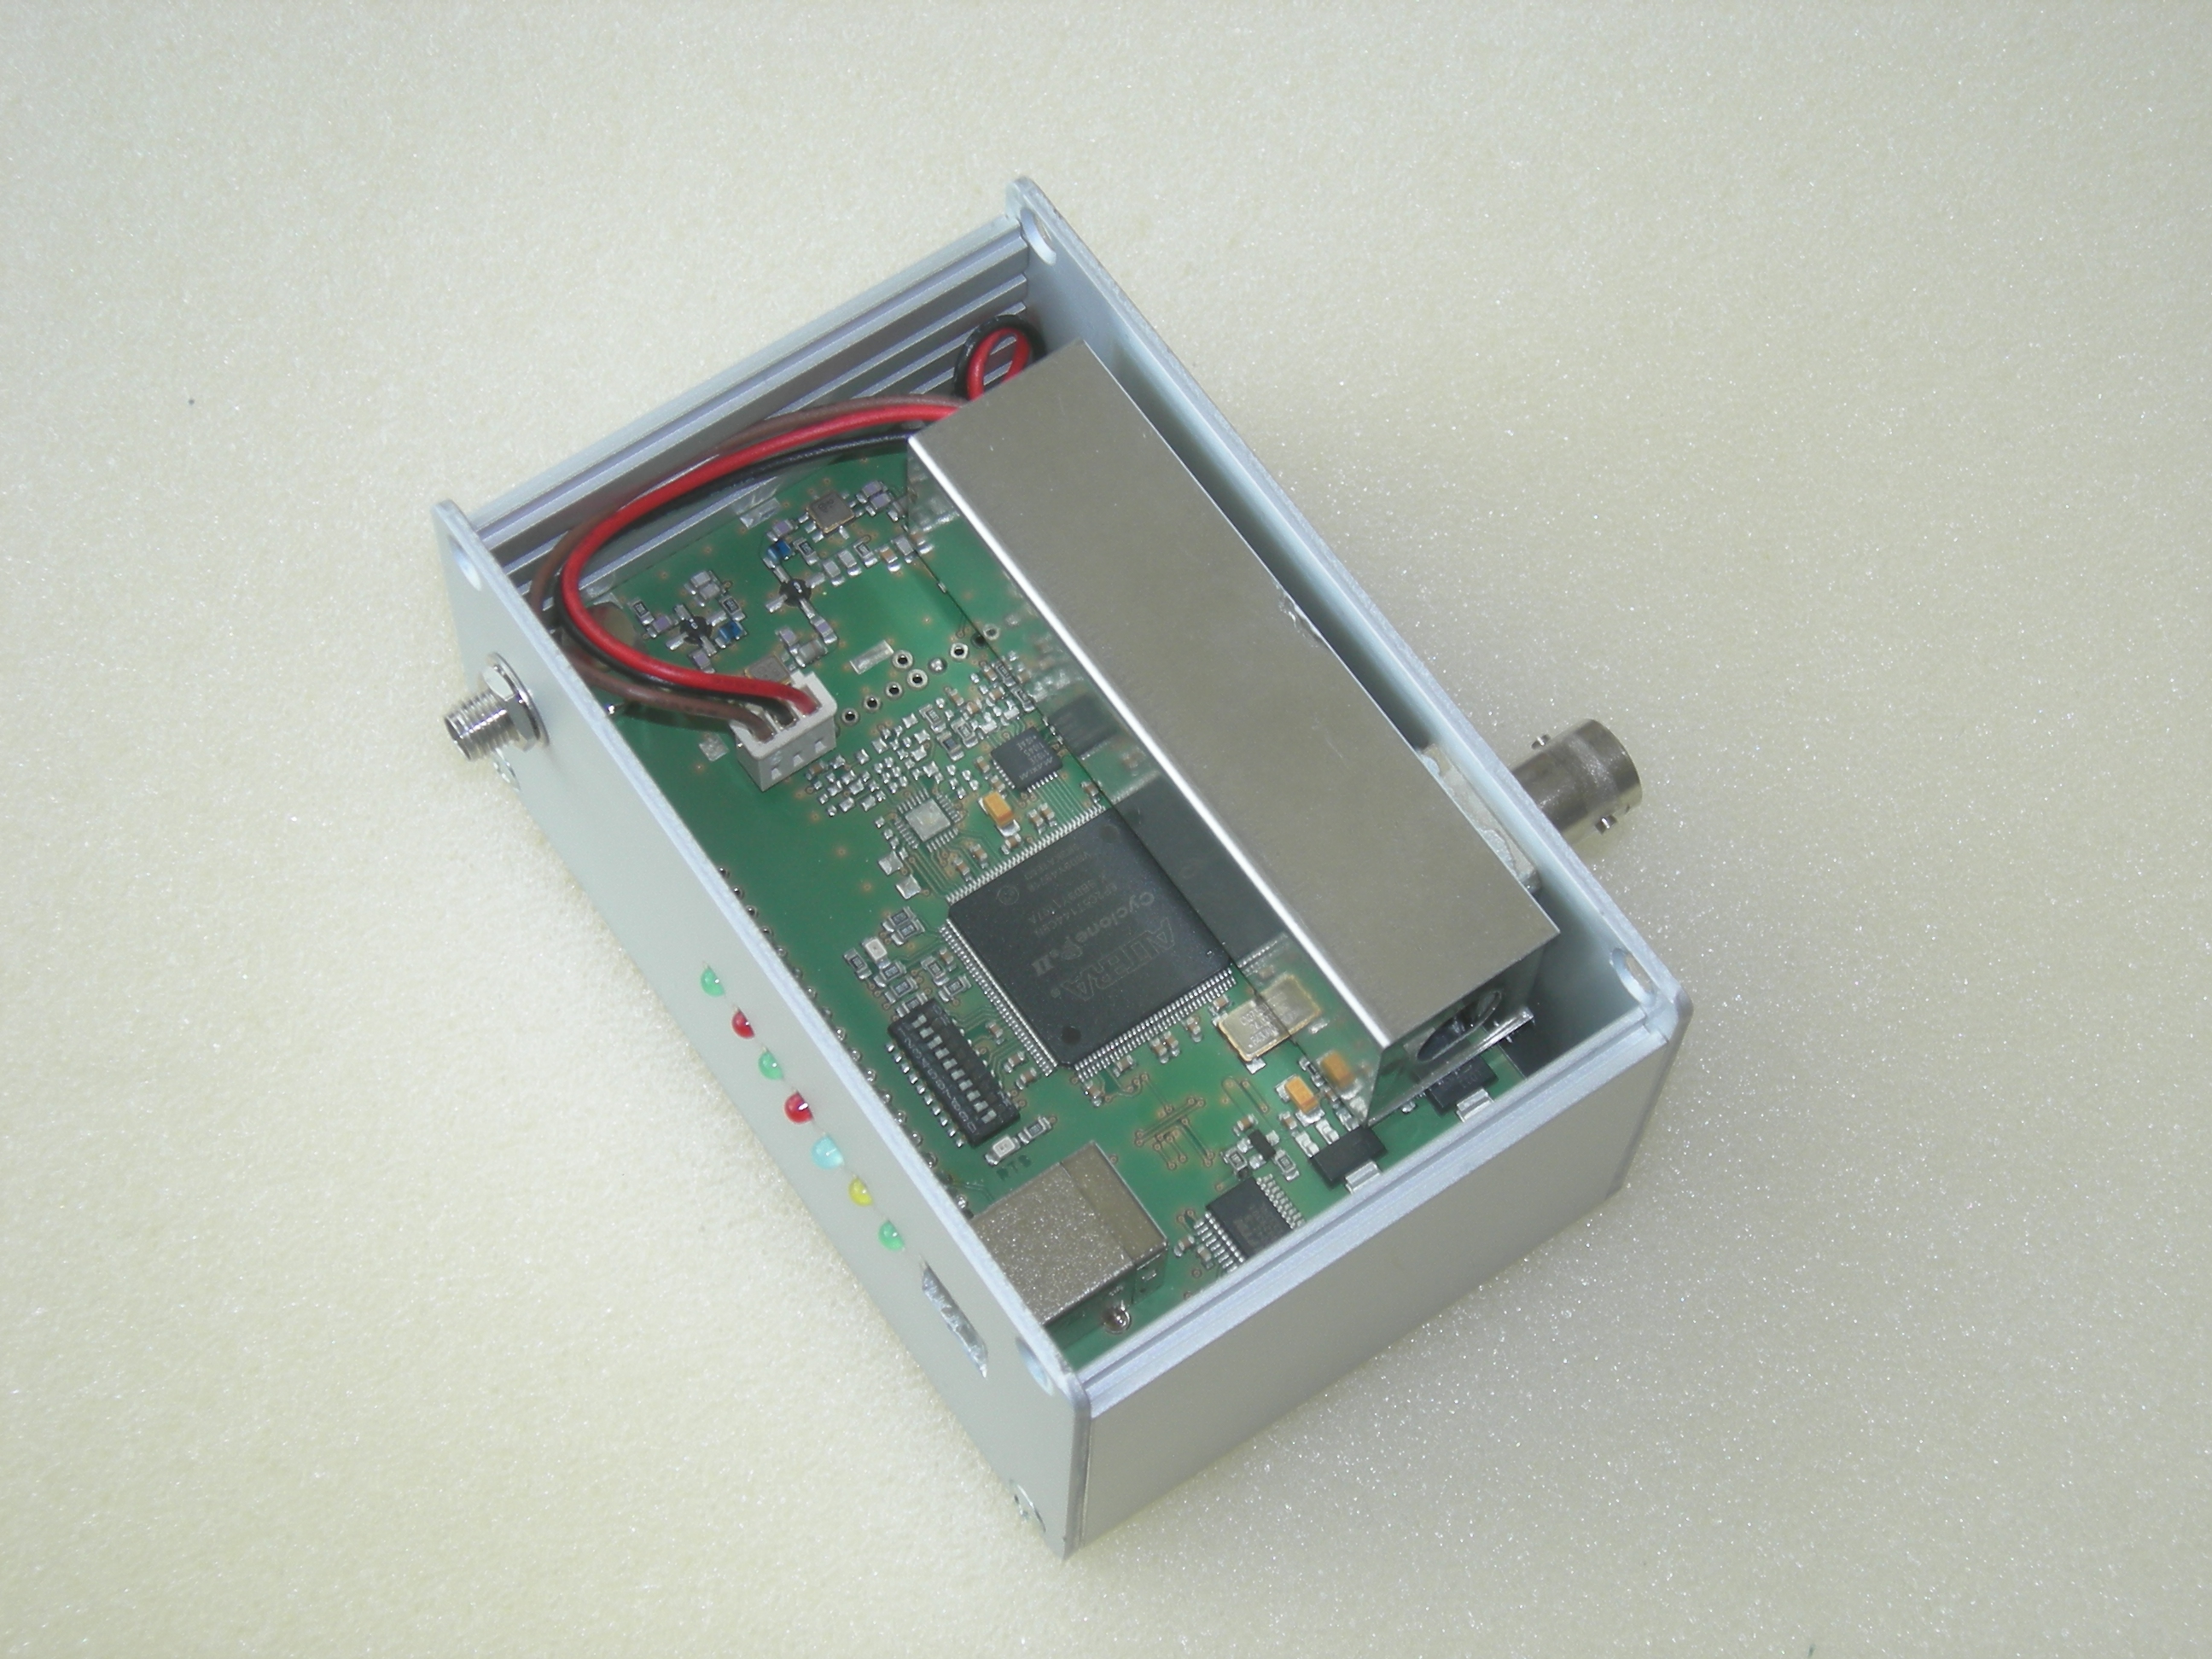
Inside View

|
The Mode-S Beast as a 4CH option with Lantronix Xport Ethernet
For a very, very special application I made a 4 channel receiver. It
requires soldering the 2nd AD converter manually, also Mode-A/C cannot
be supported with this unit. 4CH will become a common option only with
hardware version V2.0, roughly available about end of 2011.
Front Panel

From left to right:
- SMA connector for internal receiver
- +5V external power supply
- red activity LED for each channel
- blue LED for overall frame reception
- yellow LED showing USB RS232 transfer
- green LED for power on
- USB connector
|
Rear View

From left to right:
- 3 miniADSB receivers in straight version
- Lantronix Xport ethernet interface with cable to
the Mode-S Beast main PCB
|
|
Recommended Antennas:
I was looking for an antenna
manufacturer, too, but unfortunately the one I had in mind does not
have a capability to handle that fine material as it is used for
1090MHz. Look on the development page in order to see what I've used
for that, and also F5ANN describes some antennas for Mode-S receptions,
they all have been rebuilt several times with success. Maybe there is
another one who could provide the community with good and reasonably
priced Mode-S antennas and not just myrical promising ones for a
horrible price.
From the current knowledge, the Mode-S Beast works with any kind of antenna that is designed for 1090MHz.
Important Notes:
Using a preamplifier:
The Mode-S Beast when using its integrated receiver
(and not an external miniADSB) is a very sensitive device since its
receiver concept is different than the one from other comparable units.
Also, the internal design is made for maximum sensitivity. If you are
using a mast mounted preamplifier that has significantly more gain than
your cable loss, you may need an additional attenuator in order to
lower down the signal level. Remember that the preamplfiier then still makes
sense because it does what it should do: improving the noise figure of the
total system.
My own system - and you know the screenshots - consists of the G7RGQ
antenna, 3dB cable loss through 25m 1/2" foam cable (LDF or HCF 1/2")
and the Mode-S Beast. Nothing else.
High Frame Rate:
I want to be a fair player and note already here that the high number
of frames partly comes from the fact that the Mode-S Beast
transparently decodes ALL Mode-S frame types and provides them on the
interface to the PC. Planeplotter uses all of them for updating the
currently observed aircrafts, and so it counts them as useful frames.
If you compare the frame rate with other available receiver/decoders,
you have to use a tool that pre-filters the frames to a common set,
such as ModeSCompare from Jetvision.de, such as I also show it on the performance page.
Delivering performance data and screenshots:
Quite often users of the Mode-S beast make screenshots of
Planeplotter's results. Please, when doing so, be aware that there is a
long term integration done in Planeplotter, which is by default 5
minutes. This is a little bit unfair, the Mode-S beast does not need
such. Instead, lower down the integration to 1 min. Go into the menu
"Chart Settings", and enter 1.00 into "Omit aircraft after..." and "Delete Aircraft after...". Maybe you even switch of the prediction completly by unchecking the box at "Predict positions over...". A screenshot of the suggested chart settings is shown on the Planeplotter configuration page.