Welcome to the Precision CW Fistcheck help page.
I sincerely hope that the information herein will help you to make better use of
PCW Fistcheck.
These help pages are valid for version 3.9.9 and later versions.
Precision CW Fistcheck or PCW Fistcheck is a piece of software, written for PCs running the Windows operating system. It allows you to train your ability to send International Morse Code, also named Continental Code, with a straight key or semi-automatic key.
You may use Precision CW Fistcheck as a Morse decoder, but it has not been specially
designed for that purpose.
You can download the most recent version of this software in a zipped archive from the Precision CW Download Page. Save the archive file on your computer and remember the location.
Go to top.As long as you utilize Precision CW Fistcheck for your private and personal use, you are granted a personal, non-exclusive and unlimited license, completely free of charge. Any commercial use of this software without a written license agreement is prohibited. If you would like to conclude such a license agreement, then please contact the author.
Go to top.Double-click on the saved archive file. The archive should open and display a single file:
(The version information "3.9.0" may be different.)
Start the installation by double-clicking on the executable file.
A welcome window will open. Click "Next" and the license agreement will be displayed.
If you agree to the terms of the license agreement then you should check the "I agree ..." box and
click on the "Next" button. Then installation will start.
The installation process is simple, there are no new DLLs, no additions to the registry file, and no changes to your
operating system. An entry will be added to the startup menu and an icon will be placed on your desktop.
The installation can be reversed, very probably without a trace left.
I'm afraid, there is no other way than you just go on and trust me. Switch off your Antivirus system while you install PCW Fistcheck, or provide a folder that is specifically exempted from being scanned by your Antivirus system. And in case your Windows OS is complaining as well, there should be a button like "More Information", "do it anyway" or "I know what I'm doing". Try this.
There is a chance to increase trust in the installer software package: On the page you used to download the installer software, I have published the SHA256 checksum for exactly this software package. After downloading the file, you can yourself calculate the SHA256 checksum for that file you now have on your PC. And when those two checksums are identical, you can be sure that you have the original file and nobody has tampered with it.
To calculate the SHA256 checksum you need another piece of software, e.g. Hashing for Windows. And this is easy, free and open source. You can get it from here: Hashing App.
Go to top.
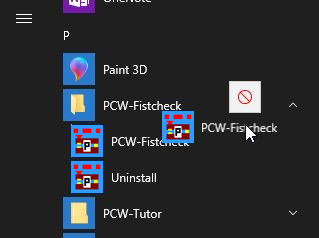
On certain installations of Windows 10 the automatic placement of an icon on the desktop may be prohibited. In this case you have to locate the program "PCW-fistcheck.exe" on your computer. With a right-click you open the context menu and then chose "shortcut".
In Windows 10 you can as well go to the Start Menu List and locate the entry for PCW Fistcheck.
By left-clicking on the icon you can drag it onto your desktop.
You either double-click on the PCW-Fistcheck shortcut icon on your desktop or you go to "Start" - "Programs" and locate the "PCW-Fistcheck" entry. Double-click on "PCW-Fistcheck", the program will start.
Go to top.
First you will see the Main Window. Here is how it's leftmost part looks like.
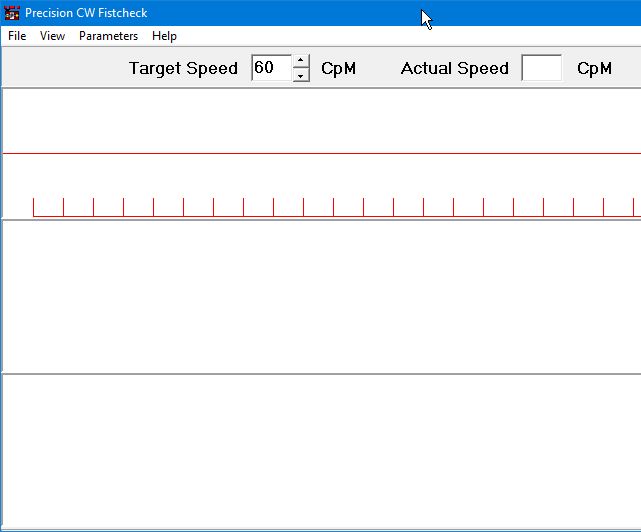
Try to press a few keys on your computer's keyboard. You will probably hear Morse code from your loudspeakers. At the same time you will see the characters you typed on the lower panel and you will see a green graphic representation of the Morse code on the upper panel.
Let's type "d", and this is what you should see:
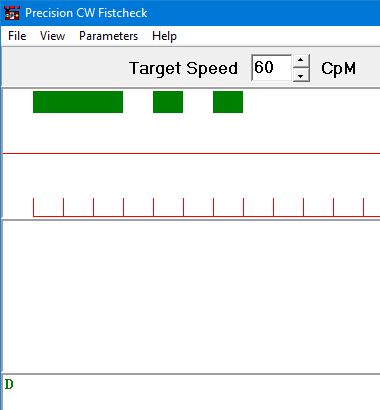
If you see letters and green bars but you don't hear anything, then probably a few things need to be adjusted (see here).
Letters shown in the panels of the main window will be in either lower case or uppercase. This depends on the "All CAPS Display" setting of the Parameters window.
Now let's try to produce some Morse code. The right-arrow cursor key on your keyboard can be used as a simple straight Morse key. Right, a keyboard key like this does not make a good Morse key at all, but you can start this way and make yourself familiar with the various features of PCW-Fistcheck.
Press the "d" key once more, listen to the sound, and then try to produce the same sound with the right-arrow cursor key. Please note that you may have to wait until the Morse code corresponding to the character you have typed is fully completed. This is typical for the default "Monaural" Morse Output Mode. It is different in the "Binaural (stereo)" Morse Output mode. Here you can find more about these two different modes.
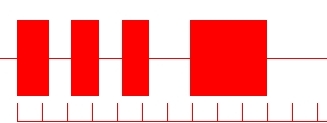
For now, your result could look like this:
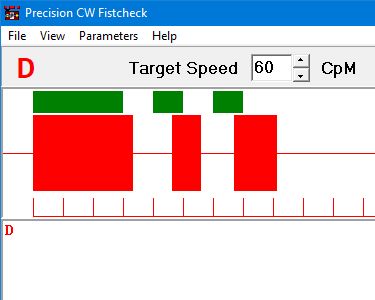
The red bars on the screen show you the actual on/off timing you have produced with the right-arrow key, and you can see the decoded letter "D" written on the middle panel. The decoded character is as well printed in red in the top left corner, just below the menu.
Not bad, the first red dash is a bit longer than the green dash, and the two dots do not have a uniform length. This Morse "D" was a bit longer and therefore slower than the 60 CpM target speed had demanded, but it was still well decodable. OK, you need speed in WpM, words per minute? We'll come to that shortly.
Go to top.
Here is the list of keyboard shortcuts that can help you to control PCW Fistcheck.
At any time, you can produce a short version of this list on your screen by pressing CTRL+F1 together.
Certainly, just click here to open a .pdf-file that you can use.
Go to top.
There are many ways to influence how the program works.
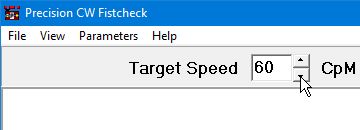
On the Main Window the actual speed of the built-in Morse code generator is shown. This is also the Target Speed for your training, and it's the first thing you should adjust according to your needs, before you start any training.
By default, speed is given in CpM, characters per minute. If you need speed given in WpM, words per minute, we'll come to that shortly.
You can change Target Speed by clicking on the small (▴) and (▾) buttons to the right of the speed display. You can also increase and decrease target speed in increments of 1 CpM or 0.2 WpM with the up and down cursor keys. With either mouse or cursor keys, if you press a SHIFT key in addition, the increment value changes to 10 CpM or 2 WpM. And if you need a really large change, then try to press SHIFT and CTRL together. The increment value will change to 100 CpM or 20 WpM.
You can as well set your mouse pointer into the small display window and edit the shown speed numbers. When you press RETURN(Enter), your new value is used.
The lower panel on the main window is used to display the characters you have typed on your keyboard. If you do not need this information, you can hide (and unhide) the lower panel by going to the View menu entry or simply by pressing F8.
And at any time you can clear and erase all panels by pressing the CTRL and Z keys together.
On the Parameter Window many more items can be adjusted. You reach this window via the Parameters menu item or by simply pressing F2. The parameter window is separated into four panels: top-left, top-right, below-left and below-right.
Let's first look at the below-right panel:
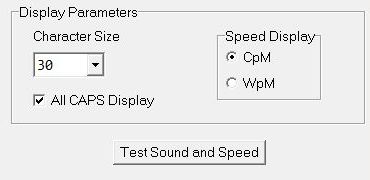
Here you can change the display of Morse speed from CpM (characters per minute) to WpM (words per minute). Between both versions there is a constant multiplication factor of 5; 12 WpM correspond to 60 CpM.
And you can select the size of the characters on your screen. Pick the point size from a list, values between 12 and 48 are available.
Furthermore, you can select the All CAPS feature to display all typed or decoded characters in uppercase.
You can further select whether the Morse characters produced by typing on the keyboard are not only heard as sound from the loudspeakers, but also displayed as a pattern of green bars on the screen.
And, you can select what happens when you produce a string of eight dots with your key, the error
or <HH> prosign:
When this box is checked, the string of eight dots is not displayed, but works like the
DEL shortcut key and erases all characters you have sent so far. Of course, when you want to train to send
this string of eight dots, then you should leave this box unchecked.
You can further select an option that may be helpful when training to produce correct Word Spaces: Whenever you have produced a Morse character, and when a certain amount of time has elapsed, there will be a short black flash on the upper panel in the main window. When you need a word space, then you should wait for that flash and then proceed with the next character. The time interval between last key-up and black flash is in fact shorter than the correct 7 elements in order to give you some time to react. This Word Space Flash will probably be helpful at slower keying speeds and not much beyond 60 CpM / 12 WpM. This option cannot be selected when you have chosen Sound Input (see below).
And finally you can select, whether the two most often used prosigns, namely <AR> and <BT>, are displayed as the common single characters "+" and "=".
Go to top.Now let's look at the top right panel:
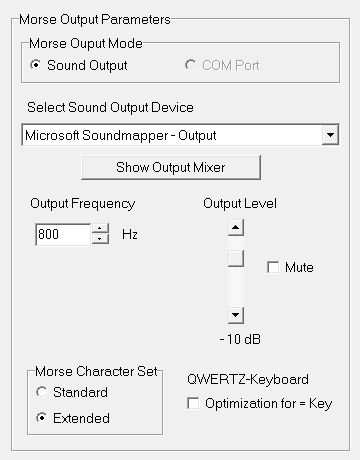
On this panel you have control over the Morse Output Parameters. These settings have influence on what you hear when you press a key on your keyboard, or a connected Morse key.
The Morse Output Mode is generally a Sound Output. You can hear the output via your loudspeakers or via connected headphones.
Then you have the choice between Monaural and Binaural mode.
In Monaural Mode there is only one output signal at a time and this is going to both loudspeakers or both sides of your headphones. It is important to notice that you can either listen to Morse characters typed on the keyboard or to the sound you produce with your Morse key - not to both at the same time.
In Binaural Mode you can hear both signals at the same time - your keying on your left ear, and the typed characters on your right ear. And furthermore, you can select different tone frequencies for these two signals
Next you can select which Sound Output Device on your computer is actually used. The contents in this drop-down list entirely depends on the hardware available on your computer. When you're in doubt what to actually use, try an entry with the word "Loudspeaker" or try "Microsoft Soundmapper".
When you press the button labeled Show Output Mixer, the sound output mixer of your Windows operating system is opened in a separate window.
Next you can adjust the Output Frequencies of the Morse signals produced. In Binaural Mode, the upper selection box is used to adjust the Key Sound Frequency used for your keying with mouse or external key. The lower selection box is used to adjust the Keyboard Sound Frequency used for Morse signals produced by typing on your keyboard. You may find it useful to use different frequencies. Please remember that in Monaural Mode there is only one frequency control.
The frequencies can be adjusted separately from 100 Hz to 2 kHz in steps of 1 Hz by clicking on the small arrow buttons, and when you additionally press the SHIFT key or the SHIFT and CTRL keys together, the increment value changes to 10 Hz and 100 Hz respectively. The frequencies can as well be directly edited in the display box. When you press the RETURN key on your keyboard, the edited number is processed. But in case you have entered something that is not a number, then the previously selected value is restored.
The Output Level can be adjusted with the slider from the nominal 0 dB down to -40 dB. The output level control adjusts the output level before any settings of the PC's output mixer are applied.
Note: Hearing damage is cumulative. Protect your hearing, use the lowest usable volume level, especially when using headphones.
When you click the Mute All Out check box, any sound output is completely muted.
And when you click the Mute Key Out check box, only the sound output for your Morse key is muted. This can be helpful when your external Morse key is already using a buzzer.
You can further choose whether to support the standard or the extended Morse character set (see here for further explanation) for the output of Morse signals.
Then you can check a box to select a small optimization for users of so-called QWERTZ keyboards,
which will mostly be users of Windows set to German language.
On these PC keyboards two keystrokes are needed to produce the frequently needed <BT> prosign,
the dash or equal sign: The "shift" key and the "0" key have to be pressed together. Therefore an optimization
is provided:
Normally the following relation between keyboard and Morse characters is in effect:
But when you check the "= key optimization" checkbox, then the following relation between keyboard and Morse characters is in effect:
Users of so-called QWERTY keyboards and all other versions should leave this box unchecked.
Finally, you can decide to prepend text loaded (CTRL+L) into the lower panel by a typical start sequence: "VVV<KA>", followed by two word spaces.
Go to top.Now let's look at the left hand panels. Here you have control over the Morse Input Parameters.

On top you select the Morse Input Mode. You basically have three choices:
First you can use the right arrow cursor key of your Keyboard as a very simple and crude straight key. And you can as well use the left button of your Mouse. You only have to place the mouse pointer into one of the panels on the main window, where the green and red bars and text does appear.
Both ways cannot really be recommended for serious work, but they are simple ways to get used to how PCW Fistcheck behaves.
But there is a more serious way to utilize Morse input via a Mouse Interface: you can connect the 2-wire line coming from your straight or semiautomatic key or even from an electronic keyer to the switch inside a computer mouse, that is operated by the left mouse button. This is one way to construct an interface between your Morse key and PCW Fistcheck. Also, there exist commercially available interfaces for this task, like MY-KEY-MOUSE by John Clements, KC9ON.
Go to top.Your second choice for Morse Input Mode is Sound Input. The sound you produce with your separate key and Morse buzzer is entered into the PC, either via the PC's built-in microphone, or via an external microphone plugged into the PC, or directly from the buzzer to the PC's line sound input. The exact setup depends on your PC hardware and may need some further adjustments (see below).
In Sound Input Mode you can use the drop-down list to Select Sound Input Device. The list in this menu entirely depends on your PC hardware, and you may need to experiment with different settings.
You can further see the Sound Input Level and adjust the Sound Input Gain with the slider on the left. When you have key-down, the sound of your buzzer should produce a level indication on the Sound Input Level gauge in the range from roughly -10 dB to 0 dB. On key-up, any residual noise should not show up, the Input Level gauge should show something like -45 dB or lower (larger negative) values. You can adjust these levels with the Input Gain slider on the left.
You can either use a Broadband Sound Input, which actually is limited to between 100 Hz and 4000 Hz, or select to apply a Bandpass Input Filter and adjust the Bandpass Filter Frequency.
The bandpass input filter helps against spurious noise entering the system via microphone or line audio input. It has a bandwidth of about +- 50 Hz around its center frequency. This center frequency can be adjusted from 100 Hz to 4000 Hz in steps of 1 Hz by clicking on the small arrow buttons. Additionally pressing the SHIFT or SHIFT and CTRL keys together changes the increment value to 10 Hz and 100 Hz respectively. The center frequency can also be directly edited in the display box.
The chosen center frequency of the bandpass filter should of course match the tone output frequency of your Morse buzzer or sidetone generator. In case you are not sure about this, here is a small procedure that may help:
With your key connected to your sidetone generator, its sound output connected to a suitable PC sound input, line or microphone, start PCW Fistcheck and select F2 - Sound Input. Start with Input Filter - Broadband, and hopefully, when you press the key, you will see some solid reaction on the Sound Input Level Gauge. Now, place something onto your key to produce a constant, long tone. Then switch to Input Filter - Bandpass and set the Bandpass Filter Frequency to 100 Hz (and please remember that you can change that frequency in steps of 100 Hz by pressing Shift + CTRL together with a mouse click).Your third choice is to connect your Morse key to a serial interface COM port on your PC. There are commercially available interfaces specially designed to connect your key via a COM port, like MY-KEY-SERIAL by John Clements, KC9ON. But you can also build your own small and simple interface as described further below.
At the lower left part of the Set Parameters window you find the items that can be adjusted in case you want to use the input via COM Port:
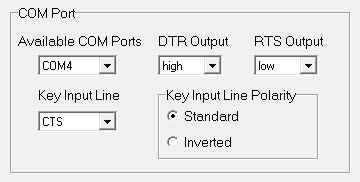
First of all you have to select the actual COM port to be used from the drop-down list of Available COM Ports. This list depends on your actual PC hardware and there may not be a COM port available at all (indicated by "none").
Most newer PCs don't have such a port any more, but there are external USB-to-COM converters that can be plugged into a USB socket on your PC. Such devices either act as general-purpose COM interface, typically showing a 9-pin male D-Sub connector. Or they are specialized devices that directly connect your key to the USB port.
Sometimes the external device or other hardware connected to the COM port requires a special setting of the two output lines called DTR and RTS. You can select their status to be either "low" or "high". If not sure what to do, leave them as they are: "DTR Output: high" and "RTS Output: low".
The COM port interface provides several input lines, of which two are typically used for Morse key inputs: the so-called
CTS and/or the DSR line. In the Key Input Line selection box you can
select to use either of the two or both of them together (CTS+DSR). The latter case is useful when you want to use a one- or two-lever
paddle with a standard 3-wire jack connector.
If not sure what to select, then leave this box with "CTS" selected.
Depending on the actual interface hardware, you may experience a somehow "inverted" reaction when you operate your Morse key: you hear a sound when the key is open, and silence when you press the key. Is this case you can go to the selection box labeled Key Input Line Polarity and select the Inverted case.
Go to top.For the decoding of Morse input you can separately decide to use either the standard set or the extended set of Morse characters. See here for further explanation.
When using an actual Morse key and any one of the discussed interfaces, you further have the choice to select a filter to cope with possible Contact Bounce of your Morse key. See here for more on that.
Go to top.
You will probably have a stereo audio output on your PC or laptop, and you may be listening with stereo headphones. In this case Binaural Mode means, that the Morse characters produced by typing on the keyboard will appear in the right stereo channel. And the sounds produced by operating your Morse key will appear in the left stereo channel.
The same holds true for the replay functions: replay of typed characters (<CTRL><F9>) will appear in the right channel, and replay of keyed Morse characters (<F9>) will appear in the left channel.
But the real advantage of this mode is, that you can load and play some typical Morse sequence. And while this is playing and you are listening to the Morse sound in the right stereo channel, you can operate your key and listen to the produced Morse characters in the left stereo channel. That way you can instantly compare your keying with the correct patterns. And, of course, it can help when you select different sound frequencies for typed and for keyed characters.
Go to top.
Training by ear is usually considered the best way for learning Morse code, both for reading and for sending. So start by setting your Target Speed, which is normally recommended at 60 CpM or 12 WpM respectively - but that's entirely up to you. Then hit a character on the keyboard, close your eyes and listen to the corresponding sound. Now try to reproduce that exact sound with your Morse key.
This may work fine, but PCW Fistcheck now gives you additional information by showing a graphical representation of what you did with that Morse key. You should always try to train your ears first, then you can look at the result and correct a number of things:
At the same time as the graphical representation is displayed on the top panel, the received sound or key action is decoded and the decoded character is displayed on the middle panel. But only if decoding is possible. If decoding is not possible, a question mark in angle brackets is displayed instead, like e.g.: <?>.
And here a word of caution may be appropriate: you may have produced a Morse character with perfect timing, but with grossly different speed as compared to the selected Target Speed. In that case the decoding may deliver completely unexpected results.
In addition, the measured actual speed of your last Morse character is displayed as Actual Speed in WpM or CpM, and the average speed measured over a number of past Morse characters is displayed as Avg Speed. The actual number of characters used to calculate this average can be selected on the Show Timing Values window.

Go to top.
Here are a few examples of more or less strong deviations from the correct Morse characters:
It is quite difficult to produce Morse characters with speed exactly equal to the target speed, but small deviations to slower or faster speed are not really important for readability. But once a target speed has been selected, you should try to come as close as possible.
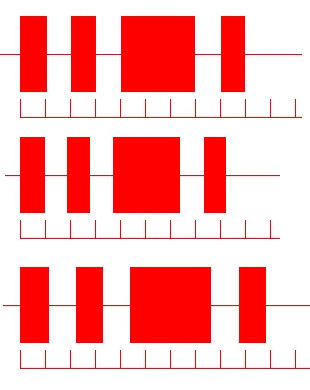
Top: perfectly formed character and speed just right (60 CpM)
Middle: perfect, but speed a bit too fast (65 CpM)
Bottom: perfect, but speed a bit too slow (55 CpM)
A dot (Mark) of certain length should be followed by a space of exactly the same length. The ratio of mark to space length in a dot is called "Weight" and is usually given as a % value. While a weight lower than 100% is considered to reduce readability, a weight larger than 100% may increase readability at higher Morse speeds.
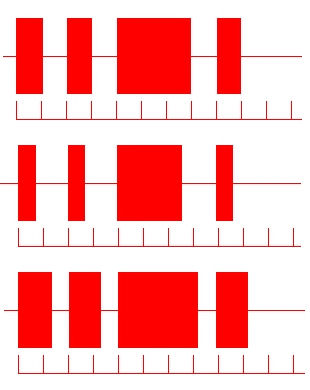
Top: perfectly formed character and weight just right (100%)
Middle: perfect, but lower weight (50%)
Bottom: perfect, but higher weight (200%)
In a standard Morse character with 100% weight the ratio between dash and dot mark length should be exactly 3:1. While automatic keyers normally do not deviate from this value, it is typical for keying with a straight key to produce stronger deviations. While a ratio lower than 3:1 can drastically reduce readability, a ratio slightly larger than 3:1 may even increase readability.
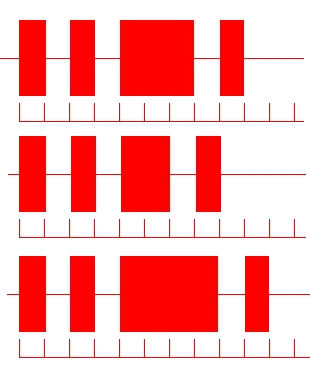
Top: perfectly formed character and ratio just right (3:1)
Middle: perfect, but lower ratio (2:1)
Bottom: perfect, but higher ratio (4:1)
When sending with a straight key, a typical deviation is the emphasis on the last dash in characters like "q". This can indeed be part of a personal "Fist" that can actually increase readability.
When sending with a semiautomatic "Bug" key, a typical deviation is the relatively larger time interval needed for transition between "automatic" dots and "hand-made" dashes. This can be seen in the following picture. Also typical is the slightly diminishing length of dots. Both effects are responsible for the typical sound of a "Bug" as compared to a straight key or even a fully automatic key.
PCW Fistcheck even helps you to train the correct spacing between characters within a word and spacing between words.
When you send a longer string of characters with the appropriate spacing between the characters, then the decoded
characters are printed one-by-one on the middle panel. But when you increase the time interval between the single characters
beyond a certain value, then it is assumed that a word space had been intended.
In this case a blank space is added to the decoded text on the middle panel, helping to visually separate characters into words.
And when this time interval is increased further, then a line break is introduced on the middle panel.
Depending on your keying you will get different displays like the following, and only the first one is correct:
It is certainly advantageous to try to first learn the correct timing of continental
Morse characters. But in the end all that counts is a successful exchange of information.
So if exaggerations of ratio or emphasis on last dashes actually help to increase readability,
there is not much to say against it.
PCW Fistcheck will support you to get a good timing and produce Morse characters with high readability. Then you will
probably develop your individual "fist".
Yes, you can. You can go back in time to look at all (*) the Morse characters you have produced since the start of the program or since you pressed DEL or CTRL+Z to clear this memory.
(*) The maximum number of characters and their patterns in memory is currently set at 512.
Just press PageUp once or more times to go back on the time scale. Press PageDown to go in the opposite direction. Or press Home to go back to the first character or End to go to the last one. You will see the string of Morse patterns move accordingly, and the character decoded from the leftmost Morse string pattern is printed on top below the menu.
Any new Morse character input will move the display to show the actual current Morse pattern.
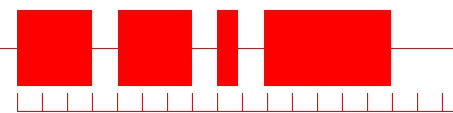
Here is an example: the characters "PSEK" were sent, and then PageUp was pressed three times (or Home just once). This is what the display will show:
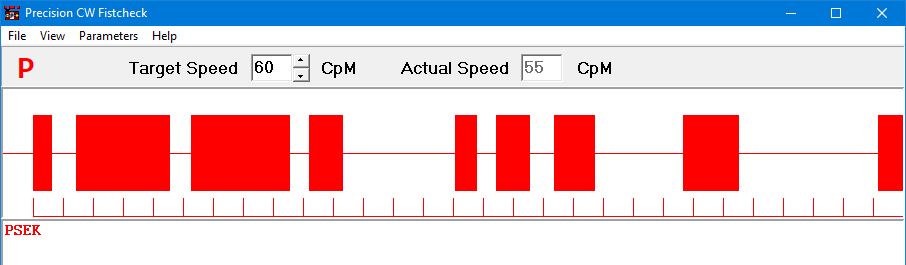
You can clearly see that characters were by no means perfect, but the space between "S" and "E" was about right as a character space with a length of about 3 ticks. The space between "E" and "K" with just short of 5 ticks was nearly too long. Just slightly longer, with a length of more than 5 ticks, this space would have been decoded as a word space, and the decoded characters on the middle panel would have been shown as "PSE K".
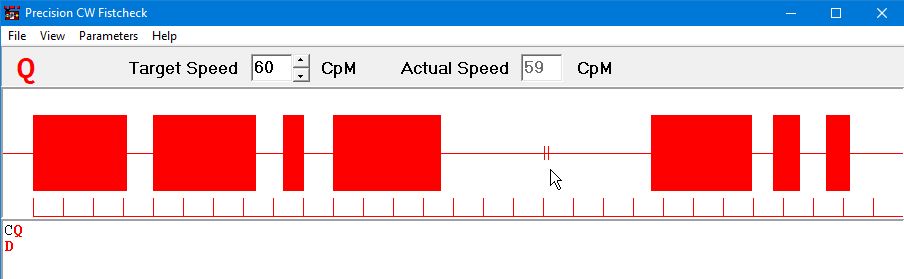
Here is another example:
The time interval between "CQ" and the following "D" was much longer than the standard word space.
In such a case the processing is stopped momentarily and when the next character gets decoded, a standard word space with
7 ticks length is displayed and two short vertical marks are added to indicate the in fact "unknown" length.
At the same time on the middle panel a new line is started.
That is really easy: just press F9 and all characters highlighted in red
are replayed with exactly your own timing. You even get a cute moving display of patterns.
Stop any output immediately by pressing ESC.
And please note that those word spaces marked as "unknown" (see above picture) are replayed with a
standard word space length of 7 elements.
Do you want to listen to only a single special character again? Go back with PgUp until that character appears as first in the highlighted line. Then press F9+Shift and you can listen to that single character again (and again).
In addition to PgUp, the Home key and PgDn can quickly navigate to the character to play or start playing from.
Go to top.
Yes, all the commands you can use for playback of the red highlighted characters can as well be used for the green highlighted characters on the lower panel. Just press the CTRL key in addition - and you're done.
Go to top.
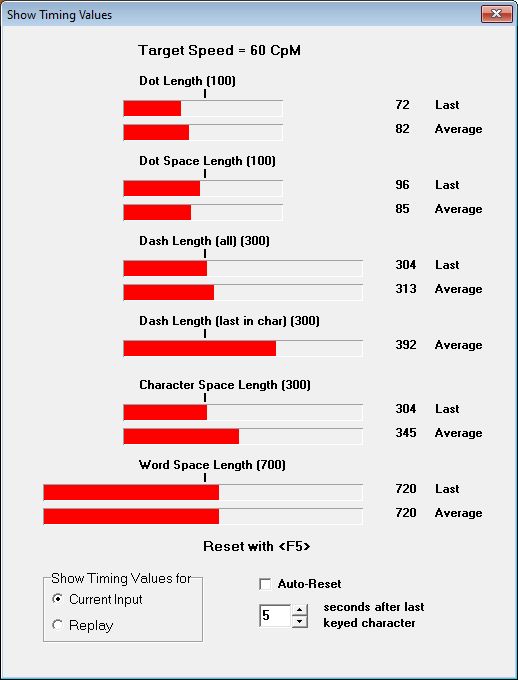
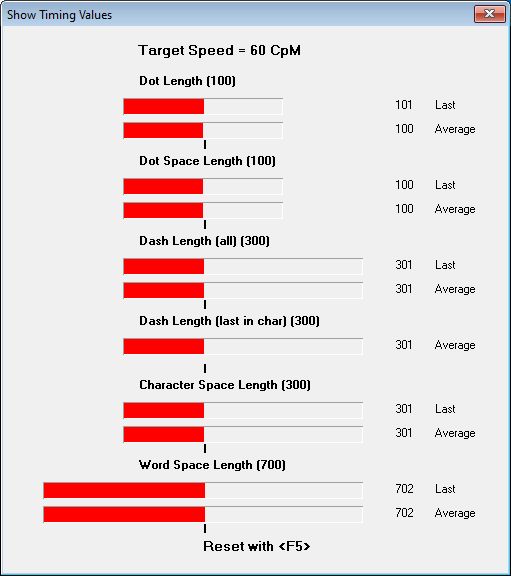
Certainly, just press F3. You will see the Show Timing Values window with information
about the lengths of your dots and dashes, and of your dot spaces, character spaces and word spaces.
There is a separate display for the average dot/(dot+space) ratio or weight, and even a separate display for the average
length of a last dash in a character.
For each category you can see the actual individual last value of dot, dash and different spaces. And additionally you can see an average value. All these averages are individually calculated for dots, dashes and spaces since start of the program, or since you pressed F5 to clear all values.
In fact, this window can display one of two different sets of timing values. You can select either display with the selection box at lower left. The set for Current Input is derived from the Morse characters you have formed, and the Last Replay set is derived from the Morse characters you have highlighted and replayed by pressing F9 or Shift+F9. This way you can selectively replay one or more characters and then look at their specific timing values.
Please keep in mind, that these values are given as %-values in relation to the theoretical element length you have chosen by setting a certain Target Speed. So an ideal dot should have a length of "100", and an ideal dash should be shown as "300".
Normally, the chosen target speed is used as reference for this display, but you can also select to use an average over the speed of the past characters you have produced. Try it, you will easily see the difference.
And there is a selection box where you can select how many of the past characters are used to calculate this speed average to be used as reference.

Please note that a low number (e.g 10) will produce an average speed that is closely following any intended or unintended speed change. A larger number (e.g. 100) will produce an average speed that is only slowly following any speed change.
You can keep the Show Timing Values window open to watch the values while you are practicing. And you can just keep an eye on the display while producing your Morse characters. The bars are arranged in a way to quickly show you where you are: when all red bars are aligned in one vertical row, in coincidence with the small black ticks, you are perfect - as shown below. But this result was produced with Precision CW Tutor as keyer!
Please remember that by pressing F5 you can reset all timing values, separately for the currently displayed set. But you can also let PCW Fistcheck do this work for you. Just select Auto-Reset and choose an appropriate interval between 2 and 30 seconds. When you further select Close on Auto-Reset, the window is automatically closed after an Auto-Reset was done.
Auto-Reset is only available for the Current Input display and automatically stopped when you decide to look at the Replay timing values. Likewise, the values for Replay are reset every time you start a new replay with F9.
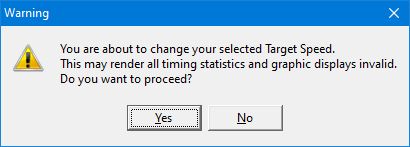
And please note that when you change the value of Target Speed, after you have produced one or more Morse characters,
all these values are newly calculated to reflect their relation to this new Target Speed. And when you do a really large change
of Target Speed, then all displayed values and decoded characters may become invalid.
That is why a warning message will appear when you try to change Target Speed while the middle panel is not empty. You can proceed with
"Yes", but you should be careful in interpreting the results.
Go to top.
Every time you hit a key on your keyboard, click on your mouse or let your Morse key change the level of an input line to a RS232/COM interface, an event is signalled within the Windows operating system. The time distances between such events can then be measured with a precision of one millisecond. For sound input the processing is slightly different: the envelope of the sound signal is derived, and when that envelope crosses a certain level, similar events are generated and time differences measured.
The measured time differences are then compared to the standard lengths of dot, dash, and spaces, which of course depend on the selected Target Speed. When a dot has a nominal length of "100", and a dash has a length of "300", then any mark shorter than "200" is decoded as dot, and anything longer is decoded as dash. The related time values are then entered into the fields on the Show Timing Values window. Average values are calculated over all measured time differences since start of program or since F5 had been pressed.
Spaces are handled similarly, though a bit more complicated. Spaces within a Morse character have a nominal length of
"100", and the space at the end of a character should have a length of "300". Therefore, every time a space
longer than "200" is detected, it is assumed that the current character has eneded and a new one has started.
The end of a word is signalled by a space of nominal length "700". Consequently, any space longer than "500"
is considered a word space, and a blank space is added to the last decoded character on the screen.
But there is one important exception: the time at the end of a character, starting with the last key-up and ending with the next key-down,
can only be measured when such a key-down actually appears. But what happens when you just stop your Morse code session?
In order to handle this situation, a forced stop is introduced: when no key-down appears within 9 times the nominal length
of a dot or "900", the pause processing is stopped, end-of-word is assumed, and a blank space is added
to the last decoded character. But as the length of this word space has been produced by a
software process and not by the operator, it is not entered into the Word Space Length field on the
Show Timing Values window.
And this is why this field may in some cases be left empty, even when decoded characters with blank spaces between them
appear on the screen.
When you use Sound Input mode, and when you see a result on the Show Timing window that you want to keep for a moment for detailed inspection, then further input signals may get decoded and change the timing results.
Just press the PAUSE/BREAK key or the F7 key on your keyboard and sound input and decoding is momentarily halted until you press that key again. While sound input processing is paused, the words Sound Input Paused are shown in the top-right corner of the Main Window. On the Set Parameters window the word Paused is placed over the Sound Input Level gauge to remind you that no relevant level measurement can be expected while processing is paused.
Go to top.
PCW Fistcheck has primarily been designed to train sending Morse Code with a straight or semi-automatic key, but it can also help you to adjust a semi-automatic or fully automatic keyer.
The speed of the automatic dots on a semi-automatic keyer is mechanically set for a certain value. PCW Fistcheck can help you to set the correct dot timing and weight. Just perform steps 1 to 7 of the list below.
A fully automatic keyer should produce perfectly formed Morse characters, but many of these keyers have continuous controls for speed and weight, without precise markings. With PCW Fistcheck you can check the performance of such a keyer and set the controls for a desired speed or weight.
Say you want to check a keyer at 20 WpM (100 CpM). Then proceed as follows:
Did you ever hear a sound from your PC or laptop? Do you hear the sound of Windows messages?
Are headphones or something else plugged into the headphone jack?
If at all possible, try to use a different program for any audio playback. Why not listen to
a good piece of mp3 music for a moment?
If you still can't hear the sound of any Morse characters, then either go to the parameters window (hit F2), then click on the Get Output Mixer button, or select Parameter, then Output Mixer from the main menu. This will bring up something that belongs to the Windows operating system and may look different on your PC, e.g. this one shown is from the German version of Windows 10.
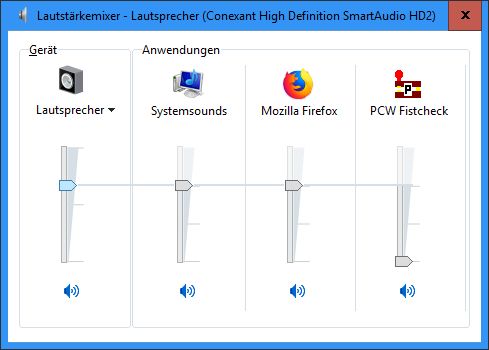
On the left you have the total audio output level Loudspeaker. This slider should not be
way down and there should be no red sign near to the loudspeaker symbol below. Get the slider up and uncheck
any suspicious red sign.
Somewhere to the right there should be the level slider for PCW Fistcheck output. This slider is normally at minimum (see picture above).
Press a key on the keyboard and watch the slider go up while the Morse character is produced. There should not be a red mark close to the
loudspeaker symbol below. Uncheck it, in case there is one.
Now you should hear the Morse output signal.
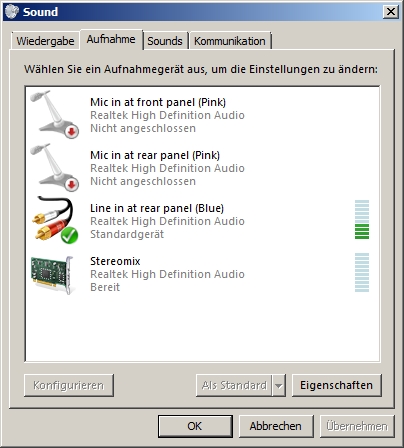
Did you connect your Morse buzzer to the PC's audio input or did you connect a microphone?
Then hit F2 and click on the button labeled Show Input Mixer
or Show Input Devices.
This will give you something like the following picture.
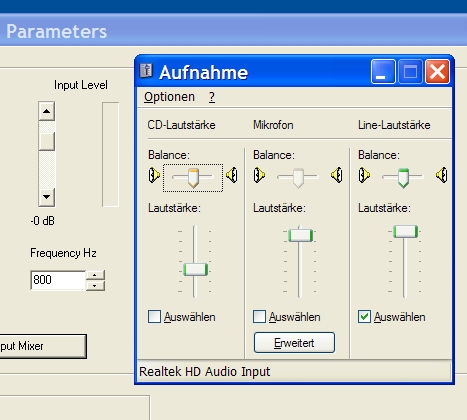
This audio input mixer belongs to the Windows operating system and may look different on your
PC. Again, this one is from the German version of Windows XP.
By checking one of the boxes in the lower part, you must choose
the input channel to which you have connected the cable from your buzzer or
to which you connected your microphone. Also, the level slider of that channel should not be
set too low.
In case you are using the Windows 7 operating system or newer, you will see something like this:
Here you can double-click the input device you want to use. Another menu will open, where you can find the level control for this device.
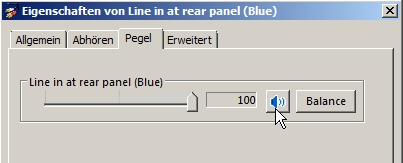
Turn the level up and make sure that the loudspeaker button is released.
Now close the key, let the buzzer do its work, and watch the level gauge in the parameters window. Still nothing to be seen? The buzzer's frequency may not be near to 800 Hz, so select the broadband mode for the moment. Now at last the level gauge should show some action and the display should react when you open and close the key.
For key-down, try to adjust the display on the level gauge with the appropriate slider of the input mixer or with the Sound Input Gain slider to a good value like shown in the following picture.
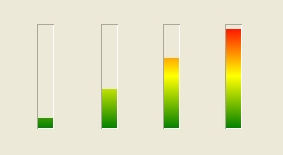
Indication of input level (from left): too low, low but OK, just OK, too high
If the level stays too high even when you pull down the slider in the input mixer to near zero, the PC's audio input may be overdriven. This may happen when you connect the buzzer's output to the microphone input on your PC. In that case external measures are needed to reduce the audio signal level at the input.
If you had selected Broadband Sound Input, you should now return to Bandpass Sound Input and adjust the Bandpass Filter Frequency until you get a level indication similar to the one in Broadband mode.
You may think that your Morse buzzer outputs a signal with, say, 800 Hz. That may be correct, but the loudspeaker can actually introduce a lot of distortion. So you may get better results when you select the frequency of the third harmonic, i.e. 3 x 800 = 2400 Hz, for the Bandpass Filter Frequency. Just give it a try.
Go to top.
You probably used the sound input mode and may have connected the audio output of a receiver or transceiver to the
audio input on your PC. What you see is the result of noise from the receiver's output entering the
software decoding process.
Please go to the parameter window and check that you are using the "Bandpass" input filtering with
a bandpass filter frequency that matches the sidetone frequency of your transceiver. If this still does not help,
then please adjust the Sound Input Gain to a lower level. In the adjacent Sound Input Level
gauge there should be very little action as long as your key is not closed.
This is very probably caused by "contact bounce" at the contacts of your Morse key. These mechanical contacts do not just close or open. The mechanical impact, especially on closing, can cause the contacts to "stutter" or "bounce". In the following picture you see a typical example of this effect.
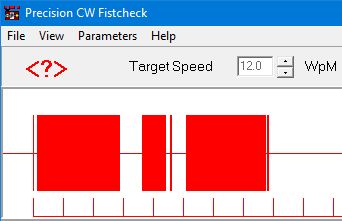
You can see that probably the letter "K" had been intended, but all three elements were accompanied, either at start or end, by a short "dit". You will clearly have heard the Morse letter "K", maybe with a bit harsh sound. But the extra "dits" made it impossible for the software to correctly decode that pattern.
What can you do? First of all you should clean the contacts of your Morse key. And you should keep them clean when you use your key for training or on the bands. Second, when you use the hardware described below, you can install a capacitor with a value of about 1 microfarad across the contacts of your key. And thirdly, you can go to the F2 parameter window and select Contact Bounce: Filter On. All these measures together should help to avoid the consequences of mechanical contact problems.
Go to top.
Yes, you can! And you have two choices:
You can either use your mouse and connect the wires from your key across the switch inside the mouse that is operated by the left mouse button. Then you choose Keyboard/Mouse as Morse Input Mode.
For the second choice you need a standard hardware interface on your PC, a COM or RS-232 interface. Then you choose COM Port as Morse Input Mode. Just keep on reading.
Go to top.To connect your Morse key to a serial COM or RS-232 interface, you first of all need to have such a serial communication interface on your PC. Typically this can be identified by a 9-pin D-sub male socket. Such a socket is shown in the following picture.
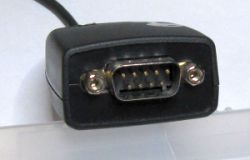
If you don't see such a socket on your PC, you're not lost. You can as well use a RS-232-to-USB adapter that plugs into a USB slot on your PC. Actually, the picture above shows a 9-pin D-sub male socket on such an adapter.
Then you have the choice between two different ways to connect your key to this COM interface:
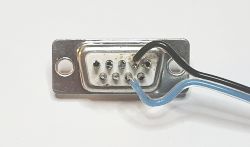
(1) The first solution is the simplest one. You just have to obtain a matching 9-pin D-sub plug (female). Look for the small
numbers beneath the pins and then connect your key in the following way:
(2) For the second method you additionally need one resistor of 1 kOhm value (color code brown-black-red), with about 1/10 .. 1/2 watt power dissipation. Then proceed as follows:
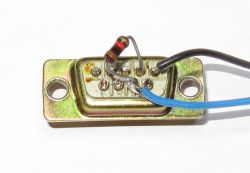
Finally, plug your little hardware interface into the 9-pin RS-232 socket on your PC or into the socket on the RS-232-to-USB adapter.
Go to top.
Two different character sets are available. The Extended set includes the Standard set. Morse characters that do not appear within the chosen set are not decoded and displayed as <?>.
The Morse standard character set as supported by PCW Fistcheck is:
If you select the extended character set, then the following characters are supported in addition:
This last character is indeed a well-defined Morse character representing two consecutive letters, a "c" and an "h". In order to make a clear distinction between this character "ch" and separate characters "c" and "h", this character is displayed and otherwise handled like a prosign <CH>, although - strictly - it is not a prosign.
Some of these characters are only available on foreign keyboards, but you can produce all of them with your Morse key.
On so-called QWERTZ-keyboards, typically used in Germany, two keystrokes are needed to produce the Morse pattern for question mark "?": "shift" key and "ß" key together. Therefore an optimization is provided: the Morse pattern for question mark can be reached without pressing the shift key, only the "ß" key needs to be pressed.
Go to top.
International Morse code has been in use since 1848, and it has been used for all kinds of communication services.
And most, if not all of these services had to implement a way to signal an operational status like "Start of Message", "End of Message", "Wait", and "Error, I repeat". And, naturally, a
Morse pattern was used for signalling. Over time several different Morse patterns have emerged as being used:
single letters like "K" or "R", combinations of two letters like "BR" or "DE",
or unique patterns that do not have a corresponding letter in the alphabet.
Operators quickly found out that most of these Procedural Signals
or Prosigns could be memorized by representing them as a digraph, a sequence of two letters, but
actually without the standard space between these letters.
You will find these digrams or prosigns in instruction tables or books, written with an
overline (overbar, overscore), like this example:
end of message: AR
Such typographical feature can be found in some wordprocessor software and in HTML markup. But it is not easily available
on PC keyboards and fonts for displays. Therefore it was chosen to write prosigns as characters included
into < > angle brackets, like <AR>.
Precision CW Fistcheck supports the generation and detection of the following set of prosigns.
A few of these prosigns, especially the first two on the list, are regularly used in Amateur Radio communication
via Morse code.
When you use your key to produce one of the following patterns, the corresponding prosign is detected and its representation in angle brackets is printed on the middle screen panel and in red in the upper left corner.
When you want to enter a prosign via the keyboard, you have two choices: you can either use a single-key abbreviation as given in the list,
or you can type an opening bracket and two letters, e.g. "<ar". Then the corresponding prosign
is produced and the closing bracket ">" is automatically added on the lower screen panel.
For the three-letter prosign <SOS> you can either type "{" or enter "<so". The
remaining third letter and the closing bracket "s>" are then added automatically.
If you type an opening bracket "<", followed by an invalid combination of two letters, then the input is ignored and only two angle brackets with a question mark "<?>" are printed on the screen. Any further letters are handled as normal input.
These nine prosigns are currently supported:
As explained above, one Morse character in the extended character set is handled like a prosign:
When Samuel Finley Breeze Morse in 1837 invented the code system that is named after him (see e.g. US patent 1647), he actually devised a variable-length code. With such codes the concept of speed measured in codewords per time instant is difficult to handle, as speed actually depends on the information sent.
The International or Continental Morse Code, as opposed to the Landline or
American Morse Code, is also named after Samuel F.B. Morse, but it has actually
been devised in 1848 by a German named Friedrich Clemens Gerke.
He was a musician and journalist in Hamburg, where he worked for telegraph companies.
His code works according to simple and strict rules and was later and after some further adaptations
standardized by the ITU for use in wireless transmissions.
Gerke's code follows these rules:
Now, take the word "PARIS", a word containing 5 characters. If you count the time elements
you need for encoding this word, you end up with 50 time elements totally. And these 50 elements do of course include
the correct seven element pause at the end of this word.
When you send this single word 12 times in 60 seconds, you have sent 12 words per minute or 60 characters per minute. And
you will have used 600 time elements in 60 seconds. From here it's easy to calculate that at this Morse speed
of 60 CpM or 12 WpM a single time element must have a duration of 0.1 seconds or 100 milliseconds.
This calculation is the basis for adjusting the speed of any Morse code generator. Of course, as you do not only want to send the word PARIS, any other text will take less or more than one minute for 12 words or 60 characters. Therefore the true speed can only be calculated after the message has been sent.
Go to top.
Yes, you can easily store the decoded text to an unformatted text file. Just press the Ctrl and S keys together, or go to the top menu and click on File / Save decoded text. A window is presented, where you can select name and location of the text file.
Default location is the %AppData% directory, typically located under c:\users\<your-username>\.
If you choose a different location, then that location will be remembered.
When trying to save, you may encounter an error message generated by the Windows operating system. The Windows safety system blocks third party software like PCW Fistcheck from storing files to certain places like "Documents". Storing to the default directory under %AppData% should be safe. Another simple solution would be to store your file unto an USB stick.
Go to top.Yes, you can load text from an unformatted text file. Just press the Ctrl and L keys together, or go to the top menu and click on File / Load text from file. A window is presented, where you can select name and location of the text file.
When the file exists, data is read and those characters that have a Morse representation are loaded into the lower panel. Of course, this also depends on your previous choice of either the standard or the extended character set, on the right panel (Morse Output Parameters) in the Set Parameters window.
Default location is the %AppData% directory, typically located under c:\users\<your-username>\.
If you choose a different location, then that location will be remembered.
The text from the chosen file is entered into the lower panel and highlighted in green. When you press CTRL and F9, you can listen to the text in Morse code, and as text is played it changes to black. After all has been played, the green highlighted region returns to the state it had before you pressed CTRL and F9. And, of course, you can change the green highlighted region by using the specific shortcut keys described here. Using Ctrl and End brings you to the end of the loaded file, therefore all text is changed to black, with the exception of the new starting point, which is the last character.
When loading text from a file, characters defined as keyboard shortcuts for prosigns (described here) are discarded, not displayed and not processed. But there are two exceptions: the characters "=" and "+" are used and sounded as the respective prosigns <BT> and <AR>. Their display on the lower panel depends on whether you have checked the "Display + and =" checkbox on the below-right panel of the F2 Parameter Window. Therefore, if you want to use prosigns in text files, you have to write them with angle brackets < >, except "=" and "+", of course.
When you load a text file in order to have it played for you, it may be advantageous to start with a typical start sequence. The sequence VVV<KA>, followed by one word space, has been predefined and can be selected on the F2 Set Parameters window.
Go to top.
If you encounter a problem not covered on this help page, then please send an
EMail with a clear description of your problem.
Please allow for a reasonable response time.
Any feedback is highly appreciated. Please send an EMail and describe what is missing or what you have found out.
Go to top.If you want to install a newer version of PCW Fistcheck, you have two choices:
You can simply install the new version over the existing version. This way all your settings selected in the parameter window will be left unchanged and used by the newer version.
Or you can first uninstall the existing version: Select "Start" - "Programs" from your task panel,
then identify the entry for PCW-Fistcheck. Within this folder you will find a shortcut
with the name Uninstall. Double-click and follow any instructions.
Then you can install the new version. This way you will have a clean new installation with all parameter values
set to their default values.
That's easy: select "Start" - "Programs" from your task panel, then identify the entry for
PCW-Fistcheck. Within this folder you will find a shortcut with the
name Uninstall. Double-click and follow any instructions.
Voilá, Precision CW Fistcheck is removed from your system, very probably
without a trace.