For example, for 25V full scale the upper resistor would be 400k Ohms. For ratiometric temperature, resistance and optical inputs, short the series resistor and connect the sensor between the input and +5V. This will be obvious from the examples. The software in the Counter is set up to display Channel 0 and Channel 1 as 0 - +5V DC by default.Rseries = (Vfullscale - 5) x 20,000 Ohms
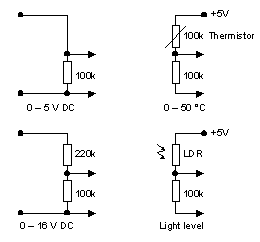
DVM Signal Conditioning Circuits
The microprocessor U2 is an Atmel AT90S4433 device, which is one of the popular AVR 8 bit RISC processor family. As well as being relatively inexpensive, this particular device also has a six channel 10 bit analog to digital converter and a 16 bit counter, which is used as part of the frequency counter. For convenience, a 28 pin dual in line device is used. It will fit very nicely in two standard 14 pin IC sockets (as used for logic ICs), placed end to end.
The signals to control the counter circuit, and those to operate the LCD display, are also shown on this drawing. The display is operated in 4-bit mode to conserve processor outputs. The adjustable resistor is used to set the contrast on the LCD display, and need not be a front panel adjustment. Almost all LCD displays use the same connections as those shown. If there are more pins, they may be for back-lighting, so check with the manufacturer's data for information about this feature.
The "Programming Header" on this drawing is a simple 10 pin two row header, which allows the microprocessor to be programmed, or reprogrammed, while still in circuit. This technique is really convenient, and the programming software is free from Atmel. These pins are also used to set the counter mode, and a front panel mode switch could be plugged in here once programming is over.

The Counter electronics
Click on image to view full size
The microprocessor operates at 4.00 MHz, and the crystal needs to be trimmed exactly to frequency for accurate operation. Although not shown on the schematic, this is achieved by adding trimmer capacitors from the microprocessor pins 9 and 10 (XTAL1 and XTAL2) to ground, until the counter reads correctly. Use polystyrene or silver mica capacitors, and a small air trimmer on pin 10 for best accuracy. Cheap microprocessor crystals are not recommended - they tend to drift, and may need as much as 100 pf on each pin to trim to frequency, or may not trim at all!
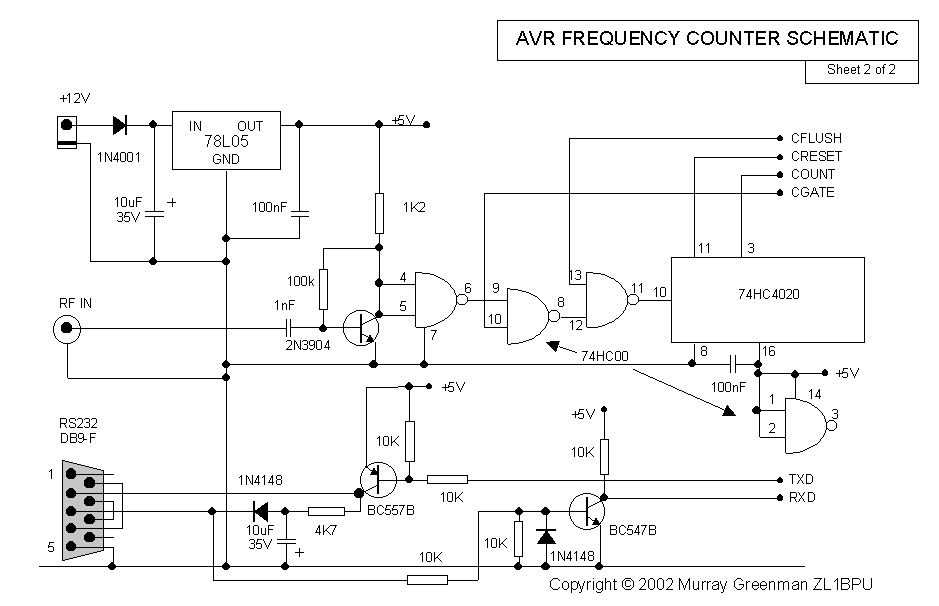
Schematic Sheet 2
The unit is powered from 6 - 15V DC by
a small regulator. A low dropout regulator is best if a 6V or 7.2V battery supply
is to be used. No heatsink is necessary on the regulator, as only flea power
is involved. The regulator and the rest of the circuit is protected from reverse polarity by
a diode.
The other two ICs on this drawing provide the counter gate circuitry and the pre-counter. The preamp shown uses a simple RF transistor. This circuit isn't very sensitive or wideband, but is quite suitable for counting a signal generator or local oscillator up to 10 - 20 MHz. For anything higher, a better circuit, such as an FET and an ECL preamp should be used. The pre-counter accumulates 14 bits of data (counts to 16384) and sends its carry output to the microprocessor for counting in an internal 16 bit hardware counter.
Unlike a prescaler, which reduces the resolution of a counter, the value in the pre-counter is recovered after the count period, so the full resolution (up to 30 binary bits) is retained. The pre-counter carry output is counted in the microprocessor's 16 bit counter, so nothing is lost. The gates on the drawing provide the ability to start and stop the counter, and to flush the pre-count into the microprocessor. The gate time is 100ms or 1s, controlled with high precision by the micro, providing jitter-free counting with 10 Hz or 1 Hz resolution. Given a fast enough external pre-counter, the internal mathematics in the processor would permit direct operation to over 160 MHz!
Also on this drawing, the circuitry at the bottom is a simple optional RS232 interface. The RS232 transmit signal from the microprocessor to the PC requires a negative voltage, and to avoid using an inconvenient negative supply, this voltage is derived from the idle PC transmit data line, which is normally at about -9V. If data collection or PC operation is not envisaged, omit all the circuitry except the 10k resistor on the RXD input. The RXD circuit (transistor and other components) can be omitted anyway, since the RS232 link is uni-directional in this version.

Counter Prototype constructed on "Veroboard",
with the pre-counter on a small "add-on"
The counter can be very small, if constructed on "spot board" or a specially designed circuit board. Even built on "Veroboard", it can be under 100 x 150 x 30mm. Perfect for building into an HF transceiver or signal generator. If the LCD display is omitted, with the RS232 telemetry it can be used in test equipment with no "front panel".