THE CISTERN Construction of the cistern turned out to be the biggest surprise of the year. I had absolutely no idea of the work involved in this thing when I began, and it's probably a good thing. I might not have had the courage to take the first step if I'd had any idea what lay in store for me. First, I had my good friend Leroy bring his giant front-loader to the lot and dig a gaping hole in the ground. That hole was about 5' deep and 30' on a side. In the process, he pulled a few rocks out of the ground that were larger than some cars I've seen. With the front-loader he had to leave a ramp into the hole to bring the loader out, so I still had a lot of digging to do after he finished. Next, I rented a backhoe from Obie to try to square off the hole. That was an exciting adventure, to say the least. I got hopelessly mired in the loose sand which had been stirred up by the front-loader...nearly tipped the backhoe over several times...and eventually convinced myself that my calling in life was not to be a heavy equipment operator. Nevertheless, a full afternoon of clumsy fumbling left the hole a little flatter on the bottom and without a ramp leading down into it. After that, the task fell to the tools of last resort: shovel, rake, and hoe. I spent over a week at the bottom of "the pit" trying to rake it smooth and level. Naturally, the sun was blazing hot and there was no air movement at the bottom of the pit. At the end of the week it looked reasonable to me--"good enough" is the phrase that comes to mind. Then I turned to building a form for the cistern base. I wanted to pour the concrete 6" thick, so I used 2" x 8" lumber to make the form. This had to enclose an area 22' long x 20'-8" wide, and at this point I was still trying to do all my level checks with a 6' carpenter's level. Big mistake! It would have been ever so much easier if I had bit the bullet and made a water level right then. But I didn't, and eventually I convinced myself the form was level. After the form was down, I went to work on my radio ground. I had brought 200' of #4 copper wire, so I snaked that wire around inside the form, then put in three 8' copperclad steel rods for good measure. On top of the wire went a layer of plastic, and then the rebar. I used #4 rebar (1/2" diameter) and ran it both directions spaced 1' apart. At that point, the form was ready to pour...almost. First, I needed to stage all the materials we would need during the pour. By way of background, I had been cautioned that the first course of concrete blocks had to be set into the concrete when it was still wet. The purpose of this is to ensure there is no leak underneath the blocks. Unfortunately, though, the only blocks I was able to find in Tampa had flush ends; I couldn't locate any stretcher blocks. With the flush ends, I would be unable to seal the gaps between the blocks after they were set. This problem was solved by buying 78 stretcher blocks there on the island--at $3.12 apiece. (Blocks in Tampa went for $.85.) It took several trips with the van, but eventually I had all 78 blocks laid around the outside of the form so we could set them in the wet concrete. Next, I cut 154 pieces of rebar about 5' long, and laid those around the edge of the pit. The plan was to put the rebar into the cores of the blocks and down into the concrete...again, before the concrete set. The big day for the giant pour was December 1, and it's a day I'll long remember. I scoured the island trying to find a helper, and finally convinced one of the few Caymanians on the island to help me for a few hours. Jimmy saved my neck on this project, since it would have been impossible for me to do the pour alone. The truck showed up at 8 a.m., and by noon all 8 cubic yards of concrete (at $250/cu. yd.) was so hard we couldn't work it any more. We did manage to get all of the blocks into the concrete in something that only remotely resembled a sequence of straight lines; the rebar went into the holes at about the last moment possible. It wasn't much of a finishing job, I'm afraid, and there are distinct undulations. After going around that first course and filling in all the gaps with mortar, I started [attempted] to lay blocks. I had done some minor brickwork when I was 12 years old in order to earn the Boy Scout "masonry" merit badge, so I actually thought I knew what I was doing when I started this phase. That turned out to be a joke! I didn't have a clue how much water to mix into the mortar, and I suspect I was placing as much mortar with my fingers as I was with the trowel. I was going nowhere, but fortunately a savior dropped by one day to see how I was doing. That was Marvin, my old landlord from a previous stay on Little Cayman. Marvin had been a builder in Alaska, and he had done this stuff before. Marvin jumped down into the pit with me and gave me a demo. I kept telling him I still didn't get it, and encouraged him to lay a few more blocks just to show me how it was done, but eventually he said "enough". His parting words were that I should be able to start off laying 100 blocks per day, and in no time at all I would be doing 400 blocks a day. Right. I actually believed him. Simple arithmetic said the whole cistern would be done by Christmas. I plunged into it, and slowly...slowly...the blockwork started to look a little better. I still couldn't seem to get the blocks quite level, and the courses were not always straight, but at least there was progress being made. Never once did I get more than 30 blocks laid in a single day. I had to begin each day by working out on the giant sand pile Leroy had built when he excavated the hole. The sand/rock/gravel/coral mess had to be shoveled against a large screen I built early in the project. With luck, I got clean sand out of the other side of the screen. In about 30 minutes, if I worked at it, I could get one wheelbarrow load of sand. Then I mixed the mortar in the trusty Red Lion mixer I had bought in Tampa--3 big coffee cans worth of sand, one coffee can worth of cement, and about half a can of hydrated lime. Add water, mix, and voila! Mortar. I dumped the mortar in a bucket, lugged the bucket down into the pit, dumped it on my mortar board and went to work. In the best of times, I could lay 7 blocks with that batch of mortar. Total elapsed time from when the water hit the cement in the mixer until I had cleaned up from the batch was about 2 hours. By Christmas, when I thought I should have been done with the whole project, I was only up to the seventh course. There were a total of 12 courses needed to complete the blocklaying. That was when Wesley came down to visit for a couple of weeks, and the break from work was fantastic. We actually got to go diving! Wesley could see that mid-April was but a dream, though, so she delivered stern warnings that I should hire somebody to help me in order to get back to California on time. Eventually I did manage to hire a helper. That was Johnny, a retired merchant sailor. Johnny was fantastic. He sifted sand, carried blocks for me, kept me supplied with mortar, and still had time to spare. The only problem was that Johnny worked for one week (at $16 an hour) and then decided he didn't want to work any more. That one week was enough to get me closer to the finish line, though, and by the end of January I laid the last block on the cistern. What an ordeal! I felt there should have been a band playing when that last block went down, and maybe even a press photographer to record the grand moment. There was only the roar of the surf to applaud the effort, and then it was time to move on to the next phase. The next effort involved pouring concrete into each of the cores in the wall. What I learned is that in reality a concrete block is nothing but a miniature concrete form. By itself, the block is fragile as fine glass. (I'm no longer impressed by Karate experts smashing blocks to demonstrate their strength; I did it all the time without even trying!) The block structure gains its strength by filling the cores with concrete and running rebar through the core. So all that was needed was to mix a bunch of mortar, dump it in a bucket, and then go pour the bucket down the core. It was a simple project, until you consider the scale. Each bucket of mortar weighed about 80 pounds, and it took 3 full buckets of mortar to fill one core. Roughly speaking, a core full of concrete is a pile 5" x 5" x 7'. There were 154 such cores to be filled. That's a lot of concrete to carry by hand. Worse, it was a lot of sand to sift by hand. I truly wondered whether even convict labor had ever been sentenced to a punishment as severe as the time I spent on the sandpile sifting sand. Moreover, I finally worked my way down the pile of cement bags to a point that I discovered the Little Cayman termites had decided to feast on the paper bag material. They not only ate through the outer paper on each bag of cement, but then penetrated the plastic lining to eat the paper on the inside of the bag. Some of the bags were so deteriorated that I dared not try to pick up the bag and carry it over to the mixer, but had to cut it open in place and scoop up the cement from there. By early February I had finished this whole job, and the picture of the top of this page was taken the day I poured my last of the 450+ buckets of mortar down the hole. After that, I had to plaster the inside of the cistern. One of the purchases I had made in Tampa was a brand of swimming pool plaster called "Krystalkrete". I had bought 80 bags of this stuff, at 80# per bag, and shipped it in the containers with the rest of my materials. Unloading that stuff back in October felt like a breeze after unloading the 94# bags of cement. Still, it was a formidable pile to tackle as I began working with it. This stuff turned out to be treacherous. The manufacturer must not have had very accurate process control when it was mixed, because some of the bags set quickly after they were mixed. More than once I got a bucket down into the cistern and then discovered it had set even before I could dump the bucket out. Once it even set on me between the time I turned off the mixer and the time I went to dump it into the bucket! It was just like working with epoxy--it would be liquid one minute and completely rigid the next. I mixed a whole bag at a time, and the combination of plaster mix, water, and the bucket itself was very close to 100#. With just a thin wire handle on the bucket, it was more than I could carry down a stepladder into the cistern. Fortunately, I was able to borrow a boat davit and hoist the buckets down into the cistern with the davit. The middle picture on this page shows the process. Two coats of plaster went on both the sides and the bottom of the cistern; each coat was about 1/4" thick. In the process, I learned yet another of my skill limitations: I cannot plaster. Yes, I got it on the walls, and I did sort of smooth it out and made sure it covered any potential leak point. But I'll have to say I'm glad the result isn't exposed to public view. One problem is that I had to do this in batches. I mixed a bucket, took it down into the cistern, applied it, and then went back up to mix another bucket. By the time I came down with the next bucket, the previous load had set so much that it was impossible to feather in the new mix with the old. I can still see the bucket boundaries on the cistern wall today! The Krystalkrete phase ended in late February, and then I went to work on the ceiling. This was a task that had worried me from the very beginning of the project, since I knew I didn't know what I was doing. The two questions I kept asking were how to build a form strong enough to hold 40,000 pounds of concrete up in the air while it was curing, and how to design the ceiling pour so that it would stay up after it cured and the forms were removed. I sought advice from others on the island who had been there and done that, and that saved me. It was indeed a lot of form work, but it was fun to be working with wood for a change. By the end of February I had the form in place and all the rebar cut and tied together. This time I used #5 rebar (5/8" diameter) and again ran it 12" apart in both directions, just as I had done on the floor of the cistern. The form was set for a 6" slab on the ceiling. Again I scoured the island trying to find a helper for the big pour coming up, but this time Johnny couldn't help me. Eventually I persuaded another fellow to take a day off from his job and work with me for the morning--for a price, of course. Philip showed up bright and early at 8 a.m. on the big day, and jumped right in (pun intended). Our biggest problem was that the ceiling of the cistern was too high for the concrete truck, so the concrete just sat in the trough when it came out of the mixer. It didn't flow down the trough at all. Consequently, we had to push it down the trough with a shovel, then push the concrete the 20' or so it had to go to get to the other side of the cistern. Yes, we had to push all 40,000 pounds of it around. That was another day I would just as soon forget. It was broiling hot, and at one point I got so desperate for a drink of water that I grabbed Philip's water jug instead of going for my own. Big mistake: it was pure gin instead of water. Philip is a 24 hour a day party animal, even when pouring concrete. The last and final touch on the cistern was to stucco the outside of it before backfilling sand into the hole. Here, I finked out completely. Experience had taught me that I could not do plaster work--and that also includes stucco. I managed to work a deal with a builder on Cayman Brac to send over a crew of Jamaicans to do this job for me. They actually made it look easy, but I know better. In only three days time they had the entire job done, and the result hid all the imperfections of my blocklaying. I think the cost to me worked out to about $600 per Jamaican per day. I just hope those poor guys got some of that, because they certainly earned it. Leroy then came back with his backhoe and backfilled the cistern. Once we filled in the pit around that cistern it didn't look quite so big any more. He spread what was left of my sand pile around and did final grading. I breathed a short, small sigh of relief, because now I could move on to another project. Unfortunately, that was more concrete work. It was by then March 23--about 3 weeks short of the day I had originally thought I would be through with the roofing and ready to go back to California. |
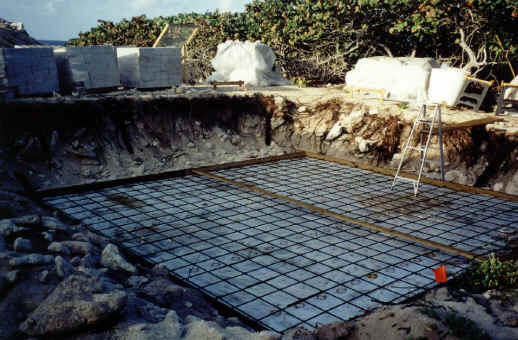 November 30, 1998: Almost ready for the cistern base to be poured. The radio ground snakes around under the plastic inside the form. |
|
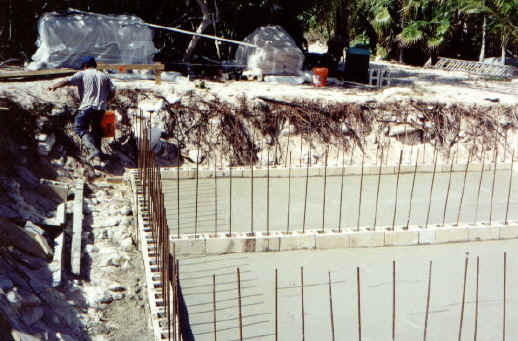 December 1, 1998: We just barely managed to set the blocks in the wet concrete and get the initial rebar in before it set. |
||
|
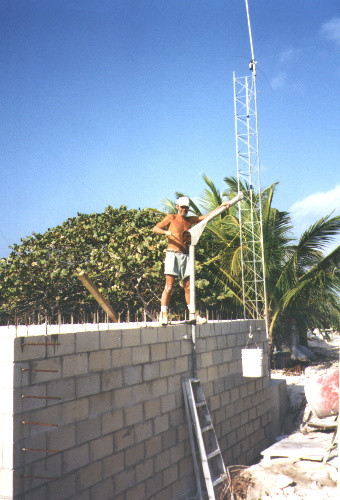
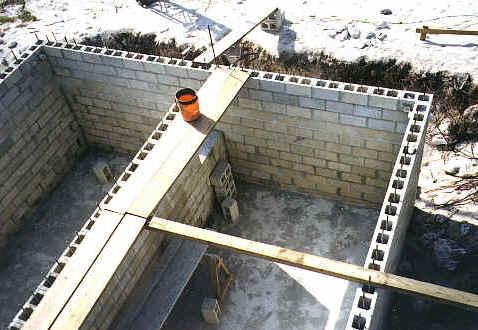
January 1, 1999: Right in the middle of all the block-laying. It seemed to me that this phase was never going to end. Note the tribander being assembled in the background. |
||
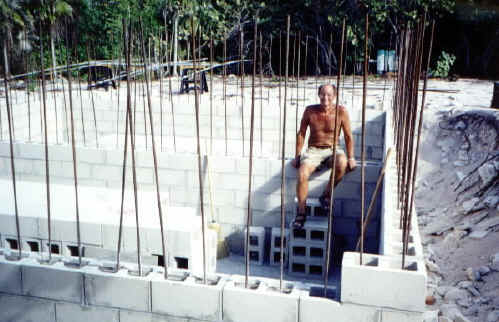
 This photo shows was taken on February 7, just as I finished pouring all of the cores with concrete. Each hole you see above required 3 buckets of concrete to fill the hole. Each bucket of concrete weighed approximately 80 pounds, and what you see is 154 holes. |
||
|
February 12: hoisting the pool finish down into the hole. I shipped 80 bags of a product called "Krystalkrete" down to Little Cayman (80# per bag, unloaded by hand from the container just as Hurricane Mitch was drawing close). The floor and interior walls of the cistern received two layers of this swimming pool plaster, each coat about 1/4" thick. |
||
|
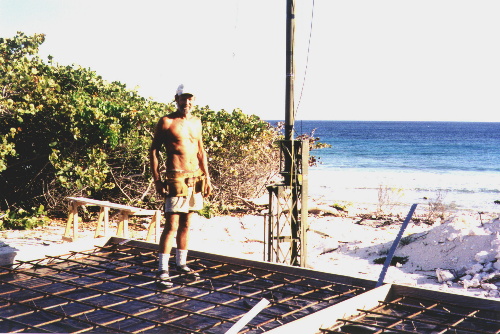
KI6Y took this photo about March 3, just before the ARRL DX (SSB) contest. This shows the forms in place for the ceiling pour, plus plastic and rebar all ready for another big concrete job. There are 11 cubic yards of concrete--nearly 40,000 pounds worth--in that ceiling. |
||
|
This man was my advisor on all of the concrete work I did. People on Little Cayman are....well, different. |