|
Operating Quick Tips
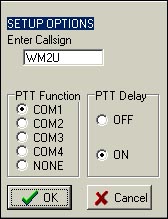
Fire up the program and set the
configuration as detailed above. ie call sign, com port. etc.
Make sure your computer is
interfaced to the radio. If you need help on this check out my Interfacing page.
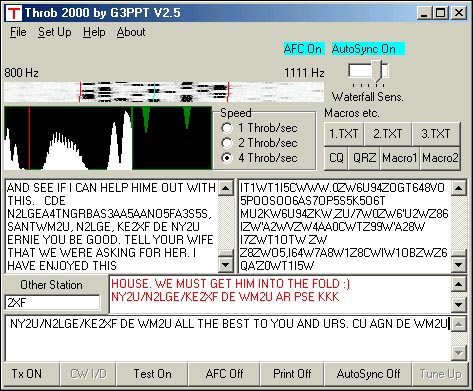
Switch on the rig and
observe that signals between 800 and 1100 Hz appear on
topmost waterfall indicator. Back off on the audio if you see red lines on the waterfall.
Click the
Test On button and observe the test signal. If the
signals marks are very faint or difficult to
see, adjust the Waterfall sensitivity control at the
right. Move the curser onto the test signal and click on the very center. The
red line markers should now straddle the signal. Practice this as the most difficult thing with this program is tuning in the signal. The test signal is at 900Hz.
|
Hardware Requirements
- A computer with Windows 95©, Windows 98©, or Windows NT©.
- At least a Pentium� 60 processor (P133 prefered)
- A 16 bit sound card that works with windows.
- A HF transceiver.
- Sound card interfacing and PTT control.
|
The profile or
shape of the signal will be seen in the graphic window on the left side display below the waterfall indicator, and the
red line shows where the sampling of the signal
starts. If you switch the autosync off you will be able to position the red bar manually.
The
small graphic window to the right shows the intensity of the decoded tones in
green. In operation you will see one or two tones but if more appear,
synchronization is out so move the red bar as described above.
Below this are
two text screens. This is a sideband sensitive mode.
What you have here is a display for both LSB and USB shown simultaneously, hence during reception of a signal, only one will make sense.
During a QSO, click on the one that you can read and it
will expand at the expense of the other one.
Now click the
Tx On button. The PTT should fire up the rig and you should hear the
transmit signal idling. Type something in the Tx
window. It will appear in the right hand memo screen before it is shifted out. You will notice that two or three
idling
pulses are sent out ahead of the data! This is really good for the receiving station to
click on for accurate tuning.
OK, finally a word on the
Macro buttons. The CQ and QRZ
buttons are self explanatory. The Macro1 and Macro
2 buttons appear to be fixed text. I have not figured how to
change them yet :) They work only when a call sign
is entered into the Other Station box and the text sent
is Other de YourCall. Now the 1.TXT,
2.TXT, and 3.TXT are programmable Macros. Simple
write buffers in WordPad and save them, in the same
directory as the Throb.exe and name them 1.txt,2.txt and
3.txt.
Hey!
would you believe that is all there is to it eh! Get to it then
and I hope to work you with Throb.
Since this page was written Throb2000 has come out and it has a New
Look. Checkout this web site for details and downloads. http://www.qsl.net/dl5swb/throb_e.htm
|