MT63
Wide Band? Yea! but fast, error free and easy to setup
by Ernie Mills, WM2U. http://www.qsl.net/wm2u
Please print this article and use it as a hand out at Club talks and lectures

Many thanks to Bill, NY2USkip, KE2XF and Kirk, N2LGE  for their help in the preparation of this web page. Since non of us had ever run MT63 prior to our tests and indeed two even had to download the software, set it up, learn it and operate it during that first test session, I felt a web page showing just how easy this mode is to set up, would be of great interest and help to the Amateur community.
Ok! Having said that, lets take a look at it's specs eh! It was developed by Pawel Jalocha, SP9VRC.  It is intended as a conversational mode between two or more Hams. It has 64 tones spaced 15.625Hz apart, in the 1kHz bandwidth.  It uses FEC error correction which, even if 25% of the character sent is obliterated, it will give perfect copy. Each character is spread over many tones to reduce interference from other radio stations, and spread over several seconds to avoid noise bursts such as lightening. Despite this seemingly slow data throughput, good text speed is maintained at 100 wpm. It is therefore a very robust mode. 
For a Digital mode, MT63 is quite wide. Just how wide is it eh! Well not as bad as the alarmist make out. It is less than half that of SSB.  It is twice as wide as standard 45 baud 170 shift Rtty but is not as  wide as Rtty at 75 baud, 850 shift. It is wider than HF packet, 300 baud, 500Hz but offers a lot better throughput. It is recommended that you operate this mode when the bands are quiet. Certainly not during contest times. There are two other bandwidths that can be used, 500Hz and 2000Hz, where the tone spacing and baud rate is halved or doubled and the throughput halves or doubles respectively.
E
nough on the Specs. but first go to this great MT63 site and copy off all the help files from the menu list. There is a lot of good information you will need on operating, configuration, and the theory of this great mode.   Now lets get ya! up and running and on the air quickly.
First off have you got the computer and radio interface wired, tested and ready to go? If not this is a must. You are going nowhere until this is done. Go to my hook-up page and you should find all the information you will ever need to accomplish this. Now download MT63 from this site and click on MT63 or download software from this site. Pan to the bottom of the page and download the latest version. Click on the .exe file and MT63 will install into the C:/program files/mt63 folder.  Oh! if you upgrade somewhere in the future, it is recommended that you uninstall the old version first. Don't worry about the computer register, this program does not write anything into it and the uninstall routine does not delete the configuration file so all your settings are preserved.

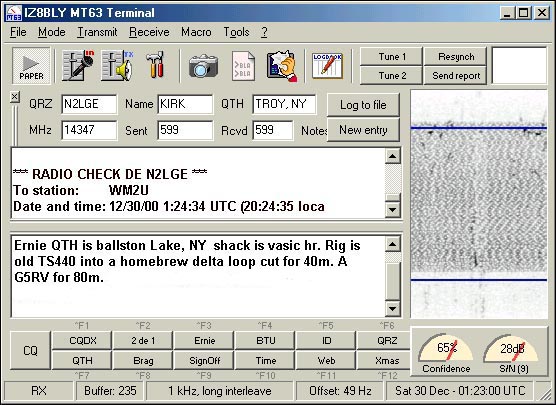
Screen shot of main window

The screen shot above shows the working screen of MT63 Along the top is a standard menu bar. We will go through some of these shortly. There is a handy row of tools next. The paper button will stop the Rx so you can copy the screen easily. The next two buttons adjust the input and output volume of the soundcard. The preference button calls this window, and the camera icon lets you copy text from the Rx window to the clip board. The paper icon will paste the clip board to the Tx window. That is really handy. Clear the Rx window is next followed by the show logbook button. Now the button marked Tune 1 will send out a single carrier which is used to adjust your rig power out level. The Tune 2 button sends out two carriers. These are very handy for the Other station to make sure he is tuned to ya!. OK! The next section is your log section. This is important because the Macros actually use this input to fill in the macro instructions, so don't forget to fill,  these in during a QSO. The window below this is the Rx window followed by the Tx window. This is the window in which you will type, or stack a Macro, ready for outgoing Tx.  The 13 buttons below this are your Macro buffers. The CQ button is edited in the File>Preferences>Tools window. The remaining 12 you simply right click on the button and an Edit window opens. You can enter your text for the buffer here and change the title of the button.

Configuration

First off lets set a few basic parameters. Go to File>Preferences>General and enter your call sign.  Click on the PTT Port and set your active Com Port, and click on Tools and edit the CQ text to your requirements. Oh! by the way. While you are in the File menu why not change the Tx and Rx font type and colors to your preference. Click on the Mode tab and set; 1000Hz bandwidth and Long Interleave. Please read the help files for an explanation of the other possibilities.  Finally, now is the time to write and edit your twelve Macro buffers.
Ok, on the right side of the working screen is the Spectrum Display or Waterfall Indicator. During a QSO or when you are receiving a Tune 2 signal, you must place the incoming signal directly between the two blue lines. It looks like hash.  This is the incoming MT63 signal. Click the sound button at the top of this page to hear what it sound like. Interesting eh! Well, would you believe! that is all there is to it. After you have made a few QSO's and read the help files, you can then fine tune it but it should work just fine like this.

Metacommands
$QRZ Your Callsign, as per preferences
$OTHER Other Callsign, as per F11 key
$OTHERNAME Sends Other Call Sign from LogBook
$OTHERQTH Sends Other QTH
$OTHERRST Sends Other RST
$RST Sends RST to Other as per Log Book
$CQ Sends standard CQ call
$CWID Sends ID in Morse code.
$UTC Time stamp in UTC
$TIME Time Stamp in UTC
$DATE Date stamp w.r.t.local time.
$DATEUTC Date stamp w.r.t. UTC time.
$$ How to print the $ sign.
$TUNE Sends full volume 980Hz sinewave.
$Cnn Sends ASCII Char. Num., ie $c65 send "A"
$BUTTONn Sends text user assigned to button #n (1 to 12)
$NOQSO Clear 'Other' callsign.
$Pn Adjusts soundcard output level. 'n' range 0 to 255.
Hardware
Requirements
  • A computer with Windows 95, Windows 98, or Windows NT.
  • At least a Pentium� processor, P166 or better.
  • A 16 bit sound card that works with windows.
  • A HF transceiver.
  • Sound card interfacing and PTT control as per my Hook-uppage.

OK! So far, so good.

Don't forget that this software uses the computer sound card and the Radio must be interfaced to the Computer. That is no big deal, just follow the suggestions on my Hook-up web page. Please print off and read the help files. There's a lot of great information in there.
T
he check list below is basic but it should get you up and running in no time. 

  • Download the software from this site and install as per above instructions. Simply run the .exe file and it will install itself.
  • Click File>Preferences and hit the General Tab. Fill in your Call Sign.
  • Select 'PTT Port' Tab and select the active com port.
  • Write your buffers as required.
  • Turn on your Radio switch the dummy load in.
  • Set the Radio Volume to a comfortable level.
  • Click the 'Set Input Volume', make sure the Microphone is selected then set the slider to about 25%.
  • Click the 'Set Output Volume' icon. Click the Tune 1 button. Using the Wave or Volume slider set rig output power to just before the ALC starts to read
  • Tune to 14.109 mHz and practice tuning in a station using the Waterfall Display until you can copy text on the screen.  Other frequencies are 10.142 mHz, 14.109 mHz, 21.130 mHz, and 28.130 mHz.
  • As soon as you start typing you will go into Tx. If you put an "*" as the first character in the Tx window you will be able to type your message and/or include a buffer without it automatically going into Tx. To transmit this info hit CTRL T. To end transmission hit F12 and it will switch to Rx after the buffer is sent. CTRL X aborts transmission.
  • That's it! The rest you will learn on your own. Please read the Help file. It has so much more important information you need to know.
Good luck, enjoy and I hope to see you in there.73 Ernie (WM2U)