Modification procedure for Aisin Seiki GPS receiver board
The Electro Mavin is currently
selling surplus GPS receivers for $20. Evidently they were for a
company developing a car navigation system, possibly this
one, but they ran out of money and abandoned the project. The package
includes the bare board receiver and a magnetic mount patch antenna. (Seems
to me the antenna alone would be worth the price. It appears to be
amplified, as there is 5v on the connector, but the connector is non-standard.)
The unit runs on 12vdc, but there is no display, I/O is serial only.
I picked up one of these at the Foothill (CA) Flea Market. There
are two I/O connectors on the board, one (CN1) for TTL-level and another
(CN2, mini-DIN) for RS-232. Although there is useful TTL-level data
coming out of the CN1 connector on the board, the format of the data does
not match the one described in the Communication Specifications document,
and there is no response to commands sent into the input port. It seemed
to me that the document must have been talking about some other unit or
some other part of this unit. The mystery of the missing data wouldnt
leave me alone, so I started poking around on the board and looking at
signals.
I discovered the Communications Specs applied to just the receiver module,
the one inside the tin shielding box. The rest of the board obviously
adds some special product-oriented functionality to the basic GPS functions,
but there's no way to know if it's useful or how to utilize it without
documentation. So I just bypassed everything, making use only of
the regulator and RS-232 transceiver and connector.
Here's my procedure:
-
Wire a 12v power connector to CN1. +12 to pin 1, GND to pin 2.
You can use a wire-wrap tool to connect to the pins if you're careful.
-
Cut 2 traces near pin 8 of IC4. They are coming from pins 9 and 10
of IC4 and going to feed-throughs.
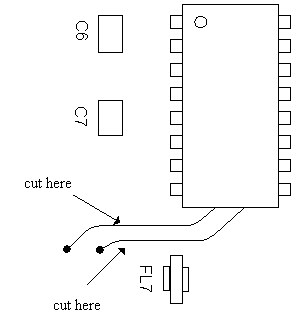
-
Pull pin 7 from the connector at CN3. Unplug the connector, bend
the plastic retainer out a bit with a knife until the pin is released,
and pull out the contact. Tape up the contact and leave it dangling.
Plug the connector back in.
-
Solder a wire from pin 9 of J201 (inside receiver module) to pin 10 of
IC4. This is tricky, be careful not to create a solder bridge to
adjoining contacts at either end. Use a narrow-tipped soldering iron
and solid-conductor wire, tin the end with a bit of solder, and just tack
it onto the contact with your iron.
-
Similarly, solder a wire from pin 10 of J201 to pin 9 of IC4.
-
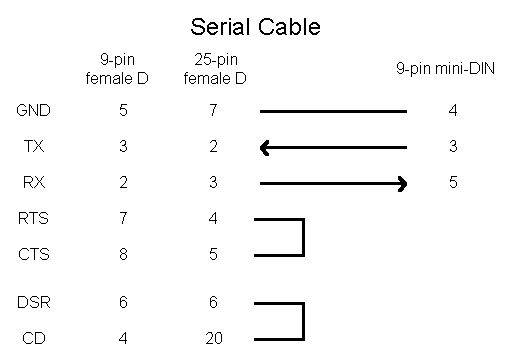
Wire a RS-232 cable for your computer with a female D (25- or 9-pin) connector
on one end and an 8-pin mini-DIN on the other.
-
Plug everything in, power it up, and check the serial output.
You should see a burst of data every second, this is the default Auto Transmit
as described on page 17 of the Communication Specifications.
It might be a good idea to cover the receiver module with a piece
of bent tin or copper RF sealing tape. The box the receiver was designed
to go in obviously included an RF-tight top to the module.
Further questions yet to be resolved:
-
What does the rest of the board (microcontroller, memory, etc.) do?
What is the format of data exchanged through CN1 and CN2?
-
Is some kind of precise time signal available, such as a one pulse-per-second
signal?
If you find the answers to these questions or other mysteries, drop me
a note.
Happy hacking!
Eric Williams
Richmond, CA