TMB-1 Tri-Mode Buffer Amplifier Box
Mark Connelly, WA1ION – 3
APR 2002
The
TMB-1 is an RF amplifier unit / receiving accessory that can be used with a
low-impedance broadband loop, a
high-impedance terminated loop (such
as a Pennant, Flag, or Kaz Delta), and whip
(telescoping rod) antennas. This
particular design is optimized for 0.5 to 2.0 MHz operation (medium wave
broadcast and 160-m amateur).
Sensitivity is slightly less, though still usable, in the 150-500 kHz
and 2-6 MHz ranges for longwave, tropical band, and 80-m amateur
operation. Circuit changes, mostly with
regards to the RF transformers, would be necessary for better performance on
other frequency ranges.
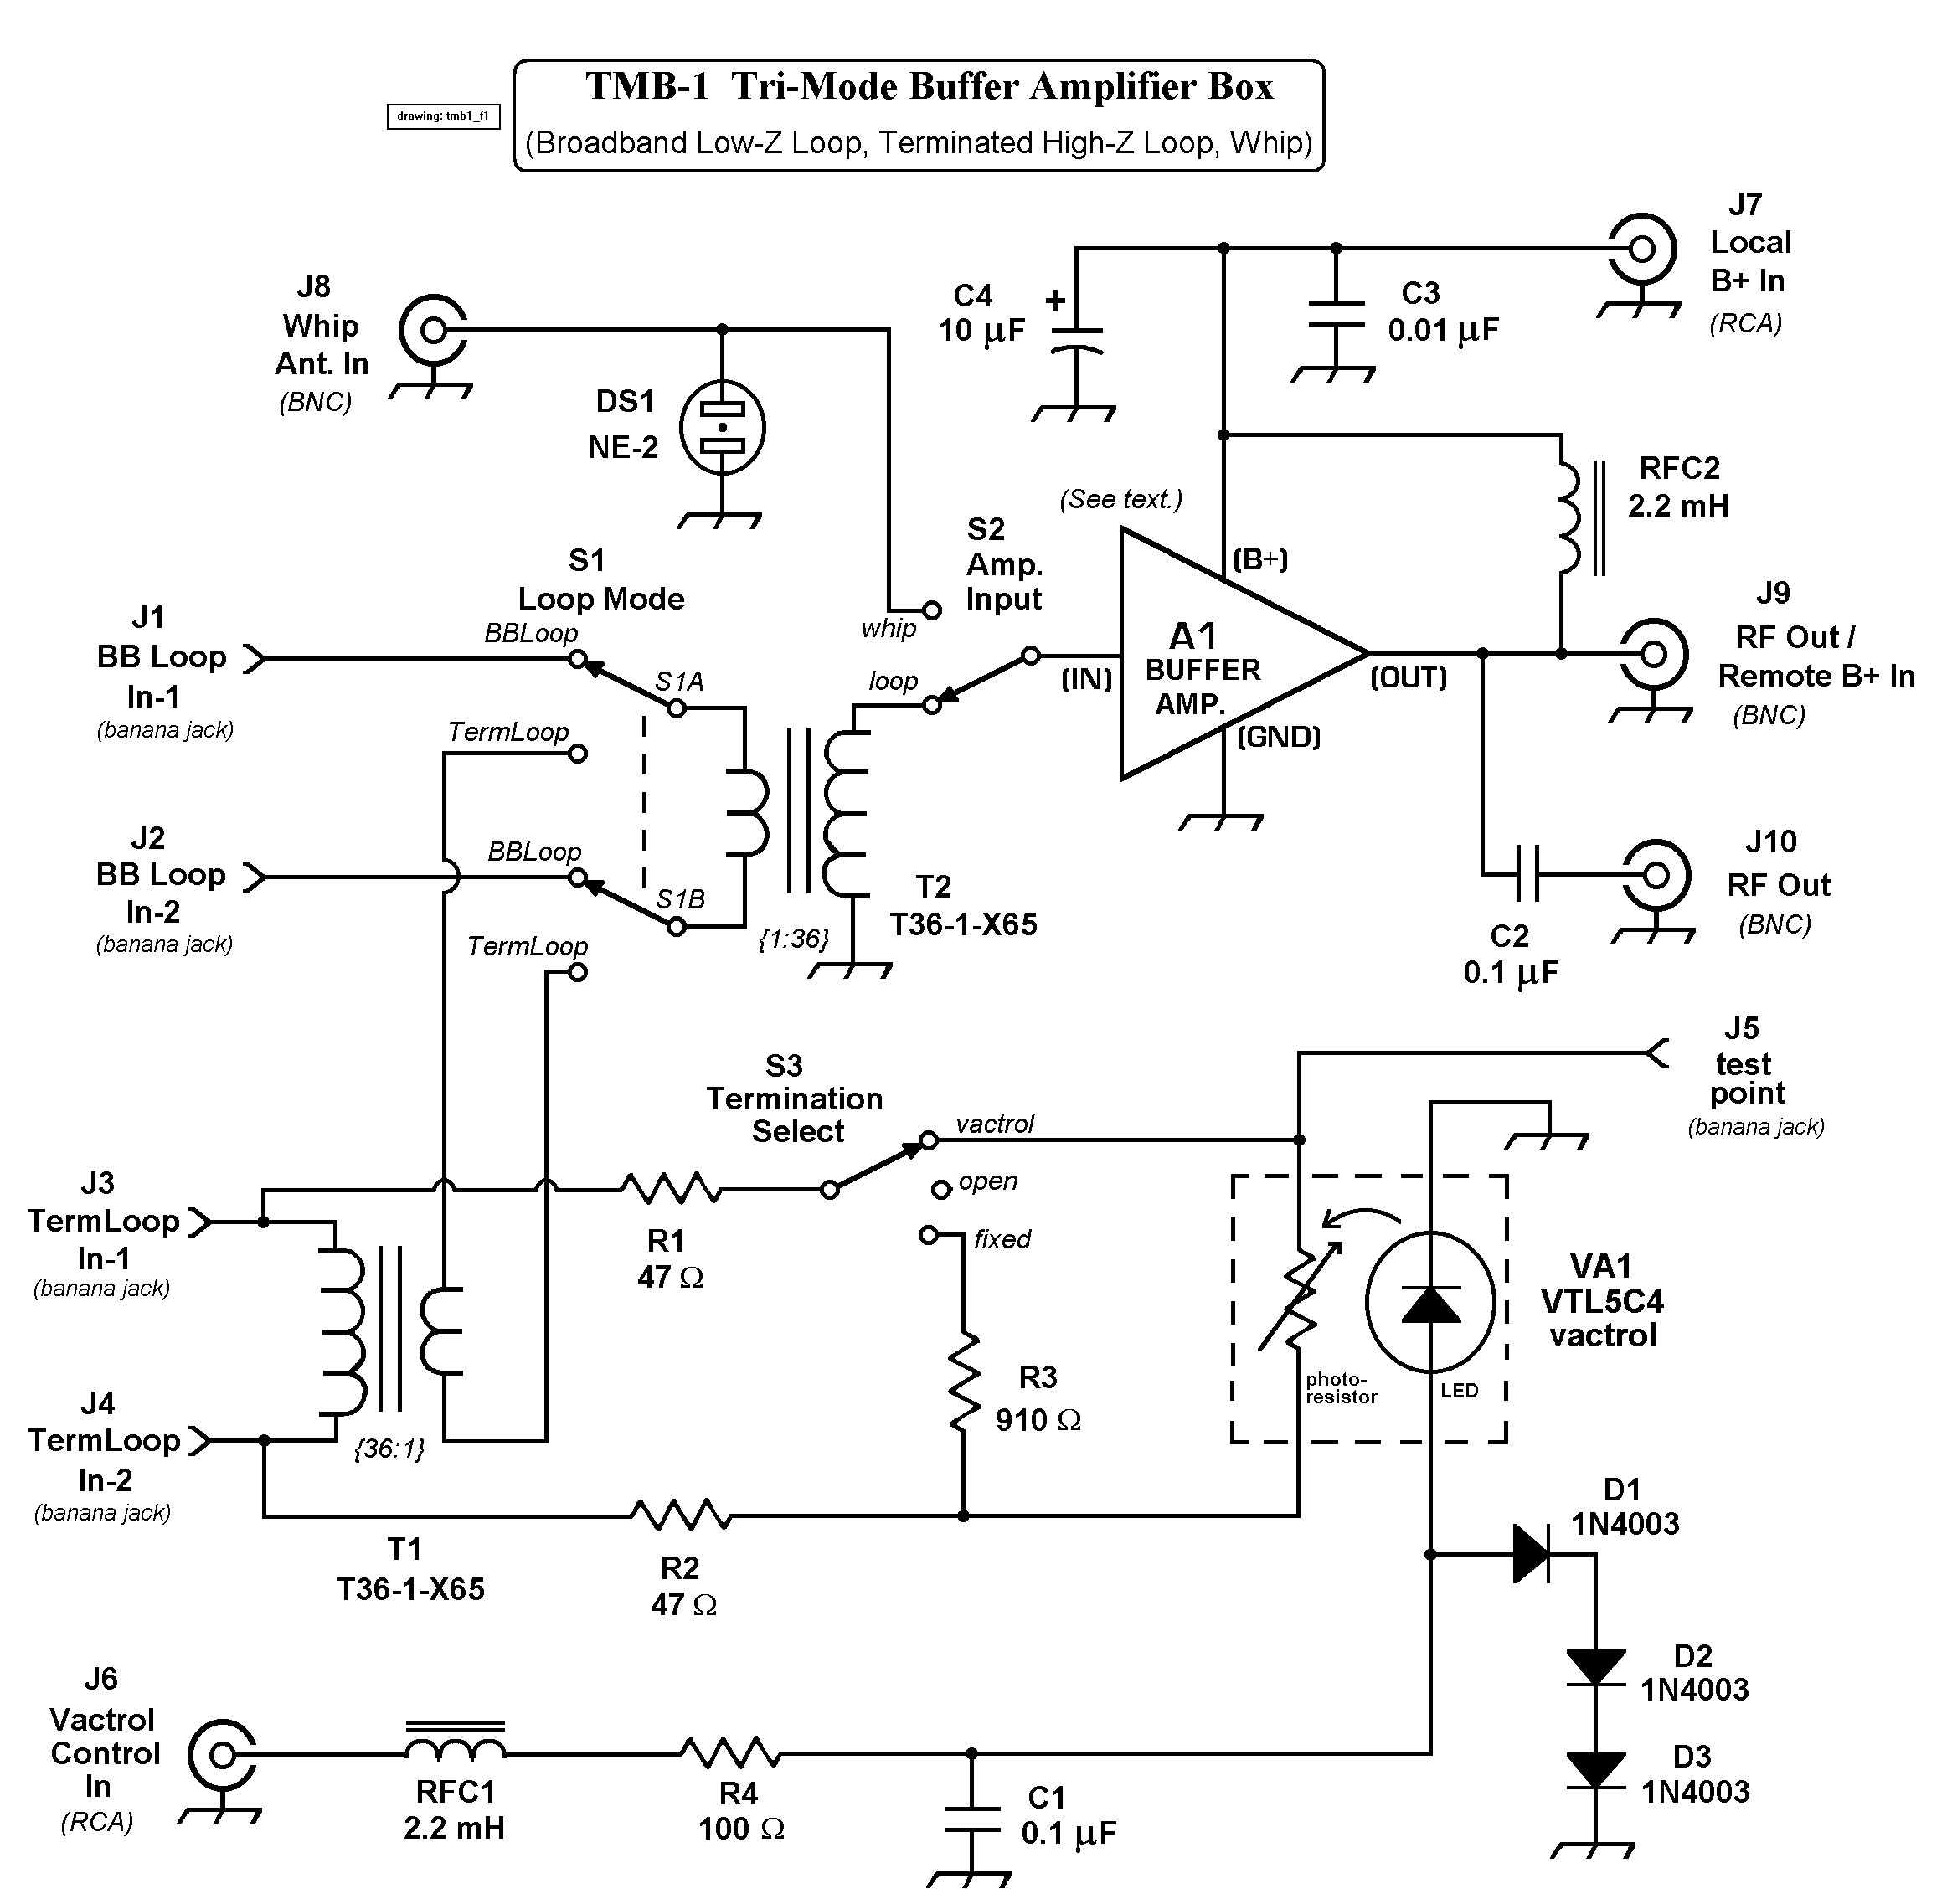
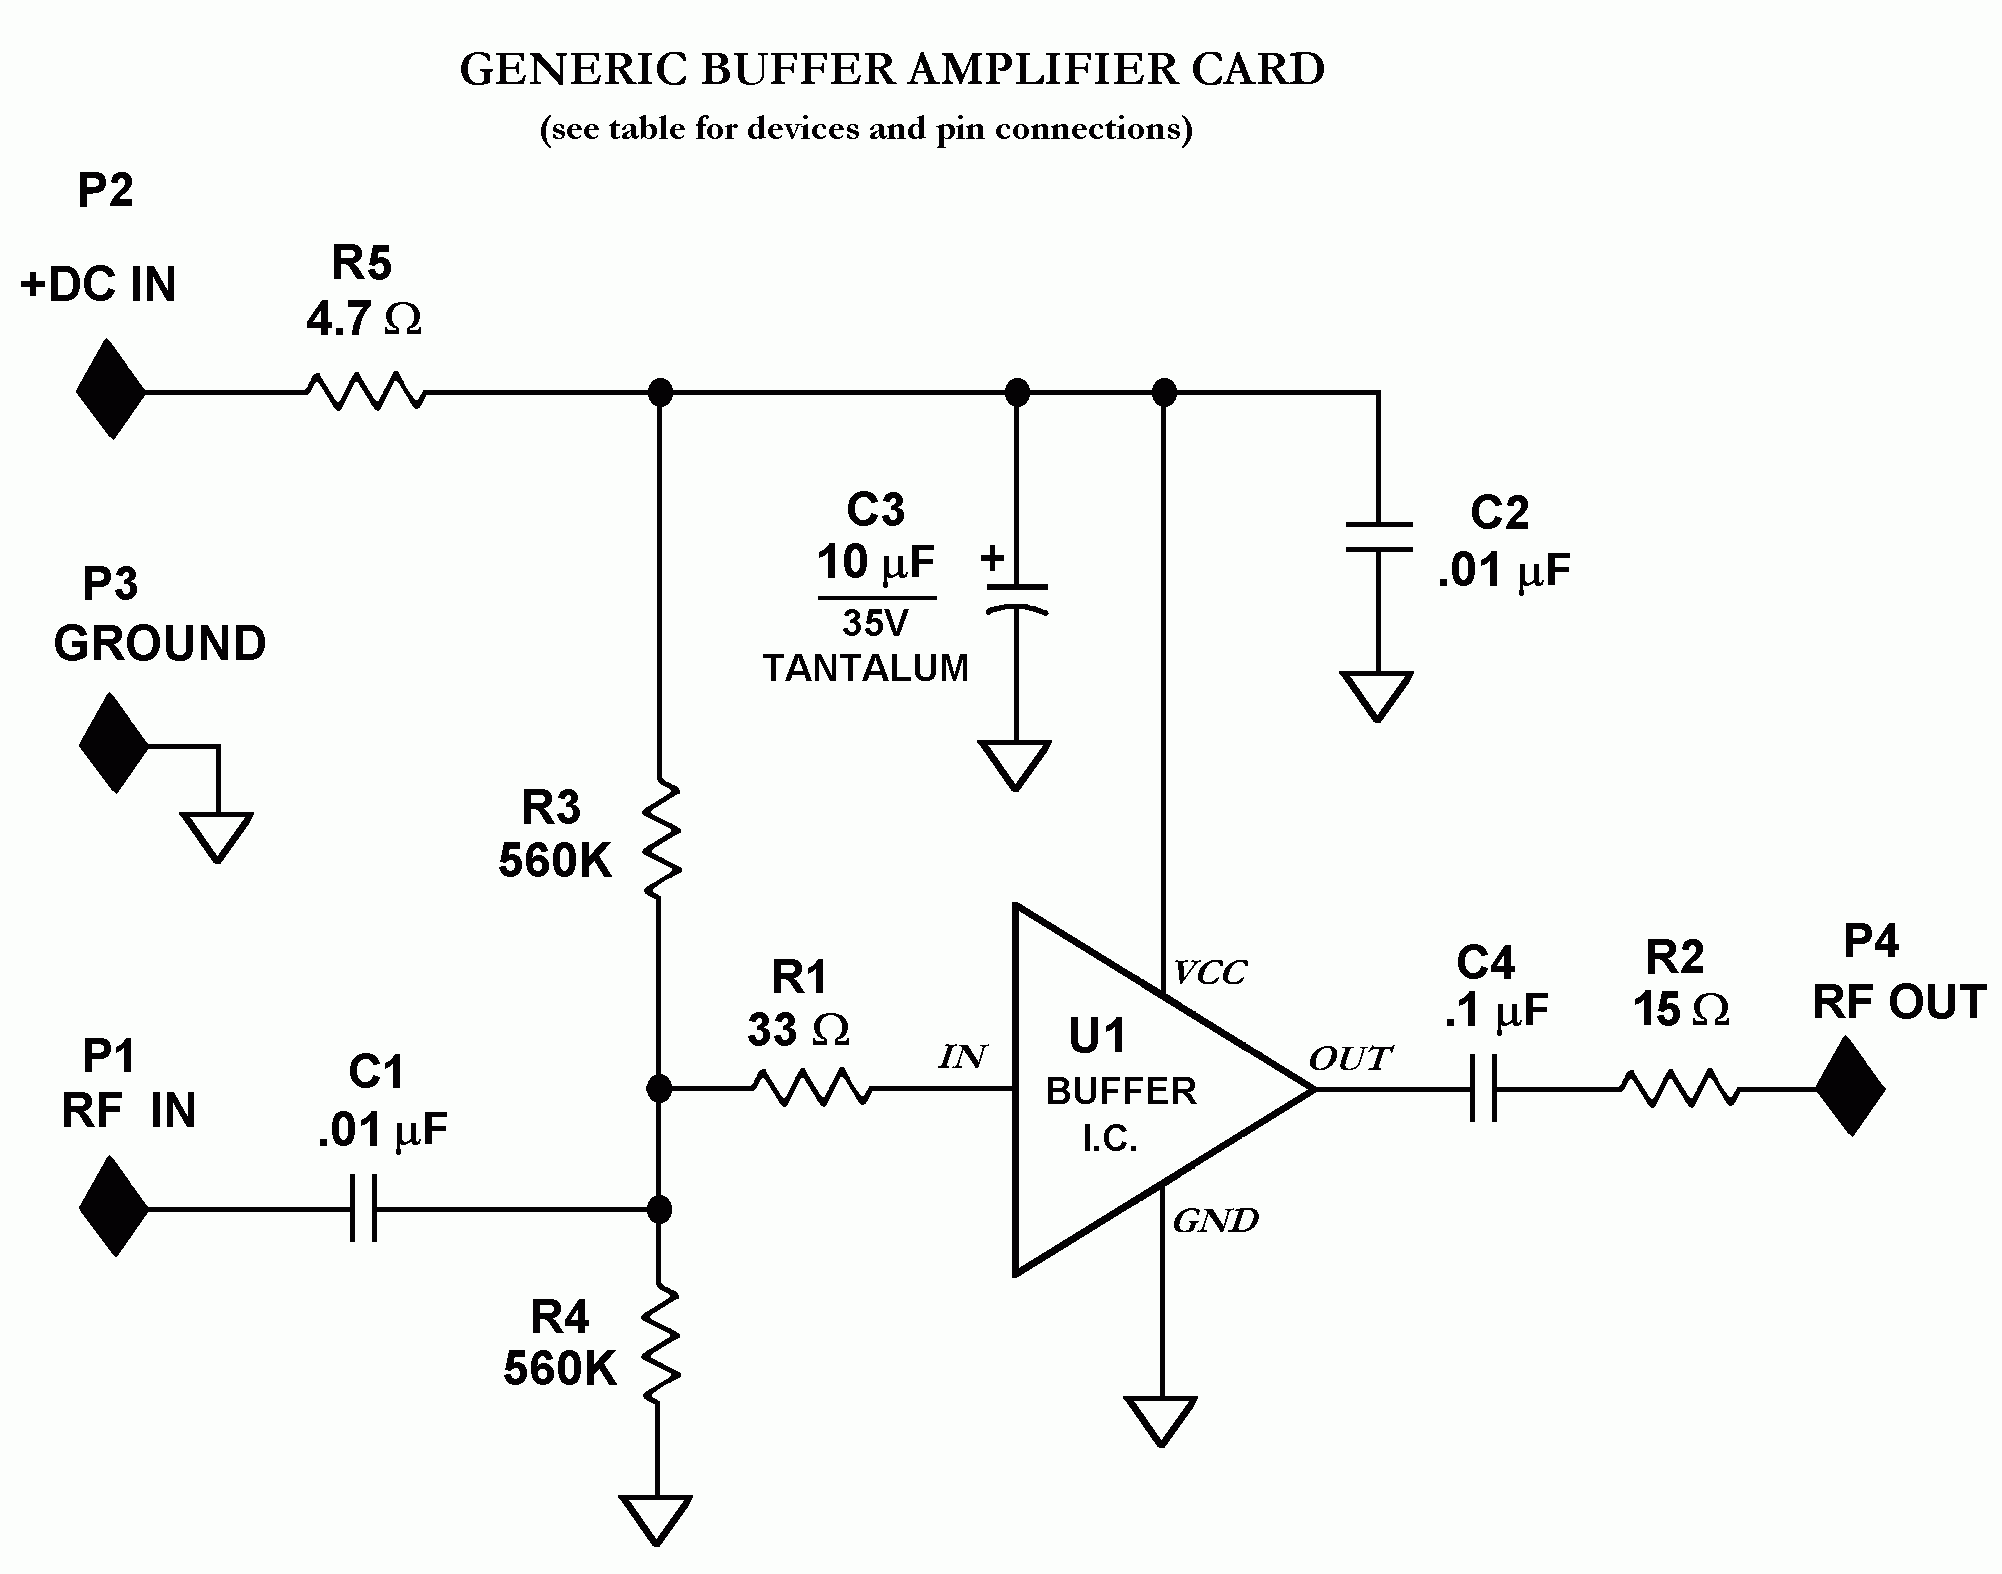
The
accompanying schematic drawing shows the TMB-1 circuit. The buffer amplifier is considered as a
“generic” building-block assembly having an input, an output, DC power, and
ground. The schematic of this amplifier
card follows the main TMB-1 drawing. A
table of suitable integrated circuit buffers is also presented.
The
antenna element (loop or whip) and TMB-1 box are often situated somewhere other
than at the receiving position. Typical
sites include the roof of a building or vehicle, the top of a mast, or out in a
field. Sometimes two or more antennas
are deployed a considerable distance (over 30 m) apart to form a phased
array. DC power is transferred to, and
RF output from, connector J9 of the TMB-1 through the 50-ohm coaxial
cable. At the receiving position, DC is
split off through an inductor and RF through a capacitor (the classic “bias
tee” arrangement). This would normally
be built into the phasing unit or preselector ahead of the receiver. A few receivers may themselves have a
built-in DC-biased RF port. If the
TMB-1 is used close to the receiving position, you can supply DC power (+12 V
to +15 V typically) to J7 and take DC-blocked RF out to the receiver (or
phaser) at J10.
Current
drain is typically about 35 mA, so the unit can be operated – at least for
short-term DXpeditions – from two 9-volt batteries in series.
In March
of 2002, I put the TMB-1 and several other competing antenna amplifier designs
through a series of tests at home in Billerica, MA and also at East Harwich, MA
(Cape Cod) and out at the Rowley, MA salt-marsh DXpedition site. All three types of antennas (broadband loop,
terminated loop, whip) were evaluated.
1. Operation with
Low-Impedance Broadband Loops
A
“low-impedance broadband loop”, for the purposes of this article, is usually
comprised of a single turn of wire between 1/40 to 1/10 wavelength in total
length. This would equate to a total
length of 4.17 to 16.67 meters at 1.8 MHz.
If this wire is formed into a square, each side will be one quarter the
total length. If it is formed into a
circle, the diameter will be the total length divided by pi (3.1416).
I
have done most of my testing with a single-turn square loop, 8 m (26.25 ft.)
total wire length or 2 m (6.56 ft.) per side.
With the broadband loop winding connected at J1 and J2, switch S1 is set
to BBLoop and S2 is set to Loop. The
1:36 step-up transformer (T2) multiplies the input voltage to be presented to
the high-impedance buffer amplifier card input. This card performs unity voltage gain but considerable current
gain in taking an input signal of a very high impedance down to an output
impedance compatible with 50-ohm coaxial feedline and receiver input. The buffer amplifier has a low noise floor
and it can handle signals with a peak-to-peak amplitude of as much as half the
supply voltage with reasonably low harmonic and intermodulation
distortion. With a +12 VDC supply,
signals up to 6 Vp-p (2.12 Vrms or +19.5 dBm) can be amplified cleanly with
most buffer IC’s. If the wire loop has
an input impedance of 50 ohms, the T2 transformer to A1 buffer card combination
gives a gain of approximately 17 dB.
2. Operation with
High-Impedance Terminated Loops
I
have had very good luck recently with a Flag antenna. The antenna is rectangular and measures 10.36 m (34 ft.)
horizontally and 4.88 m (16 ft.) on the two vertical sides. The distance of the lower horizontal section
above the ground was approximately 2.44 m (8 ft.) in the Billerica and East
Harwich tests.
Normally
the Flag antenna is fed halfway up one side (through a 16:1 transformer) and
terminated with approximately 1000 ohms halfway up the opposite side. A suitable transformer is a Mini-Circuits
T16-6T-X65 in “small signal” areas or, in bigger signal areas, an Amidon
FT-114-43 toroidal core with 11 turns for a low-Z winding (for the coaxial
feedline) and 44 turns on the opposite side of the core for the high-Z (antenna
side) winding. The directional pattern
of a terminated loop style antenna is a cardioid with a null towards the end
where the terminating resistor is sited.
A null depth of about 20 dB is common without fine adjustment of the
termination resistor value. If a
Vactrol (or, presumably, a motor-driven potentiometer) can be installed for the
termination, the null – at least on daytime groundwave stations – can be
deepened to 35 or 40 dB. This is an
improved set-up but it still gives only one directional pattern.
The
termination can be replaced by another feedline and 16:1 transformer: this
non-ideal termination scheme gives each pattern about 15 dB of cardioid
depth. Now you have two feedlines and
two opposite-nulling patterns resulting.
The two feedlines can be presented to the two inputs of a phasing unit
to affect a much deeper null: up to 45 dB depth on groundwave is achievable
this way.
The
ultimate approach is to feed and terminate both sides of the Flag (or Pennant,
Kaz, etc.) simultaneously. The
amplifier must present a load significantly higher than the approximately 1000
ohm termination so it does not prevent a normal range of Vactrol termination
resistance adjustment values. This goal
is achieved by using T1, a 36:1 transformer.
Even if its low-impedance winding were playing into 50 ohms, the load at
the input of the transformer would be about 1800 ohms. In reality, it is more like 3000 ohms;
therefore, a full range of useful termination values can be achieved. Note that the Vactrol being used to
terminate one side actually has its effect on the signal coming from the
amplifier on the other side. If your
Flag antenna is on an east-west axis, the Vactrol in the west side TMB-1
amplifier creates the null that you monitor on the feedline coming from the
east side’s TMB-1.
S1
is set to TermLoop, S2 to Loop, and S3 to Vactrol. A control voltage (0 to 10 V through an “in shack” series choke
and resistor of about 120 ohms) is fed out to J6 on a wire from the
controller. The resulting control
voltage at J6 is about 0 to +5.8 V and it’s about 0 to +2.1 V across the
Vactrol’s LED. The equivalent Vactrol
LED current range is about 0 to 30 mA for a photo-resistor range of over 10K
(at 0 mA) down to 54 ohms (at 30 mA).
Resistors R1 and R2 in series with the Vactrol resistance make the
adjustment smoother in the important 500 to 1500 ohm range. D1, D2, D3 protect the Vactrol by clamping
the LED voltage to about +2.1 VDC.
Usually I keep the Vactrol control cable next to the coaxial RF/+12V
line that goes to J9. The two cables
are brought along the ground and then travel up to the TMB-1 box at about a 45
degree angle so as not to exert much influence on the pick-up patterns.
Optimally
adjusting the termination on each side of the Flag antenna and then phasing the
two feedlines to cancel out the last remnants of unwanted-direction signal
yields cardioid nulls of very impressive depth: better than 50 dB in many cases
!
The
TMB-1 can be used simply as a Vactrol terminator without using the
amplifier. The easiest way to do this
is to connect the two antenna leads (or antenna and ground leads in the case of
a Beverage) to J4 and J5. Set S1 to
BBLoop and S3 to Open to take T1 out of the path. The Vactrol control voltage entering J6 will adjust a resistance
which can be measured easily with an ohmmeter connected between J4 and J5. No other connections to the TMB-1 are
required (besides J4, J5, and J6) for this passive-termination mode to work.
3. Whip Antenna
A
vertical whip antenna of moderate length (1 to 5 m / 3.3 to 16 ft.) can be
connected to J8. I use a Radio Shack
1.8 m (6 ft.) whip bolted to a small plastic box with a BNC male chassis mount
connector on its bottom. This works
quite well. Two or more whip-mode
TMB-1’s can be spaced about 50 m apart to form compact phased arrays (in
similar fashion to two or more broadband loops). My car “mini-DXpedition” set-up consists of an east-west
broadband loop phased against an active whip.
Considering that this whole set-up fits on the roof of the car, it is
surprisingly effective for nulling. I
must admit that the seaside locations usually chosen for these DX outings
deliver much stronger signals “right out of the box” than average “wimpy”
inland locations can. You could call
these coastal sites “geographical preamplifiers”.
Whip
antenna operation is very simple. The
RF/power cable connects to J9 and the whip goes to J8. S2 is set to Whip; positions of S1 and S3
are irrelevant.
Construction of the TMB-1
Exhaustive
construction / layout details are not being presented here. The first thing to do is to assemble a
working buffer amplifier card. This
card’s size will affect the placement of the rest of the components. The buffer card could be a BUF-E (reference
1), BUF-F (reference 2), or even the AMRAD high-performance active whip
amplifier (reference 3). The AMRAD
amplifier, partially designed by IMD-suppression stickler Dallas Lankford,
needs +24 VDC so it isn’t a likely candidate for car-based antenna
applications. An appendix to this
article discusses a “generic” buffer amplifier design. Over the years I have successfully used a
number of IC’s including BUF634T, LH0033CG, LH0063CK, LM6221N, and
HA3-5002-5. These all have
reasonably-low noise floors, good stability (low tendency to oscillate), and
acceptably low distortion. Devices with
too high a bandwidth, such as the AD9630AN, may depend more critically on
layout not to oscillate. Too much
buffer bandwidth also means that strong TV and FM signals can mix down into the
lower frequency range of interest, clearly something that is not desirable.
The size of the chassis box to be used is left up to the builder. My TMB-1 design was housed in a Radio Shack 270-238 chassis measuring 13.3 x 7.6 x 5.4 cm (5.25 x 3 x 2.125 in.). This is probably as small an enclosure as you’d want to use. J1, J2, J3, J4, and J5 are mounted on the left side of the box. J8, S1, S2, and S3 are mounted on the top of the box (as are the internal standoffs for the buffer amplifier card). J6, J7, J9, and J10 are mounted on the right side of the box. Switches are typical miniature toggle types: DPDT (S1), SPDT (S2), and SPDT center-off (S3). The RF transformers (T1, T2) are Mini-Circuits T36-1-X65 (or homebrew equivalents). The VTL5C4 Vactrol (reference 4) is available from Allied Electronics (stock number 980-0715) and from Newark Electronics (stock number 43F888): see their Web sites. The banana jacks (J1 through J5) are Radio Shack 274-662, RCA jacks (J6, J7) are Radio Shack 274-852, and BNC jacks (J8, J9, J10) are Radio Shack 278-105. The 2.2 mH RF chokes (RFC1, RFC2) should be rated for 100 mA DC or higher: Mouser part number 434-01-222J will work.
I maintain a parts vendors’ Web links page at “http://home.comcast.net/~markwa1ion/exaol1/vendors.htm” and an RF Circuits page at "http://www.qsl.net/wa1ion/index.html". These should be useful to electronics project builders.
Figure 1: TMB-1 Schematic Drawing
References
1.
BUF-E Amplifier at “http://www.qsl.net/wa1ion/buf-e/buf-e.htm”
2.
BUF-F Amplifier at “http://www.qsl.net/wa1ion/buf-f/buf-f.htm”
3.
Figure 6 of “The AMRAD Active LF Antenna” by Frank Gentges, K0BRA
QST
Magazine, September 2001
On-line
for ARRL members at “http://www.arrl.org/members-only/tis/info/pdf/0109031.pdf“
4.
Vactrol specification sheet at “http://www.qsl.net/wa1ion/vactrol/vactrol.pdf”
APPENDIX: Generic Buffer Amplifier Card circuit
|
I/O Pin List for
Selected Buffer Amplifiers |
|
|
|
|
|
|||
|
(Single Supply, AC-Coupled In & Out, Input Biased
at VCC/2) |
|
|
|
|
||||
|
|
|
|
|
|
|
|
|
|
|
Manufacturer |
Device |
Note |
Package |
In |
Out |
VCC (V+) |
GND (V-) |
Other |
|
Analog Devices |
AD9630AN |
|
DIP8 |
4 |
8 |
1, 2 |
5, 6 |
|
|
Analog Devices |
BUF04P (Z) |
|
DIP8 |
3 |
6 |
7 |
4 |
|
|
Burr-Brown (TI) |
BB3553AM |
1 |
8-lead TO-3 |
4 |
3 |
2 |
7 |
|
|
Burr-Brown (TI) |
BUF634T |
|
5-lead TO-220 |
2 |
4 |
5 |
3 |
pin 1: ~ 33 ohm to GND |
|
Elantec |
EL2008C |
3 |
5-lead TO-220 |
4 |
2 |
5 |
1 |
|
|
Intersil-Harris |
HA3-5002-5 |
|
DIP8 |
4 |
8 |
1, 7 |
2, 5 |
|
|
Intersil-Harris |
HA3-5033-5 |
|
DIP8 |
4 |
8 |
1 |
5 |
|
|
Linear Tech. |
LT1010CN8 |
1 |
DIP8 |
8 |
3 |
1 |
6 |
|
|
Maxim |
MAX460IGC |
|
12-lead TO-8 |
5 |
11 |
1, 12 |
9, 10 |
connect 6 to 7 |
|
National |
LH0002CH |
1 |
8-lead TO-99 |
8 |
4 |
1, 2 |
6, 7 |
|
|
National |
LH0033CG |
1 |
12-lead TO-8 |
5 |
11 |
1, 12 |
9, 10 |
connect 6 to 7 |
|
National |
LH0063CK |
1 |
8-lead TO-3 |
4 |
3 |
1, 2 |
7, 8 |
connect 5 to 6 |
|
National |
LM6221N |
2 |
DIP8 |
2 |
7 |
6 |
1, 4, 5, 8 |
|
|
National (Comlinear) |
CLC111AJP |
|
DIP8 |
4 |
8 |
1 |
5 |
|
|
|
|
|
|
|
|
|
|
|
|
Note 1: possibly obsolete part; may be available via surplus |
|
|
|
|
|
|||
|
Note 2: LM6121 and LM6321 parts also usable |
|
|
|
|
|
|||
|
Note 3: EL2009C part also usable |
|
|
|
|
|
|
|
|