 Click here for PDF version of this article.
Superphaser-2 Phasing Unit
(revised documentation: 9 NOV 1999)
Mark Connelly, WA1ION – Billerica, MA, USA
web: http://home.comcast.net/~markwa1ion/exaol1/weblink.htm
Click here for PDF version of this article.
The Superphaser-2 is an antenna phasing unit based on the PSA-A Phase Shift Amplifier module (two of which are used). Frequency coverage (tuned mode) is 135 to 3200 kHz, the part of the spectrum where antenna phasing has proved most worthwhile in distant signal (DX) acquisition. This coverage includes longwave broadcasting, longwave beacons, standard medium wave AM broadcasting, 160-m ham, and 120-m tropical broadcasting. The unit can be used in broadband operation up to about 5.5 MHz so full coverage of the 80/75-m ham and 90- and 60-m tropical broadcast bands can be realized. As with other phasing units (whether of R-L-C, delay-line, bridge-transformer, or FET phase-shift technology), the signal contributions of two antennas are combined in a way that can cause cancellation of unwanted interfering signals by adjustments of the phase and amplitude of each antenna. If the antennas are somewhat dissimilar in pick-up pattern or if they are spatially displaced by 1/12 to 1/3 wavelength along the null-bearing axis, nulling will be usually be successful. In such cases, the listener may sometimes enjoy dramatically improved reception of stations having amplitude and phase relationships different from those of the dominant interference signal being nulled. For operation from the car at beach DXpedition sites, I usually use a broadband loop and an active whip to produce a cardioid (single-null) pattern that gives reception possibilities different from what can be obtained with the figure-of-8 pattern of a conventional loop.
Contents
The experienced do-it-yourself radio "homebrewer" should have no problem building a Superphaser-2 from the documentation supplied. If time permits, I may add more thorough construction details (full bill of materials, drilling table, etc.) to the documentation package at a later date.
See http://home.comcast.net/~markwa1ion/exaol1/vendors.htm for Web-accessible information on parts vendors.
I used a Mouser 537-TF-782 chassis box measuring 7" x 5" x 3" (17.8 x 12.7 x 7.6 cm), but there’s no reason some other metal box couldn’t be used.
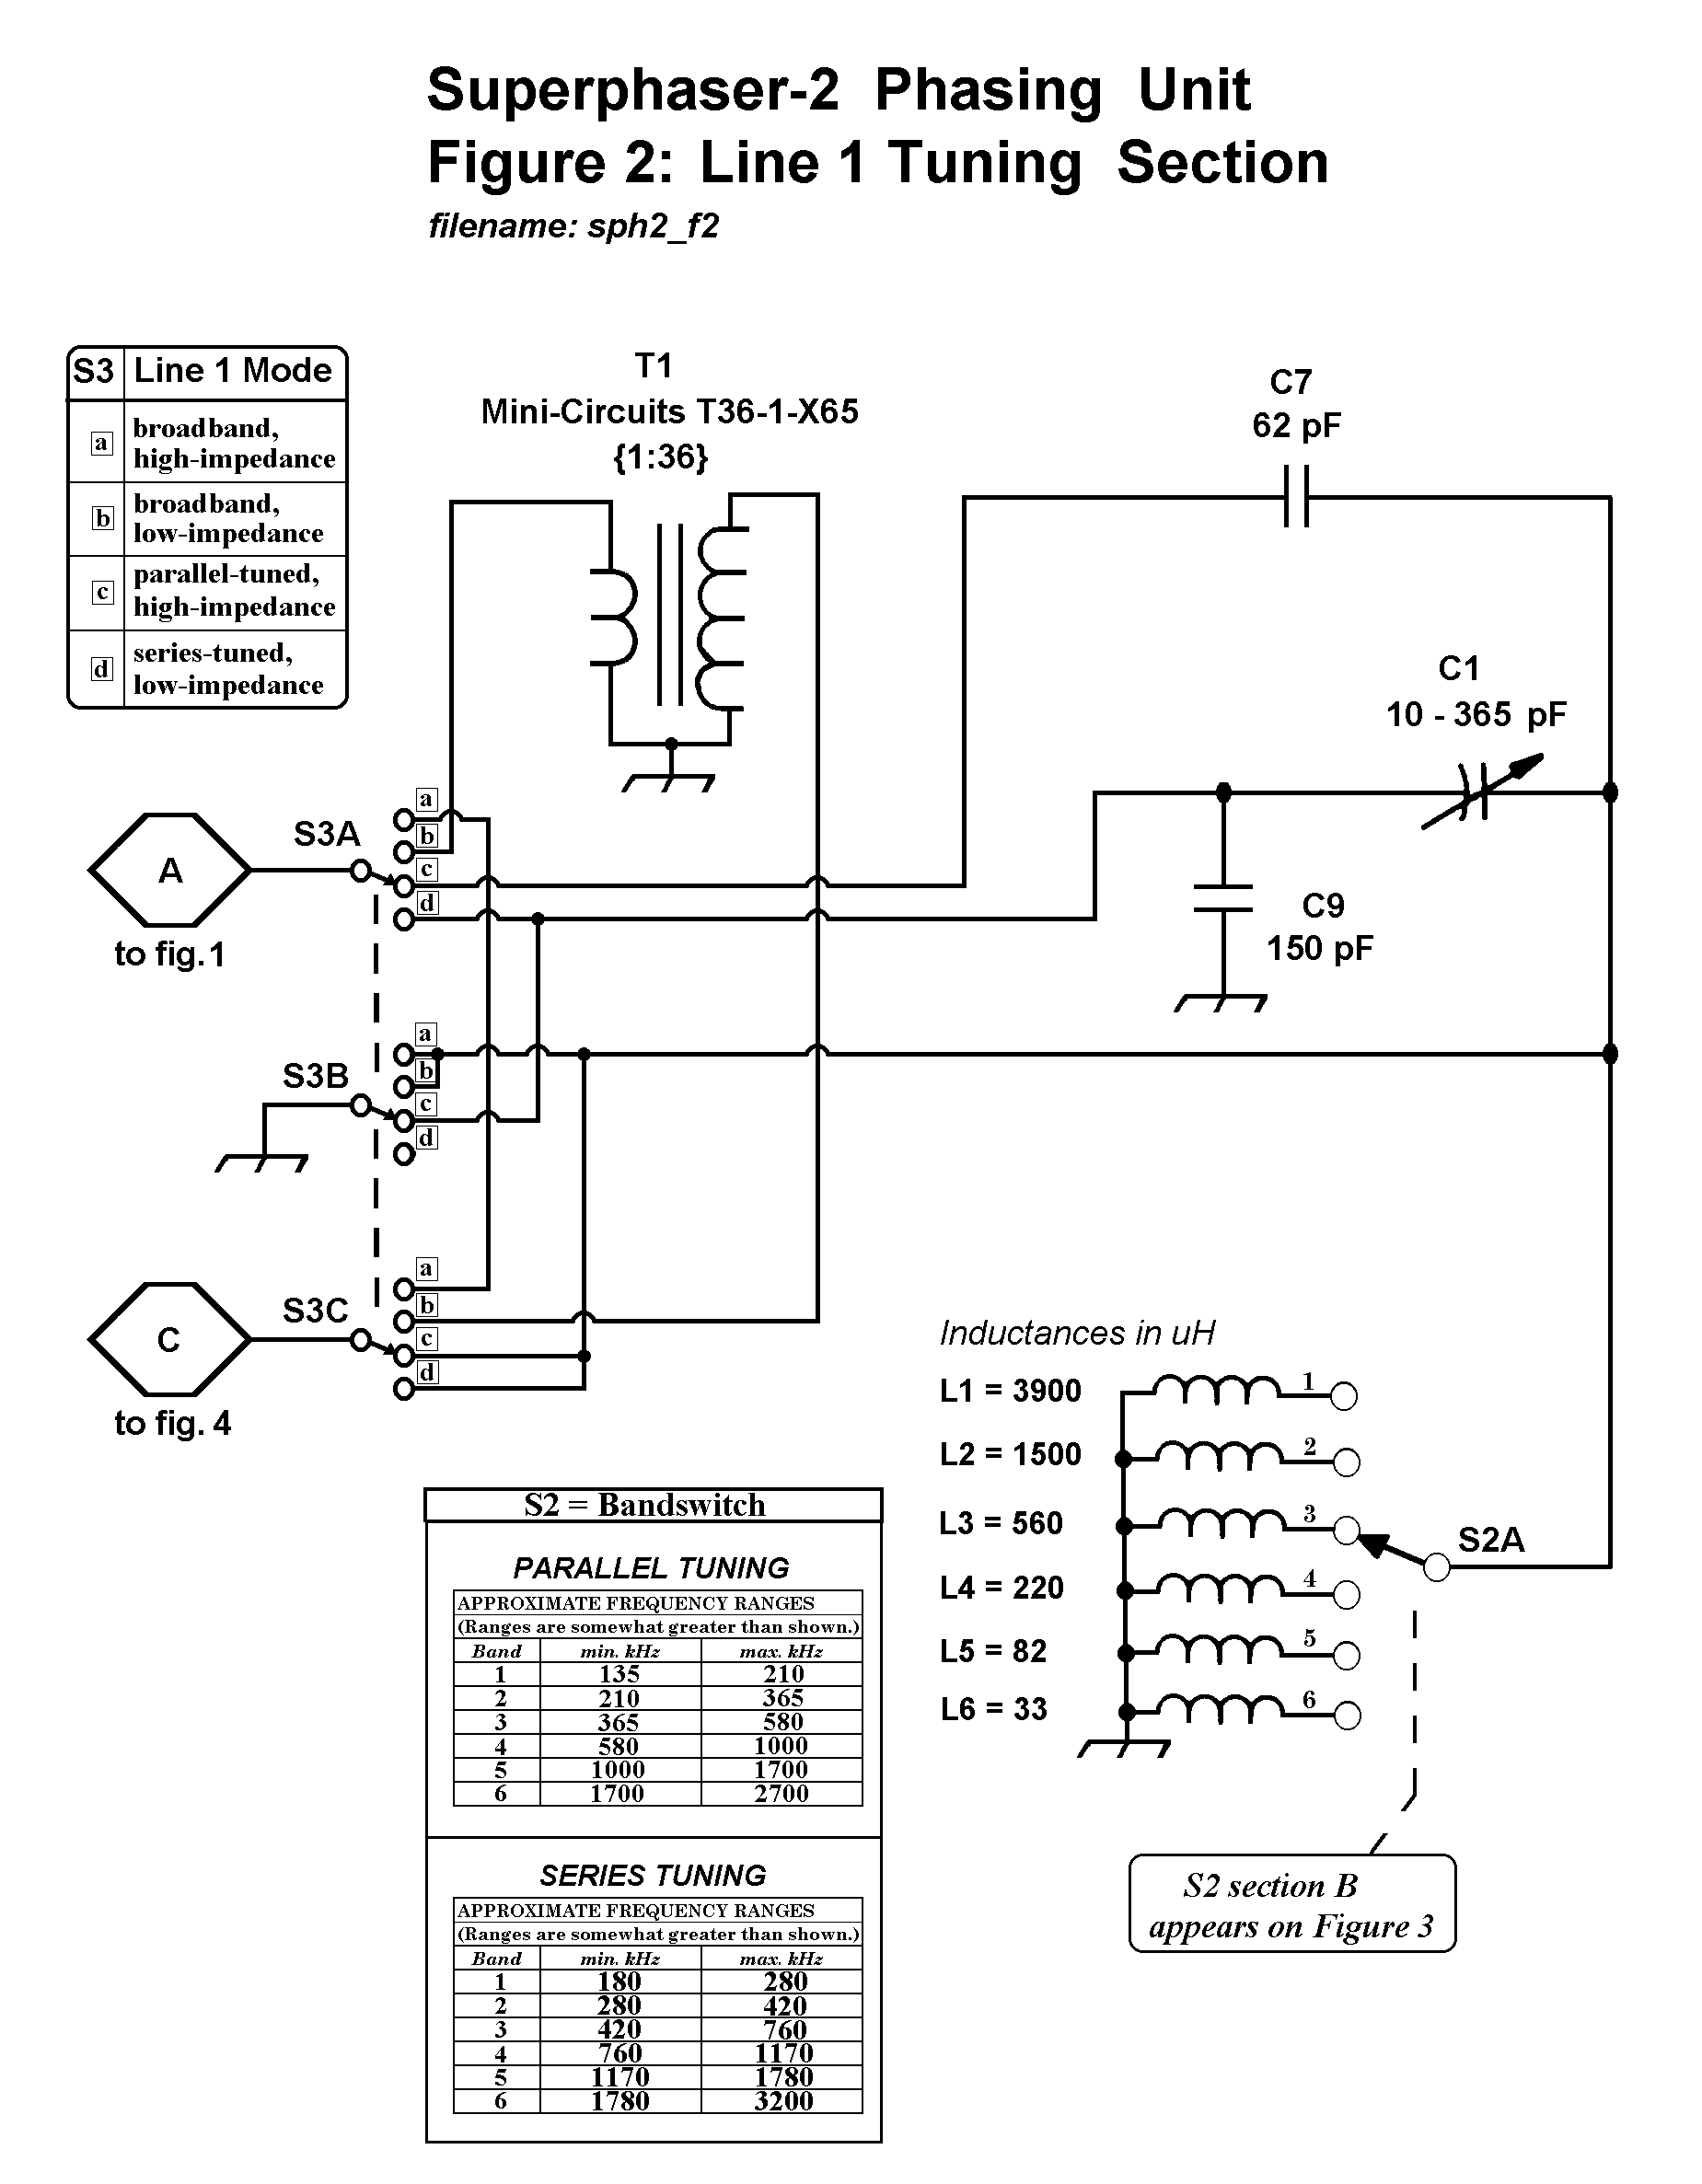
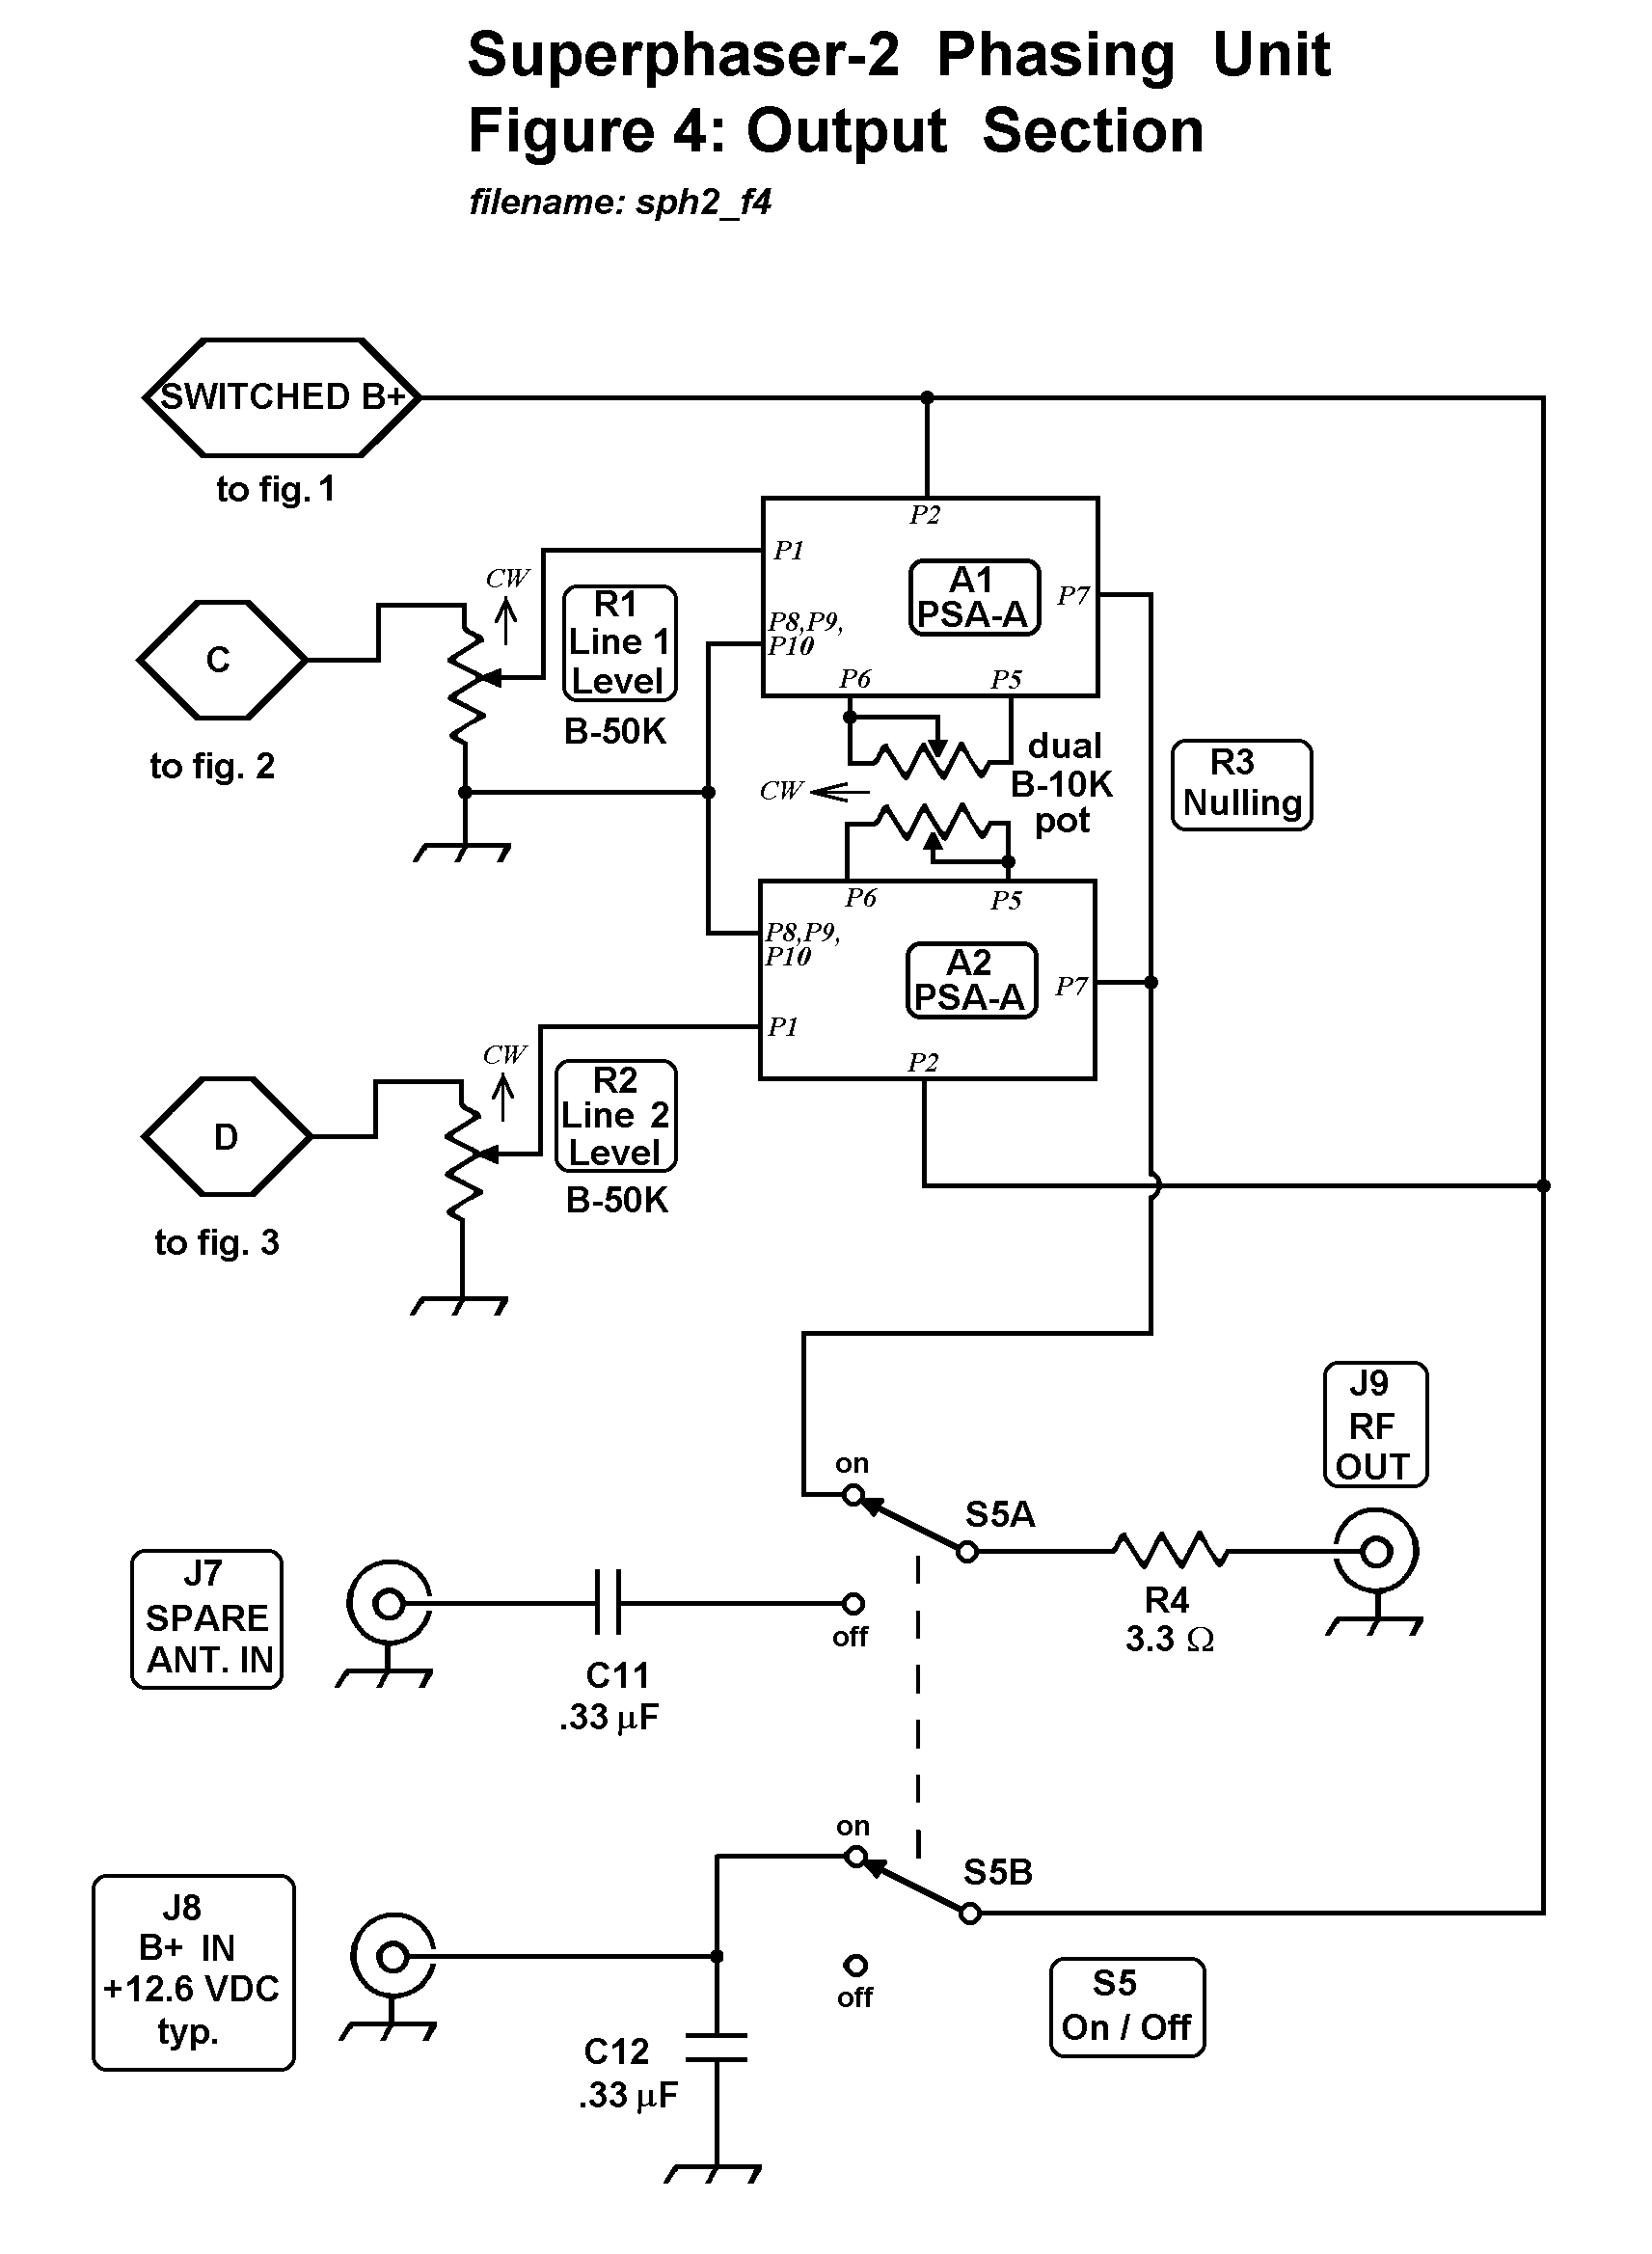
Figure 3 specifies a 10K dual linear potentiometer for the R3 null control. Mouser stock number 531-PC16DC-10K, made by Piher, is being used here successfully. A dual 25K would give slightly more phase shift coverage. Values of 50K or more will be too touchy to adjust. You could use a 25K dual pot from Newark (stock number 01F6341, Clarostat number JD1N200P253UA). This is a rather expensive part at US $46 each !
Variable capacitors C1 and C2 are Antique Electronic Supply part number C-V365, or equivalent.
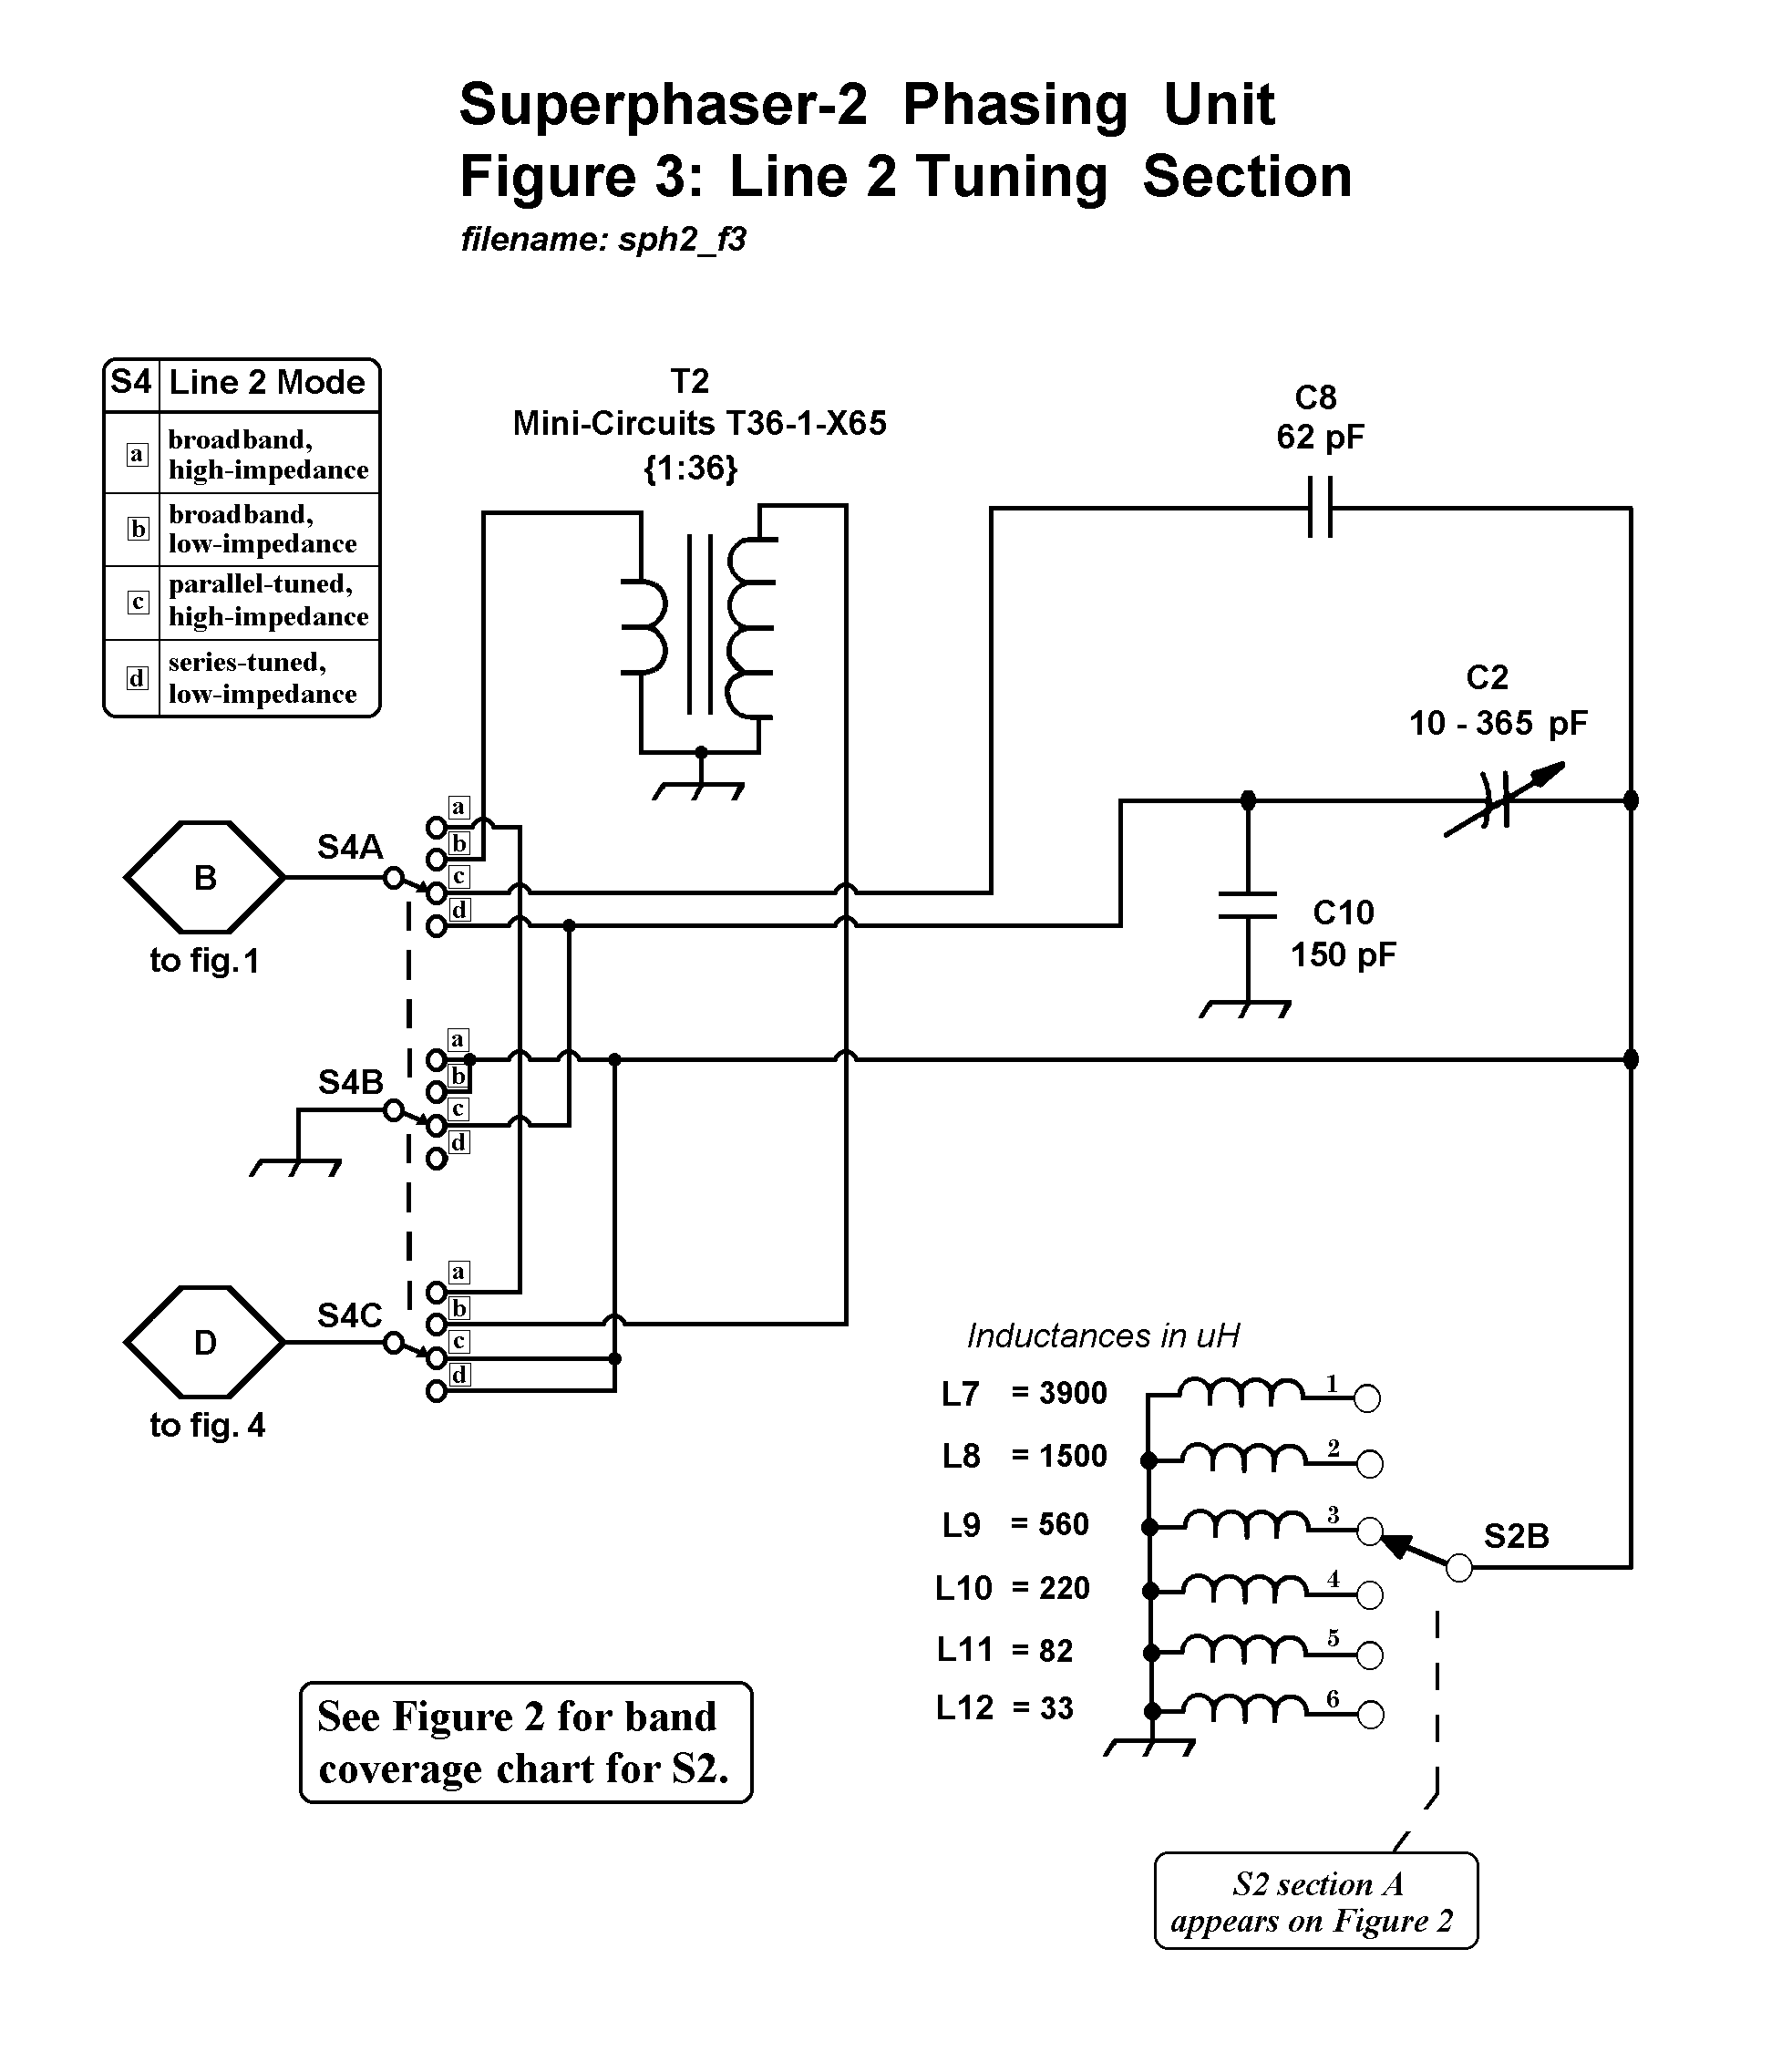
RF transformers T1, T2, and T3 are from Mini-Circuits .
RFC1 and RFC2 are high-current type chokes to supply DC to the amplifiers in external active antennas such as the MFJ-1024 whip. Either Mouser 434-05-182J or RadioShack.com 900-4895 parts are usable.
Getting Started
The first try-out of the unit should be during the day when low and medium frequency signals are arriving primarily by groundwave, rather than by ionospheric skip. Practice on channels having a station that is slightly dominant over a second audible signal. Local medium wave channels are good for this. In North America, these include 1230, 1240, 1340, 1400, 1450, and 1490 kHz. In Europe, you could try 1485, 1584, and 1602 kHz.
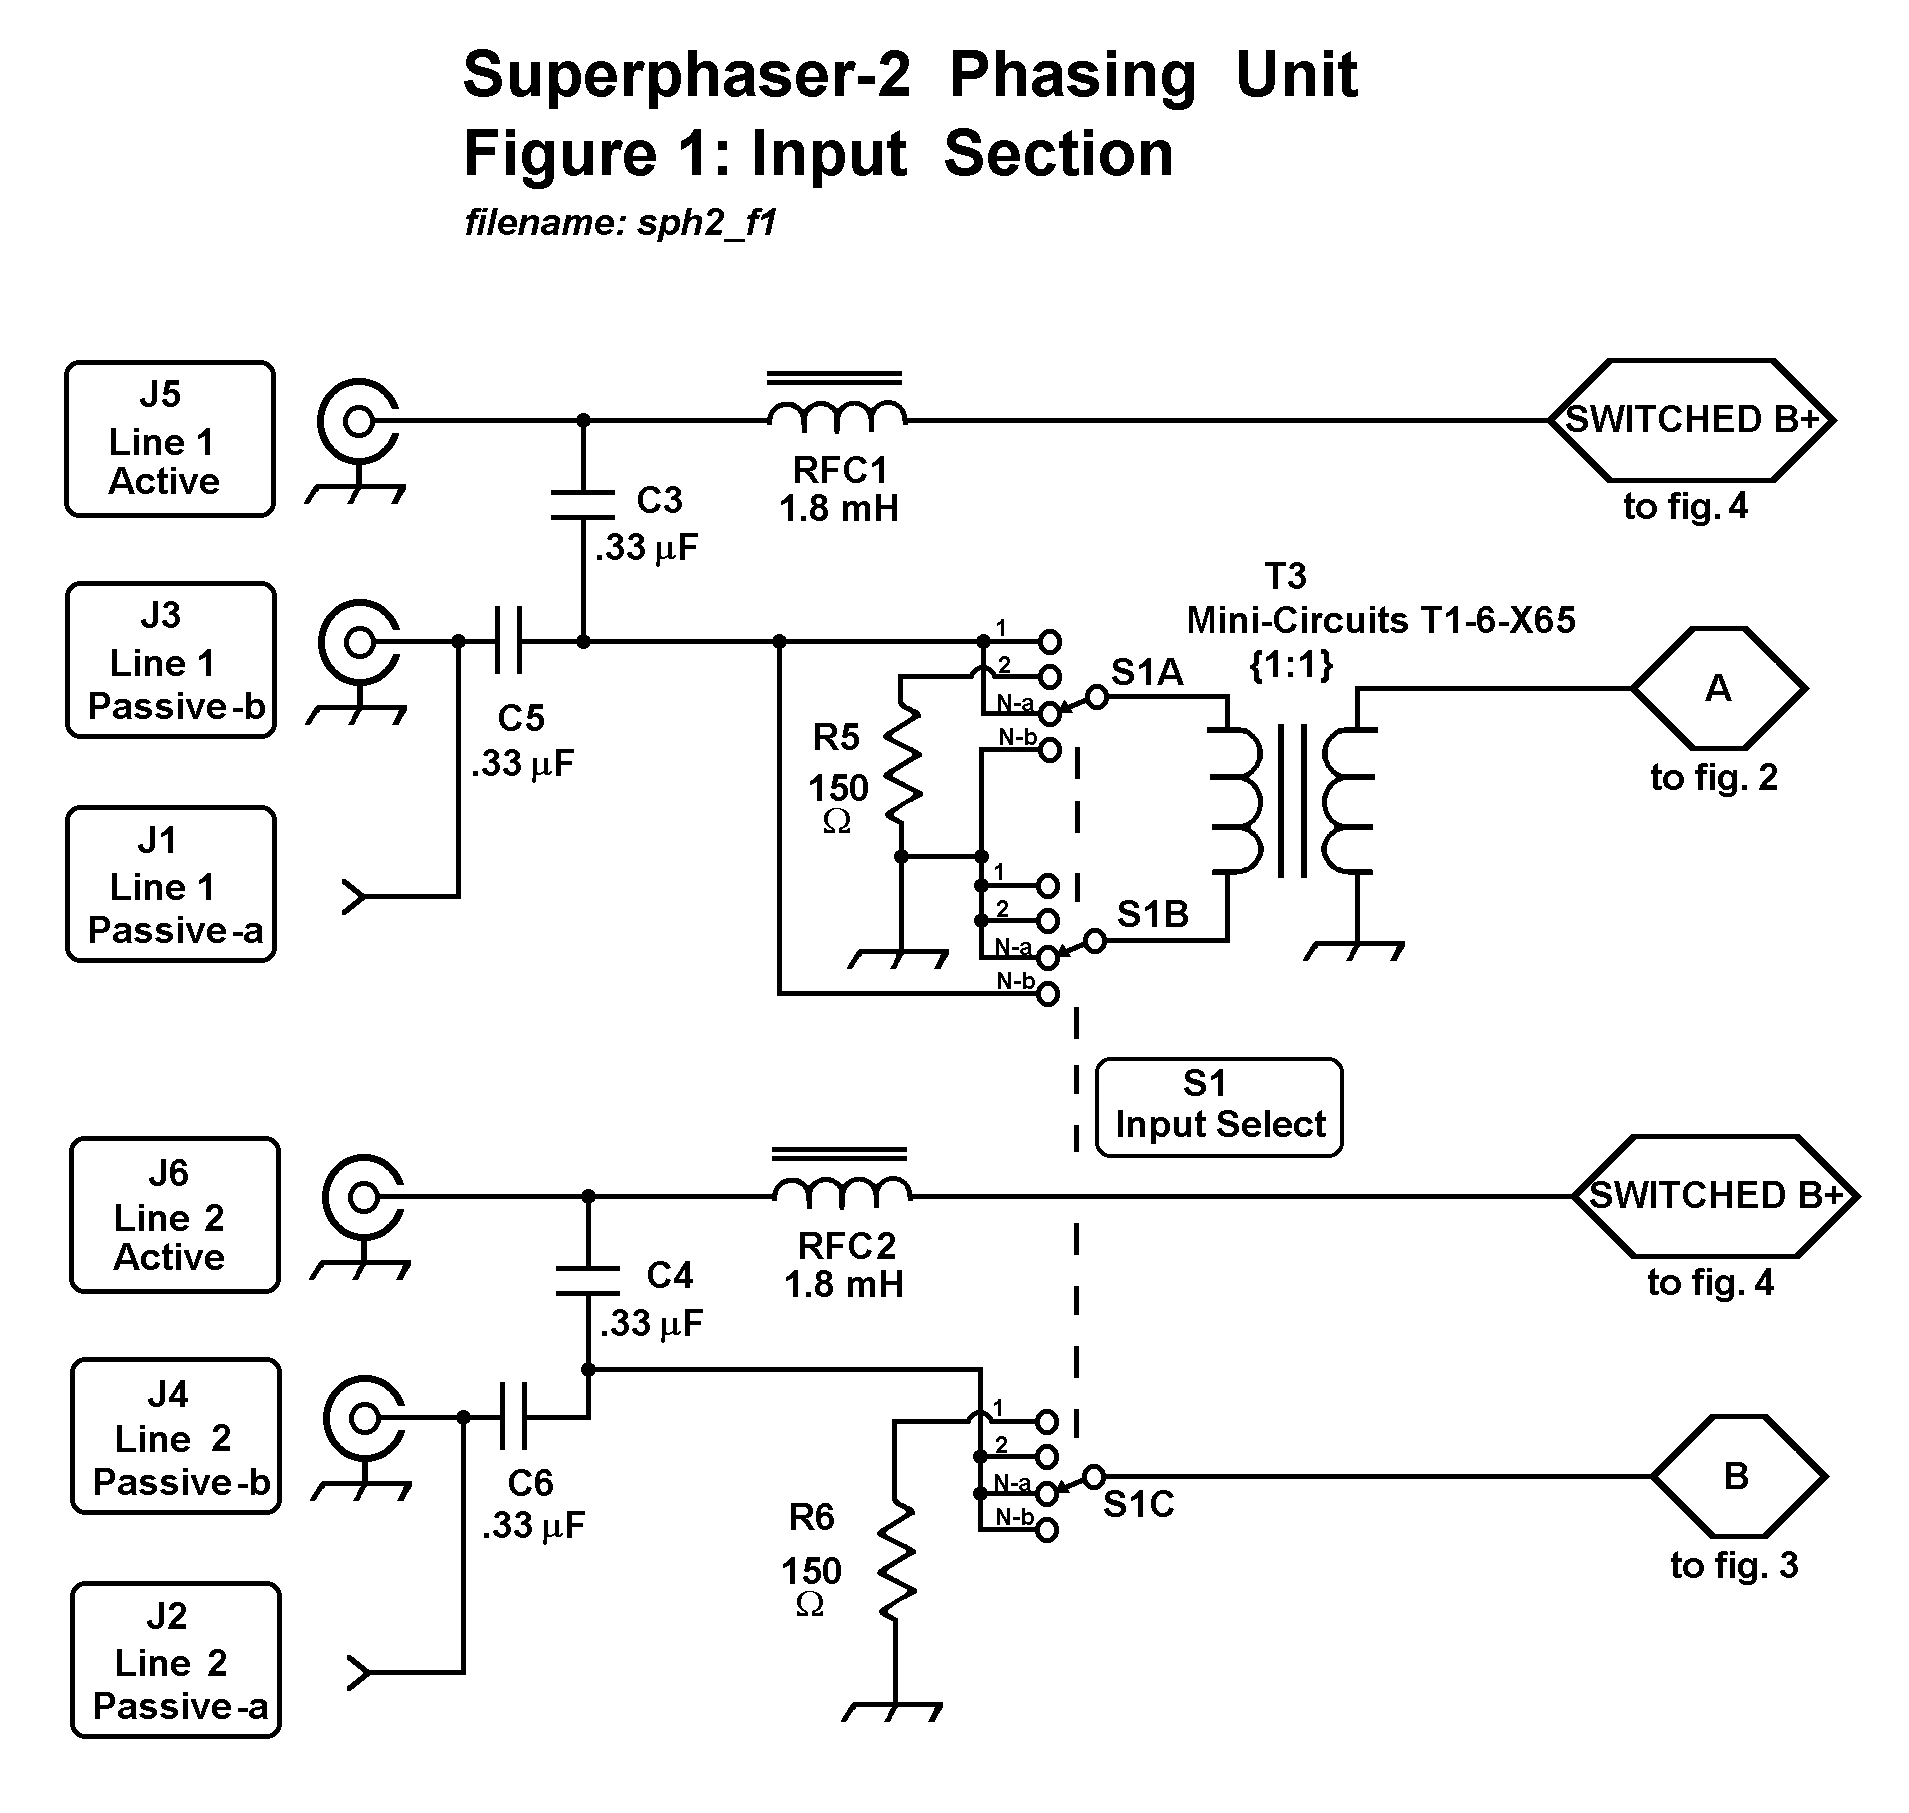
Each of the two antennas to be used is connected to an appropriate input jack for Line 1 or Line 2: these are J1 or J3 (Line 1 passive), J5 (Line 1 active), J2 or J4 (Line 2 passive), and J6 (Line 2 active).
A spare antenna, if desired, may be connected to J7. This antenna is sent to the receiver when S5 is set to turn the phasing unit power off.
DC power, typically in the 11 to 15 volt range, is connected to J8. Current drain is in the order of 100 mA plus whatever current is being supplied through J5 and J6 to remote active antennas.
A coaxial cable from J9 connects the unit’s output to the receiver.
Initially, for simplicity, you’ll want to set up a null in a broadband mode (i.e. tuning sections bypassed by setting S3 and S4 to one of the Broadband positions). Set R1 and R2 to fully clockwise ( = maximum signal, or minimum attenuation). Set R3 to center. Then turn on S5 to power up the unit.
Input Level Balancing
Set S1 to Antenna 1 and observe (on an S-meter if available) the strength of the dominant station (or electrical noise) to be nulled. Then set S1 to Antenna 2 and do the same. You’ll want to make the signal levels equal: to reduce the Antenna 1 signal, adjust R1 or to reduce the Antenna 2 signal, use R2. Note which pot had to be moved off the fully-clockwise position. This will be adjusted during the Null Completion part of the procedure. If neither R1 nor R2 had to be adjusted (because the levels were already equal), set both R1 and R2 about 1/12 of a turn off fully clockwise (e.g. to "4 o’clock" if fully clockwise is "5 o’clock") and consider R1 to be the pot used in the Null Completion step.
Null Initiation
Set S1 to Null-a and adjust R3 for a null (minimum level of the interfering station to be removed). Do the same with S1 on Null-b. Leave S1 on the position that gave a deeper and sharper null as R3 was adjusted. Touch up the R3 setting, as needed, for the best null.
Null Completion
To finish the null, make small interactive adjustments of R3 and the control (R1 or R2) determined as the right one to be used during the Input Level Balancing part of the procedure.
Miscellaneous Operating Notes: Tuned Mode
Using tuned operation, as set by S3 for Line 1 and S4 for Line 2, is recommended in areas of very low level signals (for the best sensitivity) and also in very strong signal areas (for preselection that reduces the likelihood of distortion products). Slight adjustment of tuning capacitors off a peaked condition can also be used to extend the phase shifting range provided by R3.
With some antenna lengths, tuning ranges can be a bit wider than those shown in the table on Figure 2.
GIF drawing files may be downloaded and subsequently viewed and printed at correct scaling by using a program such as Microsoft Photo Editor or Adobe Photoshop.
Figure 1: Input Section (fits one page)
Figure 1: Input Section (high resolution)
Figure 2: Line 1 Tuning Section (fits one page)
Figure 2: Line 1 Tuning Section (high resolution)
Figure 3: Line 2 Tuning Section (fits one page)
Figure 3: Line 2 Tuning Section (high resolution)
Figure 4: Output Section (fits one page)
Figure 4: Output Section (high resolution)
PSA-A Phase Shift Amplifier module drawings (A1 and A2 of Superphaser-2)