Some QRPers tell stories about slapping together a few parts in an hour, having some DX station come back to their first CQ, and then realizing they were actually operating into their dummy load. My life isn't like that...
My Kenwood 570's built-in memory keyer was my first exposure to using a paddle to send code. And although I sometimes prefer the straight key, it was clear that having a memory keyer would be nice when you're running QRP. It's not unusual for me to call CQ for an hour and get no responses when I'm running a few hundred milliwatts. With a memory keyer, this just means I have to push a button ever minute or two.
I looked at a couple of keyer kits. I finally settled on the K10 offered by K1EL. The ability to have a speed control knob was the thing that pushed my decision over the edge. (Ironically, I ended up not using this feature.)
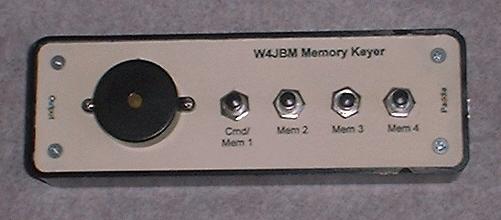
I ordered the K10 kit using PayPal and received it a few days later. Then I spent a few weeks deciding how to package it. To be honest, fitting things into the smallest possible enclosure isn't fun for me. I like being able to troubleshoot and modify projects. So even thought the K10 board is only about a square inch, I used a decent size enclosure.
I made the front panel using a computer drafting program. It was printed on card stock. I gave it two coats of clear enamel to protect it and used a spray adhesive to hold it to the aluminum enclosure top. I'm still perfecting the details, but overall this process works smooth.
The only problem I had with the K10 board was the size of the holes on the PCB--they wouldn't accept 22 gauge wire. I wanted to use stranded wire so it wouldn't break when I opened the enclosure to replace the batteries.
The other problem I had was with my battery holders. I wanted to use a pair of AA batteries and had picked up some holders for a quarter a piece at a sale. When I got the whole project put together, it was dead! After some serious head scratching, I finally found that even thought there was a rivet through the ends of the battery holders to a solder tab, the rivet didn't provide continuity. It was a metal rivet and obviously the solder tabs were there to solder wires to. Don't ask me how or why it happened. Anyway, a quick trip to RadioShack solved to problem. The battery holders are mounted to the bottom of the enclosure using hot-glue.
Like I said earlier, one of the things I liked about the K10 was that it could use a variable resistor to set the keyer speed. I never could come up with a component layout with a variable resistor that I liked, so I didn't include one. Instead I can press the command button and quickly use the paddle to increase or decrease speed. This turns out to be a very usable approach and I've never missed the speed control knob.
The other thing I considered was a power switch. The K10 is a low-power device and has a sleep mode which draws practically no power, but I thought a power switch would be nice in case I need to power cycle the keyer. Then I decided that a N.C. pushbutton in the power lead would do the same thing. And finally I just decided to skip all of that and leave the battery connected all the time.
I've never had the K10 go into any real strange modes where I need to power cycle or reset it. A soft reset is available by holding down the command button for ten or so seconds. I feel pretty comfortable that nothing flaky is going to happen. And if it does, it's probably time to change the batteries anyway...
The bottom line is I highly recommend the K10. It's small. It's cheap. You could easily build it into a rig if you wanted to. It has tons of features that I haven't even mentioned and that I'll probably never use. Check it out. I don't think you'll be disappointed!
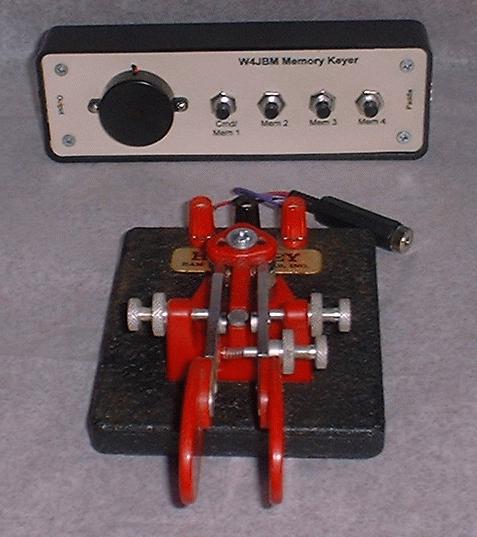
In a serious quark of fate, I had more trouble with my paddle than with the keyer. I'll admit I'm cheap and jumped at the chance to buy a used $30 paddle. Unfortunately, you get what you pay for...
The paddle is a Model HK-1 Ham-Key that was sold through Ham Radio Center. I bought it used on eBay and when I first opened the package I could immediately tell something was wrong. The paddle just felt wobbly. Inspecting it, I found that the screw that holds things in place on the top had been replaced--with a screw several sizes too large!
I removed the screw and used superglue to piece the cracked center stem back together. Then I used some plastic wood filler from the hardware store to fill the hole. I used a punch to put a guide hole into the filler before letting it dry. Once it dried I was able to use a reasonably sized screw and hold things together.
I hooked it to the memory keyer in my Kenwood 570 and it worked great! But a few months later when I tried it with the K10 I couldn't make it work. As I checked things, I found the contact resistance was almost 1,000 ohms. I tried contact cleaner, but that didn't help much. Then I tried a serious no-no--I used a soft wire buffing wheel on my Dermal tool and buffed the contacts. I then put on an anti-oxidant coating. After all of that, the resistance was still around 1,000 ohms.
After some serious head scratching and some time with an ohm meter, I finally traced the problem to the ground. The center post is screwed to the base and the common terminal is screwed to the base. The base is suppose to provide the path between them, but for some reason it had 1,000 ohms of resistance. I put a jumper under the nuts holding these both in place and things started working!
I'll admit it was a bit frustrating. But at the same time it feels good to salvage a bit of ham radio history from the dumpster. And it did cost less than a new paddle... ![]()
My Home Page / E-Mail Me
Sign My Guestbook
![]() View My Guestbook
View My Guestbook
Copyright © 2001 by Jim McClanahan All rights reserved.
All trademarks and brands are the property of their respective owners.