Portable QRP Ops |
I like to keep a QRP rig in the car. I like to operate QRP portable.
I'm not about to try and send Morse Code while operating a moving car. I
admit, I'm not coordinated enough for that! But I do like to leave the building
where I work at lunchtime, go out to the parking lot, and set up the QRP
station. I have it down to the point where I can unpack, set up and start
listening on the bands in under five minutes. And I have found a little
QRP evryday breaks up the work day nicely, releases a little stress and invigorates
me for the rest of the day's work to be done. |
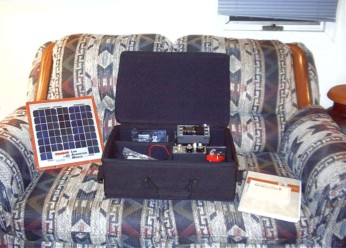
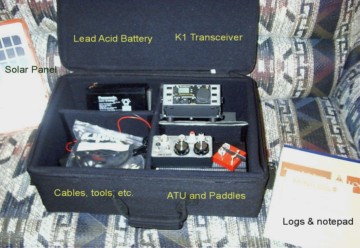
The case holds a complete station for HF QRP on 40 through 15 Meters. The contents are: 1 - Panasonic 12V 7Ah lead acid battery 1- Elecraft K1 - 4 band transceiver (40M, 20M, 30M, 15M) with KAT-1 auto-tuner 1 - Emtech ZM2 Antenna Tuner (as a backup) 1- Whiterook MK44 single lever paddle 1 - 12V Solar Panel (regulated) - to keep the battery topped off 1 - Pair of lightweight Walkman headphones and a pair of Koss Earbuds Glad kitches storage containers containing cables, jumpers, small tools, a VOM, logbook and pencils, etc. And now, all the components for a PAC-12 antenna for 40, 30, 20 and 15 Meters also fit nicely in this padded case !!! |
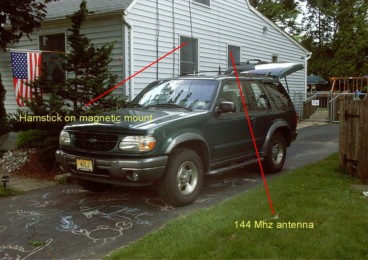
The on-board antenna system for the Explorer are three Hamsticks (one for 40M, 20M
and 15M) either of which I mount on a Lakeview Products tri-legged magnetic
mount. Since I never operate other than stationary, I never have to
worry about the Hamsticks hitting objects or anything like that. I can set
up the radio equipment, antenna, and have everything hooked up and running in
about five minutes! |
Portable Antennas |
The Hamsticks work well when I am in, or near the Explorer. However, when I
want to operate away from the vehicle - in my backyard, or in a park, or from
some other portable location, like a vacation spot - antennas become an important
consideration. I can't bring the Butternut HF9V with me; and I'm not about to take my G5RV out of the tree (it took a lot to get it up there in the first place!). It's easy enough to throw some wire around in the bushes for a random wire or string a dipole into some trees. But what if there are no trees or other, convenient supports? I also want whatever I am going to be using to be quick and easy to set up time so as to maximize operating time. The idea is to be on the air - not to waste a whole lot of time preparing to get on the air! So I have two solutions - the Buddipole and the PAC-12. These antenna are both commercially available; and both have a Website devoted to the construction of a economic, relatively easy to build homebrewed version. For plans on the Buddipole, click here. The Buddipole was my first HF antenna hombrew project. All parts were available at a local Ace Hardware store, Radio Shack and the local hamfest. If you follow Budd's easy instructions, the result is a great antenna that works wonderfully. My version is supported on a 12 foot painter's pole and my first contact with it was CU2IJ (Azores) on 20 Meter CW - 5 watts out from the K1. I made a change from the instructions on Budd's webpage. Instead of using CPVC parts that just "press together", I made a version where all the elements screw into each other for a tighter feel. I plan to replace the Radio Shack connectors with Anderson Powerpole connectors over this coming winter.. Pros - A rotatable dipole - so there is some "directionality" available depending on how you orient the two major lobes coming off the sides of the arms. The antenna was EXTREMELY simple to manufacture following Budd's wonderful instructions. There are no special mechanical skills required for assembling this antenna. Fairly inexpensive - I think the sum total of costs of materials came to about $30. Cons - You have to tote that mast along! If space is not at a premium, carting along a painter's pole is no big deal; but if space is scarce (or you're taking public transportation), the mast becomes a problem. Also once you get the mast to where you're going, you have to figure out how to support it. You either have to bungee it to something; or bring along some kind of tripod to support the mast. Portability of all the pieces can become an issue. Secondly the hombrewed version of the Buddipole was designed for use at 20 meters and up. You can wind coils for 40 meters; but they become heavy and the CPVC "frame" of this antenna can only support so much. With the 40 Meter coils I have to add a top piece that allows me to brace the arms up so they don't droop so much. When I get a chance, I will post some pictures showing what I mean. The commercial version uses aluminum tubing which makes this point moot. |
For plans on the PAC-12, click here. The PAC-12 was my second homebrew HF antenna project. The way this antenna breaks down for portability is what drove me to try it. In its' unassembled form the antenna is about 4 or 5 twelve inch pieces! Assembled, it's a vertical over eight feet in height! Jim's instructions are also super easy to understand; but the manufacture is a bit more involved. You have to thread some aluminum rod so that the ends are 1/4 20. For me this was no big deal, as I use taps and dies in my line of work, which requires some simple machining skills. For the uninitiated it might seem a little intimidating and daunting; but fear not! This is a really simple antenna to build. The ease of use and portability outweigh any misgivings you might have about building this one. And Jim, KA5DVS gives an excellent primer on thread cutting with his assembly instructions. Pro's - An easy to use vertical. It is a very efficient antenna; and it's design took top merits in the HF Pack antenna shoot out a few years back. It can be used anywhere via sticking this antenna directly into the ground or by mounting it on a small photographic tripod. It requires no mast - which can be a MAJOR consideration if extreme portability is of paramount importance to you. It was very inexpensive to build also - about the same as the Homebrew Buddipole. All materials can be found at your local hardware store and Radio Shack. Lastly, this antenna was designed to be used on all bands 80 through 10 meters - weight is not an issue at all. Cons- The construction is a bit more involved than that of the HB Buddipole; but if you are handy and are used to homebrewing, then it's no big deal. However, specialized tools, a 1/4 20 die and a 6-32 tap are required. Lastly, this antenna (like all verticals) requires the use of radials. I use six 15 foot long pieces of speaker wire which I have all soldered to an alligator clip. I just attach the clip to the ground portion of the antenna connector and spread them out like the spokes of a wheel. Not a biggie; but mention radials to some Hams and they go screaming into the night! |
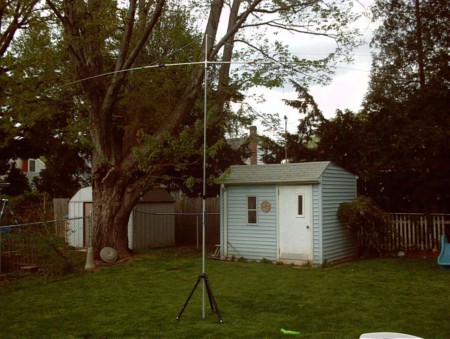
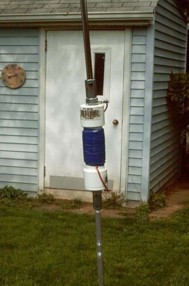
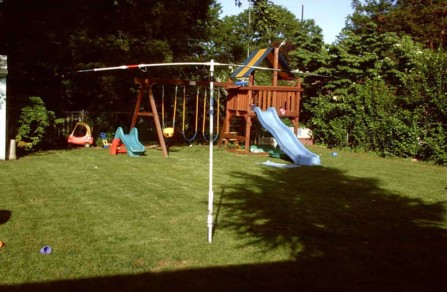
The assembled "HBP" using a 12 foot painters pole (not extended) as a mast.
I have the mast sitting in a homebrewed support system for use on grassy surfaces. |
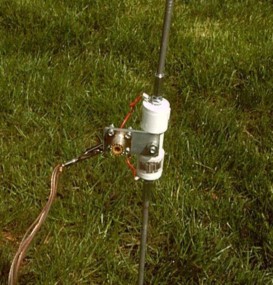
The feedpoint section of my HB PAC-12 features an SO-239 connector, unlike the BNC
connector that Jim KA5DVS uses. To the left you can see the radials hooked
to the "ground side" via an alligator clip. |
The 20 Meter loading coil. Instead of using PVC risers, I cut tubing to length and
cemented end caps on and used them for coil forms |
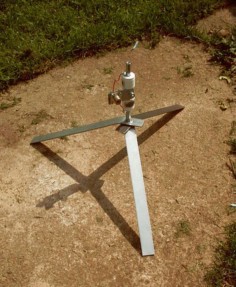
For those times when there's no soft ground to plant the bottom spike, I fashioned
this three legged base from some steel stock. The feedpoint section screws
right into it. |
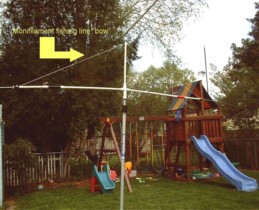
Some variations from the assembly instructions given on http://www.qsl.net/w3ff : Instead of using a T for the center section I use a 4-way junction.
A female coupling is cemented at the bottom and receives the painter's pole.
A 1/2" CPVC coupling is cemented at the top. This way I can slip another
section of 1/2" CVPC piping to go vertical from the top to act as a support for
a "bowstring" made from fishing monofilament. Each end of the bowstring has a
small "S" hook and each of these goes into a tiny cuphook that I drilled into the
CPVC just where the whips emerge from the piping. This is great for added
support of the arms when using the heavier coils. You can see this in the photo
above. The yellow arrow points to the bowstring that hooks into the cuphooks
which are by the whip sections. Also, instead of using 1/2" CPVC couplers, I
used male and female threaded couplers throughout, to give a more "positive" assembled
feel. |