Introducing Ready To Copy Version 1.7.6
Ready
to Copy - ARRL National Traffic System - Message Management
Copyright
2014 by D. Lane Kendall WK4WC
This document is an overview of the new features being introduced in Version 1.7.6. The same information will be found in the main help website.
Many of the changes for 1.7.6 are changes to NTSD features. These changes represent major improvements in how RTC interacts with the AirMail2000 software. There are also some notable changes to other areas.
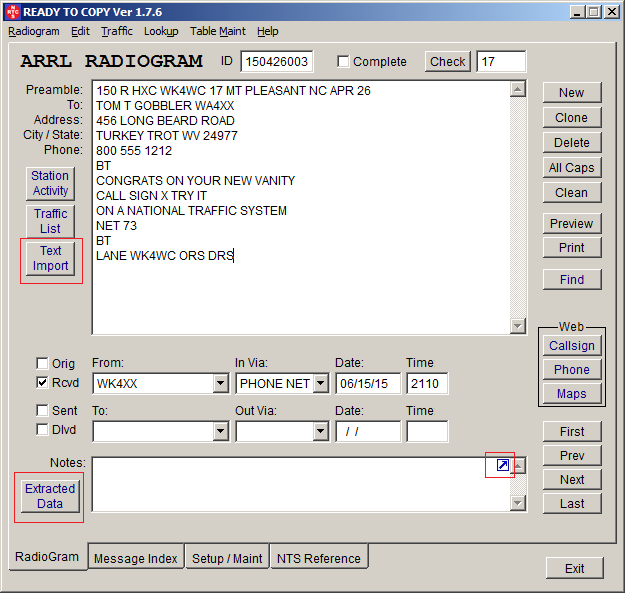
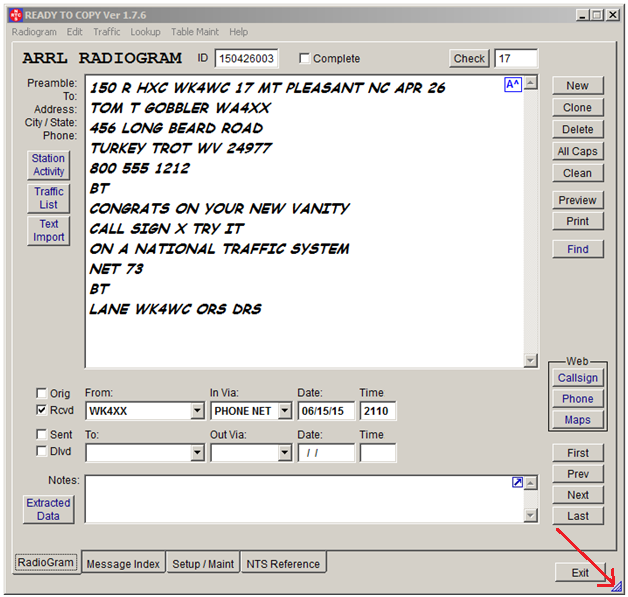
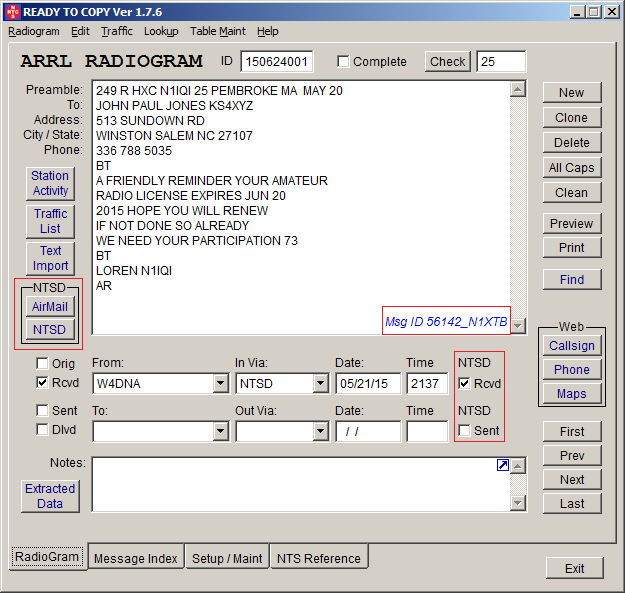
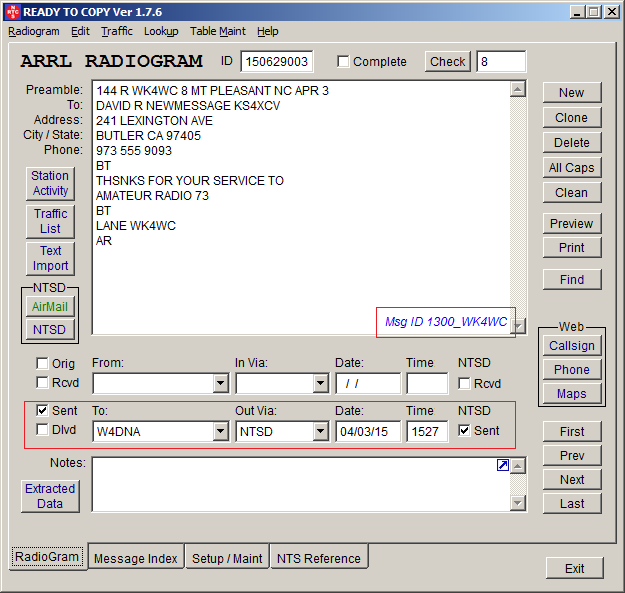
Radiogram (Main) Screen.
There are changes to the layout of some of the Command Buttons on the main screen. There is a new “Text Import” button and the Extracted Data button has been moved. You will also notice a small “Pop Out” icon in the upper right of the notes field. These features will be explained shortly. The functionality of the screen has not been altered.
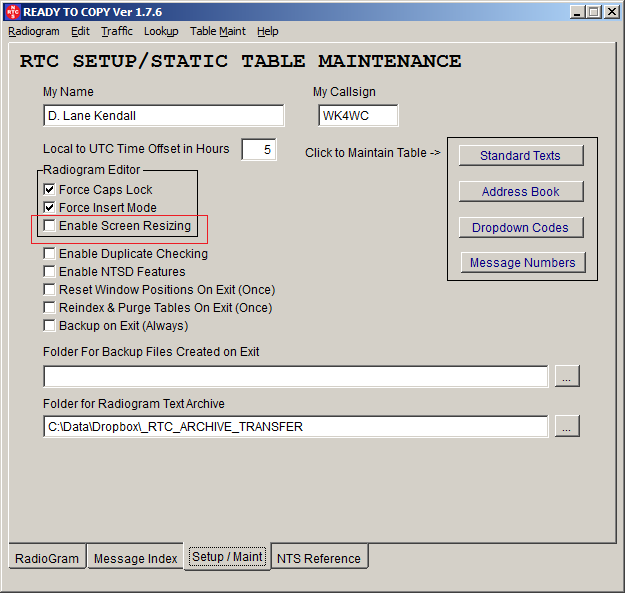
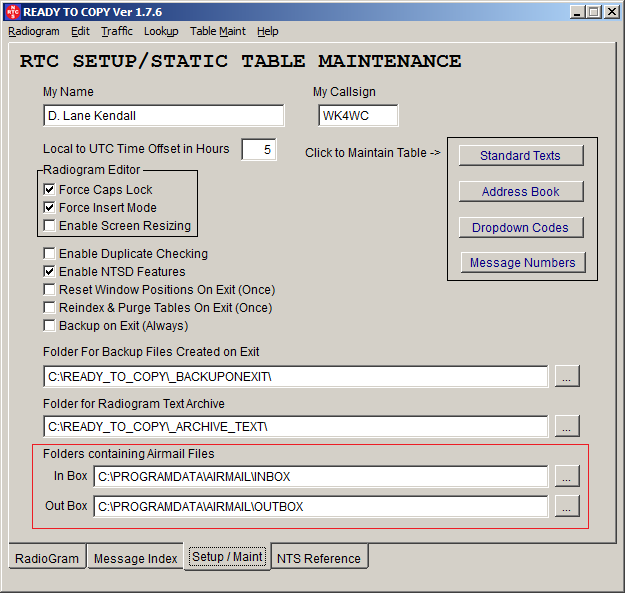
One of the original design goals for RTC was a small “footprint” so it does not occupy the entire computer screen. Depending on your screen resolution, there is usually plenty of room to run other applications while RTC runs in the background. Ever since the first release I have been asked if it was possible to make the screen larger. Until now the answer has been no. In version 1.7.6 there is a new check box on the “Setup/Maint” tab named “Enable Screen Resizing”.
With screen resizing enabled there are two new features on the main screen.
In the upper right of the Radiogram Editor control you will see a small blue “Font Selection” icon.
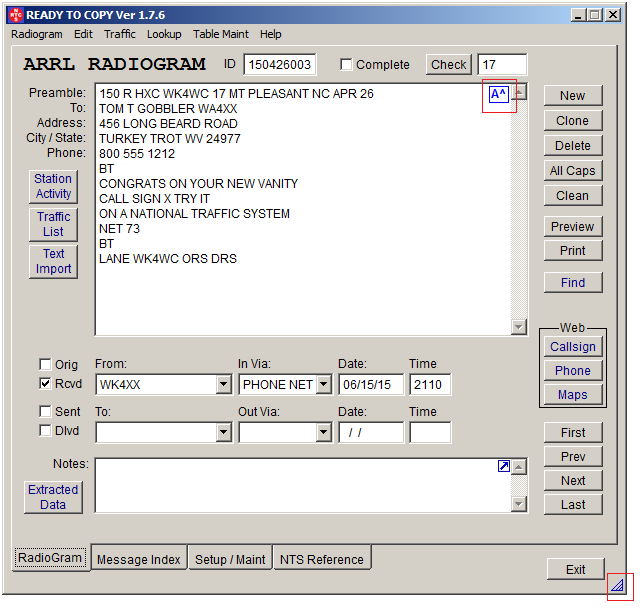
Clicking the “Font Selector” icon allows you to select any font available on your computer for editing Radiograms.
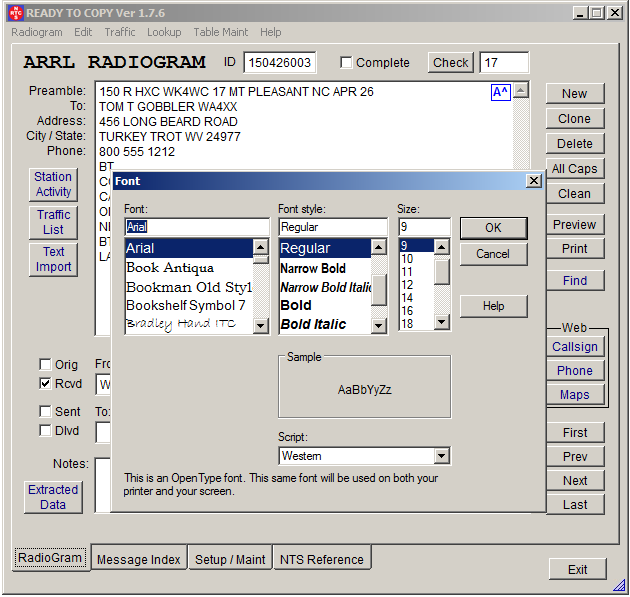
Select your favorite font, style and size then click and drag the lower right of the main screen (near the small blue icon) and resize. The fonts contained on your computer and the resolution of your screen are the only limits.
If you disable screen resizing, the default font and screen size will return, but RTC will remember your settings if you re-enable resizing.
When clicked, the “Pop Out” icon in the upper right of the notes field launches the Windows “NotePad” application where fonts can also be changed. There is no theoretical limit to the number of characters in the notes field. This feature allows editing outside the limited “Notes” editing control.
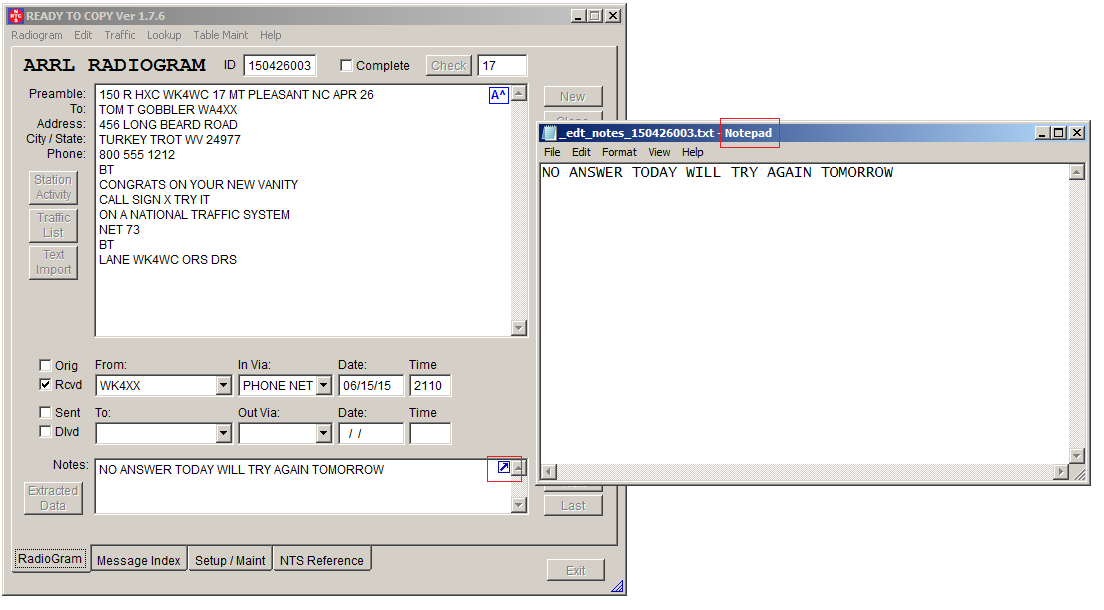
Notice that when you click inside the radiogram edit window the “Font Selection” icon is not visible so it will not interfere when you are editing. The same is true of the Notes “Popout” icon. Click anywhere outside the “edit boxes” and the icons will reappear.
The
“Extracted Data” command button has been moved and there has been a
minor change to the extracted data screen. RTC now extracts the middle
initial from the recipient’s name.
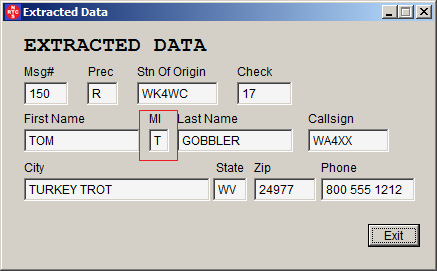
This middle initial information is used to enhance the programming in the “Phone Lookup” screen.
Text Import (New Screen)
This new feature could be an enhancement to the National Traffic System as well as the Ready to Copy program. It seems to me that if each traffic handling station across the country would originate and send just a dozen messages each month, the traffic handling experience would enhanced because the messages would be unique. There are websites that encourage this by providing names, addresses and callsigns of hams who have recently received new licenses, upgraded their license class or have received a new vanity callsign. Although time consuming, it is a relatively simple matter to assemble a list of addressees using the tools provided. The new RTC “Text Import” feature makes quick work of generating bulk traffic messages in RTC. Email [email protected] for more information on these websites.
To use the text import / merge features of RTC you must generate an address file and a message file. The address file will look like this. Note, it is important to have a blank line between each address in the file.
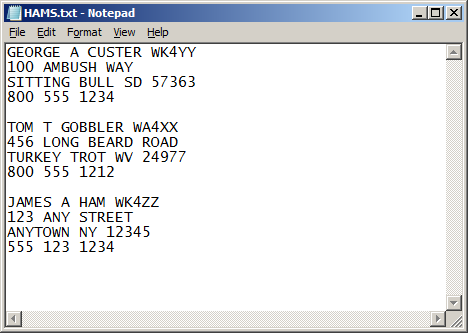
The first line should contain the addressee’s full name and callsign (if available) then the address, city state zip and phone number. If there are multiple phone numbers just list them on subsequent lines.
You will also need a message file that would look something like this.
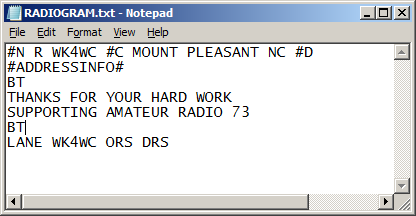
This example uses RTC macros for the message number, check and date. This is recommended in case you send the same bulk message on different days or make a minor change to the text of the message. Using the #N macro will use your next available message number just as any other radiogram.
Notice the #ADDRESSINFO# after the preamble. This tells RTC where to put the information in the address file. RTC substitutes the actual address information for the #ADDRESSINFO# macro.
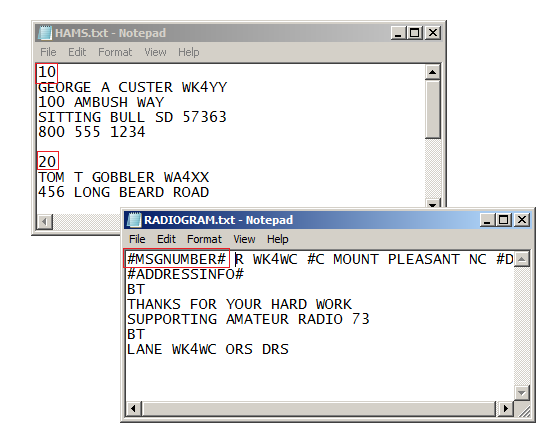
If you want to include message numbers in the generated messages you will need to include the message numbers on a separate line immediately above the addressee’s name and callsign. Also include #MSGNUMBER# macro at the beginning of the preamble. This will tell RTC where to place the message number for each message.
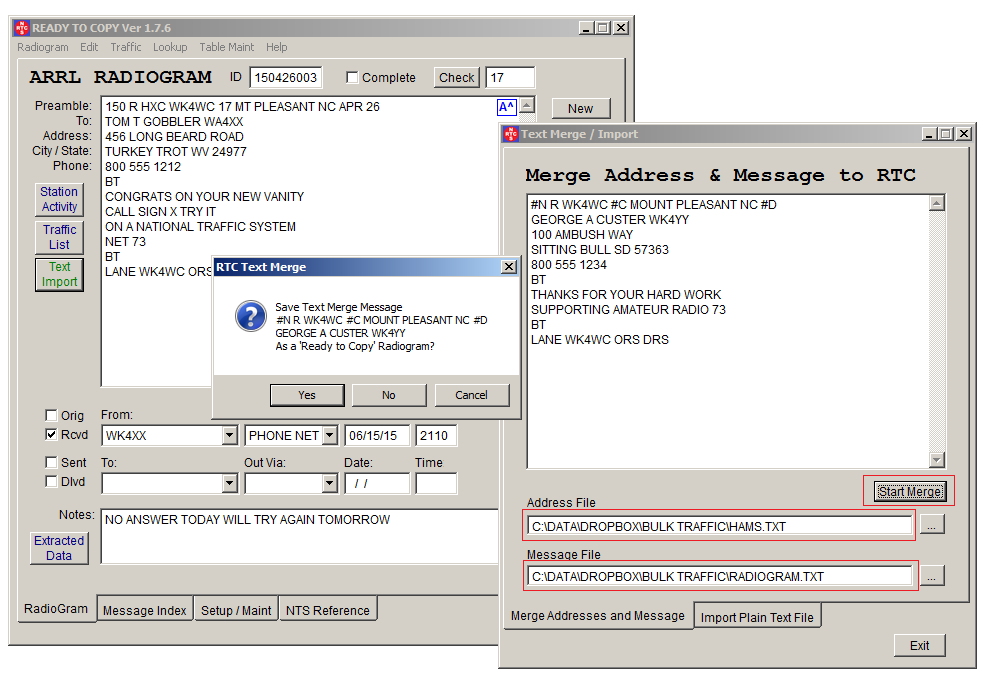
Launch the “Text Import” screen and select your address and message files. Click “Start Merge” and the RTC will generate each message and ask for confirmation as each one is created.
If you prefer to generate radiograms in a plain text file, those can also be imported painlessly into RTC. Create a file that looks like this. Make sure there is at least one blank line between messages and no blank lines within the messages.
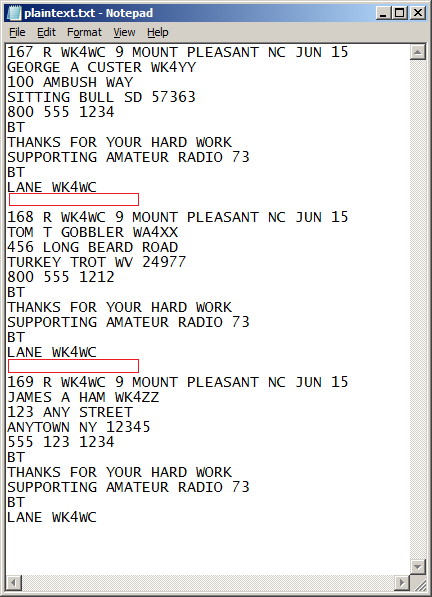
Click on the “Import Plain Text File” tab on the “Text Import” screen and start the merge. You will be asked to confirm each message as it is generated. You may also use the standard RTC macros while importing plain text messages.
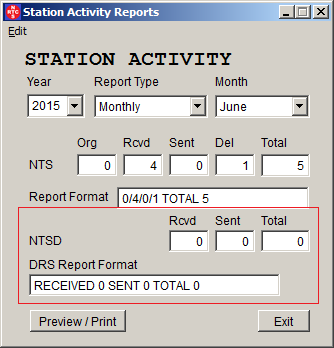
Station Activity Reporting Enhancements
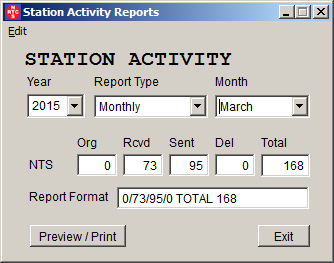
The Station Activity command button launches the “Station Activity Reports” screen. New features here include the ability to get a yearly detail or summary report as well as the existing monthly reports. Some other improvements include combo boxes for the year and report type. The re-query button has eliminated. Each time a selection in either combo box is changed, the database is instantly re-queried and the results will be displayed on the screen. In the new version, when the “Station Activity” screen is launched the default month and year are the last month and year in the database as opposed to the “current” month and year. The reasoning is, if you want to do your March reports on April first, you don’t have to reselect March. RTC will default to the latest entry.
Address and Standard Text Maintenance Screen Enhancements
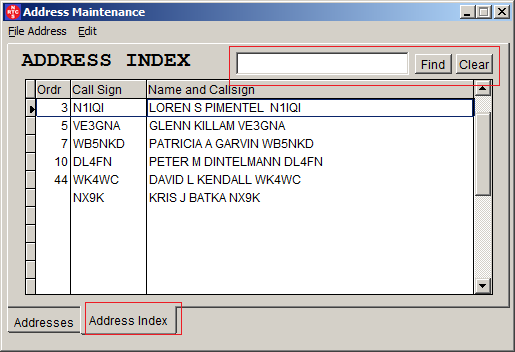
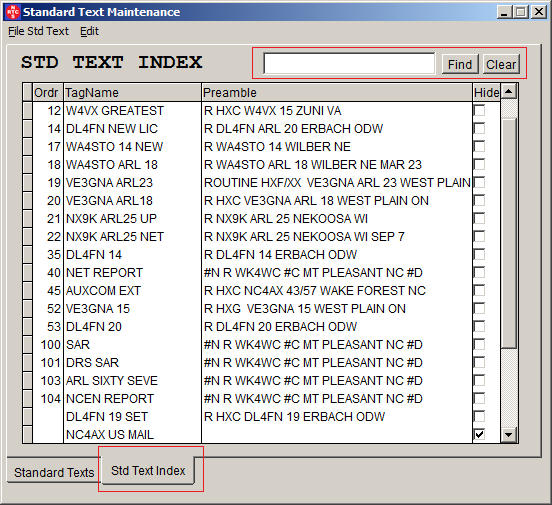
Both the Address Maintenance and Standard Text Maintenance screens have a new “Find” text box in the upper right corner of the their “Index” tab. Functionality is the same for both screens. Type something into the text box and click the “Find” command button. RTC sets a “Filter” that hides the records that do NOT contain what you typed. The filter remains until you click the “Clear” command button.
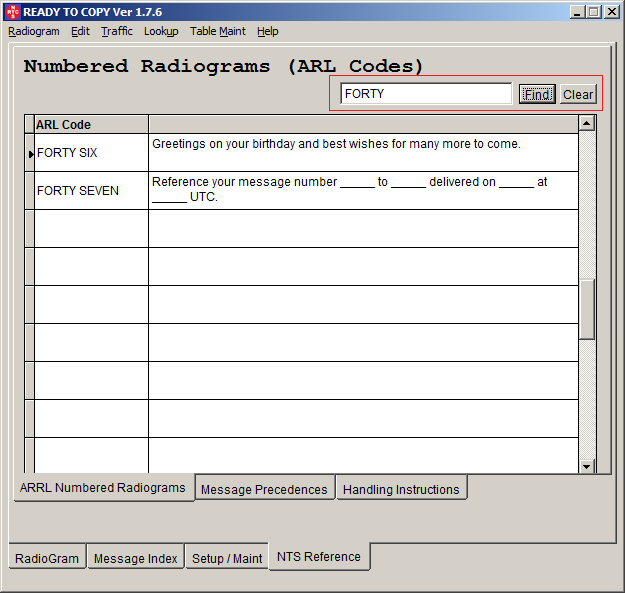
NTS Reference Tab Enhancements
The ARRL Numbered Radiograms Tab under the main screen’s NTS Reference Tab also has a new “Find” text box in the upper right corner. The functionality is the same as the address book and standard text index tab find boxes.
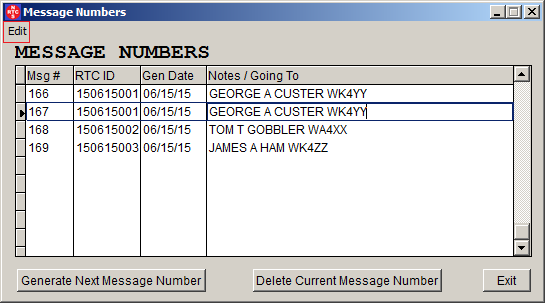
Message Numbers Screen
The Message Numbers Screen now has an “Edit” menu that supports editing features like “Cut”, “Paste” and “Select All” for the individual cells in the grid.
Lookup Screens
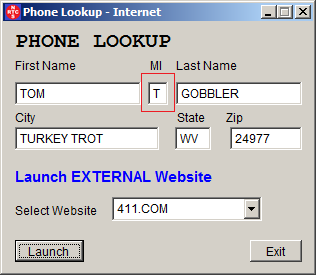
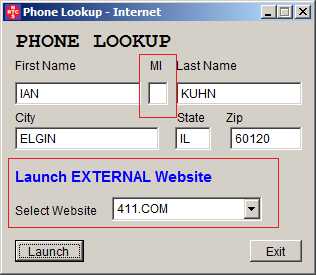
Phone
The “Phone Lookup” Screen has always provided the ability to launch external websites for the purpose of looking up an addressee’s phone number. This functionality has been changed internally and several new lookup opportunities (launch files) have been added. Also the data extraction routines now extract the addressee’s middle initial which is used in some of the “launch files”.
Callsign
In the previous version, RTC utilized the “Callook” web lookup API to look up the addressee’s callsign without launching a web browser. It did launch a web browser to address the full www.calllook.info website. That functionality is still in place but RTC now provides several new possibilities for callsign lookup by launching various external lookup sites. This process uses “launch files” similar to the phone lookup screen.

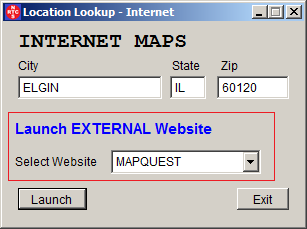
Maps (lookup)
The previous version used “Google Maps” for looking up an addressee’s location. This has been expanded to include several other mapping sites. Again, using “launch files” similar to the phone lookup screen.
User defined lookup files
RTC uses text website launch files to direct which external websites are accessed. These are plain text files that anyone can create or edit. If you would like to add a callsign, address or mapping website just follow the pattern of an existing file. The website launch files have the following naming convention…
webphone_xxx.txt
webcall_xxx.txt
webmap_xxx.txt
Detailed instructions for creating these files will be in the updated help files but for now email [email protected] for further direction if you would like to create a new website launch file.
Bug Fixes
There are several minor corrections in the code. Most of these are so minor most users would never notice.
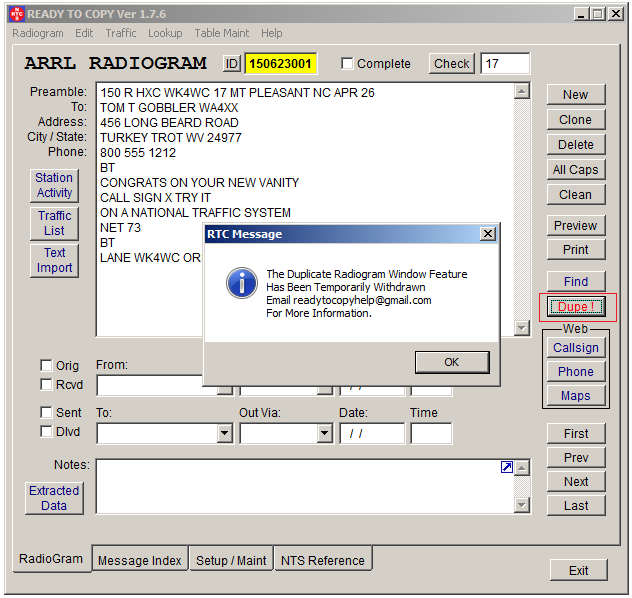
Dupe Screen (Recalled)
On the Setup/Maint tab of the main screen checking the “Enable Duplicate Checking” option will cause RTC to designate duplicate records by displaying a “Dupe” button on the main Radiogram screen. In version 1.7.2a clicking the “Dupe” button would display the Duplicate Record screen displaying the duplicate records. Due to the way the screen currently behaves users are easily confused by the way record filtering. It can also cause problems when the “Find” screen is open at the same time. For this reason, the “Dupe” screen has been recalled. You can still use the “Find” screen to track down the duplicate records. If losing the “Duplicate Records” screen creates a hardship, contact [email protected] and you will be given instructions on how to enable it.
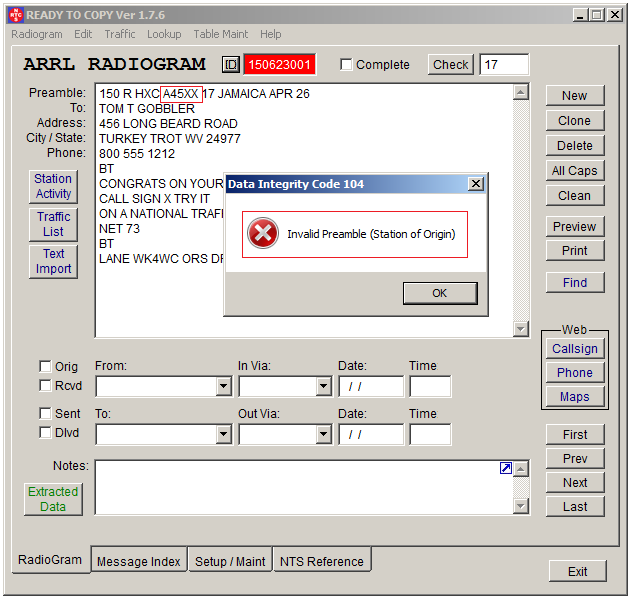
Support for foreign (or other unusual) Callsigns
Ready To Copy will report an error if the callsign in the preamble is invalid. Also an invalid callsign cannot be extracted for later use by the callsign lookups. The RTC callsign verification routine consists of a simple set of rules. A callsign will consist of 1 or 2 letters plus a single number plus 1, 2 or 3 letters. This works fine for all US callsigns and most foreign callsigns. As traffic handlers we seldom deal with anything other than US or Canadian callsigns BUT it can happen. For example Jamaican callsigns begin with a number like "6Y3B". Callsigns for Oman can have two numbers like “A45XX”. During the ARRL Centennial celebration callsign W100AW was used. Either of these exceptions will cause RTC to report an error.
In this rare circumstance, simply create a new record in the Address Book for the foreign callsign. In this case the name and address are of secondary importance but can be entered if you like.
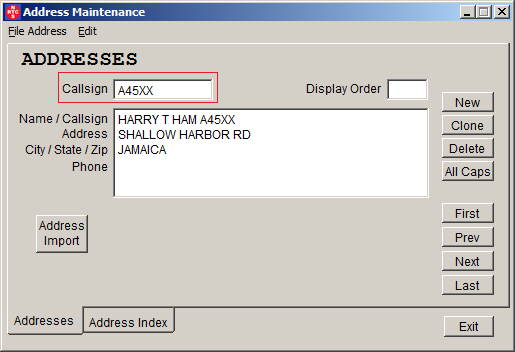
Go back to the main screen and click the “Check” button. The error will clear because RTC will now consider any callsign in the address book as valid if it fails the normal verification routines.
NTSD Enhancements
There are major changes to RTC for Digital Relay Stations who use AirMail 2000 software.
In the previous release 1.7.2a, AirMail messages could be imported one at a time using the “RTC AirMail Import” screen. Updating “Sent” messages was done in a similar manner by selecting messages from the AirMail Outbox. The transfer of messages from RTC to AirMail could only be achieved by launching the NTSD screen and using copy / paste into AirMail.
Version 1.7.6 introduces significant changes to the RTC AirMail data transfer interface.
National Traffic System - Digital
NTS Digital (NTSD) is currently configured as a parallel system to the CW and phone NTS nets, providing 24 hour continuous service as links between Regions through manned BBS stations operating on multiple HF bands. Hubs in each of the three U.S. NTS Areas, Eastern, Central and Pacific, are key stations in the Area interconnects.
Since the majority of RTC users do not operate digital stations, The RTC NTSD features and tools are disabled by default. To enable NTSD go to the “Setup/Maintenance” tab of the main radiogram screen and click the “Enable NTSD Features”.
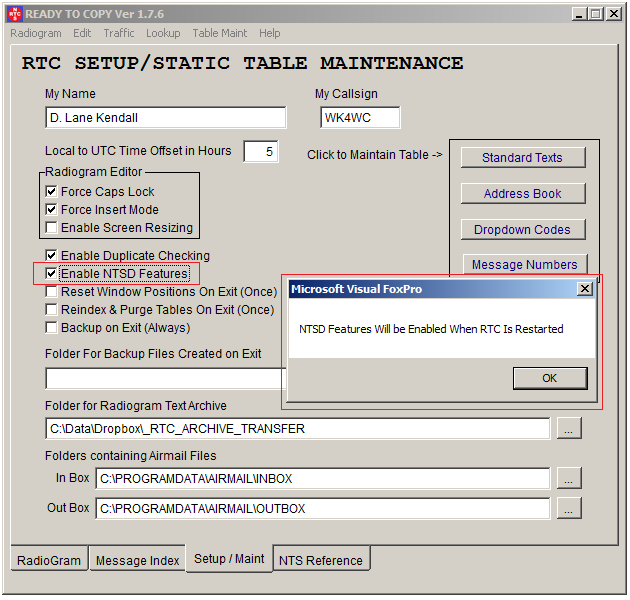
Exit and restart RTC and you will see the NTSD controls.
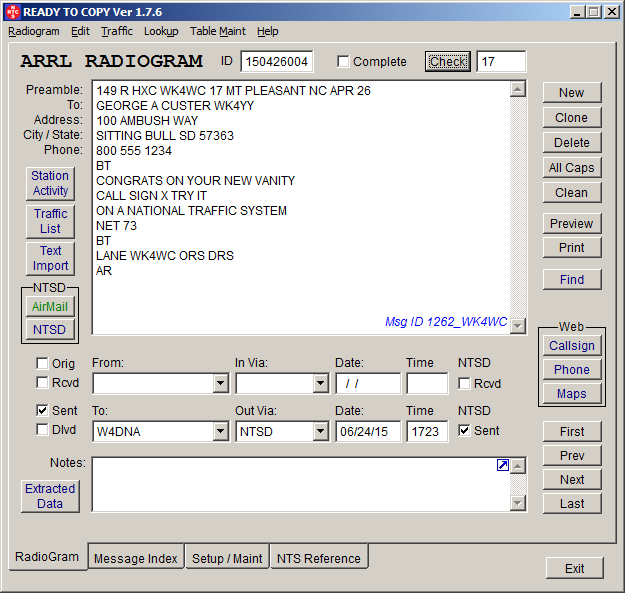
Radiogram Screen NTSD Controls
With NTSD features enabled there are several controls visible on the screen. Version 1.7.6 introduces major changes to these features.
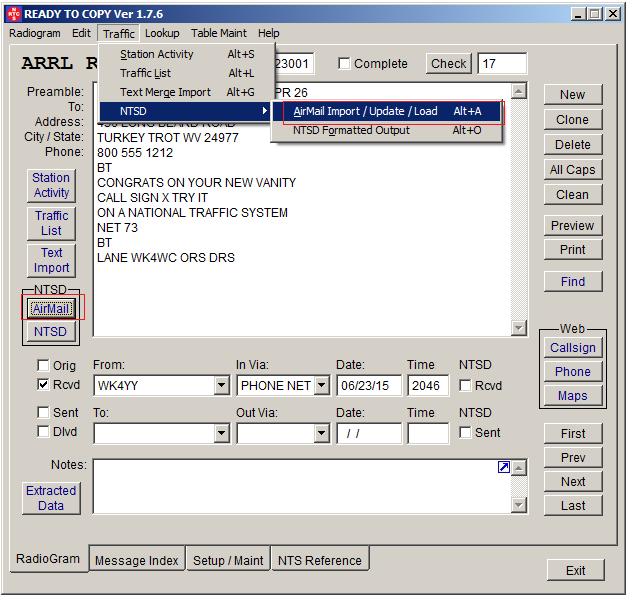
On the left side of the screen there is a, “NTSD” button group. The group has two command buttons. The “AirMail” command button launches the AirMail 2000 import export update screen. The “NTSD” command button launches the “NTSD Text” screen. Both are explained later in this document.
The message id is located INSIDE the radiogram text window. This message is used for reference only and cannot be changed. Notice that when you click inside the radiogram edit window the message id is not visible so it will not interfere when you are editing the radiogram.
At lower right of the screen note there are NTSD received and sent checkboxes. RTC tracks regular NTS and NTSD traffic seamlessly in the same database. When NTSD features are enabled, the “Station Activity Report” (SAR) screen contains details about NTSD traffic that can be sent to the
In the example below the message is marked as “Sent” as any NTS radiogram but it is also marked as “NTSD Sent”. As a general rule, RTC will manage the NTSD “Sent” and “Rcvd” checkboxes but they can be changed manually.
With NTSD features enabled, the “Station Activity” screen and report show NTSD activity as well as regular NTS message activity.
Ready To Copy – AirMail 2000 Interface ( Import / Export / Update)
The AirMail 2000 interface was completely rewritten in version 1.7.6
AirMail 2000 is a very popular messaging program (similar to Outlook) specifically designed for connection to a HF radio mailbox station.
AirMail is Copyright ©1997-2004 by Jim Corenman, KE6RK, and Sirius Cybernetics LLC, P.O. Box 2143, Friday Harbor, WA USA.
AirMail is used extensively by NTS Digital Relay Stations to send and receive NTSD messages.
You will need a working installation of AirMail Software on your computer to use the RTC to AirMail Interface. Messages can still be copied and pasted between AirMail and RTC as in RTC 1.7.2a but the new interface eliminates error and makes the transfer quite simple.
About the Interface
Internally AirMail stores messages in text file format as “.MSG” files. Importing into RTC and updating existing RTC messages is accomplished by reading these files directly from the AirMail inbox and outbox. RTC does NOT open, write to, or manipulate these files in any way. Modifying .MSG files outside AirMail’s interface could disrupt the AirMail message tracking system.
When RTC messages are exported from RTC to AirMail, third party software is used to control the AirMail application screen so messages are created much as a user would create them manually. Much more detail will follow.
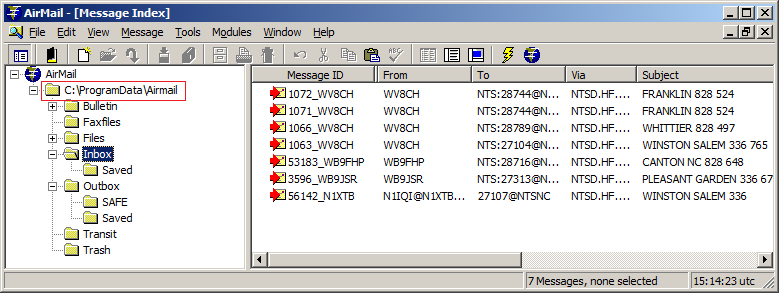
Finding the Inbox and Outbox Folders
The AirMail Message Index screen will give you an idea of where the inbox and outbox folders are located. This could be different based on the version of Windows in use. You will find “.MSG” files corresponding to the AirMail Message IDs.
AirMail Inbox and Outbox on Setup / Maintenance Tab
Go to the Setup / Maintenance Tab on the main RTC screen and locate AirMail’s inbox and outbox folders. Use the “Browse” buttons to find the folders.
AirMail Import / Export / Update Screen
Go to the main RTC (Radiogram) screen and click the “AirMail” command button or select “Traffic”, “NTSD”, “AirMail Import / Update / Load” or just press Alt+A to launch the AirMail Import / Update / Load screen.
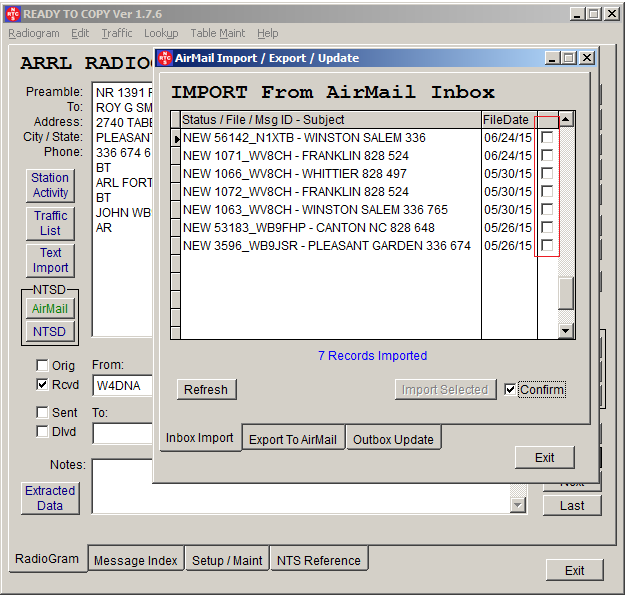
Import messages from AirMail
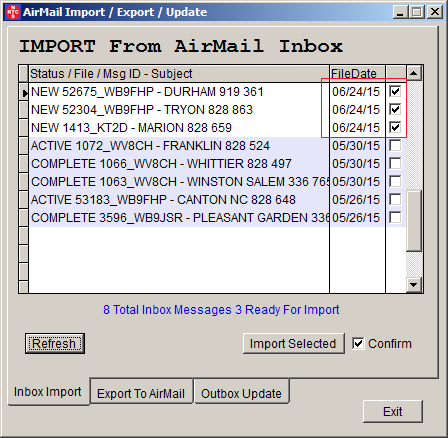
The AirMail Import / Export / Update Screen has three tabs at the bottom of the screen. With the “Inbox Import” tab selected, information about the files contained in AirMail’s inbox are displayed. The grid shows the message status, the file name or message (MSG) id, the file date and a checkbox indication whether the message has been selected for import. RTC sorts the incoming messages by their file date and always displays the most recent messages first.
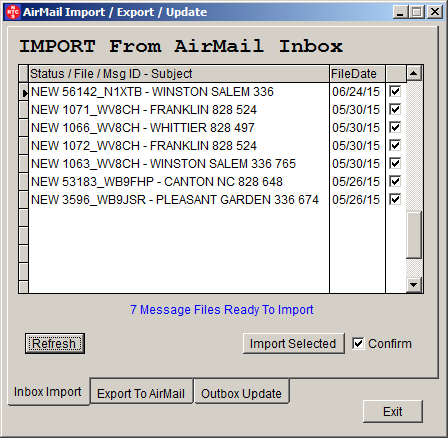
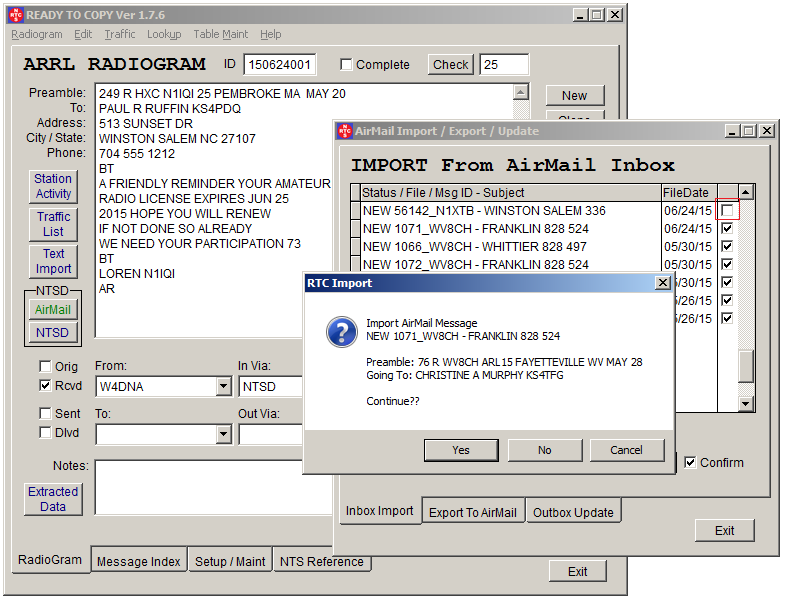
To import the selected messages simply click the “Import Selected” command button. If the “Confirm” checkbox is selected (recommended) you will be asked to approve each message as it is being imported.
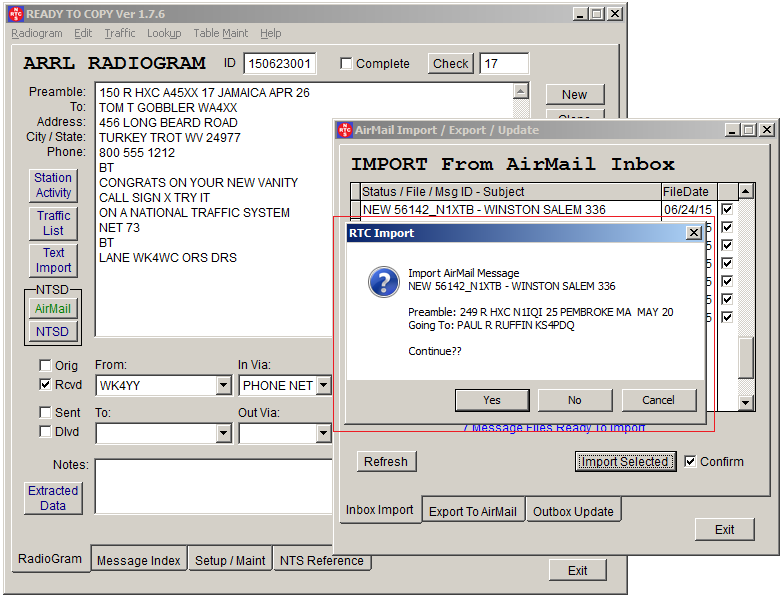
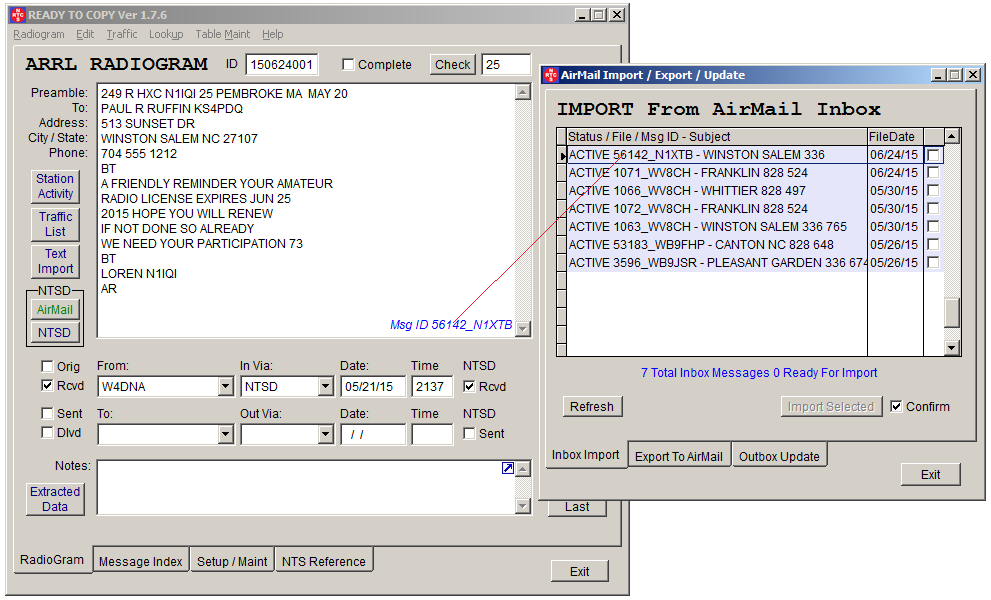
If you click “Yes” the first message will be created and displayed in the main radiogram screen and you will be asked to confirm the next message. Clicking “No” will skip the current message and clicking “Cancel” will cancel the entire import.
As messages are being imported the program runs the RTC “Check” routine so formatting and other errors will be obvious as the import proceeds. New records are deselected in the grid as they are imported.
If all the messages are imported, they will all be deselected in the grid.
Click “Refresh” in the Airmail screen to refresh the status of the messages in the inbox. In this case the messages are all “ACTIVE”. RTC will not allow records that are not “NEW” to be selected. This would create duplicate records in RTC. Any attempt to select these messages will result in a message.
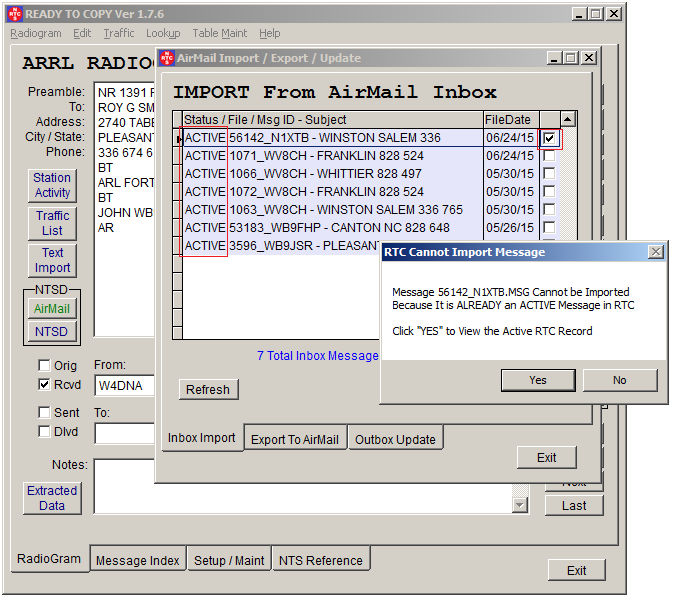
Click “Yes” and RTC will display the record in the main radiogram window.
Subsequent AirMail Connections will produce more incoming messages. RTC will see these as new messages that can be imported. The messages that have already been imported will still appear in the import grid along with their status even though they cannot be imported.
A word about AirMail message storage.
As stated, Ready To Copy does not modify AirMail MSG files in any way, but it does READ them and extract information from them to be used in the import and update processes. The underlying language is very efficient and these operations have been tested with hundreds of messages in the inbox and outbox. That said, the fewer files that have to be read the better. Having too many messages in the inbox or outbox can be very confusing.
In the interest of efficiency and speed, consider using AirMail to move messages to some other folder like “Saved” or “Imported”.
CAUTION… Do NOT move MSG files using Windows Explorer.
Folders can be created easily on the “AirMail Options” screen under the “Folders” tab.

RTC To AirMail EXPORT
The ideal method of exporting from RTC to AirMail would be to create a text file from RTC and send it to the AirMail outbox. Unfortunately AirMail does not currently support importing files to the outbox. The help files state that it does but the functionality does not work.
Versions of RTC up to and including 1.7.2a had an “NTSD Output” screen. When launched, the current message was displayed in an edit box along with a formatted “To:” and “Subject:” The contents of the edit box could be copied to the computer’s clipboard and transferred manually to a new AirMail message. This method works but it is not an ideal solution.
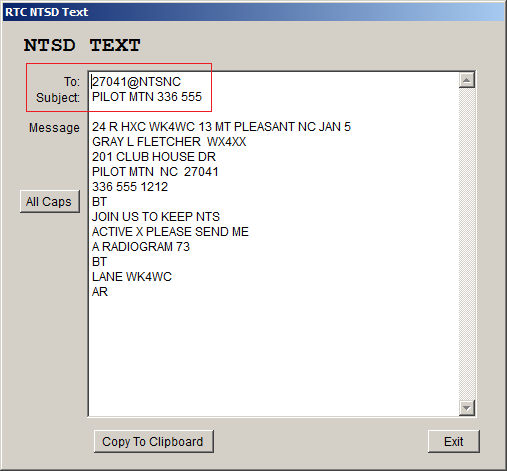
RTC versions after 1.7.2a still have the NTSD Text screen and it can be used the same way but new controls have been added.
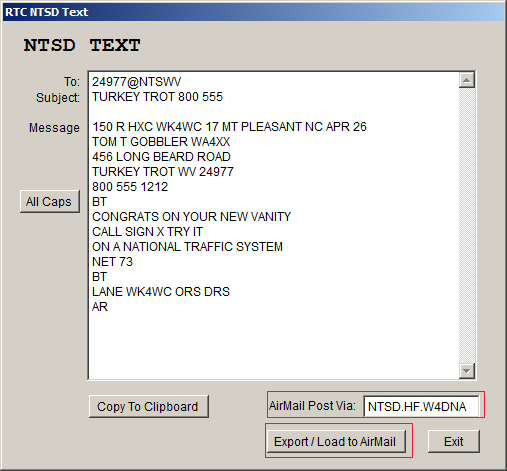
The “AirMail Post Via:” textbox contains the “Post Via” information that would appear in the upper right corner of an AirMail message.
The “Export/Load to AirMail” command button launches a custom script for third party software based on the Windows Automation API. The script activates the AirMail Message Index window and sends keystrokes to create a new message and populate all the various parts of the message. This solution is at best a workaround and will be replaced with a file transfer system when / if possible.
EXPORT / LOAD to AirMail
The custom script mentioned above will activate the AirMail Message Index window but it will not launch AirMail. AirMail must be running when the script is launched. It is also a good idea to activate the “outbox” folder in AirMail before the export starts. The export script has a number of error traps. For example it cannot proceed if an existing AirMail message is open. There are other screens within AirMail that will cause an error.
Although not always required, it is a good idea to re-start the AirMail application before you do an RTC Export/Load.
Select a message to be exported to AirMail in the main RTC window. From the NTSD panel on the main screen click the “NTSD” command button. On the NTSD Text screen make sure the AirMail Post Via: textbox contains the correct information for the MBO being accessed.

Click “Export/Load to AirMail” to start the export. You will be asked to confirm the export.
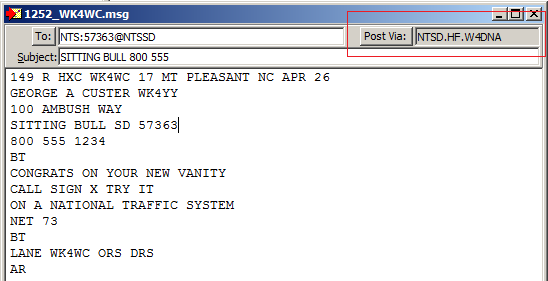
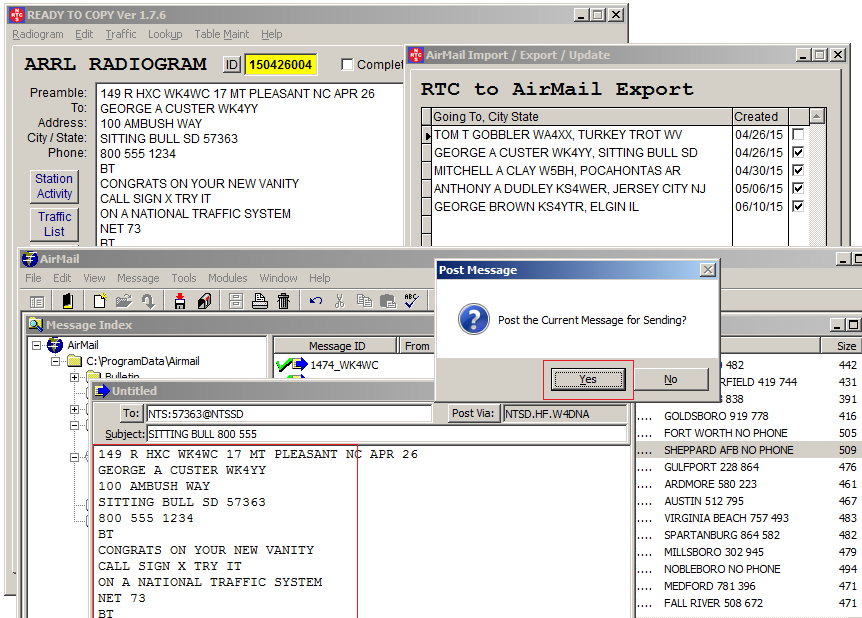
A new AirMail message will be created and all the fields populated with the information from the selected message in RTC. When the process is finished the script asks if the message should be posted for sending. If you answer yes, the message is posted, if you answer no, another message asks if you want to save the message. A positive answer will create a saved message that would need to be posted manually. A negative answer will result in no message saved in AirMail. This allows an opportunity to abort the process if you can see it is going wrong.
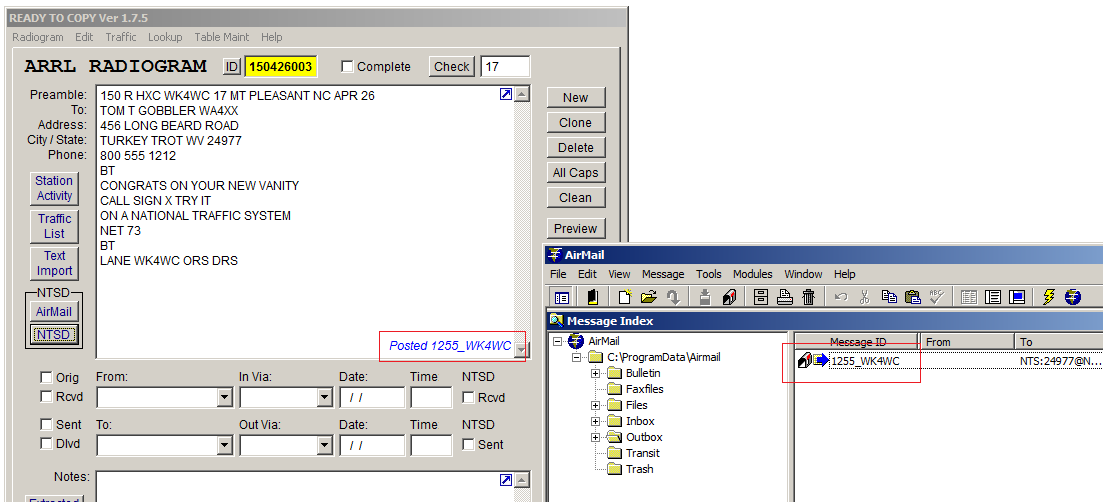
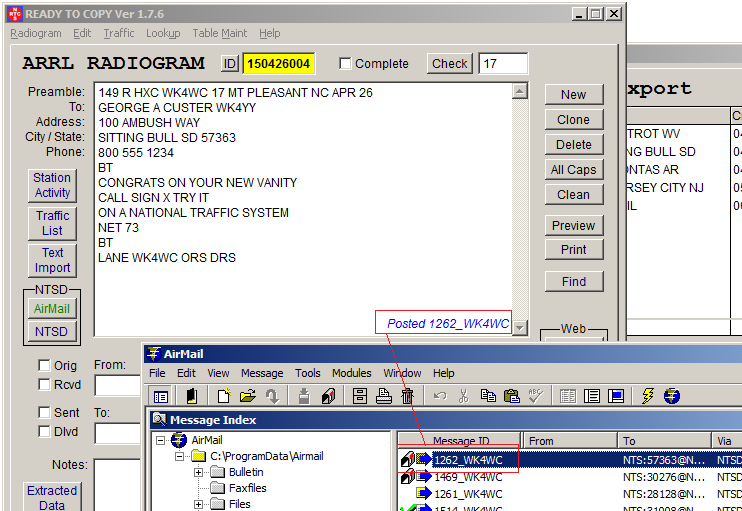
When the export is complete RTC will associate the AirMail Message ID to the RTC record. This is displayed in the lower right of the radiogram edit box. Notice that there is no “Sent” or “Via” information at this point because the message has not been sent to the MBO or other station.
After the message is sent in AirMail RTC can “Update” from the AirMail outbox to get this information. There will be much more on “Update from Outbox” later in this document.
The “NTSD Text” screen exports a single message to AirMail. When there are multiple messages, consider launching the “AirMail Import / Update / Load screen” and select the “Load to AirMail” tab. Again, make sure AirMail is running on your computer and the outbox folder is selected.
When the screen is launched RTC populates the AirMail Export grid. All active (not marked complete) traffic is listed in the grid but only new messages with no sent or received information are pre-selected. RTC cannot know the user’s intent, but assumes that a new message with no “Sent, Received or Via” information would be a candidate for export. Other messages can of course be selected and loaded as well. Click on a row in the export grid and the associated message will be displayed on the main radiogram screen.
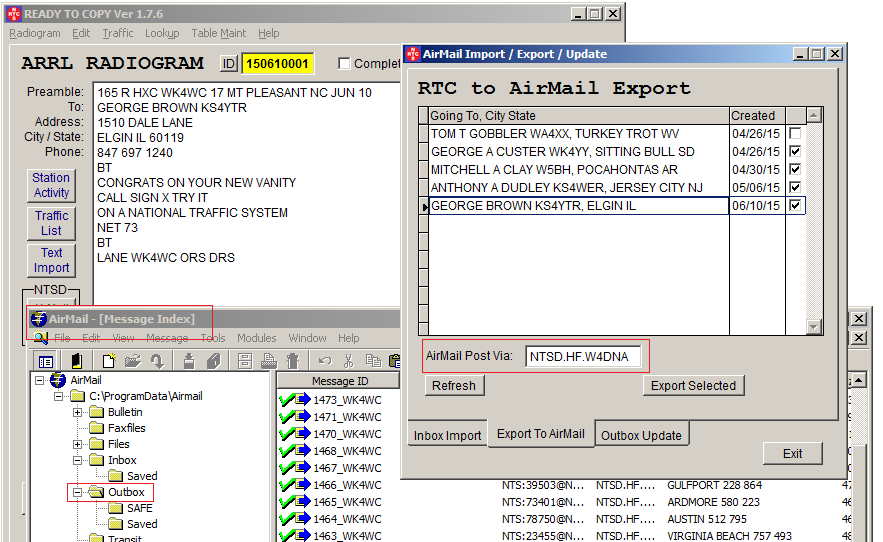
Make sure the “AirMail Post Via:” information is correct then click the “Export Selected” command button. RTC will load all the selected messages sequentially just as it does using the “NTSD Text” screen.
A confirmation message will be displayed for each message being exported much like the AirMail Import process. Each message can be confirmed or skipped. Cancel aborts the entire export.
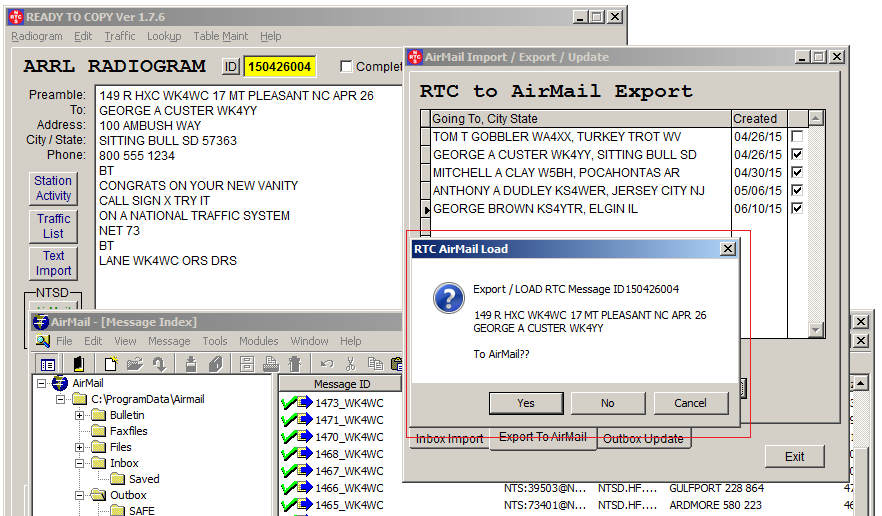
AirMail Message Ids will be associated with the RTC messages as they are exported to AirMail.
At this point the message has not been transmitted to the MBO or other point so there is still no sent or received information. This information can be entered manually but there is an easier way.
After the message has been sent using the AirMail application, return to the RTC main radiogram screen and click the “Check” button. Since the RTC message and the AirMail message (file) are already associated, RTC will read the existing file and retrieve the "Sent" information. Note. The message will be marked “NTSD Sent” as well as “NTS Sent”.
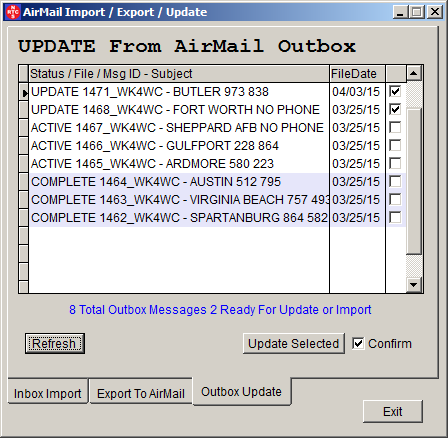
This action is considered “Outbox Update”. If you are exporting multiple messages consider using the “Outbox Update” tab on the “AirMail Import / Export / Update” screen.
There is a grid much like the Inbox Import grid that lists messages in RTC that can be updated with information contained in the AirMail outbox. All the outbox files are shown in the grid with a status. Only records with “UPDATE” status that have no sent / received information are pre-selected. An “ACTIVE” status means the record is active (not complete) in RTC and can be updated although it has already been updated. “COMPLETED” records cannot be updated.
Click the “Update Selected” command button with or without conformation. Operation is much like the Inbox Import.
Messages that were created in AirMail and already sent can be imported into RTC using the “Outbox Update” routines. The message below was created in AirMail and sent to the MBO.
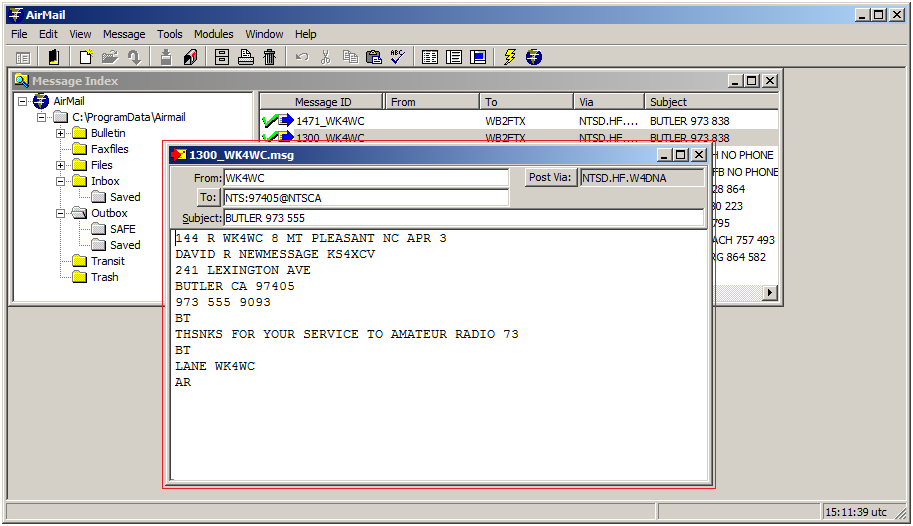
RTC will “see” the message as “NEW” and import the entire message from the AirMail outbox.
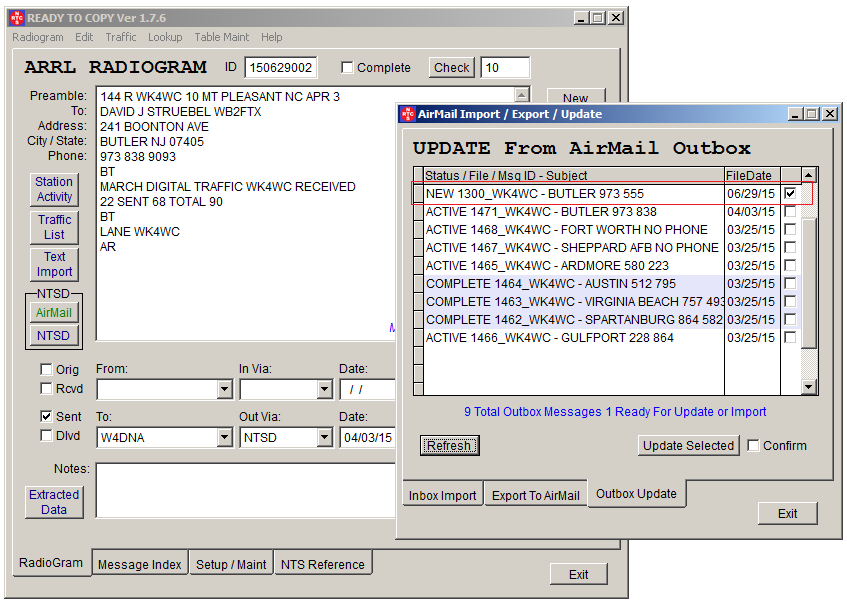
RTC compares the first two lines of the AirMail message (.MSG file) to the first two lines of the message in RTC to match and update messages. If you create a message in RTC and send it to AirMail for transmission, be sure that the first two lines are not modified until the message is updated. Otherwise the message will be seen as “NEW” by RTC and a new message will be created.
As with the AirMail Inbox it is best to move Outbox messages to a different folder after they are sent and updated.
A word about the update process
The update process is the least used and most misunderstood of the three AirMail functions. The update process simply takes “Sent” information from the AirMail MSG file (after the message is sent or transmitted by AirMail) and updates the RTC database. It also imports MSG files from AirMail to RTC if they are new to RTC.
As with many RTC features there are multiple ways to accomplishing the same thing. AirMail update is a prime example. If a message was sent to AirMail from RTC. Just click "Check" to update the message. If a message is created in AirMail and an IDENTICAL message is created in RTC, simply click the "NTSD Sent" checkbox and then the "Check" command button. RTC will look for a match in the AirMail outbox and do the update.