The TL-922 is a beautifully constructed amplifier. Unfortunately,
it is not suited for high speed T-R switching, a necessary attribute
for operating AMTOR, QSK-CW, or SSB-VOX modes. In its balky
factory-stock configuration, the TL-922 hot-switches with many of the
current crop of QSK-rated transceivers. Another factor is relay
noise. The relay clacking in a stock TL-922 is loud, if not
stentorian--and unnecessary. The modification described herein
results in greatly reduced relay noise. Also included are some
circuit improvements for the TL-922 that prolong the life of the
3-500Z amplifier-tubes and other, not inexpensive or easy to replace,
amplifier components such as the output bandswitch.
This QSK-circuit also works well in the Heathkit SB-220 amplifier
since the SB-220 uses a circuit that curiously resembles that of the
TL-922. The SB-220 also suffers from the problem of hot-switching
with modern fast-switching transceivers.
The discussions that follow use component reference designators that
are specific to the TL-922. Although the SB-220 uses different
component designators, the QSK circuits are essentially the same for
either amplifier. If you are interested in Circuit Improvements for
the SB-220 see the November and December 1990 issues of QST .
QSK
There are two, popular methods of RF switching for QSK: [1] PIN
switching diodes; and [2] High-speed vacuum-relays. PIN diodes are
quieter and faster than relays, but PIN diodes are subject to damage
from electrostatic discharges such as lightning in the near-field of
the antenna. A PIN diode QSK circuit is complex. A typical PIN-diode
QSK circuit has approx. 60 components, many of which are
specialized--so replacements are not likely to be available from your
local radio emporium.
High-speed relays can do the job of switching the amplifier in under
3mS. This is fast enough for Amateur Radio applications such as
AMTOR, SSB-VOX and CW-QSK up to about 35 words per minute. The
high-speed vacuum-relay's acoustic noise problem can be minimized
with an appropriate relay mounting technique. More on that later.
HIGH-SPEED RELAYS
There are at least two manufacturers of suitably quick vacuum-relays
that are rated to handle 2450W maximum [7a in a 50 Ohm circuit] up to
32MHz: Kilovac, Inc., located in Santa Barbara, California and
Jennings Radio, Inc., located in San Jose, California. These relays
are the Kilovac HC-1 and the Jennings RJ-1A. The two relays are
virtually interchangeable mechanically and electrically. When driven
by a 26.5V source, the relays are rated at <6mS and <8mS
switching times, respectively. The rated switching times tend to be
on the conservative side of each relay's measured capability. {mS =
millisecond = thousandths of a second}
Relay speed is not the only consideration here. In any QSK circuit,
correct relay make [on] and break [off] timing, or sequencing, are
equally important. Here's why: RF-relays should not be subjected to a
signal voltage while they are opening or closing. Switching with
voltage present on the contacts, i.e., hot-switching, causes the
contacts to arc and burn, resulting in greatly reduced life
expectancy. In order to properly sequence the RF input and RF output
relays in an amplifier, it may be necessary to speed up or slow down
the action of each relay depending on whether it is switching from
transmit to receive [break] or from receive to transmit [make].
Before a relay can close, a magnetic field, or force, must be
generated in its coil. To do this, current must flow in the coil. In
order for current to flow, the inductive reactance in the relay's
coil must be overcome. It takes a little time.
Theoretically, generating the magnetic field can take place in almost
no time at all if a perfect constant-current source is used to drive
a relay's coil. Unfortunately, this requires a current source that is
capable of infinite voltage at T=0. Infinite voltage, besides being a
large order, is going to cause a big problem for the insulation in
the relay's coil and anything else in the same room! This is not
practical.
When driven by a voltage-limited current-source, a relay can be made
to switch faster without the risk of insulation breakdown. A
voltage-limited current-source can be constructed by placing
resistors series with the TL-922's or SB-220's internal +110V power
supply. The in-series speed-up resistors limits the relay coil
current to the correct approx. 80mA @ 26.5V for each of the (2)
series connected 335 Ohm relay-coils but allows approx. 55V to
briefly appear across each relay coil at T=0. This simple speed-up
circuit reduces the make-time of the relays. Both brands of relays
have a measured make-time of less than 2mS with this circuit.
When current stops flowing in a coil, the magnetic field that was
generated by the previous flow of current begins to collapse. A relay
can not open until the magnetic field in its coil is mostly
dissipated. Since a changing, i.e., expanding or collapsing, magnetic
field generates voltage across a coil, a reverse-voltage is briefly
generated across the coil of a relay that is switched off. The
reverse-voltage that is generated in the coil by the collapsing
magnetic field is proportional to the external resistance that is in
parallel with the coil. More resistance means more reverse-voltage, a
faster collapse of the magnetic field, and faster break-speed. Less
resistance means less reverse-voltage, a slower collapse of the
magnetic field and a slower break-speed. If the resistor is omitted,
the coil voltage spike may rise to several hundred volts on break and
the relay's break-time will be very fast This reverse-voltage spike
is not good for the insulation in the relay's coil or anything that
is externally connected to the coil. A diode can be paralleled with a
DC-relay's coil to absorb the reverse-voltage spike. Since a
conducting diode has a low resistance, such a diode will considerably
lengthen the break-time of a relay. In a QSK amplifier, a diode alone
would provide too much break-time, so a resistor is placed in series
with the diode to speed things up. By choosing appropriate
resistances, correct break-time sequencing of two or more relays can
be accomplished.
As can be seen in the diagram for the QSK circuit using two identical
vacuum-relays, the resistor on the output relay's coil has less
resistance than the resistor on the input relay's coil. This keeps
the output relay connected to the antenna a fraction of a mS longer
than the input relay can apply drive to the amplifier-tubes and
assures that the output relay will not be opening, and arcing its
contacts, before the drive power disappears. When a fast reed-relay,
instead of a vacuum-relay, is used to switch the RF-input,
hot-switching on break is virtually impossible.
ELECTRONIC CATHODE-BIAS SWITCH [ECBS]
An ECBS replaces RL2, the cathode-bias relay; D2, the cathode-bias
zener; R7 and C26. The new cathode-bias switch is a garden variety,
general purpose NPN power-transistor, Q1. The transmit cathode-bias
voltage is adjustable in approx. 0.8V steps which allows the user to
set the transmit zero-signal anode [plate] current, ZSAC. Normal
transmit cathode-bias is approximately +5V. During receive, approx.
+24V cuts off the 3-500Z's anode-current. The ECBS circuit can be
built on a piece of perfboard and mounted next to the heatsink for
D2, which is not used and should be removed. The vacated heatsink can
be used for Q1. [1]
The transistor-switch (Q1) is driven by an optoisolator (Q2). The
optoisolator's resistor-shunted input is connected in series with the
relay control line. When the design current of 80mA flows in the
relay control line, approx. 63mA flows through the optoisolator's
input LED and the optoisolator's phototransistor conducts current
which turns on the transistor, Q1, which turns on the 3-500Zs. The
remainder of the relay control line current, approx. 17mA, flows
through the optoisolator's input shunt resistor. The value of the
resistor may need to be adjusted to keep the optoisolator's input
current within a safe range.
If the optoisolator's input current exceeds its maximum rating of
approx. 80mA it will probably be destroyed. The optoisolator's input
current can be measured by placing a 1 Ohm, >0.25W resistor in
series with either input pin 1 or 2. Since R=1 Ohm, by measuring the
voltage drop across the 1 Ohm resistor with a DMM, the unknown
DC-current in mA will equal the DC-mV read by the DMM.
One can measure the total current in the relay control line by
placing a 1 Ohm resistor in series with the wire to the +110V power
supply. This optional current-measuring resistor is shown on the QSK
circuit diagrams for the TL-922 and the SB-220. One of the speed-up
resistors in the control line may need to be increased or decreased
in resistance to cause the DMM read 80mV (80mA). Naturally, its safer
to start with more resistance.
The ZSAC of the 3-500Zs can be adjusted by shorting or unshorting
individual diodes in the diode string that comprises D1a in the ECBS.
The correct, SSB, ZSAC is 160mA to 200mA. Lowering this current makes
the amplifier-tubes harder to drive and increases the IMD products
[rotten splatter]. Too much ZSAC makes excessive heat and reduces
amplifier efficiency.
An important design feature of this ECBS is that the current which
passes through the RF relay coils also controls the cathode bias.
This means that whenever the RF relays are in transmit, the correct
bias for linear operation will be applied to the 3-500Zs. Thus, since
the transceiver's T-R circuitry controls the relay coil current in
the amplifier, the amplifier relays and amplifier bias will always be
synchronized with the transceiver.
This is a desirable departure from the RF-actuated electronic
cathode-bias switch circuits that have appeared in ham magazines. At
first, "RF-actuated" sounds like it might be wonderful. However,
these "RF-actuated" circuits result in the cathode bias-voltage being
rapidly switched between nonlinear-cutoff and linear operation while
the RF relays are in transmit. This often causes transmit audio to
sound rough on softly spoken syllables and increases the IMD products
that the amplifier generates.
One of the supposed "advantages" of RF-actuated ECBS circuits is that
they "don't waste plate-dissipation power when the operator is not
speaking". Could this be a case of specious logic? It seems to me
that if SSB-VOX is used with a QSK amplifier, the dissipation power
automatically drops to zero whenever the operator stops speaking.
CIRCUIT IMPROVEMENTS
The following list of circuit improvements is not unique to the
TL-922. Other makes of amplifiers have similar or even more severe
problems. The perfect amplifier has yet to be built.
FILAMENT VOLTAGE
The filament-voltage, measured at the sockets, in my stock TL-922 was
approx. 5.31v RMS @120V/240V line input.[2] This voltage exceeds the
manufacturer's maximum allowable filament-voltage for the 3-500Z.
The filament-voltage of low-operating-time 3-500Zs can be lowered to
approx. 4.8v for much longer tube life with no reduction in RF power
output. This approx. 9% decrease may not sound like much, but
according to one 3-500Z manufacturer, Eimac®, every 3% decrease
in thoriated-tungsten filament-voltage doubles the useful emission
life of the cathode, provided that the filament-voltage is kept
slightly above the level that causes a decrease in output power. A 9%
decrease in filament-voltage can increase the useful emission life by
2-cubed or 8-times. In other words, one pair of tubes will last as
long as 8 pairs of tubes.
Reducing filament voltage to achieve maximum power-grid tube life is
a considered to be good engineering practice in commercial
transmitters.
The filament-voltage can be lowered to the desired level by
connecting (2) approx. 16milli-Ohm, 5W resistors in series with the
filament-leads on the filament-transformer. An easier way to lower
the filament-voltage is to replace the #14 wires from the
filament-transformer to the filament- choke with #22 high temperature
insulated hook-up wire. Each wire will dissipate about 4W [14.7A rms
X .25v] over its approx. 40cm length.[3] This raises the wire
temperature only slightly to the touch. The new wires can be loosely
attached to the cable harness, but they should not be buried in the
cable harness; they need to breathe. Although 200 degree C
Teflon® insulation would be nice, 105 degree C vinyl insulation
is satisfactory.
Because of regional variation in line-voltage /electric-mains
voltage, the actual filament-voltage should be measured, before and
after modification, at the sockets, with the amplifier upsidedown and
the bottom cover removed.
To perform this measurement, the amplifier is switched on and the
standby/operate switch is set to standby.
If a mains-voltage of 108V/216V is used with a TL-922 whose
filament-transformer taps are set for 120V/240V, the filament-voltage
probably does not need to be lowered.
Caution: Bodily contact with the 120V/240V primary circuits, the
+2000V / 3200V, or the +110V power-supplies can be fatal. The
built-in "safety interlocks" do NOT protect the operator from all of
these dangerous voltages - even if the amplifier is switched off. To
be foolproof, the amplifier must be disconnected from the
electric-mains.
INRUSH CURRENT
When a TL-922 is switched on, each 3-500Z is subjected to approx. 48a
of filament inrush-current. This exceeds the Eimac® specification
for maximum allowable filament inrush-current.
Since the turn-on current surge for the TL-922 is infamous for
welding the contacts of the ON/OFF switch, I decided to take care of
both problems at the same time by adding a simple step-start circuit
for the entire amplifier.
The original, lethargic, RF input / output relay, that is removed
when QSK is installed, is a good choice for step-start duty. This
relay has large DPDT contacts and the correct coil voltage for
powering by the TL-922's internal +110V power supply. The extra
current demand on the +110V supply is no problem if the half-wave
rectifier circuit, D1, is replaced by a full-wave-bridge circuit
rated at approx. 1A, >200piv. Note: be sure to unground the
grounded side of the transformer's 80Vrms secondary winding when
converting to bridge rectification.
Similarly, the SB-220's factory stock relay can be used to build a
step-start circuit although only two of the available three poles
will be needed.
Other relays may be used for the step-start if the contact current
rating is 10A or more. Relays with 24VDC coils are usable if the coil
is powered by a full-wave voltage-doubler rectifier circuit that is
connected to the 11Vrms winding on the filament transformer. A series
resistor of the appropriate value, between the DC source and the
relay's coil, is used to set the pull-in voltage. Two approx.
1000µF @10V capacitors may used for the filters. The two diodes
can be any garden variety 1A units rated at 50piv or more.
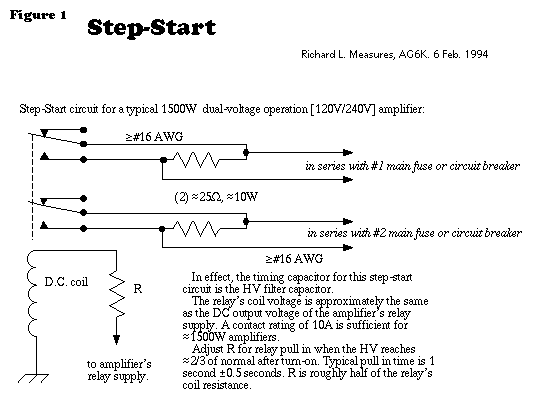
HOW THE STEP-START CIRCUIT WORKS
At the instant of turn-on, the transformer primaries look like
virtual short-circuits due to the fact that the DC filter-capacitors
in the transformer secondaries are discharged. The series primary
resistances are only approx. 1.3 Ohm [240v connection. The direct
application of 240Vrms to such a low resistance will cause a
dangerously large current to flow through the amplifier.
The step-start circuit limits the inrush line-current to <10a-peak
at 240Vrms input by temporarily connecting [2] approx. 25 Ohm
resistors in series with the low resistance of the transformer
primaries. At the instant of turn-on, T=0, most of the input voltage
will be safely dropped across the two approx. 25 Ohm, series
resistors, and very little voltage will appear across the low
resistance of the transformer-primaries. As the filter-capacitors
become charged, the line-current decreases rapidly. When the voltages
across the filter-capacitors in the +110V and HV power supplies
reaches approx. 2/3 of their normal level, the step-start relay will
close and short out the two resistors.
Step-start occurs in less than 1 second. The amplifier is ready for
immediate use without having abused anything during turn-on. If there
is a serious circuit-fault in the amplifier, the step-start relay
will not close and the step-start resistors will burn out. This
eliminates the need for the original 15A fuses The fuses should be
removed, and the leads from the step-start circuit connected across
the terminals on the fuse holders.
The original, slow-acting RF-switching relay fits neatly into the
roof of the jumper-box at the back of the amplifier. The approx. 25
Ohm resistors can be placed on a rectangle of perfboard mounted above
the existing terminal strip for the 120V/240V change-over jumpers.
The mounting holes for the step-start perfboard were already made by
Trio-Kenwood!
This step-start method is the simplest and the best because the
timing capacitor that determines the time delay is the sum total of
all of the filter-capacitors in the amplifier's power-supplies. This
circuit can not step until the filter-capacitors in the TL-922 reach
about 2/3 of their normal voltage level.
IMPROVING AMPLIFIER STABILITY
The stock TL-922 has a tendency to intermittently oscillate at
roughly 130MHz. This problem is exacerbated if above-average gain
tubes are used. The intermittent parasitic-oscillation can cause the
bandswitch to arc. The arcing can melt the contacts on the output
sections of the bandswitch.[4] If a full-blown parasitic-oscillation
occurs, a loud bang is usually heard. This noise is caused by a
one-shot high-current pulse that can damage the 3-500Zs, the Zener
cathode-bias diode, and--indirectly--the bandswitch.
If you discover that some of the output-bandswitch wafer contacts are
burned in your amplifier, you can telephone Kenwood, but their
standard answer is that "bandswitch contacts can only be burned by
the (stupid) operator (that's us) rapidly switching the bandswitch
while transmitting".
If you would like to see a photograph of a TL-922 bandswitch which
was crispy-crittered by intermittent VHF parasitics, see the magazine
article: Parasitics Revisited in the September and October 1990
issues of QST. To their credit, QST's staff had no qualms about
publishing this photograph since they have heard many complaints over
the years from TL-922 owners who were insulted by Trio-Kenwood
factory-service's typical "Not Invented Here" excuse.
Parasitic damage to 3-500Zs is indicated by a sudden change in
inter-electrode spacing. This may result in a grid to filament short.
Such a short in one of the 3-500Zs in turn places a short on the
+110V power-supply. This supply is powered by the 80Vrms winding on
the [unfused] filament-transformer. Unless the 922 is switched off
quickly after a grid to filament short occurs, the
filament-transformer will overheat and melt-down. Transformer
meltdown can be prevented by cutting the wire on the bias switching
relay between the filament CT terminal and the +110V PS terminal.
Some parasitic-damaged 3-500Zs will not short until they are hot.
Thus, the best way to test a cold 3-500Z for the problem is with a
high voltage tester. A cold tube that will not withstand at least 5kV
between its grid and filament may short during actual use. New, cold,
upright, 3-500Zs typically exhibit <10µA of grid to filament
leakage @ 8kV.
ANODE-CIRCUIT MODIFICATION
The following modifications improve amplifier stability by reducing
the VHF-Q of the anode-circuit wiring. The original, high VHF-Q
silver-plated anode-suppressors are removed and replaced by Low VHF-Q
suppressors that are constructed by soldering two, paralleled 100
Ohm, 2W or 3W, metal-oxide-film [MOF] resistors in parallel with a
100uH or so coil of nichrome-60 resistance-wire. The resistance-wire
should extend beyond the ends suppressor.
Construction Note A cooling air gap of approx. 2mm is advisable
between the paralleled resistors.
The #12 copper buswire, in the TL-922's anode circuit, that connects
the HV blocking capacitor, C34, to the top of the anode HV RF-choke,
L1, exhibits a high VHF-Q. It should be unsoldered and replaced by a
#18 nichrome-60 wire A second nichrome wire, but with a 1-turn coil
approx. 8mm i. d. is soldered in parallel with the first wire. The
second wire, which has more inductance than the first wire, creates a
double VHF self-resonance in the anode-circuit. The double-resonance
"broadbands" the VHF resonant circuit and lowers the VHF-Q, which
improves the VHF stability of the amplifier. This is the same
principle behind a conventional L/R anode parasitic-suppressor. NOTE:
the axis of the coil on the second wire must be parallel to the first
wire so that the magnetic fields from the two conductors will act
somewhat independently. If these two magnetic fields were mutually
coupled, the two conductors would act as a single inductance and the
desired broadbanding, or stagger tuning, effect would be lost.
CATHODE CIRCUIT MODIFICATION
Two, paralleled, 10 Ohm, 2W MF resistors are connected between the
cathodes of the 3-500Zs and the drive signal. These resistors lower
the VHF gain of the tubes and dampen the "Q" of the self-resonant
[near 130MHz] VHF tuned circuit formed by the coaxial cable that
brings the drive signal from the bandswitch to the tube sockets. The
resistors also generate an RF negative-feedback [RF-NFB] voltage
which reduces the intermodulation-distortion [IMD] output from the
amplifier
ANODE AND GRID GLITCH PROTECTION
A glass-coated resistor can serve as a peak current limiter between
the HV supply and the anode circuit. A $2 resistor can save an
approx. $150 3-500Z or an approx. $650 8877. If a glitch such as a
parasitic oscillation occurs, the fuse-resistor absorbs most of the
stored energy from the filter capacitors. If low VHF-Q
parasitic-suppressors have been installed in a HF amplifier, this is
less likely to happen, but it's best to be on the safe side. Even
though Eimac® recommends it, the TL-922 and the SB-220 have no
glitch resistor protection between the amplifier-tubes and the HV
filter-capacitor bank. The glitch resistor is an ordinary 10 Ohm, 10W
glass-coated wirewound unit. It has enough inductance to replace the
small VHF RF-choke, TL-922's L2 [12µH], which is inside the tube
compartment.
The grid fuse-resistors [1 per tube] are 27 Ohm to 33 Ohm, 1/2W,
carbon-film type.[6] They replace the two grid to ground, 470µH
chokes, L7 and L8.
The grid fuse-resistors also provide about 3.5V of DC
negative-feedback per grid under maximum signal condition. This helps
to equalize the currents in two 3-500Zs that are not a matched
pair.
Note: To protect the approx. 30 Ohm grid fuse-resistors from
excessive dissipation, the total grid-to-ground bypass capacitance
per tube should be increased from the stock 3 x 220pF = 660pF to
roughly 1800pF per socket. This can be accomplished by paralleling
disc ceramic or mica capacitors with the existing 220pF grid bypass
capacitors.
IMPROVED 160 METER BYPASSING
The HV lead in the TL-922 is RF-bypassed with only a 2000pF capacitor
(C25). Its reactance is minus j44.2 Ohm at 1.8MHz. L1, the 160µH
HV RF-choke has +j1809 Ohms at 1.8MHz. Since the RF voltage at the
anodes of the 3-500Zs is about 1800Vrms, about 1A of RF current
passes through the choke at 1.8MHz. The 2nF capacitor is supposed to
bypass this RF current to ground, but a minus j44.2 Ohm bypass is not
very effective at bypassing 1A of RF. Thus, a fair amount of
RF-voltage appears across the bypass capacitor and enters the power
supply compartment. RF energy is harmful to the electrolytic
capacitors in the power supplies. The filter capacitor in the +110v
supply seems to be the most vulnerable to damage.
The RF bypassing can be improved by removing the redundant
HV-interlock spring inside the RF compartment, installing a ground
lug in its place, and connecting a 3.3nF to 4.7nF [3300pF to 4700pF]
3000V to 6000V disc ceramic capacitor from HV+ to ground. The
HV-interlock spring can be removed and trimmed to make a grounded
solder lug for this purpose.
Some 160m RF current gets past the filament choke bypass capacitors
[C38 and C39]. Adding a .02µF, 1KV disc ceramic capacitor in
parallel with each of these capacitors will reduce the RF blow-by on
160m.
TO ALC, OR NOT TO ALC, that is the ?
A single 3-500Z can be linearly driven with up to about 65W. Since
most modern transceivers are adjusted for 90W to 110W output, the use
of ALC with an amplifier using a pair of 3-500Zs is unnecessary.
After the previously mentioned RF-NFB resistors are installed in the
cathode input-circuit, it becomes even more difficult to overdrive
the 3-500Zs. This is because the resistors generate a small,
distortion reducing, RF-NFB voltage. With RF-NFB and almost any
modern transceiver for the driver, the use of ALC with a pair of
3-500Zs is a folly.7 Also, ALC can interfere with proper amplifier
tuning and loading. For these reasons, I removed all of the ALC
circuitry from the amplifier. The vacated terminal-strip was used for
mounting the [2] speed-up resistors and the bypass-capacitor in the
relay control line circuit.
Note: After removing the ALC circuit, which includes C40 and C41.
some C can be added to C77 so that the total capacitance across the
end of the coax, that brings the drive power to the tubes, will
remain approximately the same [approx. 50pF]. This amount of
capacitance figures heavily in the -network input matching circuits
on 20, 15, and 10 meters, so it is best not to change it unless you
are unhappy with the stock input SWR.
IMPROVING INPUT SWR
After turning my TL-922A into a TL-922 by installing the 10 meter
modification, I noticed that the input SWR on 15 and 10 meters was so
high that it was causing power-turn-down in my TS-440S
transceiver.
Experimentation with the values of L and C in the tuned input
circuits yielded the following: 10 meters: add approx. 3 turns of #18
enameled copper, 9mm inside diameter, air-wound, in series with the
output terminal of L14. The input capacitor is 150pF. No output
capacitor is needed because of tube input capacity and the approx.
50pF of capacitance at the end of the coax that brings drive power to
the tubes. 15 meters: add approx. 4 turns of #18, 9mm i.d., in series
with the output terminal of L13. The input capacitor is also 150pF,
and no output capacitor is needed.
Note 1: The small, added inductors were necessary because the stock
inductors had inadequate inductance with the tuning slugs set for
maximum. Adjusting the tuning slugs varies inductance only a small
amount.
I was able to lower the input SWR on 20 meters by changing C55 from
the furnished value of 150pF to 100pF and readjusting the tuning
slug. The 10 meter band switch position also works well on 12 meters
- as does the 15 meter position for 17 meters.
Note 2: The same tuned input values were tried in another TL-922 and
the results were different. Apparently, each amplifier may need some
custom-work on the tuned input circuit values. The type of
transceiver and the length of coax used also seems to influence the
values.
If you would like to experiment with improving the input SWR of your
amplifier on a particular band, a compression-mica trimmer capacitor
can temporarily be connected in parallel with each of the two, fixed
capacitors on the tuned input circuit for that band.
With the amplifier being driven hard with approx. 50wpm CW dits, and
the amplifier having been tuned for maximum power output, the trimmer
capacitors and the tuned-input inductor should be adjusted for the
best input SWR. At this point it is important to check the SWR at the
band edges. If too much capacitance, and not enough L, is used for
the input and output capacitors, the circuit-Q will be high and the
SWR at the center of the band will be near-perfect. The trade-off
will be high SWR at the band edges. High-Q means reduced bandwidth
and lower Q means more bandwidth, so a compromise with slightly less
C {and Q} with more L may produce a better overall result. Eimac
recommends a Q of 2 for the pi network tuned input on 3-500Zs.
After optimization, the values of the trimmer capacitors should be
measured and the appropriate values of fixed mica capacitors soldered
into the amplifier.
If you are interested in reading more about optimizing the tuned
input circuits in g-g amplifiers, see page 42 in the December 1990
issue of QST.
SWR CAVEATS
Measuring the input-SWR of an amplifier is a very inexact science.
For example, different models of SWR-meters will give different
readings in the same circuit. Changing the lengths of coaxial cable
can also change the indicated SWR.
Modern transistor-output transceivers always use a set of switched,
approx. 1.5-octave-per-filter, broadband output-filters. This is done
so that their output signals will meet FCC requirements for spectral
purity.
At the extremes of an individual filter's bandpass, such as at 29MHz,
the filter can introduce a reactance into the transmission line. This
reactance can cause some peculiar results when you are trying to
optimize the SWR of the tuned input circuits in an amplifier.
The best way to avoid this problem is to use a tube-type radio, such
as a Trio-Kenwood TS-830S, when optimizing the tuned-input circuits.
The radio must first be tuned for maximum power into a
known-to-be-accurate 50 Ohm termination, and then not readjusted
during the adjustment of the tuned-input's L and Cout. If the
transceiver is re-tuned, it may introduce a reactance that will
affect the SWR.
RELAY MOUNTING AND WIRING
The vacuum-relay and the reed-relay are mounted on an aluminum angle
bracket. A self-clinching nut is pressed into a hole in the angle
bracket -- or a sheet-metal screw can be used.. The fastening is done
from the top side of the chassis with a screw, passed through one of
the mounting holes for the original relay. Of course, an ordinary nut
can be used with the trade-off of increased assembly difficulty.
To reduce acoustic noise, the relays are mounted without the use of
the furnished hardware. To provide side clearance, the relay mounting
holes are 2mm to 3mm larger than the threaded mounting shafts on the
relays. The vacuum relay is shock-mounted with 3 pillows of
silicone-rubber. I prefer the red-colored high-temperature General
Electric Co. silicone-rubber adhesive-sealant. It seems to have a
longer shelf life than the lower temperature variety. The RSD
reed-relay is mounted with one dab of silicone-rubber
It is important to position the vacuum relay so that no metal to
metal contact occurs between the relay and the aluminum mounting
bracket . If contact is made, there will be an acoustic path between
the relay and the chassis of the amplifier - like the sound bridge on
a violin - and the chassis will act as a sounding board. To keep the
vacuum-relay in the correct position while the silicone-rubber
pillows are curing, three cardboard rectangular spacers are
temporarily rubber-cemented around the mounting hole for the
relay.[8] The cardboard rectangles are approximately 1mm to 1.5mm
thick, 4mm wide and 25mm long. The 3 rectangles of cardboard are
spaced 120 degrees apart; each pointing at the center of the mounting
hole like the spokes of a wheel. A few mm of each cardboard rectangle
hangs over the edge of the mounting hole so that when each relay is
pushed into the mounting hole, the protruding few mm of cardboard
will be bent over and down. This insures that the relay will not
touch metal while the silicone-rubber cures.
Spiral notebook covers are a good source of cardboard material for
making the temporary clearance spacers.
Silicone-rubber will adhere well to most materials IF the surface is
prepared properly. The best surface-conditioning material I have
found is the silicone-rubber itself. First use a degreaser such as
TCE, acetone, MEK, Freon-TF or ethanol [a.k.a. "Everclear"]. Next,
apply a dab of silicone-rubber to a small, clean cloth and forcefully
rub a film of silicone-rubber into all of the surfaces that you want
to bond together. The bonding silicone-rubber should then be applied
immediately, before the conditioned surfaces start to cure. 3 dabs of
silicone-rubber about the size of green-peas are applied before the
vacuum-relay is inserted into the mounting hole A small amount of
silicone-rubber will do the job; excess silicone-rubber will enhance
the sound conduction to the mounting plate, increasing the noise. No
silicone-rubber should touch the cardboard spacers since they will be
removed later. The assembly should then be set aside for 48-hours of
undisturbed curing. After curing, the cardboard spacers are
removed.
The metal base of the vacuum relay is electrically grounded to the
aluminum mounting bracket. This is done by removing some of the paint
from the relay base and soldering a approx. 14mm long, 3mm wide,
flexible "S"-shaped strip of approx. 0.1mm thick [4-mil] copper foil
to the relay and a ground lug on the mounting plate. Use a large
soldering iron and be quick to avoid overheating the relay's ceramic
to metal seals.
The relay assembly must allow the relay to move slightly in the hole
without touching the metal mounting plate.
WIRING THE RELAYS
A vacuum relay's coil terminals can be easily broken off by sudden
impact or too much stress. The wires that connect to these terminals
should be flexible. Number 24 gauge stranded wire is satisfactory.
The RF terminals are wired with 0.1mm to 0.2mm thickness copper-foil
strips, 3mm to 4mm in width. No direct connection to the relay's RF
terminals should be made with stiff wires as this would provide a
sound conduction path between the relay and the chassis. If a
connection is to be made between an RF terminal and a stiff wire, a U
{or S}-shaped 3mm by approx. 20mm flexible bridge of copper foil is
soldered between the stiff wire and the relay terminal to reduce
sound conduction and stress on the relay.
All of this may sound like a lot of trouble to go to, but the
resulting quietness IS worth the effort.
OPTIMIZING 10 METER BYPASS SWR
One frequently overlooked refinement in commercial amplifiers becomes
apparent when the amplifier is switched off [bypass], connected to a
50 Ohm non-reactive load whose SWR = 1 to 1. and the 10 meter input
SWR to the amplifier is found to be worse than it should be.
This problem is caused by the inductive reactances in the T-R relays
and the associated wiring. These inductive reactances can be
cancelled by connecting a approx. 1KV rated capacitor of the proper
value from the common-terminal of the output-relay to chassis-ground.
The value of this capacitor can be found experimentally by
temporarily installing a 50pF variable capacitor at the point of
question. The capacitor is adjusted until the 10 meter SWR is minimum
with the amplifier off and with an accurate 50 Ohm [confirmed with a
DMM] termination connected to the amplifier's output connector. The
variable capacitor is removed and its capacitance is measured on a
capacity meter. A fixed capacitor of the closest standard value is
then permanently installed. In my amplifier the required capacitance
was 36pF. This capacitor can also be connected between the
normally-closed terminal of the RF output relay and
chassis-ground.
PRECAUTIONS
1. Hotswitching: -- Many QSK-transceivers use a slow-acting,
conventional relay to key the relay-control circuit from an external
amplifier. The conventional relay in the transceiver causes a
needless and often excessive time delay in the operation of the QSK
relays in the amplifier. In some cases this delay may cause RF drive
to be applied to the amplifier before the relays in the amplifier
have had a chance to close. This causes the RF-relays to
"hot-switch", which burns their contacts.
The conventional, amplifier-keying relay in the transceiver should be
replaced with a switching transistor circuit in Figure 7, Q3 and also
in the article on the TS-440S. This circuit requires a +9V to +12V,
approx. 10mA signal on transmit and approx. 0V on receive. This
voltage can be obtained from the point where the original relay coil
was connected in the transceiver circuit. This circuit can also be
mounted in the amplifier, as is shown in Figure 7.
If the transceiver uses a reed-relay to switch the amplifier, there
is a good chance that the reed-relay's contacts will not be able to
withstand the QSK circuit's 110V, /. 80mA. In this case, the
reed-relay should be replaced with a switching transistor.
2. Tune-C Arcs. -- The 922's Tune-C has a 6000V breakdown. The
bandswitch has c. a 5000v breakdown. Thus, in the event of a tank
arc, the bandswitch arcs first. Arcs can easily incinerate the
bandswitch. However, the Tune-C can tolerate arcing. Arcing pits can
easily be cleaned up with a flat file. To avoid bandswitch arcs, bend
the first rotor plate of the C-tune to reduce the air-gap. so that
the breakdown V at any setting is c. 4000v. This may look a bit
strange, but changing a bandswitch will unduubtedly ruin a Saturday
morning -- and a $100-bill.
ODDS AND ENDS FOR THE TL-922
1. RL-2 is electrically replaced by the ECBS. After RL-2 and all of
its external wires are removed, the hole in the chassis should be
covered to maintain correct cooling air flow. With RL-2 removed, the
"ON THE AIR" lamp does not light on transmit. If this is important to
you, it is possible to wire the lamp in series with the relay control
line. The lamp current is adjusted to a safe value by adding a
resistor in parallel with the lamp. Otherwise, the full 80mA will
reduce the life of the lamp.
2. The life of the meter lamps can be prolonged by either increasing
the resistance of the 10 Ohm resistor, that is in series with each
lamp, to 20-24 Ohm, or, by rewiring the circuits so that one 10 Ohm
resistor carries the current for each pair of meter lamps.
3. The cooling fan in the TL-922 moves over 3000 cubic feet of air
through the amplifier every hour. This brings a fair amount of dust
and lint into the amplifier. A yearly cleaning of the inside of the
[unplugged] amplifier with a small brush and a vacuum-cleaner is a
good preventative maintenance procedure. The cooling fan bearings
supposedly do not require lubrication. The bearings can be lubricated
with a syringe containing 5W or 10W oil.
4. You may have noticed that the full-break-in circuit does not use a
bypass capacitor directly across the TL-922's "RL CONT" [relay
control] jack. There is a resistor between the bypass capacitor and
the jack so that the switching transistor in the transceiver is not
required to directly short-out the bypass capacitor--which is charged
to approx. +120V during receive. A direct short on a charged
capacitor can easily create a nano-second discharge current pulse of
many amperes. This current pulse can damage the transceiver's
switching transistor (or reed-relay) that keys the "RL CONT" circuit.
The series resistor limits the peak switching current.
5. L18, which is bulky and gets in the way of the QSK modification,
can be replaced by a 100k Ohm, 3W resistor.
6. The spark-gap [V3], which apparently becomes damaged by the
original lack of proper relay sequencing, can be removed with no ill
effects.
7. All manufacturers take a dim view of any modification to one of
their amplifiers. This is true even if the modification corrects an
obvious design error such as excessive filament-voltage, too much
inrush-current, or a tendency for VHF parasitic-oscillation.
Before working on a modified amplifier, factory-"service" may insist
on unmodifying the amplifier at the owner's expense - even though the
unmodifications place the 3-500Zs at risk!
Thus, after QSK-modification, the amplifier must forever be serviced
by the owner of the amplifier or some other knowledgeable person.
Factory-service should be used only as a source of replacement parts,
or, in times of war, as a source of electronic saboteurs to be sent
behind enemy lines.
Engineers, and especially their bosses, do not like to admit that
they may have made a mistake, even when they know there is a problem.
This is known as Not Invented Here [NIH] Syndrome.
Its like "Our Space Shuttle booster O-rings will work just fine in
cold weather." Or, this telescope does not need to be tested before
it is placed in Earth-orbit." Translation: we don't make mistakes.
Hubris is a terrible malady.
8. The original large, stiff coax that is used to go from the
RF-input connector to the RF-input relay can be replaced with
miniature Teflon® 50 Ohm coax, which is easier to work with.
Ordinary RG58C/U can also be used if the Teflon® coax is
unavailable.
9. To tune-up the TL-922 [or any grounded-grid amplifier] correctly,
without a two-tone generator plus oscilloscope, a tuning-pulser, or
an electronic-keyer: Set the amplifier to the CW position; for
starters, apply full CW drive power; adjust the amplifier's tune and
load controls alternately for maximum relative power output. The
complete tune-up should take less than 10 seconds. The amplifier is
now tuned up for CW or SSB operation. The mode switch should then be
set to SSB for voice use.
If you are not sure where to preset the load control, start at the
1:00 o'clock position. It is safer to start off with heavier loading
than necessary. This approach keeps the grid-current from getting out
of hand.
No linear amplifier can be correctly tuned-up without applying full,
peak, drive power, despite what the instructions may say.
The amplifier can be tuned-up more gently by using an
electronic-keyer to key the transceiver, on CW mode, sending dits at
approx. 50wpm. Since standard International Morse dits are half on
and half off, the duty cycle is reduced from 100% to 50%. It is
important to adjust the carrier control so that the transceiver is
indicating a small amount of ALC. If this tune-up method is used, the
amplifier can be tuned-up for SSB operation using the SSB, higher-V,
switch position.
10. If the DC current gain [ß or HFE] of Q1 is very low, the
voltage between the collector and the emitter of Q1, may rise above
the desired approx. 5V of fixed transmit bias during a maximum signal
condition, making the tubes harder to drive. This problem can be
corrected by using a transistor with a higher current gain.
11. After the quieter, QSK-relays have been installed, the TL-922's
fan becomes the major noise source.
The fan-noise can be substantially reduced by hanging an
approximately 1m by 1m square of thick carpet on the wall, directly
behind the fan outlet. The carpet acts as a sound absorber, reducing
fan-noise that is reflected off of the wall. The carpet can be glued
to a piece of thin Masonite or wood-paneling and hung like a
picture.
Notes
It is important to make sure that the reed-relay has the correct 12V
across the coil. The relay control loop current of 80mA is far too
much current for the Matsushita reed-relay's coil--which requires
about 13.7mA. The extra 66.3mA of loop current must be diverted into
a coil shunt-resistor of the appropriate value--approximately 200
Ohms. Note that the reed relay coil has a polarity requirement. If
the polarity is not correct, the relay will not operate.
The QSK-circuit diagram for the SB-220 shows an optional relay
control transistor that is controlled by a positive voltage on
transmit output from the transceiver. This circuit obviates the need
for a switch transistor or reed-relay in the transceiver for the
purpose of controlling the amplifier.
USE IN OTHER AMPLIFIERS
This QSK circuit will work well in other amplifiers that use a +110V
relay power supply. If no such supply exists, rectify the
electric-mains with a half wave rectifier and you will have roughly
+150VDC to power the QSK circuit.
Some people have asked me if they can use an existing 26.5VDC supply
to power a QSK circuit. If this is done, the RF output relay will
take much longer to make because the series-resistor speed-up
technique can not be used.
PARTS SUPPLIERS
Vacuum-Relays:
New: Surcom [Jennings] 619 438 4420; ask for Lenk or Dick; // Kilovac 805 684 4560. . Either supplier will ship UPS/COD.
Surplus:
Alan Emerald, K6GA, 714 964 3912. // Fair Radio Sales ($35) [419-227-6573]. // Allen Bond ($32.50), (770) 973-6251 . www.mgs4u.com/relay.htm
Improved Parasitic-Suppressors: Low VHF-Q Parasitic-Suppressor
retrofit-kits: Richard L. Measures, AG6K, 6455 La Cumbre Road, Somis,
CA 93066. 805 386 3734]. See: "New Products" QST Magazine April 1990,
page 75; Parasitics Revisited, September and October 1990 QST
magazine.
- We sell a parts-kit for the high-speed switching mod that does not
include the vacuum-relay. p/n 47, $21 plus postage.
END NOTES [...]
1. D2 is located near the filament-transformer, under the
chassis.
2 , This is not a fluke. Other TL-922 owners have measured similarly
excessive filament-voltage at the tube-sockets with a line-voltage of
120V/240V.
3. The length of these wires may need to be increased if you have
above-average line voltage.
4 . On page 14 of the instruction manual, the manufacturer refers to
an arcing sound as "normal". The arcing sound is not normal. It is
the foreboding sound of an intermittent VHF
parasitic-oscillation.
5. A suitable flux for soldering nickel-chromium alloys with an
ordinary soldering-iron is J. W. Harris' Stay Brite. A suitable
solder is (430ºF) .94% tin, 6% silver solder (J. W. Harris Co.
Stay-Brite-8).
- note After soldering, the corrosive flux residue should be
thoroughly removed with warm water and a brush. A silver-solder kit
is supplied with the Low VHF-Q Parasitic-Suppressor Retrofit-Kit. See
below.
6. Metalfilm or metal-oxide-film "flameproof" resistors should not be
used for grid fuse-resistors because they are too difficult to burn
out.
7. For more information see "Amplifier-Driver Compatibility", QST
Magazine, April 1989, page 17.
8. Stationary-store type, rubber-cement works well for this
purpose.
9. R. L. Measures, "Adjusting SSB Amplifiers", Ham Radio Magazine,
Sept. 1985, page 33.
Diagrams:
End