KF8KL Builds The Sierra From Wilderness Radio
How long has it been since you've built a kit? How long has it been
since you melted some solder, inhaled the fumes, and pondered the vagaries of propagation
in the radio ether? I hadn't built a challenging kit since I built a Heathkit HW-7 QRP rig
and that was more than twenty years ago.
I recently got the bug to build a kit in a roundabout way. After being on a waiting
list for four months I picked up an SGC SG 2020 low-power transceiver. I figured it would
be perfect for camping, backpacking, or just taking it outdoors and operating it during
field day. It's a decent radio with a small footprint and works for all of the HF bands.
However it has two shortcomings. First of all the way the buttons and knobs are arranged
on the front panel takes a person with really small hands to nimbly work their way through
all of the functions. The second shortcoming and most critical for me is its operation in
CW mode. Since it has mechanical relays it gets a little too noisy.
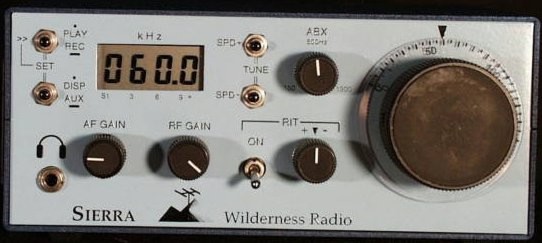
Enter the Sierra! After reading an article in the June, 1996 QST magazine comparing
several of the most popular QRP rigs the Sierra seemed to be the best bet. Below is the
completed Sierra with an LDG QRP antenna tuner atop. And of course they both sit on top of
my TenTec Corsair II which is tuned to the NerdNet frequency of 3.868. What a combination!
It certainly wasn't the cheapest but it was the most versatile: you build band modules and
plug them in much in the same way you do with the TenTec Scout. The radio took several
evenings working a few hours at a time. The manual is well documented and the circuit
boards are first class along with the precision fit cabinet. I also bought the KC2 keyer
option for another $75. It is a frequency counter, a keyer, a watt meter, and an RF meter.
A word of warning--if you don't like winding torroids or torroidal transformers this
radio may not be for you. There are five on the main pc board and each band module has
eight. SO let's see, six times eight, plus five--that's a lot of winding. After the radio
passed the initial smoke test it was time to align it along with all of the band modules.
The procedure is straight-forward. In fact you can align it using only another
transceiver. After alignment I checked out the readings on the KC2 watt meter function. On
all six modules the power was right around 2.7 to 3.0 watts--almost a full-gallon in QRP!
Next came firing it up on 40 meters. Since I have a small lot in the city of Bowling
Green, Ohio, and since I have neighbors who resent ham radio activity I have to use a
stealthy end fed wire about 40 feet in length in a sloper configuration. Underneath it are
about twenty radials. Not the greatest antenna for QRP work but my signal manages to get
out. For my initial QSO with the new rig I talked to someone in West Virginia, in
Barboursville-WA8OQZ. I don't remember a whole lot about what was said--it kind of
reminded me of my old novice days when I had to slug it out on the 40 meter novice portion
of the band, hoping someone would respond, and desperately hoping they would send slow
enough for me to copy, and hoping I'd remember all of the conventions and Q signals.
Anyway, it was a fun project, the receiver is really hot, and most of all CW is really a
pleasure when you have a rig that uses digital technology instead of mechanical
relays--real quiet!
I was really impressed with the quality of the components, the detailed manual, and the
helpfulness of Bob Dyer, KD6VIO, who owns Wilderness radio. I emailed him several times
because of an anomoly in some measurements that were taken before smoke-testing. It turned
out that the problem was in my measuring equipment and not in the radio but Bob was quite
helpful in figuring out where the problem might be.
My next project--a NorCal 40A also from the Wilderness Radio folks. For more
information on their radios visit their website at: http://www.fix.net/~jparker/wild.html