Modifications for the Kenwood
TS-430

19-07-1998 TS-430S Noise blanker
improvements
Author:
Trio-Kenwood Communication, inc.
Service Bulletin no. 887 (17-10-1984)
Some operators have indicated a desire to have their TS-430S noise blanker
operate similar to the noise blankers in the TS-120S/130S series. By performing
the following modification the operator will be able to increase the
effectiveness of the TS-430S Noise Blanker circuit.
Procedure
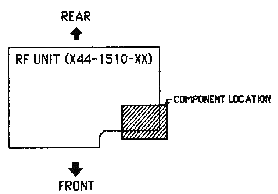
On the RF unit (X44-1510-xx) change the following components.
R80 change to a 100 Kohm ¼ Watt resistor (RD14CB2E104J)
R81 change to a 56
Kohm ¼ Watt resistor (RD14CB2E563J)
C125 change to a 560pF 25V disc capacitor
(CK45BIH561K)
This is an optional change and may not be performed in-warranty.
No realignment is required.

19-07-1998 Kenwood ts-430 AGC
mod
The type of speech processor circuit used in the ts-430 is an
agc (automatic gain control) driven audio frequency amplifier.
By decreasing
the time constant substantially, the speech processing effect will be
improved.
The modification is very simple.
Replace capacitor c104 4.5 uf
on the if board by a smaller value of o.47 uf.
To Modify This
Capacitor
- Remove the if board as indicated for the cw filter installation.
- Remove c104 from the board.
- Mount a 0.47 uf capacitor on the board.
- Mount the if board as indicated by cw filter installation.
- You are now fully operational again.
- Adjust the mic gain without the processor until normal alc deviation.
- Switch the processor on and adjust vr7 near c104 until normal ALC
deviation. (do not alter the mic gain at this time)
- Enjoy the speech processor improvement.

19-07-1998 Transmit enable for mars/cap frq
for the TS-430S
For MARS and CAP transmit capability, a minor
change is required:
- Unplug the DC power cable.
- Remove the top and bottom covers of the set.
- Locate the RF unit connector 10. Diode D39 is near the connector (labeled
D39 on the circuit board). Take a small pair of diagonal cutters and clip the
lead at the top of the bend.
- Locate IC-2 on the Control Unit, under the IF unit. Resistor R148 is near
IC-2, clip the resistor lead.
- This completes the modification. Reassemble the unit, being careful not to
pinch any leads.

19-07-1998 Mods for the kenwood TS430S for
amtor
The mods are as follows:-
On the I.F.board change
C-164 from 0.22mfd to 10nfd..50v change C-60 from 10mfd to 4.7mfd.
16v....
Parallel a 150kohm resistor across R.109 usuing a small switch or by
whatever means you can design to switch this resistor in and out.
In for arq
and out for all other modes. some people use the send/rec switch, others have
used the noise blanker switch. I have used a small mini switch which i have
mounted in place of the left front rubber foot.
It will probaly help to
cut diode d-50 on the i.f.board. If you use a 500hz filter in the cwn or ssbn
position then parallel a 10mfd capacitor across C-10 or C-8. add a 10mfd
capacitor across C-161.(actually i found that these last two were not necessary
in my 430S.)
You will find it best to take the audio from in front of the
volume control, but those people usuing audio from the speaker socket seem to
get ok results. Really you can get away with just the first two mods, change
C-60 and C-164. this originally came from VK2AGE. 73s de larry in
ravenshoe.

19-07-1998 TS430 power fault -
ANSWERS
Follows my original posting and
answers.
>As you read in the subject I have some sporadic but very annoying troubles
>with my 1988 Kenwood TS430s. This is what happens to my gear (and the same
>occours to the rig of a friend of mine):
>
>Approx. every 3-4 hours of CW operation (while working without any problem)
>the power output drops down to a few watt (tipically duringa pileup and when
>the dx sent 'ik3huk 599...'). During this power-loss the ALC level is low
>(regularly).
>To have back the full power I have to do the following:
>-Turn CARRIER knob fully clockwise (full power position - ALC doesn't move)
>-Key down for several seconds (very looooong time when in pileup)
>
>I sent the radio to a laboratory for repair (and friend of mine did the same)
>but they're not able to reproduce the power-fault when the radio is on their
>table. They cleaned up all the relais, but the RTX is still loosing power.
This sounds suspiciously like a problem I had with my 430 on voice. It
would behave quite similarly, losing power and becoming distorted on an
occasional basis. There was a well reported problem with early 430's where the
finals were riveted, but not soldered, and the rivets could eventually develop a
high electical resistance, with ensuing power problems. This was diagnosed and
corrected by Kenwood early, so I doubt it would be a problem in a unit
manufactured as late as yours. (I bought mine in late 1984, and it already had a
modified PA -- believe me, I checked!)
My problem turned out to be a
marginal connection in the internal switch on the XVTR jack on the back of the
rig. This is the connector with 8 pins. The switch is integral to the connector
and works when the plug is inserted. The fix was to insert and remove the plug
in the jack several times. Since I have done this, my 430 has never shown this
symptom again.
I wish I could claim to have deduced this myself, but it
was pointed out to me by a friend who read it in a snippet from someone in QST.
To whoever took the time to send in that suggestion, I am eternally grateful.
Hope this solves your problem, too.
--
Rob Stampfli [email protected] The neat thing about standards:
614-864-9377 HAM RADIO: [email protected] There are so many to choose from.
-------------------------------------------------------------------------------
To all Kenwood users:
The 430 has a corresponding problem to the
older rigs:
specifically the 520(S), 820(S), 530S, and 830S
rigs....
Power drops while running... if this occurs, tighten the screws
on the driver board and IF board.
Had this happen to me and friends a few
times...also watch out for the coax connector on the back...they get loose
too...no lock washer on the back.
73,
Tom
[email protected]
-------------------------------------------------------------------------
Diego,
I
had a similar problem with a 430. Mine was intermittent. Finally one cold day
[0c] it became permanent. I traced my problem to an open via connection on one
of the final transistor bases. This resulted in that device not getting a dc
return to ground. I re-soldered the via to my success!
I found it by checking
dc bias on each final transistor and found one being different in voltage
reading.
Good luck,
regards
George
Hawkins
--------------------------------------------------------------------------------
Here
is a solution I heard of for a problem like yours. Perhaps it will be of use to
you. Luckily, I have not had any problems with my TS430S. I'm very pleased with
it.
Hope this is of use to you.
73 es GL.... Mark
KG7JL
---------------------------------------------------------------------------------
KD7EV
advises intermittent power output problems on his '430 was cured by installing a
more conventional nut on the rear panel UHF style antenna connector. Apparently
a faulty ground connection at this point caused a change in the VSWR which
affected the sensing circuit and thus reducing the RF output
power.
--------------------------------------------------------------------------------
Guarda
che io ho lo stesso problema con un ICOM IC-745. Ogni tanto la c'e' una
protezione che va in funzione e la potenza va giu'. Nel caso mio probabilmente
c'e' un problema di corrente di fuga da compensare opportunamente, ma per te
potresti provare a vedere se con una semplice vantola puoi risolvere il caso.
Infine, tanto per confermare che per me i diavoletti che muovono gli elettroni
esistono, il problema c'e' solo di estate, quando la temperatura esterna e'
sopra i 20 gradi (... qui in Olanda). Faccio notare che dentro casa la
temperatura e' circa la
stessa.
Saluti
I0WTD-PA3FWP
Stefano
(In this article
Stefano I0WTD told that he had a similar problem on his IC745 and suggested to
put a blower on the radio to solve it out. 'His' power fault happened only on
summer. (mine in winter too !!) ik3huk)

19-07-1998 TS-430S Intermittent PLL Unlock in
FM/AM
Author: Trio-Kenwood
Communication, inc.
Service Bulletin no. 888 (17-10-1984)
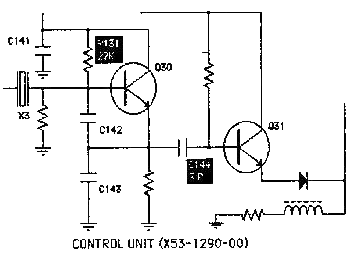
Some owners of the TS-430S have reported intermittent loss of transmit and
Receive when operating in the FM or AM modes, along with a loss of the digital
display.
The cause of this may be due to a loss of the FM/AM Heterodyne Oscillator
signal. Replacing the components listed below will correct most instances of
this failure.
Procedure:
ON the Control Unit (X53-1290-XX) change R131 to a 22 K ohm 1/4 watt carbon
resistor, and change C144 to a 3 pF 25v Disc ceramic capacitor.
Time required for this modification is 30 minutes.
No realignment is required.


19-07-1998 TS-430S PLL Unlock at High
Temperatures (Revision)
Author:
Trio-Kenwood Communication, inc.
Service Bulletin no. 895 (14-9-1985)
This service bulletin supercedes bulletin 891, which concerned low input
level to IC-16 as the radio warmed up. This bulletin incorporates information
contained in Bulletin 891 plus additional information.
PROCEDURE:
On the Control Unit (X53-1290-XX)
Check transistor Q8. If it is not a 2SC1815Y change it to this type (Serial
numbers 408XXXX-509XXXX).
For serial numbers before 408XXXX change R29 to 820 ohms and C41 to 100 pF.
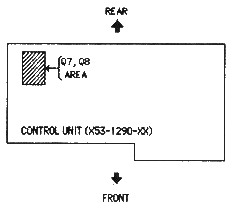
In addition to the changes listed above check for the following
signals:
(You must check these at a dial frequency of exactly 14.000.000 MHz)
TP-1 6.0v (L18 adjusts)
TP-2 70 MHz
TP-3 45.3 MHz
TP-4 6.35v (L10
adjusts)
Time required for this modification is 1 hour or less.

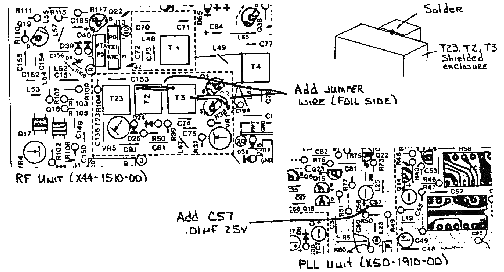
19-07-1998 TS-430 extended coverage. Include
0-150 KHz
Author: Wim
Beekman
Date: 25-Oct-1988
This modification is to include the
receiving range from the TS430 from 0-150 kHz.
Connect a resistor from 1K
from IC1 pin 14 to ground in the PLL Unit.
(Pin 14 from IC1 goes to the
base of a transistor.)
The best way to do this, is by soldering the
resistor at the solder side of the PLL Unit PCB.

19-07-1998 TS-430S Reset the
microprocessor
For those of you wanting to know how to reset the
microprocessor in the TS-430S, here's what it looks like in the service
manual:
1) FUNCTION SW:A
POWER SW:OFF
Set the POWER SW ON
while
depressing the A=B
key. Then release the
A=B key.
Hope this helps
someone...

26-01-2000 Kenwood TS-430S, no display, no
RX/TX with certain modes
Author:
Colin Robertson - [email protected]
I recently acquired a Kenwood TS-430 with an intermittent fault. The rig
would occasionally perform normally but the rest of the time the display and RX
would be dead only in the LSB, USB and CW modes. The rig would also not transmit
in all modes.
The number of factory “add-on” components found under the PC boards on the
rig was a real surprise. The Control and IF boards were first checked for dry
joints and several were found, but the fault persisted. All switching circuits
appeared to check out fine. After searching the Web for assistance, a mod
described in a Kenwood Bulletin for a similar display problem was tried without
success. A change in our hot summer weather seemed to indicate the problem was
temperature related as the rig worked normally for longer periods under colder
conditions. Freeze spray was then tried on all accessible components on the
Control and IF Unit boards. No joy!
A QSO with Roger ZS1J, who used to run a ham radio outlet in Natal for
several years, had him recalling a similar problem he had encountered some years
ago on two TS430’s brought in for repair. The culprit in both cases turned out
to be leaking LED’s on the mode selector switch indicators. He suggested this
area be check out.
Removal of plug 13 from the Control Unit board (X53-1290-00) proved Roger
correct and brought the rig back to life. There was a very low leakage on the
LSB, USB and CW indicator LED’s. Exact replacement LED’s for D3- D7 were not
obtainable locally, so to get around this, 1N4004 diodes were installed in
series with the 5 leads on plug 13. The diodes were soldered directly onto the
pins in plug 13 (with cathodes facing away from the plug side), and the plug
reconnected to the board. The rig is now fully functional again.
It‘s incredible that the same LED’s should fail in three different rigs!
Obviously just a bad batch of components used! Maybe this mod can restore a dead
TS-430 that someone has given up on.
Colin Robertson
ZS2CR
East London,
South Africa
25 January 2000
Packet: ZS2CR @ ZS0ELD
e-Mail: R.
[email protected]

23-03-2000 No signal on the
meter
Author: Mike WP4COQ
- [email protected]
I have a Kenwood TS430 that was transmiting and receiving fine except that
the signal meter was not showing any signal on the AM,CW,LSB,USB.
I open the radio and found that the VR3 pot that is on the X48-1370-00 board
was defective, i just replaced the pot with a new one and it start to receive
the signals again.

09-04-2000 TS-430S 500KHz
Hetrodyne
Author: Trio-Kenwood
Communication, inc.
Service Bulletin no. 865 (23-3-1983)
Some users of the TS-430S have reported a hetrodyne signal at the 500KHz
point on the band. This tone may be reduced or eliminated by the following
procedure.
Parts required
Qty Description Kenwood parts number
1 .001 µF disc cap. CC45B1H102K
1 220 pF disc cap. CC45SL1H221J
1 470 µH coil L40-4711-13
Procedure
- Remove top and bottom covers.
- Turn radio bottom up and locate PLL unit (X50-1910-00).
- Remove the sex (6) screws securing the PLL unit to the chassises and fold
the unit over, to allow access to the foil side of the circuit board.
- Remove the jumper wire that is installed between TP-1 and C6. Install the
parallel circuit consisting of the 220 pF capacitor and the 470 µH coil in its
place. See figure 2.
- Install the .001 µF capacitor as shown in figure 2.
- Reinstall the PLL unit and replace the top and bottom covers.
- No alignment is required.
Note: This change may be performed at the owners option and may not be
performed in-warranty.

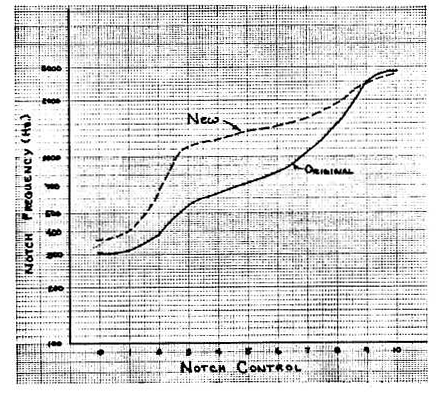
09-04-2000 TS-430 Notch
Control
Author: Trio-Kenwood
Communication, inc.
Service Bulletin no. 882 (7-11-1983)
Notch/Squelch control (VR5) may be replaced with part number R24-9403-15, to
allow greater flexibility in adjustment. As can be seen from the chart below,
the curve is smoother on the high frequency side (1 KHz to 2.7 KHz), making
tuning easier. VR5 is located on Switch unit (X41-1470-00).


09-04-2000 TS-430S AM Wide/Narrow filter
selection
Author: Trio-Kenwood
Communication, inc.
Service Bulletin no. 883 (8-12-1983)
This procedure will allow selection of the Wide or the Narrow filter for AM.
Parts list
Qty Description Circuit designation
2 2SA1115(E) Transistor Q401, Q402
4 1S1555 Diode D401-D404
1 4.7 Kohm 1/8 Watt R405
2 22 Kohm 1/8 Watt R403, R404
2 47 Kohm 1/8 Watt R401, R402
Insulated hookup wire ½28
goage or larger
1 Short jumper
Modification procedure:
Caution: This modification requires advance soldering and printed circuit
board modification techniques, and should only be performed by experienced kit
builders and or technicians. If you are at all unsure of your ability to install
this modification after reading these instructions, please have someone with
more experience perform the modification for you.
- Remove the power connector from the radio.
- Using a #2 Philips screwdriver, remove the top cover (8 screws). Be
careful of the VOX controls, and the speaker lead, which may be unplugged.
- Loosen the two countersunk side screws and remove the 2 screws securing
the IF unit bracket. Swing the bracket up slightly to access and remove the
two heat sink screws, Swing the assembly down.
- Remove 7 screws from the IF unit. Protect the top of the front panel from
scratching.
- Desolder IB1 and discard (use a 45 watt or less iron, and solder wicking).
- Locate the white jumper wire that is plugged on to the "S" terminal of the
IF unit. Desolder the wire from its present location, and reinstall as shown
in figure 1.
- Install a short jumper wire, as shown in figure 1.
- Cut the foil paths as shown in figure 2. There are five locations that
must be cut. CAUTION: Ensure you cut only the traces as shown in the figure.
Spend a little extra time to ensure you have correctly identified the trace to
cut.
- Install J401, J402 (may all ready be installed), J403, D403, D404, R403,
R404, and R405 as shown in figure 2 (use the shortest lead lengths possible).
Check to ensure there are no solder bridges, or splashes on the board.
- Install Q401, Q402, R401, R402, D401 and D402 as shown on figure 2, again
being careful to check for solder bridges, short, etc.
- Check to see if D82 is installed, as shown in figure 1. If it is not,
install it (1S1555). D83 should also be installed on the foil side of the
board, as shown in figure 2.
Note: Some unit's have D82 and D83
installed, if so go to step 12.
- Move the filter select jumper to the "A" pin, as shown in figure 1.
- On control unit (x53-1290-00), cut the lead of resistor R129.
- Solder a jumper wire to the metal lead of resistor R129, as shown in
figure 5. Connect the other end to IF units connector 18 pin 2 from the foil
side of the board as shown in figure 4. The wire may be conveniently routed
between the circuit board and the chassis.
- Install insulating tape below the area of the modification to ensure that
no components short out against the case.
- This completes the modification procedure. The TS-430S will now select
either AM Wide or Narrow. Before reassemble, go back through the procedure and
check you work, to ensure no errors have been made.


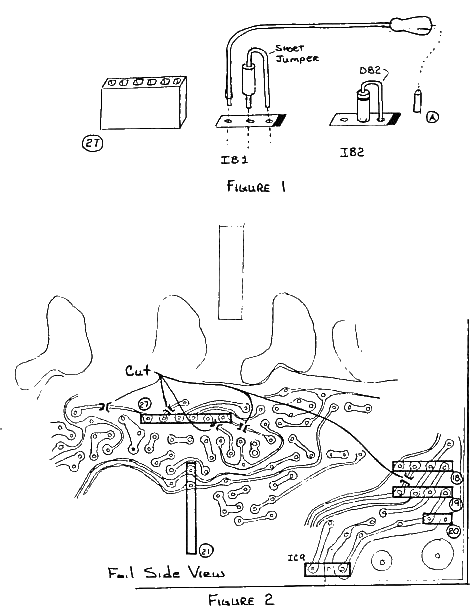
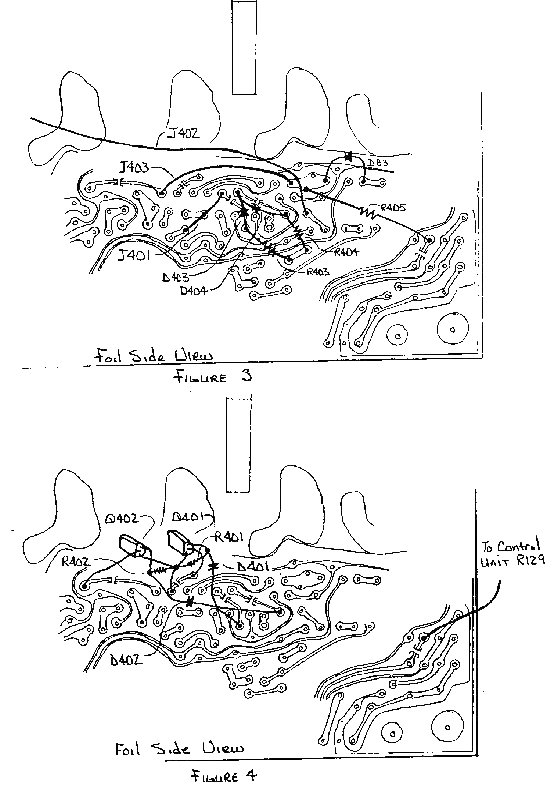
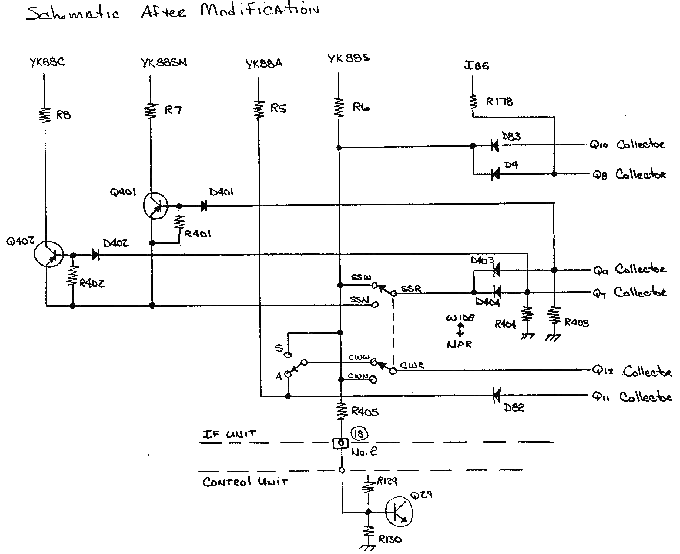
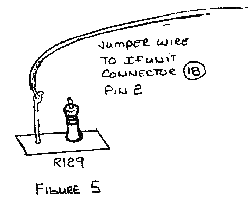
Note: This is an optional change and may no be performed
in-warranty.

09-04-2000 TS-430 receiver internal
beat
Author: Trio-Kenwood
Communication, inc.
Service Bulletin no. 885 (27-1-1984)
For reports of an internal beat at 20.415 MHz or at 21.526 MHz perform the
following modification.
- On the RF unit (X44-1510-00) add a short jumper wire from the primary
ground of transformer T2 to the primary ground of T3 as shown.
- Add a jumper from the ground of the secondary of T3 to the ground side of
capacitor C194, as shown.
- Solder a jumper from the shield surrounding T1 to the shield surrounding
T2, T3 etc. It may be possible to just bridge the two cases together with
solder, either way is acceptable.
- On PLL unit (X50-1910-00) locate the position shown for capacitor C57.
This capacitor was not installed at the factory, install a .01 µF 25V disc
ceramic capacitor.
This change is applicable to units prior to serial number 407xxxx.
Time required for this modification is ½ hour or less.
This modification may be performed in-warranty on a case by case
basic.

15-04-2000 TS-430S
Low/intermittent RX
Author:
Trio-Kenwood Communication, inc.
Service Bulletin no. 902 (18-10-1985)
Low or intermittent receive on the TS-430S may be caused by a poor contact on
one or more of the LPF relays. In most cases the following procedure will
correct this problem without having to replace relays. The procedure has two
steps; first initial cleaning of the contact by passing a relatively high
current thru them (about 500 mA), and then installing a contact maintenance
circuit that will apply a relatively low current (about 8 mA) whenever a new
band is selected.
Procedure:
- Initial contact cleaning procedure.
Parts List:
56 ohm 5W ceramic
resistor (R92-0622-05)… 2 mA
- Press and hold the "UP" bandswitch of the TS-430S (ensure the 1 MHz
switch is ON).
- Apply 13.8V DC to the antenna terminal thru a 28 ohm, 10W resistor for
approximately 1 minute. This will cycle thru all the relays and burn any
axidation/contamination from the contacts.
- Contact maintenance circuit installation.
Part List:
Terminal Strip (E22-0371-05)
C1, C2 (CK45D2H473M) .47 µF 500V
C3
(C91-0117-05) .01 µF 50V
L1 (L33-0259-05) 470 µH
R1 (RD14CB2E102J) 1
Kohm ¼ Watt
Small length of hookup wire ………. 6 inches
- Disconnect the center lead of the coaxial cable from the antenna
terminal.
- Install the contact maintenance circuit as shown in the accompanying
diagrams. Attach the terminal lug strip with one of the filter unit over
screws.
- Solder the 0v lead to the "JP" terminal of the Filter
Unit.

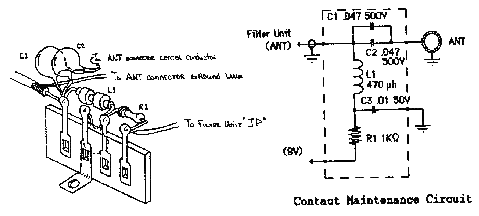
This procedure should may be performed only to those units received for this
specific repair symptom. Time required for this procedure is 1 hour or
less.
